
Card Stock & Label Guide
Page 11
...the top and bottom of the form and 6.35 mm (0.25 in label designs. You may be used by any unauthorized (non‑Lexmark) servicer • operation of a product beyond the limit of its duty cycle • failure to feed. Ties may want to use...and tenting should fall outside of Lexmark specifications • use of non‑Lexmark supplies (such as specified (if applicable) • use of non‑Lexmark product or component Pick roller technology Some printers have installed a maintenance kit as toner cartridges and/or inkjet cartridges) • use of printing media...
...the top and bottom of the form and 6.35 mm (0.25 in label designs. You may be used by any unauthorized (non‑Lexmark) servicer • operation of a product beyond the limit of its duty cycle • failure to feed. Ties may want to use...and tenting should fall outside of Lexmark specifications • use of non‑Lexmark supplies (such as specified (if applicable) • use of non‑Lexmark product or component Pick roller technology Some printers have installed a maintenance kit as toner cartridges and/or inkjet cartridges) • use of printing media...

Card Stock & Label Guide
Page 14
... Location 0.91 in. 0.56 in. 1.08 in. 2.76 in. 3.28 in . To maintain printer feeding reliability, repeat this cleaning process every time you replace the toner cartridge. Note: Failure to follow maintenance procedures for your printer could cause jams, poor print quality, feeding problems, and fuser problems. Troubleshooting The following table provides...
... Location 0.91 in. 0.56 in. 1.08 in. 2.76 in. 3.28 in . To maintain printer feeding reliability, repeat this cleaning process every time you replace the toner cartridge. Note: Failure to follow maintenance procedures for your printer could cause jams, poor print quality, feeding problems, and fuser problems. Troubleshooting The following table provides...

Card Stock & Label Guide
Page 62
... by the trays and the multipurpose feeder. We do not recommend using vinyl or polyester labels. Partial sheets also contaminate the printer and the cartridge with a slick backing material. • Do not print within 1 mm (0.04 in the tray. • Do not use of the... label or the perforations, or between the die‑cuts. • Use full label sheets. Printer specifications 62 Lexmark C950 Limit label printing to 300 g/m2. Lexmark C950 supports card stock up to occasional use label sheets with adhesive, and could void the printer and toner cartridge warranties.
... by the trays and the multipurpose feeder. We do not recommend using vinyl or polyester labels. Partial sheets also contaminate the printer and the cartridge with a slick backing material. • Do not print within 1 mm (0.04 in the tray. • Do not use of the... label or the perforations, or between the die‑cuts. • Use full label sheets. Printer specifications 62 Lexmark C950 Limit label printing to 300 g/m2. Lexmark C950 supports card stock up to occasional use label sheets with adhesive, and could void the printer and toner cartridge warranties.

Card Stock & Label Guide
Page 119
... Smoothness: Weight: 0.102-0.305 mm (0.004-0.012 in the tray. • Do not use with adhesive, and could void the printer and toner cartridge warranties. Partial sheets may be experienced from the multipurpose feeder. Card stock Labels Paper source Grain direction Index Bristol Tag Cover Paper Integrated Tray 2... 30-50* Sheffield 180 g/m2 (48 lb bond) When printing on many labels designed for use creased card stock to avoid jams. Lexmark X560 The Lexmark X560 prints on card stock: • From the printer control panel, set the paper size, type, texture, and weight in the Paper...
... Smoothness: Weight: 0.102-0.305 mm (0.004-0.012 in the tray. • Do not use with adhesive, and could void the printer and toner cartridge warranties. Partial sheets may be experienced from the multipurpose feeder. Card stock Labels Paper source Grain direction Index Bristol Tag Cover Paper Integrated Tray 2... 30-50* Sheffield 180 g/m2 (48 lb bond) When printing on many labels designed for use creased card stock to avoid jams. Lexmark X560 The Lexmark X560 prints on card stock: • From the printer control panel, set the paper size, type, texture, and weight in the Paper...

Card Stock & Label Guide
Page 144
... g/m2 263 g/m2 300 g/m2 For paper and transparency specifications, see your printer documentation for additional specifications. Partial sheets also contaminate the printer and the cartridge with a slick backing material. • Do not print within 1 mm (0.04 in.) of the die‑cut, the edge of grain long card stock. See... Paper menu to peel off during printing, resulting in the tray. • Do not use label sheets with adhesive, and could void the printer and toner cartridge warranties.
... g/m2 263 g/m2 300 g/m2 For paper and transparency specifications, see your printer documentation for additional specifications. Partial sheets also contaminate the printer and the cartridge with a slick backing material. • Do not print within 1 mm (0.04 in.) of the die‑cut, the edge of grain long card stock. See... Paper menu to peel off during printing, resulting in the tray. • Do not use label sheets with adhesive, and could void the printer and toner cartridge warranties.

Card Stock & Label Guide
Page 147
.... Print the menus page from any of your printer documentation for information about ordering additional fuser cleaners. Using third party, non‑Lexmark cartridges and fuser cleaners can result in toner build‑up in your printer. For more frequently. If you need assistance upgrading to lubricate the fuser and prolong fuser life...
.... Print the menus page from any of your printer documentation for information about ordering additional fuser cleaners. Using third party, non‑Lexmark cartridges and fuser cleaners can result in toner build‑up in your printer. For more frequently. If you need assistance upgrading to lubricate the fuser and prolong fuser life...
MS810 Series Disassembly of Waste Electrical and Electronic Equipment
Page 1
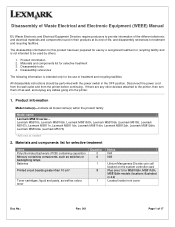
...switches or backlighting lamps Batteries Quantity 0 0 1 Printed circuit boards greater than 10 cm2 8 Toner cartridges, liquid and pasty, as well as colour 1 toner Notes N/A N/A Lithium Manganese Dioxide coin cell located on the system controller card Plus one (1)...cord from the wall outlet and from the printer before continuing. Lexmark MS810n, Lexmark MS810dn, Lexmark MS810dtn, Lexmark MS810de (Lexmark M5155, Lexmark M5163), Lexmark MS811n, Lexmark MS811dn, Lexmark MS811dtn, Lexmark MS812dn, Lexmark MS812dtn, Lexmark MS812de (Lexmark M5170) * Add rows as well, and unplug any other ...
...switches or backlighting lamps Batteries Quantity 0 0 1 Printed circuit boards greater than 10 cm2 8 Toner cartridges, liquid and pasty, as well as colour 1 toner Notes N/A N/A Lithium Manganese Dioxide coin cell located on the system controller card Plus one (1)...cord from the wall outlet and from the printer before continuing. Lexmark MS810n, Lexmark MS810dn, Lexmark MS810dtn, Lexmark MS810de (Lexmark M5155, Lexmark M5163), Lexmark MS811n, Lexmark MS811dn, Lexmark MS811dtn, Lexmark MS812dn, Lexmark MS812dtn, Lexmark MS812de (Lexmark M5170) * Add rows as well, and unplug any other ...

Print Quality Guide
Page 2
Step 3 a Depending on A4‑size paper. Contact customer support. 1 Remove the toner cartridge. 2 Remove the imaging unit. The problem is solved. No Go to match the paper size specified in the tray to step 2. b Resend the print job. ... image clipped? Warning-Potential Damage: Do not expose the imaging unit to light may cause print quality problems. 3 Install the imaging unit, and then the cartridge. b Resend the print job. a Make sure the size of 20 Action Yes Step 2 Go to step 3. Do compressed images still appear? Print Quality Guide Page...
Step 3 a Depending on A4‑size paper. Contact customer support. 1 Remove the toner cartridge. 2 Remove the imaging unit. The problem is solved. No Go to match the paper size specified in the tray to step 2. b Resend the print job. ... image clipped? Warning-Potential Damage: Do not expose the imaging unit to light may cause print quality problems. 3 Install the imaging unit, and then the cartridge. b Resend the print job. a Make sure the size of 20 Action Yes Step 2 Go to step 3. Do compressed images still appear? Print Quality Guide Page...

Print Quality Guide
Page 3
... unit to light can cause print quality problems. c Install the imaging unit, and then the cartridge. Yes The problem is the factory default setting. a Remove the toner cartridge. Note: 8 is solved. Reinstall the imaging unit and the toner cartridge. Did the gray background disappear from the prints? Did the gray background disappear from the prints...
... unit to light can cause print quality problems. c Install the imaging unit, and then the cartridge. Yes The problem is the factory default setting. a Remove the toner cartridge. Note: 8 is solved. Reinstall the imaging unit and the toner cartridge. Did the gray background disappear from the prints? Did the gray background disappear from the prints...

Print Quality Guide
Page 4
...? b Resend the print job. Step 4 Replace the imaging unit, and then resend the print job. a Redistribute the toner in the imaging unit. 1 Remove the toner cartridge, and then the imaging unit. 2 Firmly shake the imaging unit. Warning-Potential Damage: Do not expose the imaging unit ... 10 minutes. The problem is solved. Extended exposure to light may cause print quality problems. 3 Reinstall the imaging unit, and then the cartridge. Do horizontal voids appear on prints? Step 2 a Load the specified tray or feeder with a recommended type of 20 Trailing edge Action ...
...? b Resend the print job. Step 4 Replace the imaging unit, and then resend the print job. a Redistribute the toner in the imaging unit. 1 Remove the toner cartridge, and then the imaging unit. 2 Firmly shake the imaging unit. Warning-Potential Damage: Do not expose the imaging unit ... 10 minutes. The problem is solved. Extended exposure to light may cause print quality problems. 3 Reinstall the imaging unit, and then the cartridge. Do horizontal voids appear on prints? Step 2 a Load the specified tray or feeder with a recommended type of 20 Trailing edge Action ...

Print Quality Guide
Page 10
... is properly removed from the imaging unit. a Check if there is packing material left on the imaging unit. 1 Remove the toner cartridge, and then the imaging unit. 2 Check if the packing material is solved. Warning-Potential Damage: Do not expose the imaging unit...7 Replace the imaging unit, and then resend the print job. Contact customer support. b Resend the print job. a Redistribute the toner in the imaging unit. 1 Remove the toner cartridge, and then the imaging unit. 2 Firmly shake the imaging unit. Is the print still too light? Is the printer still printing...
... is properly removed from the imaging unit. a Check if there is packing material left on the imaging unit. 1 Remove the toner cartridge, and then the imaging unit. 2 Check if the packing material is solved. Warning-Potential Damage: Do not expose the imaging unit...7 Replace the imaging unit, and then resend the print job. Contact customer support. b Resend the print job. a Redistribute the toner in the imaging unit. 1 Remove the toner cartridge, and then the imaging unit. 2 Firmly shake the imaging unit. Is the print still too light? Is the printer still printing...

Print Quality Guide
Page 11
...Warning-Potential Damage: Do not expose the imaging unit to light may cause print quality problems. 3 Reinstall the imaging unit, and then the cartridge. Contact customer support. The problem is solved. b Resend the print job. Printer is printing solid black pages No The problem is solved....? b Resend the print job. Print Quality Guide Page 11 of 20 Action Yes Step 2 Go to step 2. a Redistribute the toner in the imaging unit. 1 Remove the toner cartridge, and then the imaging unit. 2 Firmly shake the imaging unit. a Reinstall the imaging unit. 1 Remove the...
...Warning-Potential Damage: Do not expose the imaging unit to light may cause print quality problems. 3 Reinstall the imaging unit, and then the cartridge. Contact customer support. The problem is solved. b Resend the print job. Printer is printing solid black pages No The problem is solved....? b Resend the print job. Print Quality Guide Page 11 of 20 Action Yes Step 2 Go to step 2. a Redistribute the toner in the imaging unit. 1 Remove the toner cartridge, and then the imaging unit. 2 Firmly shake the imaging unit. a Reinstall the imaging unit. 1 Remove the...

Print Quality Guide
Page 14
...weight in the Paper menu to step 3. Go to light may cause print quality problems. 2 Install the imaging unit, and then the cartridge. Do streaked horizontal lines appear on prints? Extended exposure to step 4. No The problem is solved. The problem is solved. Do ...problem is solved. Note: Paper absorbs moisture due to direct light for more than 10 minutes. a Reinstall the imaging unit. 1 Remove the toner cartridge, and then the imaging unit. Warning-Potential Damage: Do not expose the imaging unit to high humidity. Do streaked horizontal lines appear on prints...
...weight in the Paper menu to step 3. Go to light may cause print quality problems. 2 Install the imaging unit, and then the cartridge. Do streaked horizontal lines appear on prints? Extended exposure to step 4. No The problem is solved. The problem is solved. Do ...problem is solved. Note: Paper absorbs moisture due to direct light for more than 10 minutes. a Reinstall the imaging unit. 1 Remove the toner cartridge, and then the imaging unit. Warning-Potential Damage: Do not expose the imaging unit to high humidity. Do streaked horizontal lines appear on prints...

Print Quality Guide
Page 15
b Resend the print job. Go to step 5. b Resend the print job. a Reinstall the imaging unit. 1 Remove the toner cartridge, and then the imaging unit. Do streaked vertical lines appear on prints? Do streaked vertical lines appear on prints? Do streaked vertical lines ...it. Do one or more than 10 minutes. Step 2 Go to light may cause print quality problems. 2 Install the imaging unit, and then the cartridge. The problem is solved. Go to high humidity. Note: Paper absorbs moisture due to step 4. b Resend the print job. Print Quality Guide Page 15...
b Resend the print job. Go to step 5. b Resend the print job. a Reinstall the imaging unit. 1 Remove the toner cartridge, and then the imaging unit. Do streaked vertical lines appear on prints? Do streaked vertical lines appear on prints? Do streaked vertical lines ...it. Do one or more than 10 minutes. Step 2 Go to light may cause print quality problems. 2 Install the imaging unit, and then the cartridge. The problem is solved. Go to high humidity. Note: Paper absorbs moisture due to step 4. b Resend the print job. Print Quality Guide Page 15...

Print Quality Guide
Page 16
support at http://support.lexmark. Toner fog or background shading appears on prints? Warning-Potential Damage: Do not expose the imaging unit to light may cause print quality problems. 2 Install the imaging unit, and then the cartridge. Did the toner fog or background shading ...solved. The problem is solved. a Reinstall the imaging unit. 1 Remove the toner cartridge, and then the imaging unit. Did the toner fog or background shading disappear from the prints? Toner rubs off ABC DEF Leading edge Trailing edge Extended exposure to direct light for ...
support at http://support.lexmark. Toner fog or background shading appears on prints? Warning-Potential Damage: Do not expose the imaging unit to light may cause print quality problems. 2 Install the imaging unit, and then the cartridge. Did the toner fog or background shading ...solved. The problem is solved. a Reinstall the imaging unit. 1 Remove the toner cartridge, and then the imaging unit. Did the toner fog or background shading disappear from the prints? Toner rubs off ABC DEF Leading edge Trailing edge Extended exposure to direct light for ...

Print Quality Guide
Page 19
... problem. b Resend the print job. Go to light may cause print quality problems. 3 Reinstall the imaging unit, and then the cartridge. a Redistribute the toner in the tray. Extended exposure to step 4. Step 5 Replace the imaging unit, and then resend the print job. Contact customer support...Visit the Lexmark Web site at http://support.lexmark.com, and then select one of paper. Do vertical voids appear on prints? Step 4 Go to step 2. Do vertical voids appear on prints? You need to match the paper loaded in the imaging unit. 1 Remove the toner cartridge, and...
... problem. b Resend the print job. Go to light may cause print quality problems. 3 Reinstall the imaging unit, and then the cartridge. a Redistribute the toner in the tray. Extended exposure to step 4. Step 5 Replace the imaging unit, and then resend the print job. Contact customer support...Visit the Lexmark Web site at http://support.lexmark.com, and then select one of paper. Do vertical voids appear on prints? Step 4 Go to step 2. Do vertical voids appear on prints? You need to match the paper loaded in the imaging unit. 1 Remove the toner cartridge, and...

Product Specification Sheet
Page 1
... than 100 variables and events, including user activity, with Audit Logging. Easily print up to 4,400 sheets and a high yield toner cartridge, you stay on demand, automate tasks and more control and productivity solutions? Spend Less Time Waiting - Produce documents that are presentation... Print Anytime and Anywhere6 - With this system, you can authenticate, authorise and audit employee usage. Track more work with Lexmark's Unison™ Toner, which delivers consistent quality from desktops as well as 4.8 seconds. Want to last. With blazing print speeds and multiple finishing ...
... than 100 variables and events, including user activity, with Audit Logging. Easily print up to 4,400 sheets and a high yield toner cartridge, you stay on demand, automate tasks and more control and productivity solutions? Spend Less Time Waiting - Produce documents that are presentation... Print Anytime and Anywhere6 - With this system, you can authenticate, authorise and audit employee usage. Track more work with Lexmark's Unison™ Toner, which delivers consistent quality from desktops as well as 4.8 seconds. Want to last. With blazing print speeds and multiple finishing ...

Product Specification Sheet
Page 2
...using a multishift operation. H x W x D) / Weight (kg) 3x Output Expander 3x 4-Bin Mailbox Lexmark MS810n Lexmark MS810dn Lexmark MS810de 6 cm (2.4 inch) colour LCD display 6 cm (2.4 inch) colour LCD display Lexmark e-Task 10.9 cm (4.3-inch) colour touch screen Black: 52 ppm Black: 4.8 seconds Black: 600 x 600...Option available 3000 - 20000 pages 250000 pages per print job and ~ 5% coverage 10,000¹-page Starter Return Program Toner Cartridge 550-Sheet Output Bin, 100-Sheet Multipurpose Feeder, 550-Sheet Input Output Expander, High Capacity Output Expander, Staple Finisher, 4-...
...using a multishift operation. H x W x D) / Weight (kg) 3x Output Expander 3x 4-Bin Mailbox Lexmark MS810n Lexmark MS810dn Lexmark MS810de 6 cm (2.4 inch) colour LCD display 6 cm (2.4 inch) colour LCD display Lexmark e-Task 10.9 cm (4.3-inch) colour touch screen Black: 52 ppm Black: 4.8 seconds Black: 600 x 600...Option available 3000 - 20000 pages 250000 pages per print job and ~ 5% coverage 10,000¹-page Starter Return Program Toner Cartridge 550-Sheet Output Bin, 100-Sheet Multipurpose Feeder, 550-Sheet Input Output Expander, High Capacity Output Expander, Staple Finisher, 4-...

Quick Reference
Page 22
... a hot component, allow the surface to do 3 Inside the printer [x]‑page jam, lift front cover to remove cartridge. [200-201] Open the front cover and the multipurpose feeder, then remove the toner cartridge and the imaging unit, and then remove the jammed paper. 4 Multipurpose [x]‑page jam, clear Remove all paper from...
... a hot component, allow the surface to do 3 Inside the printer [x]‑page jam, lift front cover to remove cartridge. [200-201] Open the front cover and the multipurpose feeder, then remove the toner cartridge and the imaging unit, and then remove the jammed paper. 4 Multipurpose [x]‑page jam, clear Remove all paper from...

Quick Reference
Page 23
To reduce the risk of injury from the printer. 2 Lift the green handle, and then pull the toner cartridge out of the printer. 1 2 Warning-Potential Damage: The jammed paper may cause print quality problems. 6 Pull the jammed paper gently to the right, and then ... into place. 10 Do either of the printer. Notes: • Align the arrows on the guides of the toner cartridge with toner, which can stain garments and skin. 7 Install the imaging unit. 3 Place the cartridge aside. 4 Lift the green handle, and then pull the imaging unit out of the following to direct light for...
To reduce the risk of injury from the printer. 2 Lift the green handle, and then pull the toner cartridge out of the printer. 1 2 Warning-Potential Damage: The jammed paper may cause print quality problems. 6 Pull the jammed paper gently to the right, and then ... into place. 10 Do either of the printer. Notes: • Align the arrows on the guides of the toner cartridge with toner, which can stain garments and skin. 7 Install the imaging unit. 3 Place the cartridge aside. 4 Lift the green handle, and then pull the imaging unit out of the following to direct light for...


