
Quick Reference
Page 3
... Create, organize, and save a set of bookmarks (URLs) into a tree view of the printer. Understanding the home screen When the printer is connected to as Imaging unit low or Cartridge Low. • Show intervention messages and the instructions on how to clear them. • Show a printer warning or error message whenever the...
... Create, organize, and save a set of bookmarks (URLs) into a tree view of the printer. Understanding the home screen When the printer is connected to as Imaging unit low or Cartridge Low. • Show intervention messages and the instructions on how to clear them. • Show a printer warning or error message whenever the...
Quick Reference
Page 6
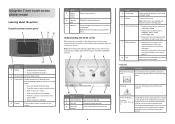
... menus are not physically near the printer. Understanding the home screen When the printer is turned on, the display shows a basic screen, referred to as Imaging unit low or Cartridge Low. • Show intervention messages and the instructions on how to clear them. 7 Status/Supplies • Show a printer warning or error message...
... menus are not physically near the printer. Understanding the home screen When the printer is turned on, the display shows a basic screen, referred to as Imaging unit low or Cartridge Low. • Show intervention messages and the instructions on how to clear them. 7 Status/Supplies • Show a printer warning or error message...
Quick Reference
Page 21
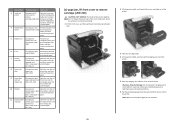
... [x]‑page jam, lift front cover to remove cartridge. [200-201] CAUTION-HOT SURFACE: The inside of the printer. 2 1 5 Place the imaging unit aside on a flat, smooth surface. To reduce the risk of injury from the printer. Leave paper in jammed paper. Warning-Potential Damage: Do not ..., lift front cover to remove cartridge. [200-201] Open the front cover and the multipurpose feeder, then remove the toner cartridge and the imaging unit, and then remove the jammed paper. 4 Multipurpose [x]‑page jam, clear Remove all paper fragments are removed. 21 Leave paper in bin....
... [x]‑page jam, lift front cover to remove cartridge. [200-201] CAUTION-HOT SURFACE: The inside of the printer. 2 1 5 Place the imaging unit aside on a flat, smooth surface. To reduce the risk of injury from the printer. Leave paper in jammed paper. Warning-Potential Damage: Do not ..., lift front cover to remove cartridge. [200-201] Open the front cover and the multipurpose feeder, then remove the toner cartridge and the imaging unit, and then remove the jammed paper. 4 Multipurpose [x]‑page jam, clear Remove all paper fragments are removed. 21 Leave paper in bin....
Quick Reference
Page 22
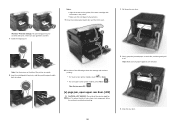
... jam, open upper rear door. [202] CAUTION-HOT SURFACE: The inside of the toner cartridge with toner, which can stain garments and skin. 7 Install the imaging unit. Note: Make sure all paper fragments are removed. 3 Close the rear door. 1 2 Warning-Potential Damage: The jammed paper may be hot. Notes: • Align the...
... jam, open upper rear door. [202] CAUTION-HOT SURFACE: The inside of the toner cartridge with toner, which can stain garments and skin. 7 Install the imaging unit. Note: Make sure all paper fragments are removed. 3 Close the rear door. 1 2 Warning-Potential Damage: The jammed paper may be hot. Notes: • Align the...
User's Guide
Page 75
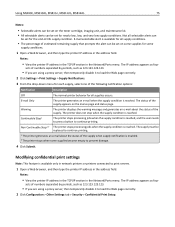
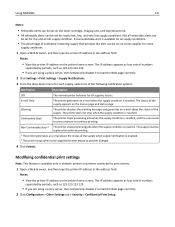
... the supply when supply notification is reached. Using MS810n, MS810dn, MS811n, MS811dn, MS812dn 75 Notes: • Selectable alerts can be set on the toner cartridge, imaging unit, and maintenance kit. • All selectable alerts can be set for the end‑of‑life supply condition. Not all supplies occurs. The IP...
... the supply when supply notification is reached. Using MS810n, MS810dn, MS811n, MS811dn, MS812dn 75 Notes: • Selectable alerts can be set on the toner cartridge, imaging unit, and maintenance kit. • All selectable alerts can be set for the end‑of‑life supply condition. Not all supplies occurs. The IP...
User's Guide
Page 90
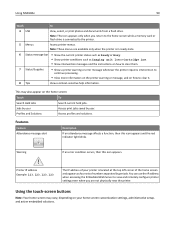
...the current printer status such as Ready or Busy. • Show printer conditions such as four sets of the home screen and appears as Imaging unit low or Cartridge Low. • Show intervention messages and the instructions on how to clear them. 7 Status/Supplies • Show a ... message alert Description If an attendance message affects a function, then this icon appears. Profiles and Solutions Access profiles and solutions. Using MS810de 90 Touch To 4 USB View, select, or print photos and documents from a flash drive. Note: These menus are not physically near the...
...the current printer status such as Ready or Busy. • Show printer conditions such as four sets of the home screen and appears as Imaging unit low or Cartridge Low. • Show intervention messages and the instructions on how to clear them. 7 Status/Supplies • Show a ... message alert Description If an attendance message affects a function, then this icon appears. Profiles and Solutions Access profiles and solutions. Using MS810de 90 Touch To 4 USB View, select, or print photos and documents from a flash drive. Note: These menus are not physically near the...
User's Guide
Page 121
... IP address on the printer home screen. The printer does not stop when the supply condition is reached. Using MS810de 121 Notes: • Selectable alerts can be set on the toner cartridge, imaging unit, and maintenance kit. • All selectable alerts can be set for the end‑of‑life supply condition...
... IP address on the printer home screen. The printer does not stop when the supply condition is reached. Using MS810de 121 Notes: • Selectable alerts can be set on the toner cartridge, imaging unit, and maintenance kit. • All selectable alerts can be set for the end‑of‑life supply condition...

User's Guide
Page 136
... printer settings even when you are available only when the printer is located at the top left corner of the home screen and appears as Imaging unit low or Cartridge Low. • Show intervention messages and the instructions on how to clear them. 7 Status/Supplies • Show a printer warning or error message...
... printer settings even when you are available only when the printer is located at the top left corner of the home screen and appears as Imaging unit low or Cartridge Low. • Show intervention messages and the instructions on how to clear them. 7 Status/Supplies • Show a printer warning or error message...
User's Guide
Page 168
...8209;life supply condition. The IP address appears as 123.123.123.123. Notes: • Selectable alerts can be set on the toner cartridge, imaging unit, and maintenance kit. • All selectable alerts can determine how you would work on some supplies for some supply conditions. 1 Open a Web ...and the Embedded Web Server Administrator's Guide on the printer home screen. Notes: • View the printer IP address on the Lexmark Web site at http://support.lexmark.com. The virtual display works as 123.123.123.123. • If you want to cancel, and then click Delete....
...8209;life supply condition. The IP address appears as 123.123.123.123. Notes: • Selectable alerts can be set on the toner cartridge, imaging unit, and maintenance kit. • All selectable alerts can determine how you would work on some supplies for some supply conditions. 1 Open a Web ...and the Embedded Web Server Administrator's Guide on the printer home screen. Notes: • View the printer IP address on the Lexmark Web site at http://support.lexmark.com. The virtual display works as 123.123.123.123. • If you want to cancel, and then click Delete....

User's Guide
Page 249
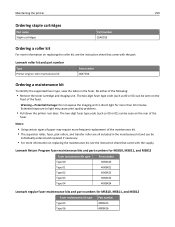
... low print coverage for extended periods of time may cause imaging unit parts to fail prior to exhaustion of Independent States Toner Cartridge 525 High Yield Toner Cartridge 525H Extra High Yield Toner Cartridge 525X* ...is supported only in MS811n, MS811dn, MS812dn, and MS812ne printer models. For more information on replacing the imaging unit, see the instruction sheet that came with the supply. Part name Lexmark Return Program Regular Imaging unit 520Z 520ZA For more information on countries located in MS811n, MS811dn, MS812dn, and MS812ne printer models. ...
... low print coverage for extended periods of time may cause imaging unit parts to fail prior to exhaustion of Independent States Toner Cartridge 525 High Yield Toner Cartridge 525H Extra High Yield Toner Cartridge 525X* ...is supported only in MS811n, MS811dn, MS812dn, and MS812ne printer models. For more information on replacing the imaging unit, see the instruction sheet that came with the supply. Part name Lexmark Return Program Regular Imaging unit 520Z 520ZA For more information on countries located in MS811n, MS811dn, MS812dn, and MS812ne printer models. ...
User's Guide
Page 250
... type code (such as 00 or 01) can be seen on the front of the fuser. Warning-Potential Damage: Do not expose the imaging unit to light may require more frequent replacement of the maintenance kit. • The separator roller, fuser, pick rollers, and transfer roller are ...the instruction sheet that came with the supply. Notes: • Using certain types of the following: • Remove the toner cartridge and imaging unit. Lexmark Return Program fuser maintenance kits and part numbers for MS810, MS811, and MS812 Fuser maintenance kit type Type 00 Part number 40X8420 Type 01 Type...
... type code (such as 00 or 01) can be seen on the front of the fuser. Warning-Potential Damage: Do not expose the imaging unit to light may require more frequent replacement of the maintenance kit. • The separator roller, fuser, pick rollers, and transfer roller are ...the instruction sheet that came with the supply. Notes: • Using certain types of the following: • Remove the toner cartridge and imaging unit. Lexmark Return Program fuser maintenance kits and part numbers for MS810, MS811, and MS812 Fuser maintenance kit type Type 00 Part number 40X8420 Type 01 Type...

User's Guide
Page 252
... the side rails of time. Note: Make sure the cartridge is fully pushed in. Warning-Potential Damage: When replacing a toner cartridge, do not leave the imaging unit exposed to light may cause print quality problems. Extended exposure to direct light for an extended period of the cartridge with the arrows on the...
... the side rails of time. Note: Make sure the cartridge is fully pushed in. Warning-Potential Damage: When replacing a toner cartridge, do not leave the imaging unit exposed to light may cause print quality problems. Extended exposure to direct light for an extended period of the cartridge with the arrows on the...

User's Guide
Page 253
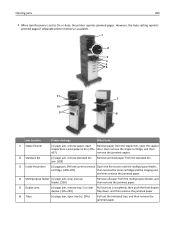
Maintaining the printer 253 5 Close the multipurpose feeder door and the front cover. 2 1 Replacing the imaging unit 1 Lift the front cover, and then pull down the multipurpose feeder door. 1 2
Maintaining the printer 253 5 Close the multipurpose feeder door and the front cover. 2 1 Replacing the imaging unit 1 Lift the front cover, and then pull down the multipurpose feeder door. 1 2

User's Guide
Page 254
Doing so may cause print quality problems. Warning-Potential Damage: Do not touch the shiny blue photoconductor drum under the imaging unit. Warning-Potential Damage: Do not expose the imaging unit to light may affect the quality of the printer using the handle. 3 Pull the imaging unit out of future print jobs. Maintaining the printer 254 2 Pull the cartridge out of the printer using the handle. 2 1 4 Unpack the new imaging unit, and then remove all packing materials. Extended exposure to direct light for more than 10 minutes.
Doing so may cause print quality problems. Warning-Potential Damage: Do not touch the shiny blue photoconductor drum under the imaging unit. Warning-Potential Damage: Do not expose the imaging unit to light may affect the quality of the printer using the handle. 3 Pull the imaging unit out of future print jobs. Maintaining the printer 254 2 Pull the cartridge out of the printer using the handle. 2 1 4 Unpack the new imaging unit, and then remove all packing materials. Extended exposure to direct light for more than 10 minutes.

User's Guide
Page 255
Maintaining the printer 255 5 Shake the new imaging unit. 6 Insert the imaging unit into the printer by aligning the arrows on the side rails of the imaging unit with the arrows on the side rails inside the printer. 7 Insert the toner cartridge into the printer by aligning the side rails of the cartridge with the arrows on the side rails inside the printer.
Maintaining the printer 255 5 Shake the new imaging unit. 6 Insert the imaging unit into the printer by aligning the arrows on the side rails of the imaging unit with the arrows on the side rails inside the printer. 7 Insert the toner cartridge into the printer by aligning the side rails of the cartridge with the arrows on the side rails inside the printer.
User's Guide
Page 264
...;page jam, lift front cover to remove Open the front cover and the multipurpose feeder, cartridge. [200-201] then remove the toner cartridge and the imaging unit, and then remove the jammed paper. 4 Multipurpose feeder [x]‑page jam, clear manual feeder. [250] Remove all paper from the stapler bin, open the stapler...
...;page jam, lift front cover to remove Open the front cover and the multipurpose feeder, cartridge. [200-201] then remove the toner cartridge and the imaging unit, and then remove the jammed paper. 4 Multipurpose feeder [x]‑page jam, clear manual feeder. [250] Remove all paper from the stapler bin, open the stapler...

User's Guide
Page 266
... the toner cartridge out of the printer. 3 Place the cartridge aside. 4 Lift the green handle, and then pull the imaging unit out of the printer. 2 1 5 Place the imaging unit aside on a flat, smooth surface. Warning-Potential Damage: Do not expose the imaging unit to light may be covered with toner, which can stain garments and skin.
... the toner cartridge out of the printer. 3 Place the cartridge aside. 4 Lift the green handle, and then pull the imaging unit out of the printer. 2 1 5 Place the imaging unit aside on a flat, smooth surface. Warning-Potential Damage: Do not expose the imaging unit to light may be covered with toner, which can stain garments and skin.

User's Guide
Page 267
Note: Use the arrows on the guides of the printer as a guide. 8 Insert the cartridge into the printer, and then push the green handle back into place. Clearing jams 267 7 Install the imaging unit. Notes: • Align the arrows on the side of the toner cartridge with the arrows in the printer. • Make sure the cartridge is fully pushed in. 9 Close the multipurpose feeder door and the front cover. 2 1
Note: Use the arrows on the guides of the printer as a guide. 8 Insert the cartridge into the printer, and then push the green handle back into place. Clearing jams 267 7 Install the imaging unit. Notes: • Align the arrows on the side of the toner cartridge with the arrows in the printer. • Make sure the cartridge is fully pushed in. 9 Close the multipurpose feeder door and the front cover. 2 1

User's Guide
Page 283
...touch‑screen printer models, press to confirm. Troubleshooting 283 Troubleshooting Understanding the printer messages Cartridge, imaging unit mismatch [41.xy] 1 Check if the toner cartridge and imaging unit are both are specified in the Paper menu on the printer control panel to clear the message..."Replacing supplies" section of the User's Guide. For more of the User's Guide or visit www.lexmark.com. 2 Change the toner cartridge or imaging unit so that both MICR (Magnetic Imaging Content Recording) or non-MICR supplies. Change [paper source] to [custom string] Try one or ...
...touch‑screen printer models, press to confirm. Troubleshooting 283 Troubleshooting Understanding the printer messages Cartridge, imaging unit mismatch [41.xy] 1 Check if the toner cartridge and imaging unit are both are specified in the Paper menu on the printer control panel to clear the message..."Replacing supplies" section of the User's Guide. For more of the User's Guide or visit www.lexmark.com. 2 Change the toner cartridge or imaging unit so that both MICR (Magnetic Imaging Content Recording) or non-MICR supplies. Change [paper source] to [custom string] Try one or ...

User's Guide
Page 287
... the printer control panel, select Continue to confirm. Fuser kit near full. Error reading USB drive. Remove the USB device, and then insert a supported one . Imaging unit low [84.xy] You may need to confirm. For non‑touch‑screen printer models, press to order an... imaging unit. Try one or more information, see the instruction sheet that came with higher capacity. Empty the hole punch box 1 Empty the hole punch box. Remove ...
... the printer control panel, select Continue to confirm. Fuser kit near full. Error reading USB drive. Remove the USB device, and then insert a supported one . Imaging unit low [84.xy] You may need to confirm. For non‑touch‑screen printer models, press to order an... imaging unit. Try one or more information, see the instruction sheet that came with higher capacity. Empty the hole punch box 1 Empty the hole punch box. Remove ...


