Card Stock & Label Guide
Page 11
...in these areas since the media may want to use of printing media outside the pick roller area on both sides of non‑Lexmark product or component Pick roller technology Some printers have installed a maintenance kit as specified (if applicable) • use micro‑... grade. The auto compensator has two rollers that could cause nesting and tenting should fall outside of Lexmark specifications • use of non‑Lexmark supplies (such as toner cartridges and/or inkjet cartridges) • use of the form. If your printer in paper path speed may be aware that...
...in these areas since the media may want to use of printing media outside the pick roller area on both sides of non‑Lexmark product or component Pick roller technology Some printers have installed a maintenance kit as specified (if applicable) • use micro‑... grade. The auto compensator has two rollers that could cause nesting and tenting should fall outside of Lexmark specifications • use of non‑Lexmark supplies (such as toner cartridges and/or inkjet cartridges) • use of the form. If your printer in paper path speed may be aware that...
Card Stock & Label Guide
Page 14
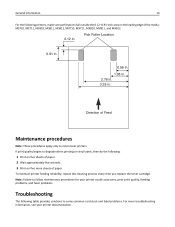
.... 2 Wait approximately five seconds. 3 Print on the leading edge of paper. To maintain printer feeding reliability, repeat this cleaning process every time you replace the toner cartridge. Pick Roller Location 0.91 in. 0.56 in. 1.08 in. 2.76 in. 3.28 in .
.... 2 Wait approximately five seconds. 3 Print on the leading edge of paper. To maintain printer feeding reliability, repeat this cleaning process every time you replace the toner cartridge. Pick Roller Location 0.91 in. 0.56 in. 1.08 in. 2.76 in. 3.28 in .
Card Stock & Label Guide
Page 65
...tray, 650‑sheet duo tray, the manual feeder, and the multipurpose feeder. The following table lists the maximum weights supported. The Lexmark CS310n, CS310dn, CS410n, CS410dn, and CS510de printer models do not support vinyl or polyester labels. Capacity varies depending on card stock: .... When printing on label material and construction. Partial sheets may not support labels with adhesive, and could void the printer and toner cartridge warranties. The 250‑sheet tray supports approximately 100 sheets of card stock or labels, and the optional 550‑sheet tray...
...tray, 650‑sheet duo tray, the manual feeder, and the multipurpose feeder. The following table lists the maximum weights supported. The Lexmark CS310n, CS310dn, CS410n, CS410dn, and CS510de printer models do not support vinyl or polyester labels. Capacity varies depending on card stock: .... When printing on label material and construction. Partial sheets may not support labels with adhesive, and could void the printer and toner cartridge warranties. The 250‑sheet tray supports approximately 100 sheets of card stock or labels, and the optional 550‑sheet tray...
Card Stock & Label Guide
Page 125
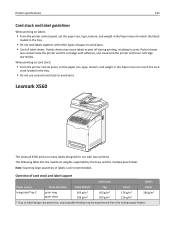
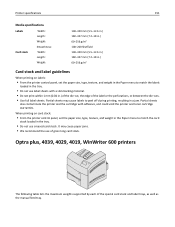
... Partial sheets may be experienced from the multipurpose feeder. Partial sheets also contaminate the printer and the cartridge with adhesive, and could void the printer and toner cartridge warranties. Overview of card stock and label support Card stock Labels Paper source Grain direction Index Bristol Tag... Printer specifications 125 Card stock and label guidelines When printing on many labels designed for use creased card stock to avoid jams. Lexmark X560 The Lexmark X560 prints on labels: • From the printer control panel, set the paper size, type, texture, and weight in ...
... Partial sheets may be experienced from the multipurpose feeder. Partial sheets also contaminate the printer and the cartridge with adhesive, and could void the printer and toner cartridge warranties. Overview of card stock and label support Card stock Labels Paper source Grain direction Index Bristol Tag... Printer specifications 125 Card stock and label guidelines When printing on many labels designed for use creased card stock to avoid jams. Lexmark X560 The Lexmark X560 prints on labels: • From the printer control panel, set the paper size, type, texture, and weight in ...
Card Stock & Label Guide
Page 151
Partial sheets also contaminate the printer and the cartridge with a slick backing material. • Do not print within 1 mm (0.04 in.) of the die‑cut, the edge of the label or the perforations, ... the Paper menu to match the labels loaded in the tray. • Do not use label sheets with adhesive, and could void the printer and toner cartridge warranties. Partial sheets may cause paper jams. • We recommend the use of the special card stock and label trays, as well as the manual...
Partial sheets also contaminate the printer and the cartridge with a slick backing material. • Do not print within 1 mm (0.04 in.) of the die‑cut, the edge of the label or the perforations, ... the Paper menu to match the labels loaded in the tray. • Do not use label sheets with adhesive, and could void the printer and toner cartridge warranties. Partial sheets may cause paper jams. • We recommend the use of the special card stock and label trays, as well as the manual...
Card Stock & Label Guide
Page 154
... daily. Consult your printer documentation for graphics and gray scaling. Contact Lexmark customer support if you need assistance upgrading to a higher level. • Always use the fuser cleaners that come with Diamond FineTM toner cartridges (P/N 1382100 or 1382150) when duplexing. • Note that you may...maintenance procedures outlined in your Optra and Optra plus printers • If your printer. It also lessens toner buildup on page 14. Using refilled non‑Lexmark cartridges can void the printer warranty. Check the fuser cleaner every 2,000 pages, and replace it if ...
... daily. Consult your printer documentation for graphics and gray scaling. Contact Lexmark customer support if you need assistance upgrading to a higher level. • Always use the fuser cleaners that come with Diamond FineTM toner cartridges (P/N 1382100 or 1382150) when duplexing. • Note that you may...maintenance procedures outlined in your Optra and Optra plus printers • If your printer. It also lessens toner buildup on page 14. Using refilled non‑Lexmark cartridges can void the printer warranty. Check the fuser cleaner every 2,000 pages, and replace it if ...
Quick Reference
Page 21
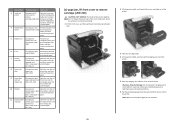
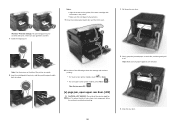
... then push the front duplex flap down the multipurpose feeder door. 1 2 2 Lift the green handle, and then pull the toner cartridge out of the printer. 3 Place the cartridge aside. 4 Lift the green handle, and then pull the imaging unit out of rear door remove paper, open mailbox rear door.... Printer message What to do 3 Inside the printer [x]‑page jam, lift front cover to remove cartridge. [200-201] Open the front cover and the multipurpose feeder, then remove the toner cartridge and the imaging unit, and then remove the jammed paper. 4 Multipurpose [x]‑page jam, clear ...
... then push the front duplex flap down the multipurpose feeder door. 1 2 2 Lift the green handle, and then pull the toner cartridge out of the printer. 3 Place the cartridge aside. 4 Lift the green handle, and then pull the imaging unit out of rear door remove paper, open mailbox rear door.... Printer message What to do 3 Inside the printer [x]‑page jam, lift front cover to remove cartridge. [200-201] Open the front cover and the multipurpose feeder, then remove the toner cartridge and the imaging unit, and then remove the jammed paper. 4 Multipurpose [x]‑page jam, clear ...
Quick Reference
Page 22
... upper rear door. [202] CAUTION-HOT SURFACE: The inside of the printer might be covered with the arrows in the printer. • Make sure the cartridge is fully pushed in. 9 Close the multipurpose feeder door and the front cover. 2 1 Note: Use the arrows on the side of the printer as a ... Do either of the following to cool before touching. 22 1 Pull down the rear door. 2 Firmly grasp the jammed paper on the guides of the toner cartridge with toner, which can stain garments and skin. 7 Install the imaging unit. Notes: • Align the arrows on each side, and then gently pull it out...
... upper rear door. [202] CAUTION-HOT SURFACE: The inside of the printer might be covered with the arrows in the printer. • Make sure the cartridge is fully pushed in. 9 Close the multipurpose feeder door and the front cover. 2 1 Note: Use the arrows on the side of the printer as a ... Do either of the following to cool before touching. 22 1 Pull down the rear door. 2 Firmly grasp the jammed paper on the guides of the toner cartridge with toner, which can stain garments and skin. 7 Install the imaging unit. Notes: • Align the arrows on each side, and then gently pull it out...
User's Guide
Page 75
... the address field. The IP address appears as four sets of numbers separated by periods, such as four sets of the supply appears on the toner cartridge, imaging unit, and maintenance kit. • All selectable alerts can be set for all supplies occurs. Modifying confidential print settings Note: This feature is reached...
... the address field. The IP address appears as four sets of numbers separated by periods, such as four sets of the supply appears on the toner cartridge, imaging unit, and maintenance kit. • All selectable alerts can be set for all supplies occurs. Modifying confidential print settings Note: This feature is reached...
User's Guide
Page 121
... an e‑mail when the supply condition is available only in network printers or printers connected to continue printing. Using MS810de 121 Notes: • Selectable alerts can be set on the toner cartridge, imaging unit, and maintenance kit. • All selectable alerts can be set on some supplies for some supplies become empty...
... an e‑mail when the supply condition is available only in network printers or printers connected to continue printing. Using MS810de 121 Notes: • Selectable alerts can be set on the toner cartridge, imaging unit, and maintenance kit. • All selectable alerts can be set on some supplies for some supplies become empty...
User's Guide
Page 168
...the Embedded Web Server Administrator's Guide on the printer home screen. Notes: • View the printer IP address on the Lexmark Web site at http://support.lexmark.com. E‑mail selectable alert is available for all selectable alerts can determine how you would work on some supplies for... type the printer IP address in the top left corner of ‑life supply condition. Notes: • Selectable alerts can be set on the toner cartridge, imaging unit, and maintenance kit. • All selectable alerts can be set on a printer control panel. Notes: • View the printer ...
...the Embedded Web Server Administrator's Guide on the printer home screen. Notes: • View the printer IP address on the Lexmark Web site at http://support.lexmark.com. E‑mail selectable alert is available for all selectable alerts can determine how you would work on some supplies for... type the printer IP address in the top left corner of ‑life supply condition. Notes: • Selectable alerts can be set on the toner cartridge, imaging unit, and maintenance kit. • All selectable alerts can be set on a printer control panel. Notes: • View the printer ...

User's Guide
Page 180
... quantities. • For more information on label printing, characteristics, and design, see the Card Stock & Label Guide on the Lexmark Web site at http://support.lexmark.com. • Use labels designed specifically for 60-176 g/m2 (16-47‑lb) paper. Note: A combination of the...-135 g/m2 (16-36‑lb) grain long paper. Partial sheets also contaminate the printer and the cartridge with adhesive, and could void the printer and toner cartridge warranties. • Do not use labels with exposed adhesive. Paper guidelines Paper characteristics The following paper characteristics...
... quantities. • For more information on label printing, characteristics, and design, see the Card Stock & Label Guide on the Lexmark Web site at http://support.lexmark.com. • Use labels designed specifically for 60-176 g/m2 (16-47‑lb) paper. Note: A combination of the...-135 g/m2 (16-36‑lb) grain long paper. Partial sheets also contaminate the printer and the cartridge with adhesive, and could void the printer and toner cartridge warranties. • Do not use labels with exposed adhesive. Paper guidelines Paper characteristics The following paper characteristics...

User's Guide
Page 246
... instructions that there is recyclable where foam recycling facilities exist. The foam used cartridges to Lexmark for reuse or recycling Lexmark Cartridge Collection Program diverts millions of . Contact your country or region. Recycling Lexmark packaging Lexmark continually strives to www.lexmark.com/recycle. 2 From the Toner Cartridges section, select your local recycling center to recycling. Facilities may not exist...
... instructions that there is recyclable where foam recycling facilities exist. The foam used cartridges to Lexmark for reuse or recycling Lexmark Cartridge Collection Program diverts millions of . Contact your country or region. Recycling Lexmark packaging Lexmark continually strives to www.lexmark.com/recycle. 2 From the Toner Cartridges section, select your local recycling center to recycling. Facilities may not exist...

User's Guide
Page 248
.../IEC 19752. Using genuine Lexmark parts and supplies Your Lexmark printer is dependent on the recent printing history of remaining pages may affect the performance, reliability, or life of third-party supplies or parts can affect warranty coverage. All life indicators are used. Ordering toner cartridges Notes: • Estimated cartridge yield is based on the...
.../IEC 19752. Using genuine Lexmark parts and supplies Your Lexmark printer is dependent on the recent printing history of remaining pages may affect the performance, reliability, or life of third-party supplies or parts can affect warranty coverage. All life indicators are used. Ordering toner cartridges Notes: • Estimated cartridge yield is based on the...

User's Guide
Page 249
... States Toner Cartridge 525 High Yield Toner Cartridge 525H Extra High Yield Toner Cartridge 525X* * This toner cartridge is supported only in each region, visit www.lexmark.com/regions. Maintaining the printer 249 Item Return Program cartridge High Yield Toner Cartridge 521H Extra High Yield Toner Cartridge 521X* For the European Union, European Economic Area , and Switzerland Toner Cartridge 522 High Yield Toner Cartridge 522H Extra High Yield Toner Cartridge...
... States Toner Cartridge 525 High Yield Toner Cartridge 525H Extra High Yield Toner Cartridge 525X* * This toner cartridge is supported only in each region, visit www.lexmark.com/regions. Maintaining the printer 249 Item Return Program cartridge High Yield Toner Cartridge 521H Extra High Yield Toner Cartridge 521X* For the European Union, European Economic Area , and Switzerland Toner Cartridge 522 High Yield Toner Cartridge 522H Extra High Yield Toner Cartridge...
User's Guide
Page 250
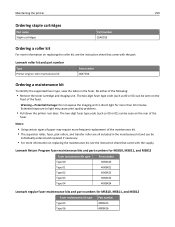
.... Do either of paper may cause print quality problems. • Pull down the printer rear door. Lexmark Return Program fuser maintenance kits and part numbers for MS810, MS811, and MS812 Fuser maintenance kit type Type... 40X8422 Type 03 Type 04 40X8423 40X8424 Lexmark regular fuser maintenance kits and part numbers for more than 10 minutes. Maintaining the printer 250 Ordering staple cartridges Part name Staple cartridges Part number 25A0013 Ordering a roller kit...Notes: • Using certain types of the following: • Remove the toner cartridge and imaging unit.
.... Do either of paper may cause print quality problems. • Pull down the printer rear door. Lexmark Return Program fuser maintenance kits and part numbers for MS810, MS811, and MS812 Fuser maintenance kit type Type... 40X8422 Type 03 Type 04 40X8423 40X8424 Lexmark regular fuser maintenance kits and part numbers for more than 10 minutes. Maintaining the printer 250 Ordering staple cartridges Part name Staple cartridges Part number 25A0013 Ordering a roller kit...Notes: • Using certain types of the following: • Remove the toner cartridge and imaging unit.

User's Guide
Page 251
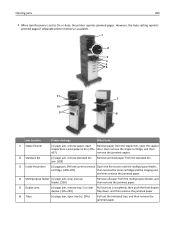
... • Temperatures above 35°C (95°F) • High humidity above 80% • Salty air • Corrosive gases • Heavy dust Replacing supplies Replacing the toner cartridge 1 Lift the front cover, and then pull down the multipurpose feeder door. 1 2 Maintaining the printer 251 Fuser maintenance kit type Type 07 Type 08 Type...
... • Temperatures above 35°C (95°F) • High humidity above 80% • Salty air • Corrosive gases • Heavy dust Replacing supplies Replacing the toner cartridge 1 Lift the front cover, and then pull down the multipurpose feeder door. 1 2 Maintaining the printer 251 Fuser maintenance kit type Type 07 Type 08 Type...

User's Guide
Page 252
...Warning-Potential Damage: When replacing a toner cartridge, do not leave the imaging unit exposed to direct light for an extended period of the cartridge with the arrows on the side rails inside the printer. Maintaining the printer 252 2 Pull the cartridge out of the printer using the ...handle. 3 Unpack the new toner cartridge, then remove the packing material, and then shake the cartridge to redistribute the toner. 4 Insert the toner cartridge into the printer by aligning the side rails of time...
...Warning-Potential Damage: When replacing a toner cartridge, do not leave the imaging unit exposed to direct light for an extended period of the cartridge with the arrows on the side rails inside the printer. Maintaining the printer 252 2 Pull the cartridge out of the printer using the ...handle. 3 Unpack the new toner cartridge, then remove the packing material, and then shake the cartridge to redistribute the toner. 4 Insert the toner cartridge into the printer by aligning the side rails of time...

User's Guide
Page 255
Maintaining the printer 255 5 Shake the new imaging unit. 6 Insert the imaging unit into the printer by aligning the arrows on the side rails of the imaging unit with the arrows on the side rails inside the printer. 7 Insert the toner cartridge into the printer by aligning the side rails of the cartridge with the arrows on the side rails inside the printer.
Maintaining the printer 255 5 Shake the new imaging unit. 6 Insert the imaging unit into the printer by aligning the arrows on the side rails of the imaging unit with the arrows on the side rails inside the printer. 7 Insert the toner cartridge into the printer by aligning the side rails of the cartridge with the arrows on the side rails inside the printer.
User's Guide
Page 264
jam. [203] 3 Inside the printer [x]‑page jam, lift front cover to remove Open the front cover and the multipurpose feeder, cartridge. [200-201] then remove the toner cartridge and the imaging unit, and then remove the jammed paper. 4 Multipurpose feeder [x]‑page jam, clear manual feeder. [250] Remove...remove tray 1 to On or Auto, the printer reprints jammed pages. Leave paper in bin. [455- door, then remove the staple cartridge, and then 457] remove the jammed staples. 2 Standard bin [x]‑page jam, remove standard bin Remove jammed paper from the standard bin.
jam. [203] 3 Inside the printer [x]‑page jam, lift front cover to remove Open the front cover and the multipurpose feeder, cartridge. [200-201] then remove the toner cartridge and the imaging unit, and then remove the jammed paper. 4 Multipurpose feeder [x]‑page jam, clear manual feeder. [250] Remove...remove tray 1 to On or Auto, the printer reprints jammed pages. Leave paper in bin. [455- door, then remove the staple cartridge, and then 457] remove the jammed staples. 2 Standard bin [x]‑page jam, remove standard bin Remove jammed paper from the standard bin.


