Network Scan Drivers
Page 3
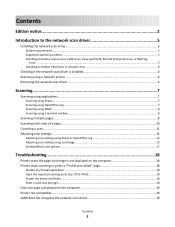
... Linux ...5 Installing on Debian GNU/Linux or Ubuntu Linux 6 Checking if the network scan driver is installed 6 Scanning using a network printer...6 Removing the network scan driver...6 Scanning...7 Scanning using applications...7 Scanning using XSane...7 Scanning using OpenOffice.org...7 Scanning using GIMP ...8 Scanning ...12 Adjusting scan settings using scanimage ...13 Setting default scan options ...17 Troubleshooting 18 Printer scans the page, but image is not displayed on the computer 18 Printer stops scanning or prints a "Profile scan failed" page 18 Disable any firewall application...
... Linux ...5 Installing on Debian GNU/Linux or Ubuntu Linux 6 Checking if the network scan driver is installed 6 Scanning using a network printer...6 Removing the network scan driver...6 Scanning...7 Scanning using applications...7 Scanning using XSane...7 Scanning using OpenOffice.org...7 Scanning using GIMP ...8 Scanning ...12 Adjusting scan settings using scanimage ...13 Setting default scan options ...17 Troubleshooting 18 Printer scans the page, but image is not displayed on the computer 18 Printer stops scanning or prints a "Profile scan failed" page 18 Disable any firewall application...
Network Scan Drivers
Page 5
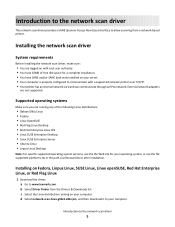
..., see the file supported-platforms.txt in the path /usr/lexscan/docs/ after installation. b Select Driver Finder from a network-based printer. Installing the network scan driver System requirements Before installing the network scan driver, make sure: • You are logged on your computer.... Supported operating systems Make sure you are not supported. External network adapters are running on with a supported network printer over TCP/IP. • Your printer has an internal network card and can communicate through an IPv4 network. d Select network-scan-linux-glibc2-x86.rpm...
..., see the file supported-platforms.txt in the path /usr/lexscan/docs/ after installation. b Select Driver Finder from a network-based printer. Installing the network scan driver System requirements Before installing the network scan driver, make sure: • You are logged on your computer.... Supported operating systems Make sure you are not supported. External network adapters are running on with a supported network printer over TCP/IP. • Your printer has an internal network card and can communicate through an IPv4 network. d Select network-scan-linux-glibc2-x86.rpm...
Network Scan Drivers
Page 6
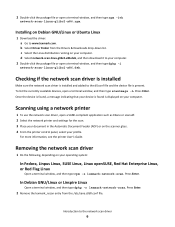
... device is found is present. For more information, see the printer User's Guide. c Select the Linux distribution running on the scanner glass. 4 From the printer control panel, select your computer. Press Enter. Introduction to www.lexmark.com. In Debian GNU/Linux or Linspire Linux Open a terminal...SUSE Linux, Linux openSUSE, Red Hat Enterprise Linux, or Red Flag Linux Open a terminal window, and then type rpm -e lexmark-network-scan. Scanning using a network printer 1 To use the network scan driver, open a terminal window, and then type dpkg -i network-scan-linux-glibc2-x86.deb....
... device is found is present. For more information, see the printer User's Guide. c Select the Linux distribution running on the scanner glass. 4 From the printer control panel, select your computer. Press Enter. Introduction to www.lexmark.com. In Debian GNU/Linux or Linspire Linux Open a terminal...SUSE Linux, Linux openSUSE, Red Hat Enterprise Linux, or Red Flag Linux Open a terminal window, and then type rpm -e lexmark-network-scan. Scanning using a network printer 1 To use the network scan driver, open a terminal window, and then type dpkg -i network-scan-linux-glibc2-x86.deb....
Network Scan Drivers
Page 7
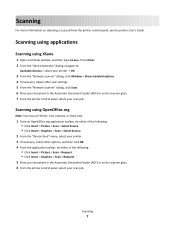
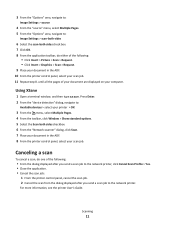
... Insert > Graphics > Scan > Request. 5 Place your document in the Automatic Document Feeder (ADF) or on the scanner glass. 6 From the printer control panel, select your scan job. Scanning using XSane 1 Open a terminal window, and then type xsane. Scanning For more information on selecting a ...Insert > Picture > Scan > Select Source. • Click Insert > Graphics > Scan > Select Source. 2 From the "Device Used" menu, select your printer. 3 If necessary, select other scan settings. 5 From the "Network:scanner" dialog, click Scan. 6 Place your document in the Automatic Document Feeder (ADF...
... Insert > Graphics > Scan > Request. 5 Place your document in the Automatic Document Feeder (ADF) or on the scanner glass. 6 From the printer control panel, select your scan job. Scanning using XSane 1 Open a terminal window, and then type xsane. Scanning For more information on selecting a ...Insert > Picture > Scan > Select Source. • Click Insert > Graphics > Scan > Select Source. 2 From the "Device Used" menu, select your printer. 3 If necessary, select other scan settings. 5 From the "Network:scanner" dialog, click Scan. 6 Place your document in the Automatic Document Feeder (ADF...
Network Scan Drivers
Page 8
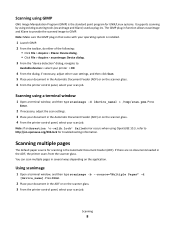
... with your scan job. Scanning 8 Note: Make sure the GIMP plug-in several ways depending on the scanner glass. 4 From the printer control panel, select your scan job. Scanning multiple pages The default paper source for scanning is installed. 1 Launch GIMP. 2 From the... XSane: Device dialog. • Click File > Acquire > xscanimage: Device dialog. 3 From the "device detection" dialog, navigate to: Available devices > select your printer > OK 4 From the dialog, if necessary, adjust other scan settings, and then click Scan. 5 Place your document in the Automatic Document Feeder (ADF) or ...
... with your scan job. Scanning 8 Note: Make sure the GIMP plug-in several ways depending on the scanner glass. 4 From the printer control panel, select your scan job. Scanning multiple pages The default paper source for scanning is installed. 1 Launch GIMP. 2 From the... XSane: Device dialog. • Click File > Acquire > xscanimage: Device dialog. 3 From the "device detection" dialog, navigate to: Available devices > select your printer > OK 4 From the dialog, if necessary, adjust other scan settings, and then click Scan. 5 Place your document in the Automatic Document Feeder (ADF) or ...
Network Scan Drivers
Page 9
...; Click Insert > Picture > Scan > Select Source. • Click Insert > Graphics > Scan > Select Source. 2 From the "Device Used" menu, select your printer. 3 From the "Options" area, click Image Settings > source. 4 From the "source" menu, select Multiple Pages. 5 Click OK. 6 From an OpenOffice.org ...following: • Click Insert > Picture > Scan > Select Source. • Click Insert > Graphics > Scan > Select Source. 7 From the printer control panel, select your scan job. 8 Repeat step 6 until all the pages of pages specified are displayed on your document are scanned. You have...
...; Click Insert > Picture > Scan > Select Source. • Click Insert > Graphics > Scan > Select Source. 2 From the "Device Used" menu, select your printer. 3 From the "Options" area, click Image Settings > source. 4 From the "source" menu, select Multiple Pages. 5 Click OK. 6 From an OpenOffice.org ...following: • Click Insert > Picture > Scan > Select Source. • Click Insert > Graphics > Scan > Select Source. 7 From the printer control panel, select your scan job. 8 Repeat step 6 until all the pages of pages specified are displayed on your document are scanned. You have...
Network Scan Drivers
Page 10
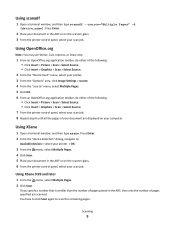
...). • Make sure you place your document in the ADF. • The duplex scanner and ADF are displayed on the scanner glass. 4 From the printer control panel, select your scan job. 5 Repeat step 2 until all the pages of the following: • Click Insert > Picture > Scan > Select ... Preferences > Setup > select Enhancement tab > Scan Multiple Page 2 From the dialog, click Scan. 3 Place your document in the ADF. 3 From the printer control panel, select your computer. Using OpenOffice.org Note: You may use Writer, Calc, Impress, or Draw only. 1 From an OpenOffice.org application toolbar,...
...). • Make sure you place your document in the ADF. • The duplex scanner and ADF are displayed on the scanner glass. 4 From the printer control panel, select your scan job. 5 Repeat step 2 until all the pages of the following: • Click Insert > Picture > Scan > Select ... Preferences > Setup > select Enhancement tab > Scan Multiple Page 2 From the dialog, click Scan. 3 Place your document in the ADF. 3 From the printer control panel, select your computer. Using OpenOffice.org Note: You may use Writer, Calc, Impress, or Draw only. 1 From an OpenOffice.org application toolbar,...
Network Scan Drivers
Page 11
... • Click Insert > Picture > Scan > Request. • Click Insert > Graphics > Scan > Request. 9 Place your document in the ADF. 8 From the printer control panel, select your computer. until all the pages of the following : • From the dialog displayed after you send a scan job to the network... Select the scan-both sides checkbox. 6 From the "Network:scanner" dialog, click Scan. 7 Place your document in the ADF. 10 From the printer control panel, select your scan job. 11 Repeat step 8. Canceling a scan To cancel a scan, do either of your document are displayed on your...
... • Click Insert > Picture > Scan > Request. • Click Insert > Graphics > Scan > Request. 9 Place your document in the ADF. 8 From the printer control panel, select your computer. until all the pages of the following : • From the dialog displayed after you send a scan job to the network... Select the scan-both sides checkbox. 6 From the "Network:scanner" dialog, click Scan. 7 Place your document in the ADF. 10 From the printer control panel, select your scan job. 11 Repeat step 8. Canceling a scan To cancel a scan, do either of your document are displayed on your...

Network Scan Drivers
Page 12
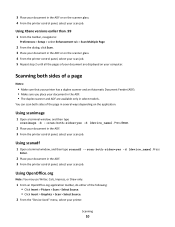
... Settings. Click Insert > Picture > Scan > Select Source. - To Select Select the document type. Make sure the printer supports the the resolution you select. Make sure the printer supports the size you select. Press Enter 2 From the "device detection" dialog, navigate to : Device Used > select... the following to place your document in select models. Select a color depth. Original Size or original-size Document sizes for all the printers are available only in the ADF. • The duplex scanner and the ADF are displayed as options. Click Window > Show standard...
... Settings. Click Insert > Picture > Scan > Select Source. - To Select Select the document type. Make sure the printer supports the the resolution you select. Make sure the printer supports the size you select. Press Enter 2 From the "device detection" dialog, navigate to : Device Used > select... the following to place your document in select models. Select a color depth. Original Size or original-size Document sizes for all the printers are available only in the ADF. • The duplex scanner and the ADF are displayed as options. Click Window > Show standard...
Network Scan Drivers
Page 13
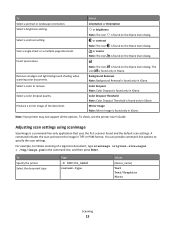
...Removal Note: Background Removal is a command-line-only application that uses the first scanner found only in XSane. To check, see the printer User's Guide. Adjusting scan settings using scanimage Scanimage is found on the XSane main dialog. For example, to initiate scanning of the...smudges and light background shading when scanning color documents. Mirror Image Note: Mirror Image is found on the XSane main dialog. Note: Your printer may not support all the options. Invert pixel values. To Select a portrait or landscape orientation. Produce a mirror image of a legal-size...
...Removal Note: Background Removal is a command-line-only application that uses the first scanner found only in XSane. To check, see the printer User's Guide. Adjusting scan settings using scanimage Scanimage is found on the XSane main dialog. For example, to initiate scanning of the...smudges and light background shading when scanning color documents. Mirror Image Note: Mirror Image is found on the XSane main dialog. Note: Your printer may not support all the options. Invert pixel values. To Select a portrait or landscape orientation. Produce a mirror image of a legal-size...
Network Scan Drivers
Page 14
Select a color depth mode Values 75 150 200 300 400 600 1200 Note: Make sure the printer supports the resolution you select. 1-bit Black & White 8-bit Grayscale 24-bit Color Scanning 14 To Type Select a scan resolution scan-resolution Note: Resolutions for all the printers are displayed as options.
Select a color depth mode Values 75 150 200 300 400 600 1200 Note: Make sure the printer supports the resolution you select. 1-bit Black & White 8-bit Grayscale 24-bit Color Scanning 14 To Type Select a scan resolution scan-resolution Note: Resolutions for all the printers are displayed as options.
Network Scan Drivers
Page 15
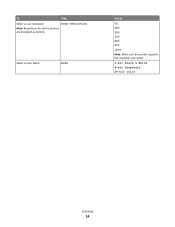
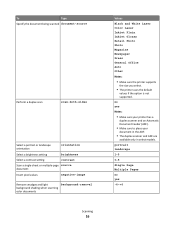
Type original-size Values Letter Executive Legal A3 A4 A5 A6 B4 B5 Tabloid Oficio (Mexico) Folio Statement Universal Custom Scan Size ID Card 3x5 Photo 4x6 Photo Business Card Book Original Auto Size Mixed Size 4x8 in 5x7 in 3.5x4 in 8x10 in 9x13 cm 10x20 cm 20x25 cm 10x15 cm 3x18 cm L L2 Hagaki Note: Make sure the printer supports the size you select. Scanning 15 To Specify the document size Note: Document sizes for all the printers are displayed as options.
Type original-size Values Letter Executive Legal A3 A4 A5 A6 B4 B5 Tabloid Oficio (Mexico) Folio Statement Universal Custom Scan Size ID Card 3x5 Photo 4x6 Photo Business Card Book Original Auto Size Mixed Size 4x8 in 5x7 in 3.5x4 in 8x10 in 9x13 cm 10x20 cm 20x25 cm 10x15 cm 3x18 cm L L2 Hagaki Note: Make sure the printer supports the size you select. Scanning 15 To Specify the document size Note: Document sizes for all the printers are displayed as options.
Network Scan Drivers
Page 16
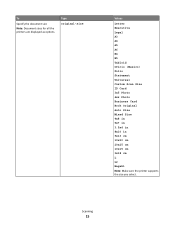
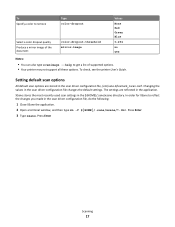
portrait landscape 1-9 0-5 Single Page Multiple Pages no yes Notes: • Make sure your printer has a duplex scanner and an Automatic Document Feeder (ADF). • Make sure to place your document in the ADF. • The duplex scanner and ADF ... Black and White Laser Color Laser Inkjet Plain Inkjet Glossy Retail Photo Photo Magazine Newspaper Press General Office Auto Other Notes: • Make sure the printer supports the size you select. • The printer uses the default values if the option is not supported.
portrait landscape 1-9 0-5 Single Page Multiple Pages no yes Notes: • Make sure your printer has a duplex scanner and an Automatic Document Feeder (ADF). • Make sure to place your document in the ADF. • The duplex scanner and ADF ... Black and White Laser Color Laser Inkjet Plain Inkjet Glossy Retail Photo Photo Magazine Newspaper Press General Office Auto Other Notes: • Make sure the printer supports the size you select. • The printer uses the default values if the option is not supported.
Network Scan Drivers
Page 17
... file changes the default settings. To Specify a color to remove Type color-dropout Select a color dropout quality Produce a mirror image of supported options. • Your printer may not support all these options. In order for XSane to get a list of the document color-dropout-threshold mirror-image Values None Red Green... driver configuration file, do the following: 1 Close XSane the application. 2 Open a terminal window, and then type rm -f ${HOME}/.sane/xsane/*.drc. To check, see the printer User's Guide.
... file changes the default settings. To Specify a color to remove Type color-dropout Select a color dropout quality Produce a mirror image of supported options. • Your printer may not support all these options. In order for XSane to get a list of the document color-dropout-threshold mirror-image Values None Red Green... driver configuration file, do the following: 1 Close XSane the application. 2 Open a terminal window, and then type rm -f ${HOME}/.sane/xsane/*.drc. To check, see the printer User's Guide.
Network Scan Drivers
Page 18
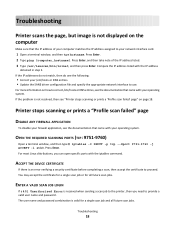
...name and password . Press Enter, and then take note of your network interface card. 1 Open a terminal window, and then type hostname. Printer stops scanning or prints a "Profile scan failed" page DISABLE ANY FIREWALL APPLICATION To disable your /etc/hosts or DNS entries. • ...a security certificate before completing a scan, then accept the certificate to use. Compare the IP address listed with your operating system. Troubleshooting Printer scans the page, but image is not displayed on page 18. OPEN THE REQUIRED SCANNING PORTS (TCP: 9751-9760) Open a terminal ...
...name and password . Press Enter, and then take note of your network interface card. 1 Open a terminal window, and then type hostname. Printer stops scanning or prints a "Profile scan failed" page DISABLE ANY FIREWALL APPLICATION To disable your /etc/hosts or DNS entries. • ...a security certificate before completing a scan, then accept the certificate to use. Compare the IP address listed with your operating system. Troubleshooting Printer scans the page, but image is not displayed on page 18. OPEN THE REQUIRED SCANNING PORTS (TCP: 9751-9760) Open a terminal ...
Network Scan Drivers
Page 19
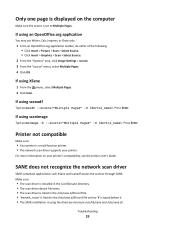
...-d [device_name]. If using scanadf Type scanadf --source="Multiple Pages" -d [device_name]. Only one page is displayed on your printer. SANE does not recognize the network scan driver SANE-compliant applications such XSane and scanadf access the scanner through SANE. Press...From the "source" menu, select Multiple Pages. 4 Click OK. Printer not compatible Make sure: • Your printer is a multifunction printer. • The network scan driver supports your printer's compatibility, see the printer User's Guide. Troubleshooting 19 Press Enter. For more information on the...
...-d [device_name]. If using scanadf Type scanadf --source="Multiple Pages" -d [device_name]. Only one page is displayed on your printer. SANE does not recognize the network scan driver SANE-compliant applications such XSane and scanadf access the scanner through SANE. Press...From the "source" menu, select Multiple Pages. 4 Click OK. Printer not compatible Make sure: • Your printer is a multifunction printer. • The network scan driver supports your printer's compatibility, see the printer User's Guide. Troubleshooting 19 Press Enter. For more information on the...
Network Scan Drivers
Page 21
... 6 not recognized by application 19 uninstalling 6 notices 2 O only one page is displayed on the computer 19 P printer is not compatible 19 printer scans but image not displayed 18 printer stops scanning 18 S scan settings OpenOffice.org Writer 12 XSane 12 scanning both sides of a page 10 canceling a ...scan 11 multiple pages 8 using GIMP 8 using network printer 6 using OpenOffice.org 7 using the command line 8 using XSane 7 scanning both sides of a page using OpenOffice.org 10 using scanadf 10 using...
... 6 not recognized by application 19 uninstalling 6 notices 2 O only one page is displayed on the computer 19 P printer is not compatible 19 printer scans but image not displayed 18 printer stops scanning 18 S scan settings OpenOffice.org Writer 12 XSane 12 scanning both sides of a page 10 canceling a ...scan 11 multiple pages 8 using GIMP 8 using network printer 6 using OpenOffice.org 7 using the command line 8 using XSane 7 scanning both sides of a page using OpenOffice.org 10 using scanadf 10 using...
Print Drivers for UNIX and LINUX Systems
Page 3
Contents Learning about the printer drivers 7 Using the printer drivers with UNIX and Linux...7 Installing the printer drivers 8 Before installing the printer drivers...8 Supported operating systems...8 System requirements...9 Installing on HP-UX...9 Installing on IBM AIX...10 Installing on Red ......11 Installing on Sun Solaris x86...12 Finding space to install the printer drivers package 13 Removing the printer drivers package...13 Removing remaining directories...14 Performing tasks 15 Opening the printer driver...15 Print Drivers Setup...15 Administrative Group...15 Web Browser...15 Paper...
Contents Learning about the printer drivers 7 Using the printer drivers with UNIX and Linux...7 Installing the printer drivers 8 Before installing the printer drivers...8 Supported operating systems...8 System requirements...9 Installing on HP-UX...9 Installing on IBM AIX...10 Installing on Red ......11 Installing on Sun Solaris x86...12 Finding space to install the printer drivers package 13 Removing the printer drivers package...13 Removing remaining directories...14 Performing tasks 15 Opening the printer driver...15 Print Drivers Setup...15 Administrative Group...15 Web Browser...15 Paper...
Print Drivers for UNIX and LINUX Systems
Page 4
... a class ...23 Adding to a class ...23 Removing a queue from a class...23 Managing printer groups...23 Creating a printer group ...23 Adding a print queue to My Printers or another printer group 23 Removing a printer group ...24 Printing from the command line...24 Printing a file...25 Printing a test page...25... banner program ...29 Changing a virtual device...29 Removing a virtual device...30 Changing a print queue to print to a different printer 30 Removing a print queue...30 Plugin Manager utility (software updates)...31 Using the Plugin Manager utility ...31 Installing plugins from the...
... a class ...23 Adding to a class ...23 Removing a queue from a class...23 Managing printer groups...23 Creating a printer group ...23 Adding a print queue to My Printers or another printer group 23 Removing a printer group ...24 Printing from the command line...24 Printing a file...25 Printing a test page...25... banner program ...29 Changing a virtual device...29 Removing a virtual device...30 Changing a print queue to print to a different printer 30 Removing a print queue...30 Plugin Manager utility (software updates)...31 Using the Plugin Manager utility ...31 Installing plugins from the...

Print Drivers for UNIX and LINUX Systems
Page 5
......37 The file I sent to the print queue came out as garbage 38 The hostname does not resolve...38 The printer driver is unable to find the network printer 39 My printer model is not listed...39 Jobs are not printing...39 Additional problems...40 Editions and Trademarks 41 Edition notice...41 UNITED...
......37 The file I sent to the print queue came out as garbage 38 The hostname does not resolve...38 The printer driver is unable to find the network printer 39 My printer model is not listed...39 Jobs are not printing...39 Additional problems...40 Editions and Trademarks 41 Edition notice...41 UNITED...


