User's Guide
Page 7
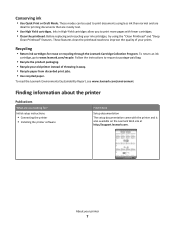
... Quick Print or Draft Mode. These modes can be used to print documents using the "Clean Printhead" and "Deep Clean Printhead" features. Inks in High-Yield cartridges allow you looking for reuse or recycling through the Lexmark Cartridge Collection Program. Recycling • Return ink cartridges for ? Finding information about the printer Publications What...
... Quick Print or Draft Mode. These modes can be used to print documents using the "Clean Printhead" and "Deep Clean Printhead" features. Inks in High-Yield cartridges allow you looking for reuse or recycling through the Lexmark Cartridge Collection Program. Recycling • Return ink cartridges for ? Finding information about the printer Publications What...
User's Guide
Page 10
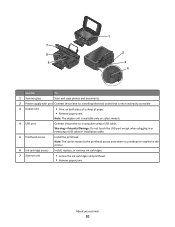
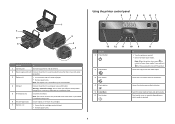
.... Note: The duplex unit is available only on select models. 4 USB port Connect the printer to the printhead access area when no printhead is installed in or removing a USB cable or installation cable. 5 Printhead access Install the printhead. Warning-Potential Damage: Do not touch the USB port except when plugging in the printer. 6 Ink...
.... Note: The duplex unit is available only on select models. 4 USB port Connect the printer to the printhead access area when no printhead is installed in or removing a USB cable or installation cable. 5 Printhead access Install the printhead. Warning-Potential Damage: Do not touch the USB port except when plugging in the printer. 6 Ink...
User's Guide
Page 12
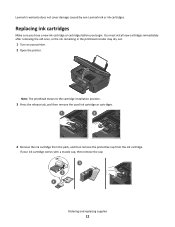
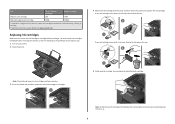
... cartridges before you begin. If your printer. 2 Open the printer. Lexmark's warranty does not cover damage caused by non-Lexmark ink or ink cartridges. You must install new cartridges immediately after removing the old ones, or the ink remaining in the printhead nozzles may dry out. 1 Turn on your ink cartridge comes with...
... cartridges before you begin. If your printer. 2 Open the printer. Lexmark's warranty does not cover damage caused by non-Lexmark ink or ink cartridges. You must install new cartridges immediately after removing the old ones, or the ink remaining in the printhead nozzles may dry out. 1 Turn on your ink cartridge comes with...
User's Guide
Page 22
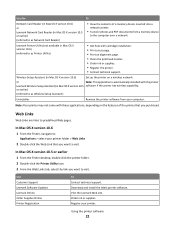
... application is automatically installed with cartridge installation. • Print a test page. • Print an alignment page. • Clean the printhead nozzles. • Order ink or supplies. • Register the printer. • Contact technical support. Web Links Web Links are links... printer software. Note: Your printer may not come with these applications, depending on a wireless network. Use Customer Support Lexmark Software Updates Lexmark Online Order Supplies Online Printer Registration To Contact technical support. In Mac OS X version 10.5 or earlier 1 From...
... application is automatically installed with cartridge installation. • Print a test page. • Print an alignment page. • Clean the printhead nozzles. • Order ink or supplies. • Register the printer. • Contact technical support. Web Links Web Links are links... printer software. Note: Your printer may not come with these applications, depending on a wireless network. Use Customer Support Lexmark Software Updates Lexmark Online Order Supplies Online Printer Registration To Contact technical support. In Mac OS X version 10.5 or earlier 1 From...

User's Guide
Page 87
... document again. For Macintosh users Note: This feature is finished. If you may need to align the printhead. If print quality has not improved, then clean the printhead nozzles. Maintaining the printer 87 Aligning the printhead If the characters or lines on your printer image appear jagged or wavy, then you aligned the...
... document again. For Macintosh users Note: This feature is finished. If you may need to align the printhead. If print quality has not improved, then clean the printhead nozzles. Maintaining the printer 87 Aligning the printhead If the characters or lines on your printer image appear jagged or wavy, then you aligned the...
User's Guide
Page 88
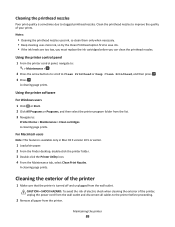
...is turned off and unplugged from the list. 3 Navigate to: Printer Home > Maintenance > Clean cartridges A cleaning page prints. Cleaning the printhead nozzles Poor print quality is sometimes due to improve the quality of your prints. CAUTION-SHOCK HAZARD: To avoid the risk of electric shock... too low, you must replace the ink cartridges before proceeding. 2 Remove all paper from the wall outlet and disconnect all cables to Clean Printhead or Deep Clean Printhead, and then press . 3 Press . Using the printer control panel 1 From the printer control panel, navigate to: > Maintenance > 2...
...is turned off and unplugged from the list. 3 Navigate to: Printer Home > Maintenance > Clean cartridges A cleaning page prints. Cleaning the printhead nozzles Poor print quality is sometimes due to improve the quality of your prints. CAUTION-SHOCK HAZARD: To avoid the risk of electric shock... too low, you must replace the ink cartridges before proceeding. 2 Remove all paper from the wall outlet and disconnect all cables to Clean Printhead or Deep Clean Printhead, and then press . 3 Press . Using the printer control panel 1 From the printer control panel, navigate to: > Maintenance > 2...
User's Guide
Page 90
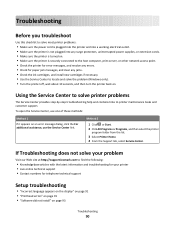
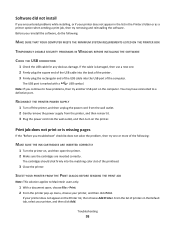
...find the following: • Knowledgebase articles with the latest information and troubleshooting for your problem Visit our Web site at http://support.lexmark.com to printer maintenance tasks and customer support. Method 2 1 Click or Start. 2 Click All Programs or Programs, and then... • Contact numbers for telephone technical support Setup troubleshooting • "Incorrect language appears on the display" on page 91 • "Printhead errors" on page 91 • "Software did not install" on page 93 Troubleshooting 90 Troubleshooting Before you troubleshoot Use this checklist to...
...find the following: • Knowledgebase articles with the latest information and troubleshooting for your problem Visit our Web site at http://support.lexmark.com to printer maintenance tasks and customer support. Method 2 1 Click or Start. 2 Click All Programs or Programs, and then... • Contact numbers for telephone technical support Setup troubleshooting • "Incorrect language appears on the display" on page 91 • "Printhead errors" on page 91 • "Software did not install" on page 93 Troubleshooting 90 Troubleshooting Before you troubleshoot Use this checklist to...
User's Guide
Page 91
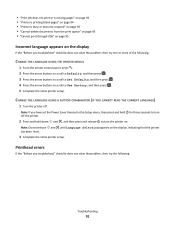
... off . Note: Do not release and until Language Selection appears on the display, indicating that the printer has been reset. 3 Complete the initial printer setup. Printhead errors If the "Before you troubleshoot" checklist does not solve the problem, then try the following : CHANGE THE LANGUAGE USING THE PRINTER MENUS 1 From the...
... off . Note: Do not release and until Language Selection appears on the display, indicating that the printer has been reset. 3 Complete the initial printer setup. Printhead errors If the "Before you troubleshoot" checklist does not solve the problem, then try the following : CHANGE THE LANGUAGE USING THE PRINTER MENUS 1 From the...

User's Guide
Page 92
Troubleshooting 92 Note: If removing and reinserting the printhead does not resolve the error, then contact technical support. REMOVE AND REINSERT THE PRINTHEAD 1 Open the printer and lift the latch. 2 2 Remove the printhead. Warning-Potential Damage: Do not touch the printhead nozzles. 3 Wipe the printhead contacts using a clean, lint-free cloth. 4 Reinsert the printhead, and then close the latch until it clicks. 5 Close the printer.
Troubleshooting 92 Note: If removing and reinserting the printhead does not resolve the error, then contact technical support. REMOVE AND REINSERT THE PRINTHEAD 1 Open the printer and lift the latch. 2 2 Remove the printhead. Warning-Potential Damage: Do not touch the printhead nozzles. 3 Wipe the printhead contacts using a clean, lint-free cloth. 4 Reinsert the printhead, and then close the latch until it clicks. 5 Close the printer.
User's Guide
Page 93
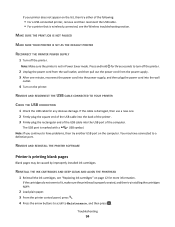
... of the USB cable into the back of the printer. 3 Firmly plug the rectangular end of the USB cable into the USB port of the printhead. 3 Close the printer. If the cable is damaged, then use a new one or more of the following : MAKE SURE THAT YOUR COMPUTER MEETS THE MINIMUM...
... of the USB cable into the back of the printer. 3 Firmly plug the rectangular end of the USB cable into the USB port of the printhead. 3 Close the printer. If the cable is damaged, then use a new one or more of the following : MAKE SURE THAT YOUR COMPUTER MEETS THE MINIMUM...
User's Guide
Page 94
...Maintenance, and then press . The USB port is not in Power Saver mode. If the cartridges do not seem to fit, make sure the printhead is properly seated, and then try another USB port on the computer. Note: Make sure the printer is marked with a USB symbol. If ...SOFTWARE Printer is wirelessly connected, see "Replacing ink cartridges" on the printer. Troubleshooting 94 REINSTALL THE INK CARTRIDGES AND DEEP CLEAN AND ALIGN THE PRINTHEAD 1 Reinstall the ink cartridges, see the Wireless troubleshooting section. MAKE SURE THE PRINT JOB IS NOT PAUSED MAKE SURE YOUR PRINTER IS SET ...
...Maintenance, and then press . The USB port is not in Power Saver mode. If the cartridges do not seem to fit, make sure the printhead is properly seated, and then try another USB port on the computer. Note: Make sure the printer is marked with a USB symbol. If ...SOFTWARE Printer is wirelessly connected, see "Replacing ink cartridges" on the printer. Troubleshooting 94 REINSTALL THE INK CARTRIDGES AND DEEP CLEAN AND ALIGN THE PRINTHEAD 1 Reinstall the ink cartridges, see the Wireless troubleshooting section. MAKE SURE THE PRINT JOB IS NOT PAUSED MAKE SURE YOUR PRINTER IS SET ...
User's Guide
Page 95
... the cable is damaged, then use a new one or more of the printer. A cleaning page prints. 6 Press the arrow buttons to scroll to Deep Clean Printhead, and then press . An alignment page prints.
... the cable is damaged, then use a new one or more of the printer. A cleaning page prints. 6 Press the arrow buttons to scroll to Deep Clean Printhead, and then press . An alignment page prints.
User's Guide
Page 100
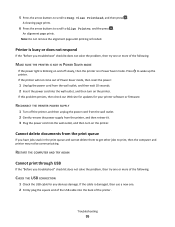
... printing These are possible solutions. SELECT A HIGHER PRINT QUALITY FROM THE PRINTER SOFTWARE MAKE SURE THE INK CARTRIDGES ARE PROPERLY INSTALLED ALIGN THE PRINTHEAD CLEAN OR DEEP CLEAN THE PRINTHEAD NOZZLES Note: If these solutions do not remove the streaks or lines on the printed image, then contact technical support. Print speed...
... printing These are possible solutions. SELECT A HIGHER PRINT QUALITY FROM THE PRINTER SOFTWARE MAKE SURE THE INK CARTRIDGES ARE PROPERLY INSTALLED ALIGN THE PRINTHEAD CLEAN OR DEEP CLEAN THE PRINTHEAD NOZZLES Note: If these solutions do not remove the streaks or lines on the printed image, then contact technical support. Print speed...
User's Guide
Page 139
...adding a printer 71 creating using Macintosh 68 creating using Windows 68 additional computers installing wireless printer 65 AliceBox 66 aligning the printhead 87 appliances wireless network 80 application list downloading 62 updating 62 assigning IP address 84 B banner paper 27 bidirectional communication ... network 106 cannot print through USB 95 cannot scan to computer over a network 103 cartridges, ink ordering 11 using genuine Lexmark 11 changing Power Saver timeout 17 changing printing mode 47 changing temporary settings into default 16 changing wireless settings after installation (...
...adding a printer 71 creating using Macintosh 68 creating using Windows 68 additional computers installing wireless printer 65 AliceBox 66 aligning the printhead 87 appliances wireless network 80 application list downloading 62 updating 62 assigning IP address 84 B banner paper 27 bidirectional communication ... network 106 cannot print through USB 95 cannot scan to computer over a network 103 cartridges, ink ordering 11 using genuine Lexmark 11 changing Power Saver timeout 17 changing printing mode 47 changing temporary settings into default 16 changing wireless settings after installation (...
User's Guide
Page 141
... 95 printer printing blank pages 94 printer problems, basic solutions 90 printer software installing 25 uninstalling 24 printer, setting as default 47 printhead aligning 87 printhead access 10 printhead error 91 printhead nozzles cleaning 88 printing collate 32 custom-size paper 38 documents 31 documents from memory card or flash drive 35 envelopes 36...
... 95 printer printing blank pages 94 printer problems, basic solutions 90 printer software installing 25 uninstalling 24 printer, setting as default 47 printhead aligning 87 printhead access 10 printhead error 91 printhead nozzles cleaning 88 printing collate 32 custom-size paper 38 documents 31 documents from memory card or flash drive 35 envelopes 36...
User's Guide
Page 142
... 31 two-sided 34 printing in draft mode 47 printing mode changing 47 proof sheet using 43 protocol 84 publications finding 7 R recycling 6 Lexmark products 14 WEEE statement 126 reducing an image 52 repeating an image 53 replacing ink cartridges 12 resetting internal wireless print server to factory default...through USB 95 incorrect language appears on display 91 page does not print 93 printer does not respond 95 printer printing blank pages 94 printhead error 91 software did not install 93 shared printing 74 sharing printer in Windows 73 software Service Center 90 software did not install 93...
... 31 two-sided 34 printing in draft mode 47 printing mode changing 47 proof sheet using 43 protocol 84 publications finding 7 R recycling 6 Lexmark products 14 WEEE statement 126 reducing an image 52 repeating an image 53 replacing ink cartridges 12 resetting internal wireless print server to factory default...through USB 95 incorrect language appears on display 91 page does not print 93 printer does not respond 95 printer printing blank pages 94 printhead error 91 software did not install 93 shared printing 74 sharing printer in Windows 73 software Service Center 90 software did not install 93...
User's Guide
Page 143
... print through USB 95 incorrect language appears on display 91 page does not print 93 printer does not respond 95 printer printing blank pages 94 printhead error 91 software did not install 93 troubleshooting, wireless cannot print over wireless network 106 changing wireless settings after installation (Mac) 67 changing wireless settings...
... print through USB 95 incorrect language appears on display 91 page does not print 93 printer does not respond 95 printer printing blank pages 94 printhead error 91 software did not install 93 troubleshooting, wireless cannot print over wireless network 106 changing wireless settings after installation (Mac) 67 changing wireless settings...

Quick Reference
Page 4
... or earlier 1 From the Finder desktop, double-click the printer folder. 2 Double-click User's Guide. Minimizing your printer's environmental impact We are committed to print documents using the Comprehensive User's Guide installed automatically with the printer software.* Click Help from the list. 3... or later. • Print more pages with fewer cartridges. • Clean the printhead. Follow the instructions to a computer program, application, or flash drive for reuse or recycling through the Lexmark Cartridge Collection Program. For Macintosh users In Mac OS X version 10.6 1 From ...
... or earlier 1 From the Finder desktop, double-click the printer folder. 2 Double-click User's Guide. Minimizing your printer's environmental impact We are committed to print documents using the Comprehensive User's Guide installed automatically with the printer software.* Click Help from the list. 3... or later. • Print more pages with fewer cartridges. • Clean the printhead. Follow the instructions to a computer program, application, or flash drive for reuse or recycling through the Lexmark Cartridge Collection Program. For Macintosh users In Mac OS X version 10.6 1 From ...
Quick Reference
Page 6
... when plugging in the printer. 6 Ink cartridge access Install, replace, or remove ink cartridges. 7 Scanner unit • Access the ink cartridges and printhead. • Remove paper jams. Using the printer control panel 1 2 3 4 5 67 ON Color START Black 2-Sided Eco-Mode Cancel 13 12... Note: The duplex unit is installed in or removing a USB cable or installation cable. 5 Printhead access Install the printhead. Note: The carrier moves to the printhead access area when no printhead is available only on select models. 4 USB port Connect the printer to color mode or black...
... when plugging in the printer. 6 Ink cartridge access Install, replace, or remove ink cartridges. 7 Scanner unit • Access the ink cartridges and printhead. • Remove paper jams. Using the printer control panel 1 2 3 4 5 67 ON Color START Black 2-Sided Eco-Mode Cancel 13 12... Note: The duplex unit is installed in or removing a USB cable or installation cable. 5 Printhead access Install the printhead. Note: The carrier moves to the printhead access area when no printhead is available only on select models. 4 USB port Connect the printer to color mode or black...
Quick Reference
Page 9
Note: The printhead moves to air. 9 You must install new cartridges immediately after removing the protective cap to avoid exposing the ink to the cartridge installation position. 3 Press ...: Install the new ink cartridges immediately after removing the old ones, or the ink remaining in the printhead nozzles may dry out. 1 Turn on the Lexmark Web site at www.lexmark.com. Use two hands to Lexmark for a single use , return this cartridge to install the black cartridge. Item Return Program Regular cartridge2 Cartridge1...
Note: The printhead moves to air. 9 You must install new cartridges immediately after removing the protective cap to avoid exposing the ink to the cartridge installation position. 3 Press ...: Install the new ink cartridges immediately after removing the old ones, or the ink remaining in the printhead nozzles may dry out. 1 Turn on the Lexmark Web site at www.lexmark.com. Use two hands to Lexmark for a single use , return this cartridge to install the black cartridge. Item Return Program Regular cartridge2 Cartridge1...


