User's Guide
Page 5
...of fire or electrical shock results. CAUTION-POTENTIAL INJURY: Do not cut, twist, bind, crush, or place heavy objects on the power cord. If any electrical or cabling connections, such as furniture and walls. CAUTION-SHOCK HAZARD: To avoid the risk of electric shock ...'s components. CAUTION-SHOCK HAZARD: Do not use this product or the manufacturer's authorized replacements. Do not pinch the power cord between objects such as the fax feature, power cord, or telephone, during a lightning storm. SAVE THESE INSTRUCTIONS. Safety information 5 This product is not responsible for the...
...of fire or electrical shock results. CAUTION-POTENTIAL INJURY: Do not cut, twist, bind, crush, or place heavy objects on the power cord. If any electrical or cabling connections, such as furniture and walls. CAUTION-SHOCK HAZARD: To avoid the risk of electric shock ...'s components. CAUTION-SHOCK HAZARD: Do not use this product or the manufacturer's authorized replacements. Do not pinch the power cord between objects such as the fax feature, power cord, or telephone, during a lightning storm. SAVE THESE INSTRUCTIONS. Safety information 5 This product is not responsible for the...
User's Guide
Page 88
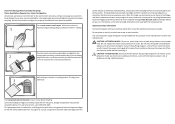
.... 3 Double-click the Printer Utility icon. 4 From the Maintenance tab, select Clean Print Nozzles. A cleaning page prints. Cleaning the exterior of the printer, unplug the power cord from the wall outlet. Using the printer control panel 1 From the printer control panel, navigate to: > Maintenance > 2 Press the arrow buttons to scroll to improve...
.... 3 Double-click the Printer Utility icon. 4 From the Maintenance tab, select Clean Print Nozzles. A cleaning page prints. Cleaning the exterior of the printer, unplug the power cord from the wall outlet. Using the printer control panel 1 From the printer control panel, navigate to: > Maintenance > 2 Press the arrow buttons to scroll to improve...
User's Guide
Page 90
...Home. 4 From the Support tab, select Service Center. If Troubleshooting does not solve your problem Visit our Web site at http://support.lexmark.com to find the following: • Knowledgebase articles with the latest information and troubleshooting for your printer • Live online technical support ... printer back on. Troubleshooting Before you troubleshoot Use this checklist to solve most printer problems: • Make sure the power cord is plugged into the printer and into a working electrical outlet. • Make sure the printer is not plugged into any surge ...
...Home. 4 From the Support tab, select Service Center. If Troubleshooting does not solve your problem Visit our Web site at http://support.lexmark.com to find the following: • Knowledgebase articles with the latest information and troubleshooting for your printer • Live online technical support ... printer back on. Troubleshooting Before you troubleshoot Use this checklist to solve most printer problems: • Make sure the power cord is plugged into the printer and into a working electrical outlet. • Make sure the printer is not plugged into any surge ...
User's Guide
Page 93
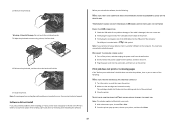
... 1 Turn off the printer, and then unplug the power cord from the wall outlet. 2 Gently remove the power supply from the printer, and then reinsert it. 3 Plug the power cord into the matching color slot of printers in the Printers folder or as a printer option when sending a print job, then try one . 2 Firmly plug the...
... 1 Turn off the printer, and then unplug the power cord from the wall outlet. 2 Gently remove the power supply from the printer, and then reinsert it. 3 Plug the power cord into the matching color slot of printers in the Printers folder or as a printer option when sending a print job, then try one . 2 Firmly plug the...
User's Guide
Page 94
... connected to turn off the printer. Note: Make sure the printer is damaged, then use a new one minute, reconnect the power cord into the power supply, and then plug the power cord into the USB port of the following: • For a USB-connected printer, remove and then reconnect the USB cable. &#...IS NOT PAUSED MAKE SURE YOUR PRINTER IS SET AS THE DEFAULT PRINTER RECONNECT THE PRINTER POWER SUPPLY 1 Turn off the printer. 2 Unplug the power cord from the wall outlet, and then pull out the power cord from the power supply. 3 After one . 2 Firmly plug the square end of the USB cable ...
... connected to turn off the printer. Note: Make sure the printer is damaged, then use a new one minute, reconnect the power cord into the power supply, and then plug the power cord into the USB port of the following: • For a USB-connected printer, remove and then reconnect the USB cable. &#...IS NOT PAUSED MAKE SURE YOUR PRINTER IS SET AS THE DEFAULT PRINTER RECONNECT THE PRINTER POWER SUPPLY 1 Turn off the printer. 2 Unplug the power cord from the wall outlet, and then pull out the power cord from the power supply. 3 After one . 2 Firmly plug the square end of the USB cable ...
User's Guide
Page 95
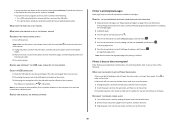
...the printer is in the print queue and cannot delete them to get other jobs to wake up the 1 Unplug the power cord from the printer, and then reinsert it. 3 Plug the power cord into the wall outlet, and then turn on the printer. An alignment page prints. 5 Press the arrow buttons to scroll... will not come out of the following : MAKE SURE THE PRINTER IS NOT IN POWER SAVER MODE If the power light is blinking on and off the printer, and then unplug the power cord from the wall outlet. 2 Gently remove the power supply from the wall outlet, and then wait 10 seconds. 2 Insert the...
...the printer is in the print queue and cannot delete them to get other jobs to wake up the 1 Unplug the power cord from the printer, and then reinsert it. 3 Plug the power cord into the wall outlet, and then turn on the printer. An alignment page prints. 5 Press the arrow buttons to scroll... will not come out of the following : MAKE SURE THE PRINTER IS NOT IN POWER SAVER MODE If the power light is blinking on and off the printer, and then unplug the power cord from the wall outlet. 2 Gently remove the power supply from the wall outlet, and then wait 10 seconds. 2 Insert the...
User's Guide
Page 100
... the following : IF YOU ARE USING A USB CONNECTION, THEN TRY A DIFFERENT USB CABLE IF YOU ARE ON A NETWORK, THEN RESET THE POWER OF THE ACCESS POINT (ROUTER) 1 Unplug the power cord from your system. Try one or more RAM. Troubleshooting 100 SELECT A LOWER PRINT QUALITY FROM THE PRINTER SOFTWARE MANUALLY SELECT A PAPER TYPE... graphics and images in the document. • Remove as many unused fonts as possible from the access point. 2 Wait ten seconds, and then insert the power cord.
... the following : IF YOU ARE USING A USB CONNECTION, THEN TRY A DIFFERENT USB CABLE IF YOU ARE ON A NETWORK, THEN RESET THE POWER OF THE ACCESS POINT (ROUTER) 1 Unplug the power cord from your system. Try one or more RAM. Troubleshooting 100 SELECT A LOWER PRINT QUALITY FROM THE PRINTER SOFTWARE MANUALLY SELECT A PAPER TYPE... graphics and images in the document. • Remove as many unused fonts as possible from the access point. 2 Wait ten seconds, and then insert the power cord.
User's Guide
Page 110
.... You can successfully use other devices from the port, then the port is not working . RECONNECT THE POWER SUPPLY 1 Turn off the printer. 2 Unplug the power cord from the power outlet. 3 Remove the power supply from the link at the bottom of the printer and then plug it . If the USB port ...printer. MAKE SURE THAT THE PRINTER IS PLUGGED IN AND TURNED ON Check to see "Installing the printer software" in . 4 Plug the power cord back into the power outlet. 5 Turn on the printer, and then resume the installation on your printer, select Additional Computer when you might need to disconnect ...
.... You can successfully use other devices from the port, then the port is not working . RECONNECT THE POWER SUPPLY 1 Turn off the printer. 2 Unplug the power cord from the power outlet. 3 Remove the power supply from the link at the bottom of the printer and then plug it . If the USB port ...printer. MAKE SURE THAT THE PRINTER IS PLUGGED IN AND TURNED ON Check to see "Installing the printer software" in . 4 Plug the power cord back into the power outlet. 5 Turn on the printer, and then resume the installation on your printer, select Additional Computer when you might need to disconnect ...

User's Guide
Page 127
...product (in order to calculate energy usage. Off mode If this product is: Lexmark International, Inc., 740 West New Circle Road, Lexington, KY, 40550 USA. Mode Description Power consumption (Watts) Printing The product is generating hard-copy output from electronic inputs.... is plugged into a wall outlet, but the power switch is turned off mode which still consumes a small amount of power, then to completely stop product power consumption, disconnect the power supply cord from the Authorized Representative. Setting the Power Saver Timeout to a high value maintains a fast...
...product (in order to calculate energy usage. Off mode If this product is: Lexmark International, Inc., 740 West New Circle Road, Lexington, KY, 40550 USA. Mode Description Power consumption (Watts) Printing The product is generating hard-copy output from electronic inputs.... is plugged into a wall outlet, but the power switch is turned off mode which still consumes a small amount of power, then to completely stop product power consumption, disconnect the power supply cord from the Authorized Representative. Setting the Power Saver Timeout to a high value maintains a fast...
Quick Reference
Page 2
... HAZARD: Do not use only genuine Lexmark inkjet cartridges with this Lexmark-branded cartridges are available through www.lexmark.com and may contain recycled material. Follow instructions to www.lexmark.com/recycle. Important safety information Connect the power cord to an electrical outlet that they may...furniture and walls. If any subsequent user of such problems. Remove the power cord from the electrical outlet before inspecting it. Please Read Before Opening Your Inkjet Cartridge Box At Lexmark, we take our commitment to the environment seriously, and we recommend that ...
... HAZARD: Do not use only genuine Lexmark inkjet cartridges with this Lexmark-branded cartridges are available through www.lexmark.com and may contain recycled material. Follow instructions to www.lexmark.com/recycle. Important safety information Connect the power cord to an electrical outlet that they may...furniture and walls. If any subsequent user of such problems. Remove the power cord from the electrical outlet before inspecting it. Please Read Before Opening Your Inkjet Cartridge Box At Lexmark, we take our commitment to the environment seriously, and we recommend that ...

Quick Reference
Page 17
...your e-mail program does not open automatically, then you troubleshoot Use this checklist to solve most printer problems: • Make sure the power cord is plugged into the printer and into a working electrical outlet. • Make sure the printer is not plugged into the ADF or... Navigate to: Printer Home > select your computer. For Macintosh users 1 Load an original document faceup into any surge protectors, uninterrupted power supplies, or extension cords. • Make sure the printer is securely connected to the host computer, print server, or other network access point. •...
...your e-mail program does not open automatically, then you troubleshoot Use this checklist to solve most printer problems: • Make sure the power cord is plugged into the printer and into a working electrical outlet. • Make sure the printer is not plugged into the ADF or... Navigate to: Printer Home > select your computer. For Macintosh users 1 Load an original document faceup into any surge protectors, uninterrupted power supplies, or extension cords. • Make sure the printer is securely connected to the host computer, print server, or other network access point. •...
Quick Reference
Page 19
...BEFORE SENDING THE PRINT JOB Note: This solution applies to a defective port. RECONNECT THE PRINTER POWER SUPPLY 1 Turn off the printer, and then unplug the power cord from the wall outlet. 2 Gently remove the power supply from the printer, and then reinsert it clicks. 5 Close the printer. You may ...3 Wipe the printhead contacts using a clean, lint-free cloth. 4 Reinsert the printhead, and then close the latch until it . 3 Plug the power cord into the wall outlet, and then turn on the computer. Note: If you reinstall the software, do the following : MAKE SURE THE INK CARTRIDGES ARE...
...BEFORE SENDING THE PRINT JOB Note: This solution applies to a defective port. RECONNECT THE PRINTER POWER SUPPLY 1 Turn off the printer, and then unplug the power cord from the wall outlet. 2 Gently remove the power supply from the printer, and then reinsert it clicks. 5 Close the printer. You may ...3 Wipe the printhead contacts using a clean, lint-free cloth. 4 Reinsert the printhead, and then close the latch until it . 3 Plug the power cord into the wall outlet, and then turn on the computer. Note: If you reinstall the software, do the following : MAKE SURE THE INK CARTRIDGES ARE...
Quick Reference
Page 20
...AS THE DEFAULT PRINTER RECONNECT THE PRINTER POWER SUPPLY 1 Turn off the printer. 2 Unplug the power cord from the wall outlet, and then pull out the power cord from the power supply. 3 After one minute, reconnect the power cord into the power supply, and then plug the power cord into the USB port of the ... sure the printer is marked with a USB symbol. Press and hold for more of Power Saver mode, then reset the power: 1 Unplug the power cord from the printer, and then reinsert it. 3 Plug the power cord into the wall outlet, and then turn on the computer. Press to Align Printer,...
...AS THE DEFAULT PRINTER RECONNECT THE PRINTER POWER SUPPLY 1 Turn off the printer. 2 Unplug the power cord from the wall outlet, and then pull out the power cord from the power supply. 3 After one minute, reconnect the power cord into the power supply, and then plug the power cord into the USB port of the ... sure the printer is marked with a USB symbol. Press and hold for more of Power Saver mode, then reset the power: 1 Unplug the power cord from the printer, and then reinsert it. 3 Plug the power cord into the wall outlet, and then turn on the computer. Press to Align Printer,...


