

Service Manual
Page 24
... • Spring hook • Needle nose pliers • Volt-ohmmeter • #1 and #2 Phillips screwdriver • Slotted screwdriver 1-8 Lexmark™ E360d, E360dn Note: Make sure the media stack is below the maximum media fill indicators on the 250-sheet tray before pushing the tray into the printer.... 4513-420, -430 Most paper jams can help prevent paper jams: • Use only the recommended print media. • Do not overload the print media sources. Have any way - If jams do occur with the print media, then try feeding one sheet at www.lexmark.com for more information about ...
... • Spring hook • Needle nose pliers • Volt-ohmmeter • #1 and #2 Phillips screwdriver • Slotted screwdriver 1-8 Lexmark™ E360d, E360dn Note: Make sure the media stack is below the maximum media fill indicators on the 250-sheet tray before pushing the tray into the printer.... 4513-420, -430 Most paper jams can help prevent paper jams: • Use only the recommended print media. • Do not overload the print media sources. Have any way - If jams do occur with the print media, then try feeding one sheet at www.lexmark.com for more information about ...
Service Manual
Page 36
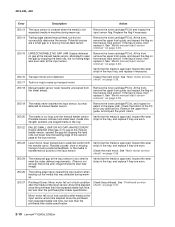
... than expected stable lock time, but less than the printhead jitter-stable specification. 2-10 Lexmark™ E360d, E360dn See "Main motor service check" on page 4-39. If the flag is approved. Remove...the upper front guide, and inspect the flag on page 4-39. 200.15 UNRECOVERABLE NO GAP JAM. See "Media manual input sensor removal" on page 2-26. 200.18 Manual feeder sensor never... Possible causes include multi-sheet feed, media size (length) problem, pre-staged media in the paper path. 4513-420, -430 Error Description Action 200.13 The input sensor is covered when the ...
... than expected stable lock time, but less than the printhead jitter-stable specification. 2-10 Lexmark™ E360d, E360dn See "Main motor service check" on page 4-39. If the flag is approved. Remove...the upper front guide, and inspect the flag on page 4-39. 200.15 UNRECOVERABLE NO GAP JAM. See "Media manual input sensor removal" on page 2-26. 200.18 Manual feeder sensor never... Possible causes include multi-sheet feed, media size (length) problem, pre-staged media in the paper path. 4513-420, -430 Error Description Action 200.13 The input sensor is covered when the ...

Service Manual
Page 38
...-up. If damage is slippage in the fuser, then replace the fuser. Open the rear door, and inspect the flag on page 4-48. 2-12 Lexmark™ E360d, E360dn If the flag does not rotate freely or has no spring action, then replace the fuser. If the flag does not rotate freely or has... and correct if needed. While feeding along the media, and immediately after it was probably staged prematurely. 202.00 Paper jam around exit sensor. The flag is located behind the fuser exit rollers, about mid printer. Page at fuser nip before fuser started ramping toward the ...
...-up. If damage is slippage in the fuser, then replace the fuser. Open the rear door, and inspect the flag on page 4-48. 2-12 Lexmark™ E360d, E360dn If the flag does not rotate freely or has no spring action, then replace the fuser. If the flag does not rotate freely or has... and correct if needed. While feeding along the media, and immediately after it was probably staged prematurely. 202.00 Paper jam around exit sensor. The flag is located behind the fuser exit rollers, about mid printer. Page at fuser nip before fuser started ramping toward the ...

Service Manual
Page 40
...the source while the other sheets were committed to go beyond the wear strips. 2-14 Lexmark™ E360d, E360dn Pages in the paper path have been flushed to the output bin. Remove Tray 2 and inspect for wear or paper dust. Pages in the source, other sheets were committed to feed from tray 2. For... manual feeder, tray 1, or feeder failed when media was in the paper path have been flushed to the output bin. Replace if necessary. Check the wear strips and replace if necessary. 251.00 251.10 251.11 Paper jam near the manual feeder. Failed to feed from manual feeder.
...the source while the other sheets were committed to go beyond the wear strips. 2-14 Lexmark™ E360d, E360dn Pages in the paper path have been flushed to the output bin. Remove Tray 2 and inspect for wear or paper dust. Pages in the source, other sheets were committed to feed from tray 2. For... manual feeder, tray 1, or feeder failed when media was in the paper path have been flushed to the output bin. Replace if necessary. Check the wear strips and replace if necessary. 251.00 251.10 251.11 Paper jam near the manual feeder. Failed to feed from manual feeder.

Service Manual
Page 62
...debris. If a menu settings page cannot be printed, then the problem is installed properly. 2-36 Lexmark™ E360d, E360dn Replace card. Load Paper displays even though there is on the next command. • Clear all jams. • Press and release , or open and close the printer cover to feed from the ...movement. • Make sure the media does not exceed the stack height indicator. • The input sensor does not sense media after a paper jam has been cleared. • Make sure the parallel or USB cable is not damaged and is firmly plugged into the connector on the back...
...debris. If a menu settings page cannot be printed, then the problem is installed properly. 2-36 Lexmark™ E360d, E360dn Replace card. Load Paper displays even though there is on the next command. • Clear all jams. • Press and release , or open and close the printer cover to feed from the ...movement. • Make sure the media does not exceed the stack height indicator. • The input sensor does not sense media after a paper jam has been cleared. • Make sure the parallel or USB cable is not damaged and is firmly plugged into the connector on the back...

Service Manual
Page 78
... as necessary to reduce curl of its bare drum • Prints patches on the operator panel to exit the EVENT LOG. 3-14 Lexmark™ E360d, E360dn Press Back once to exit the Display log, or press twice to give any indication that this setting executes, the printer performs the ...errors in consecutive positions in order to attain each operating point's darkness target • Modifies the EP mechanism as shown: Event 6/6 202.01 Paper Jam 2. All 2xx and 9xx error messages are displayed on the drum and measures the drum's reflectivity through the patches • Cleans the transfer ...
... as necessary to reduce curl of its bare drum • Prints patches on the operator panel to exit the EVENT LOG. 3-14 Lexmark™ E360d, E360dn Press Back once to exit the Display log, or press twice to give any indication that this setting executes, the printer performs the ...errors in consecutive positions in order to attain each operating point's darkness target • Modifies the EP mechanism as shown: Event 6/6 202.01 Paper Jam 2. All 2xx and 9xx error messages are displayed on the drum and measures the drum's reflectivity through the patches • Cleans the transfer ...

Service Manual
Page 126
4513-420, -430 Warning: Check to make sure the duplex paper jam door is not, then the paper tray will become lodged and the printer will need to be replaced. 4-44 Lexmark™ E360d, E360dn If it is in its proper position.
4513-420, -430 Warning: Check to make sure the duplex paper jam door is not, then the paper tray will become lodged and the printer will need to be replaced. 4-44 Lexmark™ E360d, E360dn If it is in its proper position.
Service Manual
Page 144
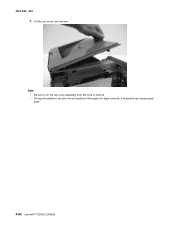
4513-420, -430 7. Note: • Be sure to lift the top cover assembly from the front to remove. • During reinstallation, be sure the exit guide and the paper bin align correctly. A mismatch can cause paper jams. 4-62 Lexmark™ E360d, E360dn Lift the top cover, and remove.
4513-420, -430 7. Note: • Be sure to lift the top cover assembly from the front to remove. • During reinstallation, be sure the exit guide and the paper bin align correctly. A mismatch can cause paper jams. 4-62 Lexmark™ E360d, E360dn Lift the top cover, and remove.

Service Manual
Page 166
... check 2-27 overview 1-2 P panel, control 1-2 paper jams tips on preventing 1-7 parallel port service check 2-29 parts catalog covers 7-2 electronics 7-4 frame 7-6 options 7-8 power-on self test (POST) 2-1 symptoms 2-20 Print Contrast 3-14 print media preventing jams 1-7 trays by model 1-5 types and sizes 1-6 ...25 LVPS/HVPS 2-25 main motor 2-26 operator panel 2-27 paper feed 2-27 paper jam during POST 2-27 paper never picks 2-28 paper picks but stops 2-27 paper picks sheets 2-28 paper trees, curls 2-29 I-2 Lexmark™ E360d, E360dn parallel port 2-29 print quality 2-30 black page 2-31 blank ...
... check 2-27 overview 1-2 P panel, control 1-2 paper jams tips on preventing 1-7 parallel port service check 2-29 parts catalog covers 7-2 electronics 7-4 frame 7-6 options 7-8 power-on self test (POST) 2-1 symptoms 2-20 Print Contrast 3-14 print media preventing jams 1-7 trays by model 1-5 types and sizes 1-6 ...25 LVPS/HVPS 2-25 main motor 2-26 operator panel 2-27 paper feed 2-27 paper jam during POST 2-27 paper never picks 2-28 paper picks but stops 2-27 paper picks sheets 2-28 paper trees, curls 2-29 I-2 Lexmark™ E360d, E360dn parallel port 2-29 print quality 2-30 black page 2-31 blank ...


