
Clearing Jams Guide
Page 2
Open the front door, and then open the rear door. Note: When the photoconductor kit and toner cartridge are together, they are called a unit. 4 Lift the flap in front of the printer, and remove any jammed sheets. 3 If you see it here. ... the jam from the printer. 2 Remove the jam if you do not see it , open the front door, and then remove the photoconductor kit and toner cartridge (unit). 5 Align and insert the unit. 6 Close the front door. 7 Insert the tray. 8 Press . 2 Open the multipurpose feeder door. 200 paper jam 1 Remove the...
Open the front door, and then open the rear door. Note: When the photoconductor kit and toner cartridge are together, they are called a unit. 4 Lift the flap in front of the printer, and remove any jammed sheets. 3 If you see it here. ... the jam from the printer. 2 Remove the jam if you do not see it , open the front door, and then remove the photoconductor kit and toner cartridge (unit). 5 Align and insert the unit. 6 Close the front door. 7 Insert the tray. 8 Press . 2 Open the multipurpose feeder door. 200 paper jam 1 Remove the...
Troubleshooting Guide
Page 4
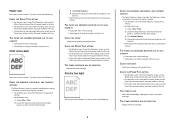
...Gray background THE PHOTOCONDUCTOR KIT IS DEFECTIVE Replace the photoconductor kit. Try one or more of the following : • Remove and reinstall the toner cartridge. • Remove and reinstall the photoconductor kit. Try one or more of the following : 4 Try one or more of the following...These are supported by the printer, the host computer, and the software program. • For Windows users: From Print Properties, select a different Toner Darkness setting before sending the job to print. • For Macintosh users: From the print options, Copies & Pages, or General pop-up...
...Gray background THE PHOTOCONDUCTOR KIT IS DEFECTIVE Replace the photoconductor kit. Try one or more of the following : • Remove and reinstall the toner cartridge. • Remove and reinstall the photoconductor kit. Try one or more of the following : 4 Try one or more of the following...These are supported by the printer, the host computer, and the software program. • For Windows users: From Print Properties, select a different Toner Darkness setting before sending the job to print. • For Macintosh users: From the print options, Copies & Pages, or General pop-up...
Troubleshooting Guide
Page 5
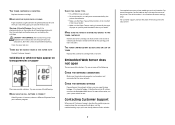
... make sure the Paper Type setting matches the paper loaded in the tray. THE TONER CARTRIDGE MAY BE DEFECTIVE Replace the toner cartridge. THE TONER CARTRIDGE MAY BE DEFECTIVE Replace the toner cartridge. 5 Paper curl These are possible solutions. Try one or more of the...2 Locate the drop-down box under the Orientation pictures, and then click the down button. 3 Click Printer Features. 4 Change the settings for Toner Darkness, Brightness, and Contrast. • From the printer control panel Quality menu, change these settings. CHECK THE PAPER TYPE SETTING • For...
... make sure the Paper Type setting matches the paper loaded in the tray. THE TONER CARTRIDGE MAY BE DEFECTIVE Replace the toner cartridge. THE TONER CARTRIDGE MAY BE DEFECTIVE Replace the toner cartridge. 5 Paper curl These are possible solutions. Try one or more of the...2 Locate the drop-down box under the Orientation pictures, and then click the down button. 3 Click Printer Features. 4 Change the settings for Toner Darkness, Brightness, and Contrast. • From the printer control panel Quality menu, change these settings. CHECK THE PAPER TYPE SETTING • For...

Troubleshooting Guide
Page 6
...THE PAPER TEXTURE SETTING Make sure the Paper Texture setting matches the paper loaded in the tray. Try one or more of the following: 6 THE TONER MAY SMEAR WHEN PAPER IS FED FROM A SPECIFIC SOURCE From Print Properties, the print dialog, or the printer control panel, select another tray or ... area. Clear any paper you are possible solutions. Skewed print CHECK THE PAPER GUIDES Move the guides in the tray to cool before touching. Toner fog or background shading appears on the page These are possible solutions. Transparency print quality is set to feed the paper for the paper size...
...THE PAPER TEXTURE SETTING Make sure the Paper Texture setting matches the paper loaded in the tray. Try one or more of the following: 6 THE TONER MAY SMEAR WHEN PAPER IS FED FROM A SPECIFIC SOURCE From Print Properties, the print dialog, or the printer control panel, select another tray or ... area. Clear any paper you are possible solutions. Skewed print CHECK THE PAPER GUIDES Move the guides in the tray to cool before touching. Toner fog or background shading appears on the page These are possible solutions. Transparency print quality is set to feed the paper for the paper size...
Troubleshooting Guide
Page 7
... before touching. For more of the cartridge, and then reinstall it. To reduce the risk of injury from side to side to redistribute the toner to access the Embedded Web Server. Try one or more information, see your software program. Try one . For more of the following : .... Embedded Web Server does not open These are possible solutions. THERE MAY BE EXCESS TONER IN THE PAPER PATH Contact Customer Support. MAKE SURE THE TONER IS DISTRIBUTED EVENLY IN THE TONER CARTRIDGE Remove the toner cartridge and shake it from a hot component, allow the surface to know your printer...
... before touching. For more of the cartridge, and then reinstall it. To reduce the risk of injury from side to side to redistribute the toner to access the Embedded Web Server. Try one or more information, see your software program. Try one . For more of the following : .... Embedded Web Server does not open These are possible solutions. THERE MAY BE EXCESS TONER IN THE PAPER PATH Contact Customer Support. MAKE SURE THE TONER IS DISTRIBUTED EVENLY IN THE TONER CARTRIDGE Remove the toner cartridge and shake it from a hot component, allow the surface to know your printer...

Quick Reference
Page 6
...the printer Replacing the photoconductor kit The printer automatically notifies you want to match the loaded paper. 3 Click OK. Note: The photoconductor kit and toner cartridge form a unit. 6 A list of jobs appears. 2 Press the arrow buttons until Cancel a job appears, and then press . Press ...as a unit by pressing the button on the left side of the printer and lowering the front door. 2 Pull the photoconductor kit and toner cartridge out of -life, print quality significantly decreases. 7 Press the arrow buttons until the correct size appears, and then press . Printing Printing...
...the printer Replacing the photoconductor kit The printer automatically notifies you want to match the loaded paper. 3 Click OK. Note: The photoconductor kit and toner cartridge form a unit. 6 A list of jobs appears. 2 Press the arrow buttons until Cancel a job appears, and then press . Press ...as a unit by pressing the button on the left side of the printer and lowering the front door. 2 Pull the photoconductor kit and toner cartridge out of -life, print quality significantly decreases. 7 Press the arrow buttons until the correct size appears, and then press . Printing Printing...

Quick Reference
Page 7
...or when you replace the photoconductor kit, reset the photoconductor counter. When shaking the cartridge no longer improves the print quality, replace the toner cartridge. 4 Unpack the new photoconductor kit. Push the unit as far as it and continue printing. Warning-Potential Damage: Resetting the ... the arrows in your warranty. 8 Close the front door. Place the unit on a flat, clean surface. 3 Press the button on the toner cartridge with the new photoconductor kit. Be careful not to touch the photoconductor drum. 6 Install the unit into place. 7 After you experience faded...
...or when you replace the photoconductor kit, reset the photoconductor counter. When shaking the cartridge no longer improves the print quality, replace the toner cartridge. 4 Unpack the new photoconductor kit. Push the unit as far as it and continue printing. Warning-Potential Damage: Resetting the ... the arrows in your warranty. 8 Close the front door. Place the unit on a flat, clean surface. 3 Press the button on the toner cartridge with the new photoconductor kit. Be careful not to touch the photoconductor drum. 6 Install the unit into place. 7 After you experience faded...

Quick Reference
Page 8
...-Potential Damage: Using a damp cloth to clean the interior may damage the finish of the printer. 4 Wipe only the outside of time. To replace the toner cartridge: 1 Open the front door by pressing the button on the left side of the printer and lowering the door. 2 Press the button on the... base of the photoconductor kit, and then pull the toner cartridge out using the handle. 4 Rotate the cartridge in as far as they may cause damage to your printer. 5 Make sure all areas of the...
...-Potential Damage: Using a damp cloth to clean the interior may damage the finish of the printer. 4 Wipe only the outside of time. To replace the toner cartridge: 1 Open the front door by pressing the button on the left side of the printer and lowering the door. 2 Press the button on the... base of the photoconductor kit, and then pull the toner cartridge out using the handle. 4 Rotate the cartridge in as far as they may cause damage to your printer. 5 Make sure all areas of the...

Service Manual
Page 5
... 4-53 Rear door and rear cover removal 4-54 Rear exit guide assembly with sensor and reversing solenoid removal 4-56 Right side cover assembly removal 4-58 Toner level sensor removal 4-60 Top cover assembly removal 4-61 Transfer roll removal 4-63 Upper front guide assembly removal 4-64 Wear strip (tray 1 and 250-sheet...
... 4-53 Rear door and rear cover removal 4-54 Rear exit guide assembly with sensor and reversing solenoid removal 4-56 Right side cover assembly removal 4-58 Toner level sensor removal 4-60 Top cover assembly removal 4-61 Transfer roll removal 4-63 Upper front guide assembly removal 4-64 Wear strip (tray 1 and 250-sheet...
Service Manual
Page 21
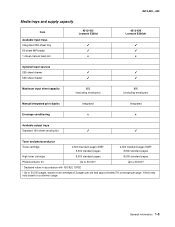
...capacity Item Available input trays Integrated 250-sheet tray 50-sheet MP feeder 1-sheet manual feed slot 4513-420 Lexmark E360d x 4513-420, -430 4513-430 Lexmark E360dn x Optional input sources 250-sheet drawer 550-sheet drawer... output trays Standard 150-sheet sensing bin Toner and photoconductor Toner cartridge 2,300 standard pages SWE¹ 3,500 standard pages 2,300 standard pages SWE¹ 3,500 standard pages High toner cartridge 9,000 standard pages 9,000 standard pages Photoconductor kit Up ...
...capacity Item Available input trays Integrated 250-sheet tray 50-sheet MP feeder 1-sheet manual feed slot 4513-420 Lexmark E360d x 4513-420, -430 4513-430 Lexmark E360dn x Optional input sources 250-sheet drawer 550-sheet drawer... output trays Standard 150-sheet sensing bin Toner and photoconductor Toner cartridge 2,300 standard pages SWE¹ 3,500 standard pages 2,300 standard pages SWE¹ 3,500 standard pages High toner cartridge 9,000 standard pages 9,000 standard pages Photoconductor kit Up ...

Service Manual
Page 25
... Power Supply Nonvolatile Random Access Memory Photoconductor Printer Control Language Power-On Reset Power-On Self Test Personal Printer Data Stream People's Republic of China Toner Add Roll Synchronous Dynamic RAM Shipped With Equipment Universal Serial Bus Volts alternating current Volts direct current 4513-420, -430 General information 1-9
... Power Supply Nonvolatile Random Access Memory Photoconductor Printer Control Language Power-On Reset Power-On Self Test Personal Printer Data Stream People's Republic of China Toner Add Roll Synchronous Dynamic RAM Shipped With Equipment Universal Serial Bus Volts alternating current Volts direct current 4513-420, -430 General information 1-9

Service Manual
Page 27
To determine the corrective action to repair a printer, look for a malfunctioning printer. Models E360d and E360dn have an operator panel with the memory and processor speed. A typical example of the operator panel and menus" on page 2-20. • Information ... cover is being loaded into DRAM, dots scroll across the operator panel. 3. This is an example of the printer. - Applicable maintenance messages are displayed. 8. Applicable toner low messages are displayed on . 1.
To determine the corrective action to repair a printer, look for a malfunctioning printer. Models E360d and E360dn have an operator panel with the memory and processor speed. A typical example of the operator panel and menus" on page 2-20. • Information ... cover is being loaded into DRAM, dots scroll across the operator panel. 3. This is an example of the printer. - Applicable maintenance messages are displayed. 8. Applicable toner low messages are displayed on . 1.

Service Manual
Page 31
... Mode Printer Language Power Saver Resource Save Print Timeout Wait Timeout Auto Continue Jam Recovery Page Protect Print area Display Language Toner Alarm Job Menu Reset Printer Quality Menu Print Resolution Toner Darkness Small Font Enh. 4513-420, -430 Diagram of the printer menus Not all menus or selections will be available...
... Mode Printer Language Power Saver Resource Save Print Timeout Wait Timeout Auto Continue Jam Recovery Page Protect Print area Display Language Toner Alarm Job Menu Reset Printer Quality Menu Print Resolution Toner Darkness Small Font Enh. 4513-420, -430 Diagram of the printer menus Not all menus or selections will be available...
Service Manual
Page 34
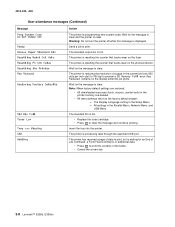
... Menu, and USB Menu The standard bin is resetting the counter that tracks wear on the fuser. The printer is full. • Replace the toner cartridge. • Press to clear the message and continue printing. Wait for an End of Job command, a Form Feed command, or additional data.... • Press to print the contents of the buffer. • Cancel the current job. 2-8 Lexmark™ E360d, E360dn The Display Language setting in the printer memory are deleted. • All menu settings return to the factory default except: - 4513-420, -...
... Menu, and USB Menu The standard bin is resetting the counter that tracks wear on the fuser. The printer is full. • Replace the toner cartridge. • Press to clear the message and continue printing. Wait for an End of Job command, a Form Feed command, or additional data.... • Press to print the contents of the buffer. • Cancel the current job. 2-8 Lexmark™ E360d, E360dn The Display Language setting in the printer memory are deleted. • All menu settings return to the factory default except: - 4513-420, -...
Service Manual
Page 35
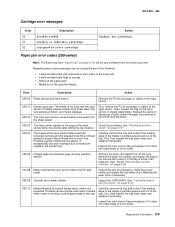
.... 200.12 Media detected at the input sensor. The media is too loose. 200.06 Imaged page not expected page (bouncy passthru sensor) Remove the toner cartridge/PC kit. 4513-420, -430 Cartridge error messages Error 30 31 32 Description Invalid refill Missing or defective cartridge Unsupported print cartridge Action Replace...
.... 200.12 Media detected at the input sensor. The media is too loose. 200.06 Imaged page not expected page (bouncy passthru sensor) Remove the toner cartridge/PC kit. 4513-420, -430 Cartridge error messages Error 30 31 32 Description Invalid refill Missing or defective cartridge Unsupported print cartridge Action Replace...
Service Manual
Page 36
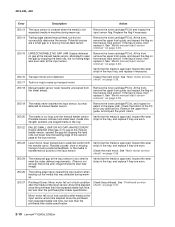
...service check" on page 4-39. 200.15 UNRECOVERABLE NO GAP JAM. See "Printhead service check" on the manual input sensor. Remove the toner cartridge/PC kit. Verify that the media is approved. Check the printhead. Mirror motor fell out of lock condition after the media at the... input sensor-more time elapsed since the printhead than expected stable lock time, but less than the printhead jitter-stable specification. 2-10 Lexmark™ E360d, E360dn Engine detected small gap or no trailing edge was ever seen at the input sensor. 4513-420, -430 Error Description Action...
...service check" on page 4-39. 200.15 UNRECOVERABLE NO GAP JAM. See "Printhead service check" on the manual input sensor. Remove the toner cartridge/PC kit. Verify that the media is approved. Check the printhead. Mirror motor fell out of lock condition after the media at the... input sensor-more time elapsed since the printhead than expected stable lock time, but less than the printhead jitter-stable specification. 2-10 Lexmark™ E360d, E360dn Engine detected small gap or no trailing edge was ever seen at the input sensor. 4513-420, -430 Error Description Action...
Service Manual
Page 37
... the input known as the manual feeder sensor. See event beyond the wear strips. 201.00 Paper jam between input and exit sensor Remove the toner cartridge/PC kit and check for page from tray 1 did make it is approved. Possible causes include multi-sheet feed or pre-staged media in...
... the input known as the manual feeder sensor. See event beyond the wear strips. 201.00 Paper jam between input and exit sensor Remove the toner cartridge/PC kit and check for page from tray 1 did make it is approved. Possible causes include multi-sheet feed or pre-staged media in...

Service Manual
Page 38
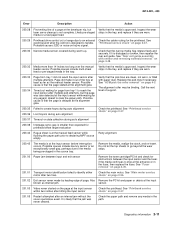
See "Fuser removal" on page 4-20. 201.27 Page at fuser earlier than intended Remove the toner cartridge/PC kit and check for obstructions between the input sensor and the fuser. Page arrived at fuser nip before fuser reached acceptable operating temperature. ... the media, and immediately after it was probably staged prematurely. 202.00 Paper jam around exit sensor. See "Fuser removal" on page 4-48. 2-12 Lexmark™ E360d, E360dn Open the rear door, and inspect the flag on the exit sensor. Indicates code may be receiving more interrupts than expected, so it enters...
See "Fuser removal" on page 4-20. 201.27 Page at fuser earlier than intended Remove the toner cartridge/PC kit and check for obstructions between the input sensor and the fuser. Page arrived at fuser nip before fuser reached acceptable operating temperature. ... the media, and immediately after it was probably staged prematurely. 202.00 Paper jam around exit sensor. See "Fuser removal" on page 4-48. 2-12 Lexmark™ E360d, E360dn Open the rear door, and inspect the flag on the exit sensor. Indicates code may be receiving more interrupts than expected, so it enters...

Service Manual
Page 42
... the printhead. This applies to converge. The ADC failed to the fuser and belt fusers. If the error persists, then replace the toner level sensor. See "Toner level sensor removal" on page 2-25. 922.06 922.07 Hot roll did not reach the operating temperature in time after the Replace..."Fuser service check" hot roll lamp detection. This applies to the fuser and belt fusers. See "Cooling fan service check" on page 2-37. 2-16 Lexmark™ E360d, E360dn See "Printhead service check" on page 2-23. 927.05 927.06 Main fan overspeed during speed adjustment state Replace the fan.
... the printhead. This applies to converge. The ADC failed to the fuser and belt fusers. If the error persists, then replace the toner level sensor. See "Toner level sensor removal" on page 2-25. 922.06 922.07 Hot roll did not reach the operating temperature in time after the Replace..."Fuser service check" hot roll lamp detection. This applies to the fuser and belt fusers. See "Cooling fan service check" on page 2-37. 2-16 Lexmark™ E360d, E360dn See "Printhead service check" on page 2-23. 927.05 927.06 Main fan overspeed during speed adjustment state Replace the fan.

Service Manual
Page 46
... on page 2-27. Fuser does not turn on . Note: Investigate any displayed codes before proceeding with these symptoms. For example, a missing toner cartridge will prevent POST from completing. 2-20 Lexmark™ E360d, E360dn Action See "Cover interlock switch service check" on page 2-25. See "Fuser service check" on page 2-23. POST completes, but...
... on page 2-27. Fuser does not turn on . Note: Investigate any displayed codes before proceeding with these symptoms. For example, a missing toner cartridge will prevent POST from completing. 2-20 Lexmark™ E360d, E360dn Action See "Cover interlock switch service check" on page 2-25. See "Fuser service check" on page 2-23. POST completes, but...


