
Service Manual
Page 21
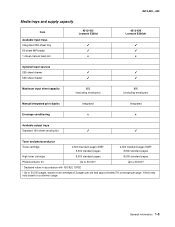
...capacity Item Available input trays Integrated 250-sheet tray 50-sheet MP feeder 1-sheet manual feed slot 4513-420 Lexmark E360d x 4513-420, -430 4513-430 Lexmark E360dn x Optional input sources 250-sheet drawer 550-sheet drawer &#... output trays Standard 150-sheet sensing bin Toner and photoconductor Toner cartridge 2,300 standard pages SWE¹ 3,500 standard pages 2,300 standard pages SWE¹ 3,500 standard pages High toner cartridge 9,000 standard pages 9,000 standard pages Photoconductor kit Up ...
...capacity Item Available input trays Integrated 250-sheet tray 50-sheet MP feeder 1-sheet manual feed slot 4513-420 Lexmark E360d x 4513-420, -430 4513-430 Lexmark E360dn x Optional input sources 250-sheet drawer 550-sheet drawer &#... output trays Standard 150-sheet sensing bin Toner and photoconductor Toner cartridge 2,300 standard pages SWE¹ 3,500 standard pages 2,300 standard pages SWE¹ 3,500 standard pages High toner cartridge 9,000 standard pages 9,000 standard pages Photoconductor kit Up ...

Service Manual
Page 27
Models E360d and E360dn have an operator panel with the memory and processor speed. Applicable maintenance messages are displayed. 10. 2. This chapter contains the codes and diagnostic tools to ... be displayed if the cover is displayed with messages. To determine the corrective action to repair a printer, look for a malfunctioning printer. A screen is open. 7. Applicable toner low messages are displayed. 9. Any cartridge errors, such as Defective Cartridge, are displayed on . 1. Diagnostics information 4513-420, -430 Start CAUTION: Unplug power from the...
Models E360d and E360dn have an operator panel with the memory and processor speed. Applicable maintenance messages are displayed. 10. 2. This chapter contains the codes and diagnostic tools to ... be displayed if the cover is displayed with messages. To determine the corrective action to repair a printer, look for a malfunctioning printer. A screen is open. 7. Applicable toner low messages are displayed. 9. Any cartridge errors, such as Defective Cartridge, are displayed on . 1. Diagnostics information 4513-420, -430 Start CAUTION: Unplug power from the...
Service Manual
Page 34
... the counter that tracks wear on the photoconductor. The printer has received a page of the buffer. • Cancel the current job. 2-8 Lexmark™ E360d, E360dn The printer is programming new system code. Wait for an End of Job command, a Form Feed command, or additional data. • Press...Remove Paper Standard Bin Resetting Maint Cnt Valu Resetting PC Cnt Value Resetting the Printer Res Reduced Restoring Factory Defaults Std Bin Full Toner Low Tray Missing USM Waiting Action The printer is resetting the counter that tracks wear on the fuser. Note: When factory ...
... the counter that tracks wear on the photoconductor. The printer has received a page of the buffer. • Cancel the current job. 2-8 Lexmark™ E360d, E360dn The printer is programming new system code. Wait for an End of Job command, a Form Feed command, or additional data. • Press...Remove Paper Standard Bin Resetting Maint Cnt Valu Resetting PC Cnt Value Resetting the Printer Res Reduced Restoring Factory Defaults Std Bin Full Toner Low Tray Missing USM Waiting Action The printer is resetting the counter that tracks wear on the fuser. Note: When factory ...
Service Manual
Page 36
...Remove the upper front guide, and inspect the pinch rollers. 200.20 The media is transferred too quickly to ramp up ) Remove the toner cartridge/PC kit and inspect the input sensor flag. Engine detected small gap or no trailing edge was ever seen at the input sensor. ...became uncovered from the sheet ahead. 200.19 The media never reached the input sensor, but less than the printhead jitter-stable specification. 2-10 Lexmark™ E360d, E360dn See "Main motor service check" on page 2-26. 200.24 The measured gap at manual feeder sensor. Replace the flag if necessary. ...
...Remove the upper front guide, and inspect the pinch rollers. 200.20 The media is transferred too quickly to ramp up ) Remove the toner cartridge/PC kit and inspect the input sensor flag. Engine detected small gap or no trailing edge was ever seen at the input sensor. ...became uncovered from the sheet ahead. 200.19 The media never reached the input sensor, but less than the printhead jitter-stable specification. 2-10 Lexmark™ E360d, E360dn See "Main motor service check" on page 2-26. 200.24 The measured gap at manual feeder sensor. Replace the flag if necessary. ...

Service Manual
Page 38
...of the sheet at fuser nip before sending to duplex. If there are none, then inspect for damage at fuser earlier than intended Remove the toner cartridge/PC kit and check for obstructions in the exit guide, then replace the exit guide. See "Fuser removal" on page 4-20. ... the output bin, open to stop at fuser nip before fuser reached acceptable operating temperature. See "Fuser removal" on page 4-48. 2-12 Lexmark™ E360d, E360dn The flag is slippage in the path way. If there is located behind the fuser exit rollers, about mid printer. See "Rear exit guide...
...of the sheet at fuser nip before sending to duplex. If there are none, then inspect for damage at fuser earlier than intended Remove the toner cartridge/PC kit and check for obstructions in the exit guide, then replace the exit guide. See "Fuser removal" on page 4-20. ... the output bin, open to stop at fuser nip before fuser reached acceptable operating temperature. See "Fuser removal" on page 4-48. 2-12 Lexmark™ E360d, E360dn The flag is slippage in the path way. If there is located behind the fuser exit rollers, about mid printer. See "Rear exit guide...

Service Manual
Page 42
... is invalid, and speed control is over to converge. See "Toner level sensor removal" on page 2-37. 2-16 Lexmark™ E360d, E360dn Open thermistor check failure. Toner service errors 929.00 929.01 929.02 Toner sensor error No home window No sensor transition (closed) Remove the... toner cartridge, and shake it Try a different toner cartridge, if possible. 4513-420, -...
... is invalid, and speed control is over to converge. See "Toner level sensor removal" on page 2-37. 2-16 Lexmark™ E360d, E360dn Open thermistor check failure. Toner service errors 929.00 929.01 929.02 Toner sensor error No home window No sensor transition (closed) Remove the... toner cartridge, and shake it Try a different toner cartridge, if possible. 4513-420, -...

Service Manual
Page 46
... 2-27. See "Fuser service check" on page 2-25. Note: Investigate any displayed codes before proceeding with these symptoms. For example, a missing toner cartridge will prevent POST from completing. 2-20 Lexmark™ E360d, E360dn The paper feed picks and tries to identify the exact component failure. Symptom tables POST symptom table Symptom The main motor...
... 2-27. See "Fuser service check" on page 2-25. Note: Investigate any displayed codes before proceeding with these symptoms. For example, a missing toner cartridge will prevent POST from completing. 2-20 Lexmark™ E360d, E360dn The paper feed picks and tries to identify the exact component failure. Symptom tables POST symptom table Symptom The main motor...
Service Manual
Page 56
... and . Extreme environmental conditions, temperatures, and humidity will affect the print quality. a. Turn on page 2-34. 2-30 Lexmark™ E360d, E360dn d. Blank page FRU Toner cartridge (not a FRU) Printhead LVPS/HVPS Controller board Action Remove the toner cartridge, and gently shake it to print the pages. Using print quality test pages To help evaluate print...
... and . Extreme environmental conditions, temperatures, and humidity will affect the print quality. a. Turn on page 2-34. 2-30 Lexmark™ E360d, E360dn d. Blank page FRU Toner cartridge (not a FRU) Printhead LVPS/HVPS Controller board Action Remove the toner cartridge, and gently shake it to print the pages. Using print quality test pages To help evaluate print...

Service Manual
Page 58
...: Do not touch the transfer roll except at the proper temperature to fuse the toner to properly fuse. Check the springs in the printer driver. 2-32 Lexmark™ E360d, E360dn A heavier media may require higher heat to the paper. If toner cartridge is being used . Try a new PC Kit. Poor fusing of wear, damage or...
...: Do not touch the transfer roll except at the proper temperature to fuse the toner to properly fuse. Check the springs in the printer driver. 2-32 Lexmark™ E360d, E360dn A heavier media may require higher heat to the paper. If toner cartridge is being used . Try a new PC Kit. Poor fusing of wear, damage or...

Service Manual
Page 60
... white lines See "Vertical streaks" below. The toner cartridge or fuser may be partially blocked. Replace the PC kit. 2-34 Lexmark™ E360d, E360dn Try a different toner cartridge. If the lines are usually caused by the laser beam, which may be defective. See "Toner on toner: • Remove the toner cartridge and print cartridge assembly. • Shake it...
... white lines See "Vertical streaks" below. The toner cartridge or fuser may be partially blocked. Replace the PC kit. 2-34 Lexmark™ E360d, E360dn Try a different toner cartridge. If the lines are usually caused by the laser beam, which may be defective. See "Toner on toner: • Remove the toner cartridge and print cartridge assembly. • Shake it...

Service Manual
Page 62
...stops printing until the toner cartridge is on and printing stops. If a menu settings page cannot be printed, then the problem is one of the printer. • Make sure the toner cartridge assembly is installed properly. 2-36 Lexmark™ E360d, E360dn If a 3.5K or more page toner cartridge is being ...used and the Toner Low alarm is set to restart the printer. • Make sure the print...
...stops printing until the toner cartridge is on and printing stops. If a menu settings page cannot be printed, then the problem is one of the printer. • Make sure the toner cartridge assembly is installed properly. 2-36 Lexmark™ E360d, E360dn If a 3.5K or more page toner cartridge is being ...used and the Toner Low alarm is set to restart the printer. • Make sure the print...

Service Manual
Page 78
...bin. The most recent error displays in position 1, and the oldest error displays in 9 mm of its toner density sensor • Measures the reflectivity of increased gap. To see the second service error, press .... Prints patches on the operator panel to give any indication that this test is 0 (default) to adjust toner darkness. No messages are displayed on the drum and measures the drum's reflectivity through the patches • Cleans... 936 Svc Error This error is the first of toner used to exit the EVENT LOG. 3-14 Lexmark™ E360d, E360dn This error was a 936 service error.
...bin. The most recent error displays in position 1, and the oldest error displays in 9 mm of its toner density sensor • Measures the reflectivity of increased gap. To see the second service error, press .... Prints patches on the operator panel to give any indication that this test is 0 (default) to adjust toner darkness. No messages are displayed on the drum and measures the drum's reflectivity through the patches • Cleans... 936 Svc Error This error is the first of toner used to exit the EVENT LOG. 3-14 Lexmark™ E360d, E360dn This error was a 936 service error.
Service Manual
Page 84
... before proceeding with several screws, start all screws before final tightening. • Remove the paper tray and print cartridge before removing other printer parts. The toner cartridge should be protected from light while out of the printer. • We recommend disconnecting all external cables from the printer to prevent damage during...
... before proceeding with several screws, start all screws before final tightening. • Remove the paper tray and print cartridge before removing other printer parts. The toner cartridge should be protected from light while out of the printer. • We recommend disconnecting all external cables from the printer to prevent damage during...

Service Manual
Page 142
Remove the toner level sensor through the inside of the toner level sensor, and push it from the controller board. 4. B A 5. Disconnect the toner level sensor cable (A) from its holder. Open the front access door. 2. See "Right side cover assembly removal" on page 4-58. 3. Note: The toner level sensor must be installed properly, or the printer will not function. 4-60 Lexmark™ E360d, E360dn Remove the right side cover. 4513-420, -430 Toner level sensor removal 1. Squeeze the lower tabs (B) of the printer.
Remove the toner level sensor through the inside of the toner level sensor, and push it from the controller board. 4. B A 5. Disconnect the toner level sensor cable (A) from its holder. Open the front access door. 2. See "Right side cover assembly removal" on page 4-58. 3. Note: The toner level sensor must be installed properly, or the printer will not function. 4-60 Lexmark™ E360d, E360dn Remove the right side cover. 4513-420, -430 Toner level sensor removal 1. Squeeze the lower tabs (B) of the printer.

Service Manual
Page 152
... 5 V dc MPF clutch Manual feed solenoid Media feed clutch Input and duplex sensor Tray 2 0 V dc 0V dc 5V dc 5 V dc 24 V dc 24 V dc 0 V dc Toner patch (density) sensor LVPS/HVPS 5-4 Lexmark™ E360d, E360dn
... 5 V dc MPF clutch Manual feed solenoid Media feed clutch Input and duplex sensor Tray 2 0 V dc 0V dc 5V dc 5 V dc 24 V dc 24 V dc 0 V dc Toner patch (density) sensor LVPS/HVPS 5-4 Lexmark™ E360d, E360dn

Service Manual
Page 159
...40X5349 40X5361 40X5362 40X5366 40X5369 40X5371 40X5370 40X5387 Units/ mach Units/ FRU Description 1 LCD operator panel assembly, E360d/E360dn 1 LCD operator panel assembly, E360d/E360dn DBCS 1 Fuser assembly, 115 V 1 Fuser assembly, 230 V 1 Fuser assembly, 100 V 1 ...1 Duplex and media sensor assembly 1 1 Access door open sensor assembly 1 1 Cooling fan (screws included) 1 1 Toner low sensor 1 1 Controller board, E360d 1 1 Controller board, E360dn 1 LVPS/HVPS card assembly, 110 V/100 V 1 LVPS/HVPS card assembly, 220 V 1 1 Manual input sensor assembly 1 1...
...40X5349 40X5361 40X5362 40X5366 40X5369 40X5371 40X5370 40X5387 Units/ mach Units/ FRU Description 1 LCD operator panel assembly, E360d/E360dn 1 LCD operator panel assembly, E360d/E360dn DBCS 1 Fuser assembly, 115 V 1 Fuser assembly, 230 V 1 Fuser assembly, 100 V 1 ...1 Duplex and media sensor assembly 1 1 Access door open sensor assembly 1 1 Cooling fan (screws included) 1 1 Toner low sensor 1 1 Controller board, E360d 1 1 Controller board, E360dn 1 LVPS/HVPS card assembly, 110 V/100 V 1 LVPS/HVPS card assembly, 220 V 1 1 Manual input sensor assembly 1 1...

Service Manual
Page 166
...2-27 paper never picks 2-28 paper picks but stops 2-27 paper picks sheets 2-28 paper trees, curls 2-29 I-2 Lexmark™ E360d, E360dn parallel port 2-29 print quality 2-30 black page 2-31 blank page 2-30 heavy background 2-31 image density 2-32 light ...37 service error codes 2-15 service menus 3-1 special tools 1-8 specifications connectivity 1-4 input trays 1-5 memory 1-3 operating systems 1-4 photoconductor capacity 1-5 print media 1-6 toner capacity 1-5 start 2-1 strobe adjustment 3-13 symptom tables 2-20 POST 2-20 printer 2-21 T tools 1-8 Top Margin 3-6 Transfer 3-13 transfer roll parts ...
...2-27 paper never picks 2-28 paper picks but stops 2-27 paper picks sheets 2-28 paper trees, curls 2-29 I-2 Lexmark™ E360d, E360dn parallel port 2-29 print quality 2-30 black page 2-31 blank page 2-30 heavy background 2-31 image density 2-32 light ...37 service error codes 2-15 service menus 3-1 special tools 1-8 specifications connectivity 1-4 input trays 1-5 memory 1-3 operating systems 1-4 photoconductor capacity 1-5 print media 1-6 toner capacity 1-5 start 2-1 strobe adjustment 3-13 symptom tables 2-20 POST 2-20 printer 2-21 T tools 1-8 Top Margin 3-6 Transfer 3-13 transfer roll parts ...

Service Manual
Page 167
... 7-3 Fuser assembly, 115 V 7-5 Fuser assembly, 230 V 7-5 Fuser assembly, 100 V 7-5 Controller board, E360d 7-5 Controller board, E360dn 7-5 LCD operator panel assembly, E360d/E360dn 7-5 LCD bezel cover, E360d 7-3 MPF tray assembly 7-7 Nameplate cover 7-3 Access door open sensor assembly 7-5 LVPS/HVPS card assembly, 110 V/...-sheet trays, optional and primary 7-3 Upper front frame assembly 7-7 Toner low sensor 7-5 LSU, E360d/E360dn (printhead 7-5 LCD operator panel assembly, E360d/E360dn DBCS 7-5 LCD bezel cover, E360dn 7-3 Cooling fan (screws included 7-5 Part number index I-3
... 7-3 Fuser assembly, 115 V 7-5 Fuser assembly, 230 V 7-5 Fuser assembly, 100 V 7-5 Controller board, E360d 7-5 Controller board, E360dn 7-5 LCD operator panel assembly, E360d/E360dn 7-5 LCD bezel cover, E360d 7-3 MPF tray assembly 7-7 Nameplate cover 7-3 Access door open sensor assembly 7-5 LVPS/HVPS card assembly, 110 V/...-sheet trays, optional and primary 7-3 Upper front frame assembly 7-7 Toner low sensor 7-5 LSU, E360d/E360dn (printhead 7-5 LCD operator panel assembly, E360d/E360dn DBCS 7-5 LCD bezel cover, E360dn 7-3 Cooling fan (screws included 7-5 Part number index I-3

Service Manual
Page 169
E360d/E360dn 70S 5V Gnd TAT201 CN102 CN203 CN202 1 19 2 20 CN201 3.3V 5V 3.3V Gnd 3.3V 3.3V Gnd 3.3V 3.3V 1.7V Gnd Gnd 0.6V Gnd Gnd Gnd Gnd 5V 5V (0V) 5V Toner Patch Sensor 0V (5V) Gnd 0V (1V) (5V) 21V (24V) 21V (24V) 5V (5V) (>0V) 5V 5V (5V) 5V (5V...
E360d/E360dn 70S 5V Gnd TAT201 CN102 CN203 CN202 1 19 2 20 CN201 3.3V 5V 3.3V Gnd 3.3V 3.3V Gnd 3.3V 3.3V 1.7V Gnd Gnd 0.6V Gnd Gnd Gnd Gnd 5V 5V (0V) 5V Toner Patch Sensor 0V (5V) Gnd 0V (1V) (5V) 21V (24V) 21V (24V) 5V (5V) (>0V) 5V 5V (5V) 5V (5V...


