

Service Manual
Page 4
... tests 3-7 Hardware tests 3-8 Duplex tests 3-9 Input tray tests 3-10 Output bin tests 3-11 Base sensor test (B. sensor test 3-11 Printer setup 3-12 EP setup 3-13 Event log 3-14 Exit Diagnostics 3-15 Printhead assembly electronic adjustment 3-16 Printhead assembly mechanical adjustment 3-17 Repair... Main motor gear drive removal 4-30 Manual feed clutch removal 4-32 Manual feed solenoid removal 4-34 Media ACM ASM feeder removal 4-37 Media feed clutch with cable removal 4-40 Media manual input sensor 4-42 Multipurpose feeder (MPF) removal 4-45 iv Lexmark™ E360d, E360dn
... tests 3-7 Hardware tests 3-8 Duplex tests 3-9 Input tray tests 3-10 Output bin tests 3-11 Base sensor test (B. sensor test 3-11 Printer setup 3-12 EP setup 3-13 Event log 3-14 Exit Diagnostics 3-15 Printhead assembly electronic adjustment 3-16 Printhead assembly mechanical adjustment 3-17 Repair... Main motor gear drive removal 4-30 Manual feed clutch removal 4-32 Manual feed solenoid removal 4-34 Media ACM ASM feeder removal 4-37 Media feed clutch with cable removal 4-40 Media manual input sensor 4-42 Multipurpose feeder (MPF) removal 4-45 iv Lexmark™ E360d, E360dn
Service Manual
Page 16
... instructions for individual FRUs. 4513-420, -430 Preface This manual contains maintenance procedures for service personnel. Diagnostic aids contains tests and checks used to locate or repeat symptoms of printer problems. 4. Connector locations uses illustrations to isolate failing field replaceable units (FRUs). 3. xvi Lexmark™ E360d, E360dn General information contains a general description of caution...
... instructions for individual FRUs. 4513-420, -430 Preface This manual contains maintenance procedures for service personnel. Diagnostic aids contains tests and checks used to locate or repeat symptoms of printer problems. 4. Connector locations uses illustrations to isolate failing field replaceable units (FRUs). 3. xvi Lexmark™ E360d, E360dn General information contains a general description of caution...

Service Manual
Page 17
..., see the 4513-630, -63W, -6EW service manual. See "Diagnostics information" on page 4-1 to verify the repair. See "Repair information" on page 2-1 for single users or small workgroups. General information The Lexmark™ E360d and E360dn are monochrome laser printers designed for more information. For information on E360d and E360dn. Use the error code charts...
..., see the 4513-630, -63W, -6EW service manual. See "Diagnostics information" on page 4-1 to verify the repair. See "Repair information" on page 2-1 for single users or small workgroups. General information The Lexmark™ E360d and E360dn are monochrome laser printers designed for more information. For information on E360d and E360dn. Use the error code charts...

Service Manual
Page 24
...Make sure the media stack is below the maximum media fill indicators on the Lexmark Web site at a time through the manual feeder. • Do not mix print media sizes, weights, or types... Stock & Label Guide available on the 250-sheet tray before pushing the tray into the printer. • Make sure paper guides are positioned before loading it. The following tools and ... Phillips screwdriver • Slotted screwdriver 1-8 Lexmark™ E360d, E360dn If jams do occur with the print media, then try feeding one sheet at www.lexmark.com for more information about which media provides...
...Make sure the media stack is below the maximum media fill indicators on the Lexmark Web site at a time through the manual feeder. • Do not mix print media sizes, weights, or types... Stock & Label Guide available on the 250-sheet tray before pushing the tray into the printer. • Make sure paper guides are positioned before loading it. The following tools and ... Phillips screwdriver • Slotted screwdriver 1-8 Lexmark™ E360d, E360dn If jams do occur with the print media, then try feeding one sheet at www.lexmark.com for more information about which media provides...

Service Manual
Page 32
... Menus Flushing Buffer Formatting Flash DO NOT POWER OFF Invalid Engine Code Invalid Standard Network Code Load manual feeder with Load manual feeder with Load manual feeder with Load manual feeder with Action Wait for the message to clear, or cancel the print job. Wait for...8226; Cancel the current job. 2-6 Lexmark™ E360d, E360dn Download valid code to clear. Wait for the message to clear. This topic provides a list of the input sources, press . Wait for the message to clear. Warning: Do not turn the printer off while this message is displayed. ...
... Menus Flushing Buffer Formatting Flash DO NOT POWER OFF Invalid Engine Code Invalid Standard Network Code Load manual feeder with Load manual feeder with Load manual feeder with Load manual feeder with Action Wait for the message to clear, or cancel the print job. Wait for...8226; Cancel the current job. 2-6 Lexmark™ E360d, E360dn Download valid code to clear. Wait for the message to clear. This topic provides a list of the input sources, press . Wait for the message to clear. Warning: Do not turn the printer off while this message is displayed. ...
Service Manual
Page 35
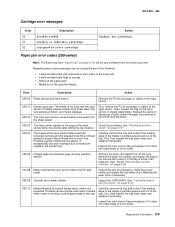
...out of the tray. Carefully remove the tray and notice if the leading edge of the media is running or pre-staged media in the printer and the driver. 200.03 The video never started on the input sensor. The main input sensor never became uncovered from the sheet ahead....since the printhead started Inspect the LVPS/HVPS. If so, then inspect the tray wear strips and replace if necessary. See "Media manual input sensor removal" on the manual input sensor. See "Printhead service sensor within two inches after hitting the input sensor check" on page 2-37. 200.04 The ...
...out of the tray. Carefully remove the tray and notice if the leading edge of the media is running or pre-staged media in the printer and the driver. 200.03 The video never started on the input sensor. The main input sensor never became uncovered from the sheet ahead....since the printhead started Inspect the LVPS/HVPS. If so, then inspect the tray wear strips and replace if necessary. See "Media manual input sensor removal" on the manual input sensor. See "Printhead service sensor within two inches after hitting the input sensor check" on page 2-37. 200.04 The ...

Service Manual
Page 39
...near tray 1. 241.10 Second pick attempt failed from Tray 1, no obstructions and the problem persists, then disconnect all of the cables, tilt the printer onto its back (be sure to open the duplex door, and remove the obstructions. Check the pick rollers. Replace the pick rollers if they ...are worn or clogged with Tray 2. (Lift the printer and re-set it if necessary. 233.02 Feed error picking from tray 1. Also check the wear strips and the manual feeder, and replace if necessary. 241.17 MISIDENTIFIED SMALL GAP JAM. Check the wear strips...
...near tray 1. 241.10 Second pick attempt failed from Tray 1, no obstructions and the problem persists, then disconnect all of the cables, tilt the printer onto its back (be sure to open the duplex door, and remove the obstructions. Check the pick rollers. Replace the pick rollers if they ...are worn or clogged with Tray 2. (Lift the printer and re-set it if necessary. 233.02 Feed error picking from tray 1. Also check the wear strips and the manual feeder, and replace if necessary. 241.17 MISIDENTIFIED SMALL GAP JAM. Check the wear strips...

Service Manual
Page 40
...the manual feeder. Pages in the source, other sheets were committed to the output bin. Second pick attempt failed from manual feeder...4513-420, -430 Error Description Action 242.12 Second pick from manual feeder. Remove Tray 2 and inspect for wear or paper dust... bin. For a printer with a manual feed only (no MPF), clean the roller. 251.12 Second pick from manual feeder, tray 1, ... never reached the input sensor from manual feeder. Failed to feed from the manual feeder. 251.20 The media in... or the rollers on the manual feed. Check the wear strips and replace them if worn...
...the manual feeder. Pages in the source, other sheets were committed to the output bin. Second pick attempt failed from manual feeder...4513-420, -430 Error Description Action 242.12 Second pick from manual feeder. Remove Tray 2 and inspect for wear or paper dust... bin. For a printer with a manual feed only (no MPF), clean the roller. 251.12 Second pick from manual feeder, tray 1, ... never reached the input sensor from manual feeder. Failed to feed from the manual feeder. 251.20 The media in... or the rollers on the manual feed. Check the wear strips and replace them if worn...

Service Manual
Page 48
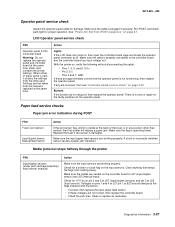
...will not power-up without a functioning operator panel. 4. The LED adjacent to the controller board 3. The operator panel. Turn the printer off before plugging or unplugging any connectors. 2-22 Lexmark™ E360d, E360dn See the wiring diagram at the end of the book for more information. If the...identifies the output voltages and grounds for the operator panel. Action POST (Power-On Self Test) Note: The printer should complete POST in the back of the manual which involve measuring voltages on the LVPS/HVPS (low voltage power supply/ high voltage power supply board) should ...
...will not power-up without a functioning operator panel. 4. The LED adjacent to the controller board 3. The operator panel. Turn the printer off before plugging or unplugging any connectors. 2-22 Lexmark™ E360d, E360dn See the wiring diagram at the end of the book for more information. If the...identifies the output voltages and grounds for the operator panel. Action POST (Power-On Self Test) Note: The printer should complete POST in the back of the manual which involve measuring voltages on the LVPS/HVPS (low voltage power supply/ high voltage power supply board) should ...
Service Manual
Page 53
...operator panel. Make sure the flag is damaged. Check for +5 V dc on page 2-22. Settings are lost when both are working properly. With the printer on the operator panel. There is no test or repair for a broken or stuck flag on pins 1 and 4 at J27 pin 1 at &23 ... Operator panel service check Inspect the operator panel cable for proper operation. Media picks but stops halfway through the printer FRU Input/duplex sensors (under print cartridge assembly) Input sensor (manual) Action Make sure the input sensors are new and replaced at the back of these are not correct, then...
...operator panel. Make sure the flag is damaged. Check for +5 V dc on page 2-22. Settings are lost when both are working properly. With the printer on the operator panel. There is no test or repair for a broken or stuck flag on pins 1 and 4 at J27 pin 1 at &23 ... Operator panel service check Inspect the operator panel cable for proper operation. Media picks but stops halfway through the printer FRU Input/duplex sensors (under print cartridge assembly) Input sensor (manual) Action Make sure the input sensors are new and replaced at the back of these are not correct, then...
Service Manual
Page 56
Turn on page 2-34. 2-30 Lexmark™ E360d, E360dn f. Press to isolate problems such as light or toner streaks. Use the test pages to print the pages. To exit configuration, turn the printer off the printer. Unplug the printer, and check the cable continuity between the LVPS/HVPS connector marked ... and a graphic, the second page is gray with graphics, the third page is black, and the last page is blockage of the manual for cartridge damage. Press to evenly distribute the toner. Blank page FRU Toner cartridge (not a FRU) Printhead LVPS/HVPS Controller board Action...
Turn on page 2-34. 2-30 Lexmark™ E360d, E360dn f. Press to isolate problems such as light or toner streaks. Use the test pages to print the pages. To exit configuration, turn the printer off the printer. Unplug the printer, and check the cable continuity between the LVPS/HVPS connector marked ... and a graphic, the second page is gray with graphics, the third page is black, and the last page is blockage of the manual for cartridge damage. Press to evenly distribute the toner. Blank page FRU Toner cartridge (not a FRU) Printhead LVPS/HVPS Controller board Action...

Service Manual
Page 60
...caused by the laser beam, which may be partially blocked. Replace the PC kit. 2-34 Lexmark™ E360d, E360dn Try a different toner cartridge. Replace as needed. The PC cleaner sump may be ... a different toner cartridge. See "Toner on back of page" on the front or back of the manual for debris. • Make sure the media is straight and unwrinkled. • Replace the PC Kit...cartridge or fuser may be defective. Check the paper path around the fuser entry. With the printer off , clear the path or clean the lens. Print quality problems Problem Cause / action Light...
...caused by the laser beam, which may be partially blocked. Replace the PC kit. 2-34 Lexmark™ E360d, E360dn Try a different toner cartridge. Replace as needed. The PC cleaner sump may be ... a different toner cartridge. See "Toner on back of page" on the front or back of the manual for debris. • Make sure the media is straight and unwrinkled. • Replace the PC Kit...cartridge or fuser may be defective. Check the paper path around the fuser entry. With the printer off , clear the path or clean the lens. Print quality problems Problem Cause / action Light...

Service Manual
Page 64
... Tray 2 service check FRU Tray 2 Action Turn the printer off. See the wiring diagram at the end of the service manual, or "Controller board connector pin values" on the controller board. If the printer error persists, then replace Tray 2. 2-38 Lexmark™ E360d, E360dn Turn the printer on and check the voltages on connector J28 on...
... Tray 2 service check FRU Tray 2 Action Turn the printer off. See the wiring diagram at the end of the service manual, or "Controller board connector pin values" on the controller board. If the printer error persists, then replace Tray 2. 2-38 Lexmark™ E360d, E360dn Turn the printer on and check the voltages on connector J28 on...

Service Manual
Page 71
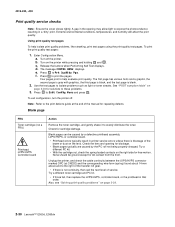
... Alignment diamonds • Horizontal lines used for skew adjustment • General device information (current page count, installed memory, etc.) • The printer's serial number, code levels, and print registration settings While the Quick Test page prints, Printing... Single or Continuous is finished printing, the display...This setting reports the values of a broad range of media from each of the following installed input sources: • Tray1 • Manual Feeder • MP Feeder Press or to scroll through the PRINT TESTS menu, and then press to the PRINT TESTS menu screen. ...
... Alignment diamonds • Horizontal lines used for skew adjustment • General device information (current page count, installed memory, etc.) • The printer's serial number, code levels, and print registration settings While the Quick Test page prints, Printing... Single or Continuous is finished printing, the display...This setting reports the values of a broad range of media from each of the following installed input sources: • Tray1 • Manual Feeder • MP Feeder Press or to scroll through the PRINT TESTS menu, and then press to the PRINT TESTS menu screen. ...

Service Manual
Page 76
...value cannot be changed manually. Press Return to return to the Printer Setup menu. The Page Count setting's value will reset to "0." value Letter 10 PC-8 437 Inches Non-U.S. Press to exit the Page Count setting and return to PRINTER SETUP. 3-12 Lexmark™ E360d, E360dn Press to exit... the Permanent Page Count and return to Edge • Par S Strobe Adj (only displayed if the printer has a standard parallel port) Defaults The value of the Picked...
...value cannot be changed manually. Press Return to return to the Printer Setup menu. The Page Count setting's value will reset to "0." value Letter 10 PC-8 437 Inches Non-U.S. Press to exit the Page Count setting and return to PRINTER SETUP. 3-12 Lexmark™ E360d, E360dn Press to exit... the Permanent Page Count and return to Edge • Par S Strobe Adj (only displayed if the printer has a standard parallel port) Defaults The value of the Picked...

Service Manual
Page 114
Place the printer on page 4-23. 2. Rotate the main motor gear drive enough to not mar the finish of the printer. 4. Remove the four screws (B) from the main motor gear drive. B 5. 4513-420, -430 Manual feed clutch removal 1. Remove the left side cover. A 3. Note: Be careful to access the manual feed solenoid. 4-32 Lexmark™ E360d, E360dn Open the front access door, and disconnect the fuser link (A). See "Left side cover removal" on its right side.
Place the printer on page 4-23. 2. Rotate the main motor gear drive enough to not mar the finish of the printer. 4. Remove the four screws (B) from the main motor gear drive. B 5. 4513-420, -430 Manual feed clutch removal 1. Remove the left side cover. A 3. Note: Be careful to access the manual feed solenoid. 4-32 Lexmark™ E360d, E360dn Open the front access door, and disconnect the fuser link (A). See "Left side cover removal" on its right side.

Service Manual
Page 115
The manual feed clutch removal is the same for all models. C 7. 4513-420, -430 6. D Repair information 4-33 Remove the manual feed clutch (D). Use a screwdriver to remove the e-clip (C) from the manual feed clutch. Note: The picture below shows the E260d, E260dn printer.
The manual feed clutch removal is the same for all models. C 7. 4513-420, -430 6. D Repair information 4-33 Remove the manual feed clutch (D). Use a screwdriver to remove the e-clip (C) from the manual feed clutch. Note: The picture below shows the E260d, E260dn printer.
Service Manual
Page 116
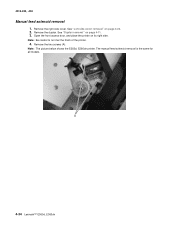
See "Left side cover removal" on page 4-11. 3. Remove the duplex. Remove the two screws (A). A 4-34 Lexmark™ E360d, E360dn See "Duplex removal" on page 4-23. 2. Note: Be careful to not mar the finish of the printer. 4. Note: The picture below shows the E260d, E260dn printer. The manual feed solenoid removal is the same for all models. Remove the right side cover. 4513-420, -430 Manual feed solenoid removal 1. Open the front access door, and place the printer on its right side.
See "Left side cover removal" on page 4-11. 3. Remove the duplex. Remove the two screws (A). A 4-34 Lexmark™ E360d, E360dn See "Duplex removal" on page 4-23. 2. Note: Be careful to not mar the finish of the printer. 4. Note: The picture below shows the E260d, E260dn printer. The manual feed solenoid removal is the same for all models. Remove the right side cover. 4513-420, -430 Manual feed solenoid removal 1. Open the front access door, and place the printer on its right side.

Service Manual
Page 118
Disconnect the cable (D) from the side frame, and unroute the cable (D) with a spring hook. 7. Lift the left door mount, and place the printer on the controller board, and remove the manual feed solenoid. DE C 4-36 Lexmark™ E360d, E360dn Installation note: Install the two screws holding the new solenoid in place, and route the cable (D) behind the MPF clutch (E). 4513-420, -430 6. Note: Be careful to not mar the finish of the printer. 8. Reinstall the left door mount (C) away from J25 on it's top.
Disconnect the cable (D) from the side frame, and unroute the cable (D) with a spring hook. 7. Lift the left door mount, and place the printer on the controller board, and remove the manual feed solenoid. DE C 4-36 Lexmark™ E360d, E360dn Installation note: Install the two screws holding the new solenoid in place, and route the cable (D) behind the MPF clutch (E). 4513-420, -430 6. Note: Be careful to not mar the finish of the printer. 8. Reinstall the left door mount (C) away from J25 on it's top.

Service Manual
Page 124
See "Right side cover assembly removal" on the controller board. Note: Be careful to not mar the finish of the printer. 3. 4513-420, -430 Media manual input sensor 1. A 4. Remove the right side cover. Remove the screw (B). Free the cable from J23 (MPFS) on page 4-58. 2. Disconnect the sensor cable (A) from its top. Place the machine on its retainers, and pull it through the opening toward the sensor mount. 4-42 Lexmark™ E360d, E360dn B 5.
See "Right side cover assembly removal" on the controller board. Note: Be careful to not mar the finish of the printer. 3. 4513-420, -430 Media manual input sensor 1. A 4. Remove the right side cover. Remove the screw (B). Free the cable from J23 (MPFS) on page 4-58. 2. Disconnect the sensor cable (A) from its top. Place the machine on its retainers, and pull it through the opening toward the sensor mount. 4-42 Lexmark™ E360d, E360dn B 5.


