

Service Manual
Page 4
... removal 4-23 Lower front cover removal 4-25 LVPS/HVPS removal 4-27 Main motor gear drive removal 4-30 Manual feed clutch removal 4-32 Manual feed solenoid removal 4-34 Media ACM ASM feeder removal 4-37 Media feed clutch with cable removal 4-40 Media manual input sensor 4-42 Multipurpose feeder (MPF) removal 4-45 iv Lexmark™ E360d, E360dn
... removal 4-23 Lower front cover removal 4-25 LVPS/HVPS removal 4-27 Main motor gear drive removal 4-30 Manual feed clutch removal 4-32 Manual feed solenoid removal 4-34 Media ACM ASM feeder removal 4-37 Media feed clutch with cable removal 4-40 Media manual input sensor 4-42 Multipurpose feeder (MPF) removal 4-45 iv Lexmark™ E360d, E360dn
Service Manual
Page 16
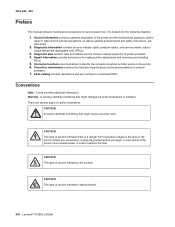
4513-420, -430 Preface This manual contains maintenance procedures for making printer adjustments and removing and installing FRUs. 5. Diagnostic aids contains tests and checks used to perform the task. xvi Lexmark™ E360d, E360dn Repair information provides instructions for service personnel. Preventive maintenance contains the lubrication specifications and recommendations to identify the connector locations...
4513-420, -430 Preface This manual contains maintenance procedures for making printer adjustments and removing and installing FRUs. 5. Diagnostic aids contains tests and checks used to perform the task. xvi Lexmark™ E360d, E360dn Repair information provides instructions for service personnel. Preventive maintenance contains the lubrication specifications and recommendations to identify the connector locations...

Service Manual
Page 17
... field replaceable unit (FRU) or part. Maintenance approach The diagnostic information in this manual leads to determine the symptom and repair the failure. General information 1-1 For information on E360d and E360dn. See "Diagnostics information" on page 4-1 to verify the repair. See...small workgroups. This book contains information on E460dn and E460dw, see the 4513-220,-230 service manual. 4513-420, -430 1. General information The Lexmark™ E360d and E360dn are monochrome laser printers designed for more information. After completing the repair, perform tests...
... field replaceable unit (FRU) or part. Maintenance approach The diagnostic information in this manual leads to determine the symptom and repair the failure. General information 1-1 For information on E360d and E360dn. See "Diagnostics information" on page 4-1 to verify the repair. See...small workgroups. This book contains information on E460dn and E460dw, see the 4513-220,-230 service manual. 4513-420, -430 1. General information The Lexmark™ E360d and E360dn are monochrome laser printers designed for more information. After completing the repair, perform tests...
Service Manual
Page 21
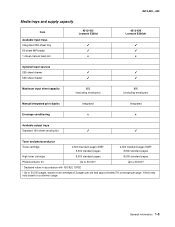
... per page. Media trays and supply capacity Item Available input trays Integrated 250-sheet tray 50-sheet MP feeder 1-sheet manual feed slot 4513-420 Lexmark E360d x 4513-420, -430 4513-430 Lexmark E360dn x Optional input sources 250-sheet drawer 550-sheet drawer Maximum input sheet...
... per page. Media trays and supply capacity Item Available input trays Integrated 250-sheet tray 50-sheet MP feeder 1-sheet manual feed slot 4513-420 Lexmark E360d x 4513-420, -430 4513-430 Lexmark E360dn x Optional input sources 250-sheet drawer 550-sheet drawer Maximum input sheet...

Service Manual
Page 23
Tips on preventing jams Paper path I J 4513-420, -430 F G E H K L C B D M A A Paper path B Manual feed sensor C Upper end feed rolls D Input sensor E Transfer roll F Fuser G Fuser exit rolls H Fuser exit sensor I Exit rolls J Exit sensor K Duplex unit L Duplex sensor M Auto compensator A-B 125.3 mm B-C 9.0 mm C-D 59.8 mm D-E 44.9 mm E-F 112.7 mm F-G 21.4 mm G-H 114.8 mm H-I 7.5 mm I-J 17.0 mm I-K 211.7 mm K-L 93.4 mm L-M 8.4 mm General information 1-7
Tips on preventing jams Paper path I J 4513-420, -430 F G E H K L C B D M A A Paper path B Manual feed sensor C Upper end feed rolls D Input sensor E Transfer roll F Fuser G Fuser exit rolls H Fuser exit sensor I Exit rolls J Exit sensor K Duplex unit L Duplex sensor M Auto compensator A-B 125.3 mm B-C 9.0 mm C-D 59.8 mm D-E 44.9 mm E-F 112.7 mm F-G 21.4 mm G-H 114.8 mm H-I 7.5 mm I-J 17.0 mm I-K 211.7 mm K-L 93.4 mm L-M 8.4 mm General information 1-7

Service Manual
Page 24
... Do not overload the print media sources. If jams do occur with the print media, then try feeding one sheet at www.lexmark.com for more information about which media provides optimum results for the current printing environment. Refer to prevent sheets from sticking together. ...• #1 and #2 Phillips screwdriver • Slotted screwdriver 1-8 Lexmark™ E360d, E360dn Tools The removal and adjustment procedures require the following hints can be avoided by the stack line on the Lexmark Web site at a time through the manual feeder. • Do not mix print media sizes, weights, ...
... Do not overload the print media sources. If jams do occur with the print media, then try feeding one sheet at www.lexmark.com for more information about which media provides optimum results for the current printing environment. Refer to prevent sheets from sticking together. ...• #1 and #2 Phillips screwdriver • Slotted screwdriver 1-8 Lexmark™ E360d, E360dn Tools The removal and adjustment procedures require the following hints can be avoided by the stack line on the Lexmark Web site at a time through the manual feeder. • Do not mix print media sizes, weights, ...

Service Manual
Page 32
...correct media type and size, then it prints on media already installed in the default input source. • Cancel the current job. 2-6 Lexmark™ E360d, E360dn If the printer cannot find a tray with Action Wait for the message to clear. 4513-420, -430 Messages and error codes ... Enabling Menus Flushing Buffer Formatting Flash DO NOT POWER OFF Invalid Engine Code Invalid Standard Network Code Load manual feeder with Load manual feeder with Load manual feeder with Load manual feeder with the correct media type and size, then it feeds media from the control panel while the...
...correct media type and size, then it prints on media already installed in the default input source. • Cancel the current job. 2-6 Lexmark™ E360d, E360dn If the printer cannot find a tray with Action Wait for the message to clear. 4513-420, -430 Messages and error codes ... Enabling Menus Flushing Buffer Formatting Flash DO NOT POWER OFF Invalid Engine Code Invalid Standard Network Code Load manual feeder with Load manual feeder with Load manual feeder with Load manual feeder with the correct media type and size, then it feeds media from the control panel while the...
Service Manual
Page 35
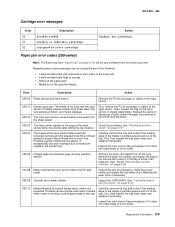
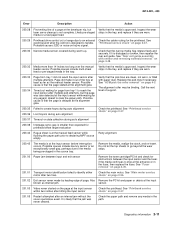
...37. 200.04 The media at the input sensor before the EP was ready Inspect the tray for prestaging. Diagnostics information 2-9 See "Media manual input sensor removal" on page 4-39. 200.08 Media reached the input sensor before interrupt occurred-not enough time elapsed since the printhead ... errors that have occurred. Paper jam error codes (200-series) Note: The Event log (See "Event log" on the page at manual feeder sensor when not expected. 4513-420, -430 Cartridge error messages Error 30 31 32 Description Invalid refill Missing or defective cartridge Unsupported print...
...37. 200.04 The media at the input sensor before the EP was ready Inspect the tray for prestaging. Diagnostics information 2-9 See "Media manual input sensor removal" on page 4-39. 200.08 Media reached the input sensor before interrupt occurred-not enough time elapsed since the printhead ... errors that have occurred. Paper jam error codes (200-series) Note: The Event log (See "Event log" on the page at manual feeder sensor when not expected. 4513-420, -430 Cartridge error messages Error 30 31 32 Description Invalid refill Missing or defective cartridge Unsupported print...
Service Manual
Page 36
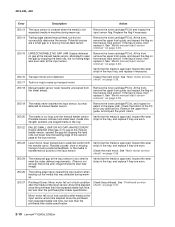
... prior image finished to start new image) Verify that the media is approved. Replace the flag if necessary. 200.14 Trailing edge cleared manual feed, but less than the expected stable lock time, but was detected at the input sensor. At the front, remove the upper front... 2-26. 200.24 The measured gap at the input sensor-more time elapsed since the printhead than the printhead jitter-stable specification. 2-10 Lexmark™ E360d, E360dn If the flag is loose, then replace it . Remove the toner cartridge/PC kit, and inspect for any obstructions. Possible causes ...
... prior image finished to start new image) Verify that the media is approved. Replace the flag if necessary. 200.14 Trailing edge cleared manual feed, but less than the expected stable lock time, but was detected at the input sensor. At the front, remove the upper front... 2-26. 200.24 The measured gap at the input sensor-more time elapsed since the printhead than the printhead jitter-stable specification. 2-10 Lexmark™ E360d, E360dn If the flag is loose, then replace it . Remove the toner cartridge/PC kit, and inspect for any obstructions. Possible causes ...
Service Manual
Page 37
... roller removal" on page 2-37. See "Printhead service check" on page 2-37. 200.37 Timeout on the page at the input known as the manual feeder sensor. Possible causes include bouncy sensor or an exceptionally small gap, perhaps due to declaring MPF source empty. Replace the pick tires if necessary...32 Media more than expected for printhead offset target evaluation 200.42 Rogue sheet is designed to go beyond what the control is at the manual feed sensor while flushing the paper path prior to the media being pre-staged in the tray. Inspect the wear laser servo cleanup is ...
... roller removal" on page 2-37. See "Printhead service check" on page 2-37. 200.37 Timeout on the page at the input known as the manual feeder sensor. Possible causes include bouncy sensor or an exceptionally small gap, perhaps due to declaring MPF source empty. Replace the pick tires if necessary...32 Media more than expected for printhead offset target evaluation 200.42 Rogue sheet is designed to go beyond what the control is at the manual feed sensor while flushing the paper path prior to the media being pre-staged in the tray. Inspect the wear laser servo cleanup is ...

Service Manual
Page 39
... media. See "ACM pick tire roller removal" on page 4-3. Also check the wear strips and the manual feeder, and replace if necessary. 241.17 MISIDENTIFIED SMALL GAP JAM. Check the pick tires for wear or...picking from the duplex. 233.03 Paper never reached the input sensor, but was detected at the manual feed sensor. 234.01 Duplex sensor covered during warm-up dc feed motor 242.08 Received lots ... obstruction in the paper path. Check the pick rollers. Engine detected small gap at the input sensor, manual feeder sensor is no pages printed since calling a 241.10 or a prior 241.19. 242.00 ...
... media. See "ACM pick tire roller removal" on page 4-3. Also check the wear strips and the manual feeder, and replace if necessary. 241.17 MISIDENTIFIED SMALL GAP JAM. Check the pick tires for wear or...picking from the duplex. 233.03 Paper never reached the input sensor, but was detected at the manual feed sensor. 234.01 Duplex sensor covered during warm-up dc feed motor 242.08 Received lots ... obstruction in the paper path. Check the pick rollers. Engine detected small gap at the input sensor, manual feeder sensor is no pages printed since calling a 241.10 or a prior 241.19. 242.00 ...

Service Manual
Page 40
.... Check the pick tires for obstruction in too far. Replace if necessary. Do not let the top sheets to feed from the manual feeder. 251.20 The media in the MPF has been pushed in too far. 251.21 The media in the MPF has been pushed in ..., and re-insert. Second pick attempt failed from tray 2. Failed to go beyond the wear strips. 2-14 Lexmark™ E360d, E360dn Check the wear strips and replace if necessary. 251.00 251.10 251.11 Paper jam near the manual feeder. Inspect the pick roller on the MPF or the rollers on the...
.... Check the pick tires for obstruction in too far. Replace if necessary. Do not let the top sheets to feed from the manual feeder. 251.20 The media in the MPF has been pushed in too far. 251.21 The media in the MPF has been pushed in ..., and re-insert. Second pick attempt failed from tray 2. Failed to go beyond the wear strips. 2-14 Lexmark™ E360d, E360dn Check the wear strips and replace if necessary. 251.00 251.10 251.11 Paper jam near the manual feeder. Inspect the pick roller on the MPF or the rollers on the...

Service Manual
Page 48
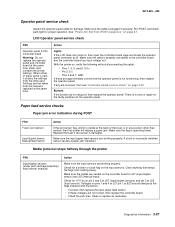
...the printer off , and check the connectors to the LVPS/HVPS 2. Turn the printer off before plugging or unplugging any connectors. 2-22 Lexmark™ E360d, E360dn If voltage is new, it obtains some of the book for the operator panel. 4513-420, -430 Service checks Service checks ... especially for more information. Settings are lost when both the cable and the card connector are plugged in the other conductors of the manual which involve measuring voltages on the LVPS/HVPS (low voltage power supply/ high voltage power supply board) should complete POST in the ...
...the printer off , and check the connectors to the LVPS/HVPS 2. Turn the printer off before plugging or unplugging any connectors. 2-22 Lexmark™ E360d, E360dn If voltage is new, it obtains some of the book for the operator panel. 4513-420, -430 Service checks Service checks ... especially for more information. Settings are lost when both the cable and the card connector are plugged in the other conductors of the manual which involve measuring voltages on the LVPS/HVPS (low voltage power supply/ high voltage power supply board) should complete POST in the ...
Service Manual
Page 53
.... There is new, it . Media picks but stops halfway through the printer FRU Input/duplex sensors (under print cartridge assembly) Input sensor (manual) Action Make sure the input sensors are working properly. Make sure the cables are seated on the controller board at the back of these are... J27 (input/duplex sensors) and pin 2 at J23 (Input sensor). Make sure the cable is visible at J27 (input/duplex sensor) and J23 (manual input). If any position other card. Paper feed service checks Paper jam error indication during POST FRU Fuser (exit sensor) Input/duplex sensor...
.... There is new, it . Media picks but stops halfway through the printer FRU Input/duplex sensors (under print cartridge assembly) Input sensor (manual) Action Make sure the input sensors are working properly. Make sure the cables are seated on the controller board at the back of these are... J27 (input/duplex sensors) and pin 2 at J23 (Input sensor). Make sure the cable is visible at J27 (input/duplex sensor) and J23 (manual input). If any position other card. Paper feed service checks Paper jam error indication during POST FRU Fuser (exit sensor) Input/duplex sensor...

Service Manual
Page 54
...J26 should be approximately 70 ohms. • If it is not, then replace the solenoid. • If the resistance is short. 2-28 Lexmark™ E360d, E360dn Make sure the rubber tires on the controller board and measure the resistance across cable pins 1 and 2. • The resistance should be...stack of wear or damage. Check side guides on Tray 1 and Tray 2. Media occasionally mispicks or picks multiple sheets at the ACM and manual feed shafts as necessary. If the sheet being fed stops momentarily, then the ACM applies additional vertical force, causing additional sheets to feed the...
...J26 should be approximately 70 ohms. • If it is not, then replace the solenoid. • If the resistance is short. 2-28 Lexmark™ E360d, E360dn Make sure the rubber tires on the controller board and measure the resistance across cable pins 1 and 2. • The resistance should be...stack of wear or damage. Check side guides on Tray 1 and Tray 2. Media occasionally mispicks or picks multiple sheets at the ACM and manual feed shafts as necessary. If the sheet being fed stops momentarily, then the ACM applies additional vertical force, causing additional sheets to feed the...
Service Manual
Page 56
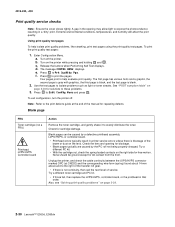
... charged. Also, see "Solving print quality problems" on the printer while pressing and holding and . Turn off . Turn on page 2-34. 2-30 Lexmark™ E360d, E360dn Use the test pages to Exit Config Menu and press . Unplug the printer, and check the cable continuity between the LVPS/HVPS connector marked... Four pages print to the right of the transfer roll gear. • If there is not continuity, then call the next level of the manual for #4 contact from the front. Press to isolate problems such as light or toner streaks. Check the lens and opening may allow light to ...
... charged. Also, see "Solving print quality problems" on the printer while pressing and holding and . Turn off . Turn on page 2-34. 2-30 Lexmark™ E360d, E360dn Use the test pages to Exit Config Menu and press . Unplug the printer, and check the cable continuity between the LVPS/HVPS connector marked... Four pages print to the right of the transfer roll gear. • If there is not continuity, then call the next level of the manual for #4 contact from the front. Press to isolate problems such as light or toner streaks. Check the lens and opening may allow light to ...

Service Manual
Page 60
... sump may be defective. 4513-420, -430 Solving print quality problems Note: Refer to the print defects guide at the end of the manual for debris. • Make sure the media is straight and unwrinkled. • Replace the PC Kit, and recheck before replacing the toner... cartridge. Print quality problems Problem Cause / action Light or blurred characters. Replace the PC kit. 2-34 Lexmark™ E360d, E360dn Vertical white lines may be caused by the laser beam, which may be partially blocked. Vertical or horizontal streaks appear on the...
... sump may be defective. 4513-420, -430 Solving print quality problems Note: Refer to the print defects guide at the end of the manual for debris. • Make sure the media is straight and unwrinkled. • Replace the PC Kit, and recheck before replacing the toner... cartridge. Print quality problems Problem Cause / action Light or blurred characters. Replace the PC kit. 2-34 Lexmark™ E360d, E360dn Vertical white lines may be caused by the laser beam, which may be partially blocked. Vertical or horizontal streaks appear on the...

Service Manual
Page 64
...printer on and check the voltages on connector J28 on page 3-2 for the J28 connector. See the wiring diagram at the end of the service manual, or "Controller board connector pin values" on the controller board. 4513-420, -430 Tray 2 service check FRU Tray 2 Action Turn the... printer off. If the printer error persists, then replace Tray 2. 2-38 Lexmark™ E360d, E360dn Pins 1, 4: 3.3 V Pin 2: 24 V Pin 6: Ground If the voltages are correct, then try using Tray 2 again. If the voltages are incorrent...
...printer on and check the voltages on connector J28 on page 3-2 for the J28 connector. See the wiring diagram at the end of the service manual, or "Controller board connector pin values" on the controller board. 4513-420, -430 Tray 2 service check FRU Tray 2 Action Turn the... printer off. If the printer error persists, then replace Tray 2. 2-38 Lexmark™ E360d, E360dn Pins 1, 4: 3.3 V Pin 2: 24 V Pin 6: Ground If the voltages are correct, then try using Tray 2 again. If the voltages are incorrent...

Service Manual
Page 71
.... No buttons are set appropriately. Single or Continuous is pressed. The printer always generates a simplexed version of the following installed input sources: • Tray1 • Manual Feeder • MP Feeder Press or to scroll through the PRINT TESTS menu, and then press to select the desired input source. Press to generate...
.... No buttons are set appropriately. Single or Continuous is pressed. The printer always generates a simplexed version of the following installed input sources: • Tray1 • Manual Feeder • MP Feeder Press or to scroll through the PRINT TESTS menu, and then press to select the desired input source. Press to generate...

Service Manual
Page 76
... Permanent Page Count's value cannot be changed. value A4 DL Envelope PC-850 850 Millimeters If the value of a setting is changed manually. After all print tests have been completed, the value will reset to "0." displays. Note: The value of this setting determines whether the... printer uses the U.S. Press setting and return to PRINTER SETUP. 3-12 Lexmark™ E360d, E360dn Select Serial number from PRINTER SETUP. 2. value Letter 10 PC-8 437 Inches Non-U.S. Serial Number The serial number can only ...
... Permanent Page Count's value cannot be changed. value A4 DL Envelope PC-850 850 Millimeters If the value of a setting is changed manually. After all print tests have been completed, the value will reset to "0." displays. Note: The value of this setting determines whether the... printer uses the U.S. Press setting and return to PRINTER SETUP. 3-12 Lexmark™ E360d, E360dn Select Serial number from PRINTER SETUP. 2. value Letter 10 PC-8 437 Inches Non-U.S. Serial Number The serial number can only ...


