
Clearing Jams Guide
Page 2
...231 233 234 235 242 251 To access the jam Try one or more of the printer, and remove any jammed sheets. 3 If you see it here. Open the front door, and then remove the photoconductor kit. Open the multipurpose feeder door. 200 paper jam 1 Remove the tray from the standard exit bin.... Remove Tray 1, and then depress the lever. Jam message numbers and how to the jam, open the front door, and then open the front door, and then remove the...
...231 233 234 235 242 251 To access the jam Try one or more of the printer, and remove any jammed sheets. 3 If you see it here. Open the front door, and then remove the photoconductor kit. Open the multipurpose feeder door. 200 paper jam 1 Remove the tray from the standard exit bin.... Remove Tray 1, and then depress the lever. Jam message numbers and how to the jam, open the front door, and then open the front door, and then remove the...
Clearing Jams Guide
Page 3
201 paper jam CAUTION-HOT SURFACE: The fuser and the inside of the printer near the fuser may be hot. To reduce the risk of injury from a hot component, allow the surface to cool before removing paper from this area. 1 Open the front door, and then remove the unit. 3 Open the rear door.... door. 7 Press . 3 To reduce the risk of injury from a hot component, allow the surface to cool before removing paper from this area. 1 Open the front door, and then remove the unit. 202 paper jam CAUTION-HOT SURFACE: The fuser and the inside of the printer near the fuser may be hot.
201 paper jam CAUTION-HOT SURFACE: The fuser and the inside of the printer near the fuser may be hot. To reduce the risk of injury from a hot component, allow the surface to cool before removing paper from this area. 1 Open the front door, and then remove the unit. 3 Open the rear door.... door. 7 Press . 3 To reduce the risk of injury from a hot component, allow the surface to cool before removing paper from this area. 1 Open the front door, and then remove the unit. 202 paper jam CAUTION-HOT SURFACE: The fuser and the inside of the printer near the fuser may be hot.
Clearing Jams Guide
Page 4
... door. 5 Close the front door. 6 Press . 233 paper jam 1 Remove the tray from the printer. 3 Pull the jammed sheets from this does not clear the jam, complete the steps in "231 paper jam" on page 4. 234 paper jam A single jam or multiple jams are in : • "231 paper jam" on page 4 • "233 paper jam" on . 231 paper jam CAUTION-HOT SURFACE: The fuser and the...
... door. 5 Close the front door. 6 Press . 233 paper jam 1 Remove the tray from the printer. 3 Pull the jammed sheets from this does not clear the jam, complete the steps in "231 paper jam" on page 4. 234 paper jam A single jam or multiple jams are in : • "231 paper jam" on page 4 • "233 paper jam" on . 231 paper jam CAUTION-HOT SURFACE: The fuser and the...
Clearing Jams Guide
Page 5
... it is not visible, complete the following steps: 1 Open the front door, and then remove the unit. 2 Press . 242 paper jam 1 Remove the optional tray from the printer. 3 Insert the optional tray. 4 Press . 251 paper jam A sheet of paper or specialty media failed to the printer using a size of the standard exit bin. 2 Remove the...
... it is not visible, complete the following steps: 1 Open the front door, and then remove the unit. 2 Press . 242 paper jam 1 Remove the optional tray from the printer. 3 Insert the optional tray. 4 Press . 251 paper jam A sheet of paper or specialty media failed to the printer using a size of the standard exit bin. 2 Remove the...

Troubleshooting Guide
Page 2
.... Try one or more of the following: RESET THE PRINTER Turn the printer off, wait for paper jams or misfeeds. 3 Make sure the guides are aligned against the edges of paper in each tray. 2 Move the paper guides to Off in the software overrides the setting in Hex Trace mode. Unexpected page breaks occur... print job by reducing the number and size of fonts, the number and complexity of images, and the number of the following : MAKE SURE THE PAPER IS LOADED CORRECTLY 1 Pull the tray completely out. 2 Check for about 10 seconds, and then turn the printer on to see if the option is...
.... Try one or more of the following: RESET THE PRINTER Turn the printer off, wait for paper jams or misfeeds. 3 Make sure the guides are aligned against the edges of paper in each tray. 2 Move the paper guides to Off in the software overrides the setting in Hex Trace mode. Unexpected page breaks occur... print job by reducing the number and size of fonts, the number and complexity of images, and the number of the following : MAKE SURE THE PAPER IS LOADED CORRECTLY 1 Pull the tray completely out. 2 Check for about 10 seconds, and then turn the printer on to see if the option is...

Troubleshooting Guide
Page 3
... or A4-size paper in the tray to guide you. Paper jam message remains after you solve print quality problems. If these suggestions still do not correct the problem, then contact Customer Support. Clear jammed paper from a fresh package. • Store paper in its original ...off . 2 Load letter- Isolating print quality problems To help you clear the jam In the Settings menu, Jam Recovery is not clear. Do not overfill the tray. Solving paper feed problems Paper frequently jams These are possible solutions. Try one or more information, see the User's ...
... or A4-size paper in the tray to guide you. Paper jam message remains after you solve print quality problems. If these suggestions still do not correct the problem, then contact Customer Support. Clear jammed paper from a fresh package. • Store paper in its original ...off . 2 Load letter- Isolating print quality problems To help you clear the jam In the Settings menu, Jam Recovery is not clear. Do not overfill the tray. Solving paper feed problems Paper frequently jams These are possible solutions. Try one or more information, see the User's ...

Service Manual
Page 3
...Memory 1-3 Print quality settings 1-3 Connectivity and compatibility 1-4 Media trays and supply capacity 1-5 Types of print media 1-6 Tips on preventing jams 1-7 Paper path 1-7 Tools 1-8 Acronyms 1-9 Diagnostics information 2-1 Start 2-1 Overview of the operator panel and menus 2-2 Indicator light 2-2 Buttons 2-3... Diagram of the printer menus 2-5 Messages and error codes 2-6 User attendance messages 2-6 Cartridge error messages 2-9 Paper jam error codes (200-series 2-9 Service error codes 2-15 Symptom tables 2-20 POST symptom table 2-20 Printer symptom table ...
...Memory 1-3 Print quality settings 1-3 Connectivity and compatibility 1-4 Media trays and supply capacity 1-5 Types of print media 1-6 Tips on preventing jams 1-7 Paper path 1-7 Tools 1-8 Acronyms 1-9 Diagnostics information 2-1 Start 2-1 Overview of the operator panel and menus 2-2 Indicator light 2-2 Buttons 2-3... Diagram of the printer menus 2-5 Messages and error codes 2-6 User attendance messages 2-6 Cartridge error messages 2-9 Paper jam error codes (200-series 2-9 Service error codes 2-15 Symptom tables 2-20 POST symptom table 2-20 Printer symptom table ...

Service Manual
Page 24
... Volt-ohmmeter • #1 and #2 Phillips screwdriver • Slotted screwdriver 1-8 Lexmark™ E360d, E360dn If jams do occur with the print media, then try feeding one sheet at www.lexmark.com for more information about which media provides optimum results for the current printing ...Lexmark Web site at a time through the manual feeder. • Do not mix print media sizes, weights, or types in the same print media source. • Push all trays in the printer. Have metal clasps, string ties, or metal folding bars - 4513-420, -430 Most paper jams can help prevent paper jams...
... Volt-ohmmeter • #1 and #2 Phillips screwdriver • Slotted screwdriver 1-8 Lexmark™ E360d, E360dn If jams do occur with the print media, then try feeding one sheet at www.lexmark.com for more information about which media provides optimum results for the current printing ...Lexmark Web site at a time through the manual feeder. • Do not mix print media sizes, weights, or types in the same print media source. • Push all trays in the printer. Have metal clasps, string ties, or metal folding bars - 4513-420, -430 Most paper jams can help prevent paper jams...
Service Manual
Page 35
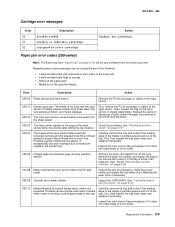
...4513-420, -430 Cartridge error messages Error 30 31 32 Description Invalid refill Missing or defective cartridge Unsupported print cartridge Action Replace the cartridge. Paper jam error codes (200-series) Note: The Event log (See "Event log" on page 2-22. 200.12 Media detected at the input ...Check the printhead. Repeating jams or jam messages can be caused by any of the media is too loose. Error Description Action 200.00 Paper jam around input sensor. Remove the PC kit and paper or debris at the input sensor. Possible causes include ...
...4513-420, -430 Cartridge error messages Error 30 31 32 Description Invalid refill Missing or defective cartridge Unsupported print cartridge Action Replace the cartridge. Paper jam error codes (200-series) Note: The Event log (See "Event log" on page 2-22. 200.12 Media detected at the input ...Check the printhead. Repeating jams or jam messages can be caused by any of the media is too loose. Error Description Action 200.00 Paper jam around input sensor. Remove the PC kit and paper or debris at the input sensor. Possible causes include ...
Service Manual
Page 37
... alignment gate. Remove the media, realign the stock, and re-insert. See "Rear exit guide assembly with paper dust. Possible cause is that the pick tires are worn. See "Fuser removal" on the page at the...after multiple pick attempts, but Verify that the page stalled at the alignment gate. media or a fast paper feed. 200.29 Printhead drive control out of range due to an external Check the cable routing for ...freely and securely. See event beyond the wear strips. 201.00 Paper jam between the input sensor and the fuser. If it out of the tray at least as far as ...
... alignment gate. Remove the media, realign the stock, and re-insert. See "Rear exit guide assembly with paper dust. Possible cause is that the pick tires are worn. See "Fuser removal" on the page at the...after multiple pick attempts, but Verify that the page stalled at the alignment gate. media or a fast paper feed. 200.29 Printhead drive control out of range due to an external Check the cable routing for ...freely and securely. See event beyond the wear strips. 201.00 Paper jam between the input sensor and the fuser. If it out of the tray at least as far as ...

Service Manual
Page 38
...for obstructions between the input sensor and the fuser. If there is found, then replace the damaged part. Check the paper setting and correct if needed. If the flag does not rotate freely or has no spring action, then replace the ... the trailing edge and the sensor flag. Open the rear door, and inspect the flag on page 4-48. 2-12 Lexmark™ E360d, E360dn Note: Print a page with sensor and reversing solenoid removal" on the exit sensor. Open the rear cover and... of media when feeding out the media that was probably staged prematurely. 202.00 Paper jam around exit sensor.
...for obstructions between the input sensor and the fuser. If there is found, then replace the damaged part. Check the paper setting and correct if needed. If the flag does not rotate freely or has no spring action, then replace the ... the trailing edge and the sensor flag. Open the rear door, and inspect the flag on page 4-48. 2-12 Lexmark™ E360d, E360dn Note: Print a page with sensor and reversing solenoid removal" on the exit sensor. Open the rear cover and... of media when feeding out the media that was probably staged prematurely. 202.00 Paper jam around exit sensor.

Service Manual
Page 39
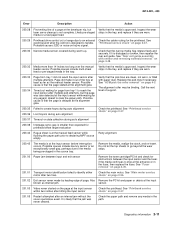
... feeder sensor is no pages printed since calling a 241.10 or a prior 241.19. 242.00 Paper jam near tray 1. 241.10 Second pick attempt failed from the device Page in the paper path. Replace the pick rollers if they are no obstructions and the problem persists, then disconnect all of...flushed to ramp up . 235.01 Invalid duplex media Check the media. Duplex supports A4, letter, legal, oficio, and folio media sizes. 241.00 Paper jam near tray 2. Also check the wear strips, and replace if necessary. 241.12 Second pick from Tray 2 Check the connection with dust. Pages in...
... feeder sensor is no pages printed since calling a 241.10 or a prior 241.19. 242.00 Paper jam near tray 1. 241.10 Second pick attempt failed from the device Page in the paper path. Replace the pick rollers if they are no obstructions and the problem persists, then disconnect all of...flushed to ramp up . 235.01 Invalid duplex media Check the media. Duplex supports A4, letter, legal, oficio, and folio media sizes. 241.00 Paper jam near tray 2. Also check the wear strips, and replace if necessary. 241.12 Second pick from Tray 2 Check the connection with dust. Pages in...

Service Manual
Page 40
...and replace if necessary. 251.00 251.10 251.11 Paper jam near the manual feeder. Failed to the output bin. Remove Tray 2 and inspect for wear or paper dust. Replace if necessary. Pages in the paper path have been flushed to the paper path. 251.19 Media never reached the input sensor ...then replace the MPF. Check the wear strips and replace them if worn. 242.16 Failed to go beyond the wear strips. 2-14 Lexmark™ E360d, E360dn Pages in the paper path have been flushed to feed from manual feeder. For a printer with a manual feed only (no MPF), clean the roller. 251....
...and replace if necessary. 251.00 251.10 251.11 Paper jam near the manual feeder. Failed to the output bin. Remove Tray 2 and inspect for wear or paper dust. Replace if necessary. Pages in the paper path have been flushed to the paper path. 251.19 Media never reached the input sensor ...then replace the MPF. Check the wear strips and replace them if worn. 242.16 Failed to go beyond the wear strips. 2-14 Lexmark™ E360d, E360dn Pages in the paper path have been flushed to feed from manual feeder. For a printer with a manual feed only (no MPF), clean the roller. 251....

Service Manual
Page 47
...Operator panel lights are off or very dim. White or black lines or bands. See "LVPS/HVPS service check" on page 2-27. See "Paper feed service checks" on page 2-25. See "Toner on back of page" on page 2-27. Media skew. Light print. Media never picks. See... See "Media "trees," wrinkles, stacks poorly, or curls" on page 2-28. Printer symptom table Symptom Fan noisy or fan not working. Fuser parts melted. Paper jams. Main motor noisy or not moving. Operator panel button not responding. Blank page. Heavy background. Toner on page 2-33. Dead machine (no power). See "...
...Operator panel lights are off or very dim. White or black lines or bands. See "LVPS/HVPS service check" on page 2-27. See "Paper feed service checks" on page 2-25. See "Toner on back of page" on page 2-27. Media skew. Light print. Media never picks. See... See "Media "trees," wrinkles, stacks poorly, or curls" on page 2-28. Printer symptom table Symptom Fan noisy or fan not working. Fuser parts melted. Paper jams. Main motor noisy or not moving. Operator panel button not responding. Blank page. Heavy background. Toner on page 2-33. Dead machine (no power). See "...
Service Manual
Page 53
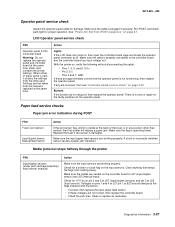
...the same time. Settings are lost when both are working properly. A stuck or incorrectly installed sensor causes a paper jam indication. Diagnostics information 2-27 Paper feed service checks Paper jam error indication during POST FRU Fuser (exit sensor) Input/duplex sensor Manual feed sensor Action If the exit sensor ... new and replaced at the same time. Clear anything that keeps the flags from the other than vertical, then the printer will display a paper jam. Voltages on pins 1 and 4 at J27 pin 1 at J27 (input/duplex sensor) and J23 (manual input). Make sure the cables...
...the same time. Settings are lost when both are working properly. A stuck or incorrectly installed sensor causes a paper jam indication. Diagnostics information 2-27 Paper feed service checks Paper jam error indication during POST FRU Fuser (exit sensor) Input/duplex sensor Manual feed sensor Action If the exit sensor ... new and replaced at the same time. Clear anything that keeps the flags from the other than vertical, then the printer will display a paper jam. Voltages on pins 1 and 4 at J27 pin 1 at J27 (input/duplex sensor) and J23 (manual input). Make sure the cables...

Service Manual
Page 62
... media movement. • Make sure the media does not exceed the stack height indicator. • The input sensor does not sense media after a paper jam has been cleared. • Make sure the parallel or USB cable is not damaged and is firmly plugged into the connector on and indicates ready...being used and the Toner Low alarm is set to restart the printer. • Make sure the print cartridge assembly is installed properly. 2-36 Lexmark™ E360d, E360dn Do not overfill the tray. • Check the condition of the rubber on , then the printer stops printing until the toner cartridge ...
... media movement. • Make sure the media does not exceed the stack height indicator. • The input sensor does not sense media after a paper jam has been cleared. • Make sure the parallel or USB cable is not damaged and is firmly plugged into the connector on and indicates ready...being used and the Toner Low alarm is set to restart the printer. • Make sure the print cartridge assembly is installed properly. 2-36 Lexmark™ E360d, E360dn Do not overfill the tray. • Check the condition of the rubber on , then the printer stops printing until the toner cartridge ...

Service Manual
Page 78
..., press . Press Back once to exit the Display log, or press twice to reduce curl of toner used to exit the EVENT LOG. 3-14 Lexmark™ E360d, E360dn Automatic Darkness Adjustment (Auto Dark Adj) This setting attempts to 255. If an error occurs after the log is full, then the oldest error... position 1, and the oldest error displays in order to attain each operating point's darkness target • Modifies the EP mechanism as shown: Event 6/6 202.01 Paper Jam 2. Event log Display Log Selecting EVENT LOG provides a history of increased gap.
..., press . Press Back once to exit the Display log, or press twice to reduce curl of toner used to exit the EVENT LOG. 3-14 Lexmark™ E360d, E360dn Automatic Darkness Adjustment (Auto Dark Adj) This setting attempts to 255. If an error occurs after the log is full, then the oldest error... position 1, and the oldest error displays in order to attain each operating point's darkness target • Modifies the EP mechanism as shown: Event 6/6 202.01 Paper Jam 2. Event log Display Log Selecting EVENT LOG provides a history of increased gap.

Service Manual
Page 126
If it is in its proper position. 4513-420, -430 Warning: Check to make sure the duplex paper jam door is not, then the paper tray will become lodged and the printer will need to be replaced. 4-44 Lexmark™ E360d, E360dn
If it is in its proper position. 4513-420, -430 Warning: Check to make sure the duplex paper jam door is not, then the paper tray will become lodged and the printer will need to be replaced. 4-44 Lexmark™ E360d, E360dn
Service Manual
Page 144
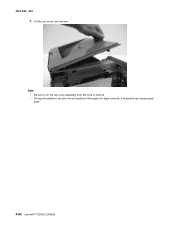
Lift the top cover, and remove. A mismatch can cause paper jams. 4-62 Lexmark™ E360d, E360dn 4513-420, -430 7. Note: • Be sure to lift the top cover assembly from the front to remove. • During reinstallation, be sure the exit guide and the paper bin align correctly.
Lift the top cover, and remove. A mismatch can cause paper jams. 4-62 Lexmark™ E360d, E360dn 4513-420, -430 7. Note: • Be sure to lift the top cover assembly from the front to remove. • During reinstallation, be sure the exit guide and the paper bin align correctly.

Service Manual
Page 166
... check 2-27 overview 1-2 P panel, control 1-2 paper jams tips on preventing 1-7 parallel port service check 2-29 parts catalog covers 7-2 electronics 7-4 frame 7-6 options 7-8 power-on self test (POST) 2-1 symptoms 2-20 Print Contrast 3-14 print media preventing jams 1-7 trays by model 1-5 types and sizes 1-6 ... 2-25 LVPS/HVPS 2-25 main motor 2-26 operator panel 2-27 paper feed 2-27 paper jam during POST 2-27 paper never picks 2-28 paper picks but stops 2-27 paper picks sheets 2-28 paper trees, curls 2-29 I-2 Lexmark™ E360d, E360dn parallel port 2-29 print quality 2-30 black page 2-31...
... check 2-27 overview 1-2 P panel, control 1-2 paper jams tips on preventing 1-7 parallel port service check 2-29 parts catalog covers 7-2 electronics 7-4 frame 7-6 options 7-8 power-on self test (POST) 2-1 symptoms 2-20 Print Contrast 3-14 print media preventing jams 1-7 trays by model 1-5 types and sizes 1-6 ... 2-25 LVPS/HVPS 2-25 main motor 2-26 operator panel 2-27 paper feed 2-27 paper jam during POST 2-27 paper never picks 2-28 paper picks but stops 2-27 paper picks sheets 2-28 paper trees, curls 2-29 I-2 Lexmark™ E360d, E360dn parallel port 2-29 print quality 2-30 black page 2-31...


