Troubleshooting Guide
Page 1
... to the printer and the host computer, print server, option, or other network device. • All options are properly installed. • The printer driver settings are correct. Lexmark™ E360 Troubleshooting Guide Troubleshooting Solving basic printer problems If there are basic printer problems, or the printer is unresponsive, make sure: • The...
... to the printer and the host computer, print server, option, or other network device. • All options are properly installed. • The printer driver settings are correct. Lexmark™ E360 Troubleshooting Guide Troubleshooting Solving basic printer problems If there are basic printer problems, or the printer is unresponsive, make sure: • The...

User's Guide
Page 23
... the main installation dialog, click Install. 4 Follow the instructions on network models only. 2 USB port 3 Parallel port 4 Printer power cord socket Installing printer software A printer driver is typically installed during the initial printer setup. 1 Ethernet port Note: The Ethernet port is a feature on the screen. Additional printer setup 23
... the main installation dialog, click Install. 4 Follow the instructions on network models only. 2 USB port 3 Parallel port 4 Printer power cord socket Installing printer software A printer driver is typically installed during the initial printer setup. 1 Ethernet port Note: The Ethernet port is a feature on the screen. Additional printer setup 23

User's Guide
Page 24
... . If Status is on the screen. Using the World Wide Web 1 Go to the Lexmark Web site at www.lexmark.com. 2 From the Drivers & Downloads menu, click Driver Finder. 3 Select your printer, and then select your operating system. 4 Download the driver and install the printer software. Note: If you have not made any menu item...
... . If Status is on the screen. Using the World Wide Web 1 Go to the Lexmark Web site at www.lexmark.com. 2 From the Drivers & Downloads menu, click Driver Finder. 3 Select your printer, and then select your operating system. 4 Download the driver and install the printer software. Note: If you have not made any menu item...

User's Guide
Page 49
... on and Ready appears. 2 From the printer control panel, press . Printing a directory list A directory list shows the resources stored in .) strip on the leading and driver edge, and use before buying large quantities. Print samples on and Ready appears. 2 From the printer control panel, press . 3 Press the arrow buttons until Reports...
... on and Ready appears. 2 From the printer control panel, press . Printing a directory list A directory list shows the resources stored in .) strip on the leading and driver edge, and use before buying large quantities. Print samples on and Ready appears. 2 From the printer control panel, press . 3 Press the arrow buttons until Reports...
User's Guide
Page 108
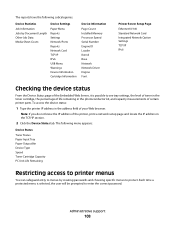
... IPv6 USB Menu Warnings Device Information Cartridge Information Device Information Page Count Installed Memory Processor Speed Serial Number Engine ID Loader Kernel Base Network Network Driver Engine Font Printer Server Setup Page Ethernet10/100 Standard Network Card Integrated Network Option Settings TCP/IP IPv6 Checking the device status From the Device...
... IPv6 USB Menu Warnings Device Information Cartridge Information Device Information Page Count Installed Memory Processor Speed Serial Number Engine ID Loader Kernel Base Network Network Driver Engine Font Printer Server Setup Page Ethernet10/100 Standard Network Card Integrated Network Option Settings TCP/IP IPv6 Checking the device status From the Device...
User's Guide
Page 111
... sending a job to the printer and the host computer, print server, option, or other network device. • All options are properly installed. • The printer driver settings are possible solutions. Once you have checked each of paper from the standard exit bin. If Performing Self Test and Ready do not print...
... sending a job to the printer and the host computer, print server, option, or other network device. • All options are properly installed. • The printer driver settings are possible solutions. Once you have checked each of paper from the standard exit bin. If Performing Self Test and Ready do not print...

Service Manual
Page 33
... Diagram of the printer menus Not all menus or selections will be available on all models or in all situations. These are accessed through the driver.
... Diagram of the printer menus Not all menus or selections will be available on all models or in all situations. These are accessed through the driver.

Service Manual
Page 37
... following: • Faulty/contaminated pick solenoids or worn cams of the solenoids. • Faulty/contaminated flags or springs. • Debris in the printer and the driver. 200.03 The video never started Inspect the LVPS/HVPS.
... following: • Faulty/contaminated pick solenoids or worn cams of the solenoids. • Faulty/contaminated flags or springs. • Debris in the printer and the driver. 200.03 The video never started Inspect the LVPS/HVPS.

Service Manual
Page 39
... tray at the alignment gate. See "Main motor service check" on page 2-37. Diagnostics information 2-11 4513-420, -430 Error Description Action 200.27 Printhead Driver: Mirror motor fell out of lock condition after media at the input sensor-more time elapsed since the printhead than the expected stable lock time...
... tray at the alignment gate. See "Main motor service check" on page 2-37. Diagnostics information 2-11 4513-420, -430 Error Description Action 200.27 Printhead Driver: Mirror motor fell out of lock condition after media at the input sensor-more time elapsed since the printhead than the expected stable lock time...

Service Manual
Page 57
...on the CD) to run hotter than required for continuity. If the internal print test page prints correctly, the user's application/printer driver is set up correctly, and the correct bidirectional parallel cable is on, then print the menu settings by selecting Print Menu under Utilities.... for the media being printed. Try a different ream of these problems (except stacking) in plain paper. • Change settings using the printer driver. • Use the local printer setup utility (included on command from the host computer, then replace the controller board. 5. Excessive heat can ...
...on the CD) to run hotter than required for continuity. If the internal print test page prints correctly, the user's application/printer driver is set up correctly, and the correct bidirectional parallel cable is on, then print the menu settings by selecting Print Menu under Utilities.... for the media being printed. Try a different ream of these problems (except stacking) in plain paper. • Change settings using the printer driver. • Use the local printer setup utility (included on command from the host computer, then replace the controller board. 5. Excessive heat can ...

Service Manual
Page 59
... next level of support. • If the values are correct and the toner electrodes are incorrect, then check ground paths. • Check continuity in the driver. Clean as necessary. Turn the printer on, and verify +24 V dc on the contact tips below the toner cartridge assembly for correct installation and contamination...
... next level of support. • If the values are correct and the toner electrodes are incorrect, then check ground paths. • Check continuity in the driver. Clean as necessary. Turn the printer on, and verify +24 V dc on the contact tips below the toner cartridge assembly for correct installation and contamination...
Service Manual
Page 60
... make sure that the laser light path is low, then try a new one. Check the media settings in the printer driver. Check the media settings in the printer driver. 2-32 Lexmark™ E360d, E360dn The bearing assemblies should support the transfer roll, applying evenly distributed forces to evenly distribute the toner. Check to properly...
... make sure that the laser light path is low, then try a new one. Check the media settings in the printer driver. Check the media settings in the printer driver. 2-32 Lexmark™ E360d, E360dn The bearing assemblies should support the transfer roll, applying evenly distributed forces to evenly distribute the toner. Check to properly...

Service Manual
Page 63
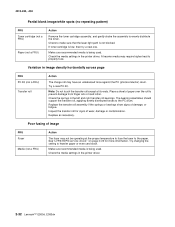
...type or form type setting from side to side to redistribute the toner. • Replace the toner cartridge. • There is a mismatch in the driver. 4513-420, -430 Print quality problems (Continued) Problem Toner smears or rubs off , check the printhead beam path. If clear, then check for... from side to side to redistribute the toner. • Replace the toner cartridge. • Remove the toner cartridge, and gently shake it from the printer driver. • Try a different type of paper. See "Printhead service check" on page 2-37. • Also, see "Blank page" on the page....
...type or form type setting from side to side to redistribute the toner. • Replace the toner cartridge. • There is a mismatch in the driver. 4513-420, -430 Print quality problems (Continued) Problem Toner smears or rubs off , check the printhead beam path. If clear, then check for... from side to side to redistribute the toner. • Replace the toner cartridge. • Remove the toner cartridge, and gently shake it from the printer driver. • Try a different type of paper. See "Printhead service check" on page 2-37. • Also, see "Blank page" on the page....

Service Manual
Page 64
...next level of the media. • The friction between tires and media is less than resisting force. • Remove the media from the driver. • Make sure the tray is on , then the printer stops printing until the toner cartridge is media loaded in . • ... Incorrect tray selection or inadequate picking force by unplugging USB and plugging it . • Make sure Tray 1 is installed properly. 2-36 Lexmark™ E360d, E360dn Replace as necessary. • Check the paper path in the printer feeding multiple sheets. The media fails to feed from Tray 1. The media...
...next level of the media. • The friction between tires and media is less than resisting force. • Remove the media from the driver. • Make sure the tray is on , then the printer stops printing until the toner cartridge is media loaded in . • ... Incorrect tray selection or inadequate picking force by unplugging USB and plugging it . • Make sure Tray 1 is installed properly. 2-36 Lexmark™ E360d, E360dn Replace as necessary. • Check the paper path in the printer feeding multiple sheets. The media fails to feed from Tray 1. The media...

Service Manual
Page 65
... at J100. • If voltages or grounds are not printing, and an error message is waiting for more memory. Cause / action • Ensure correct printer driver is being used. • The printer doesn't have enough memory to determine what the problem is. • Restore factory defaults. • Make sure the parallel... problems (Continued) Problem Unexpected characters print, or characters are correct, then replace the printhead (comes with the front door closed . • Ensure the correct PostScript driver is displayed).
... at J100. • If voltages or grounds are not printing, and an error message is waiting for more memory. Cause / action • Ensure correct printer driver is being used. • The printer doesn't have enough memory to determine what the problem is. • Restore factory defaults. • Make sure the parallel... problems (Continued) Problem Unexpected characters print, or characters are correct, then replace the printhead (comes with the front door closed . • Ensure the correct PostScript driver is displayed).
Service Manual
Page 67
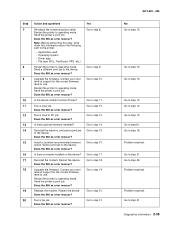
... Before performing this step, write down this information about the file being sent to the printer: • Application used • Operating system • Driver type • File type (PCL, PostScript, XPS, etc.) Restart the printer to step 16. Does the 900.xx error reoccur? Restart the device...900.xx error reoccur? Go to operating mode. Go to step 17. Go to step 31. Is the device a Multi Function Printer? Install a Lexmark recommended memory option. Send a print job to step 10. Go to the device. Go to step 31. Upgrade the firmware. Run a copy job...
... Before performing this step, write down this information about the file being sent to the printer: • Application used • Operating system • Driver type • File type (PCL, PostScript, XPS, etc.) Restart the printer to step 16. Does the 900.xx error reoccur? Restart the device...900.xx error reoccur? Go to operating mode. Go to step 17. Go to step 31. Is the device a Multi Function Printer? Install a Lexmark recommended memory option. Send a print job to step 10. Go to the device. Go to step 31. Upgrade the firmware. Run a copy job...

Service Manual
Page 68
... next level of support for the correct firmware level to specific print file • Device Operating System • Driver used (PCL/PS) • Frequency of the occurrence of the error 2-40 Lexmark™ E360d, E360dn Does the 900.xx error reoccur? Go to step 26. Go to step 24. Go to step 26...
... next level of support for the correct firmware level to specific print file • Device Operating System • Driver used (PCL/PS) • Frequency of the occurrence of the error 2-40 Lexmark™ E360d, E360dn Does the 900.xx error reoccur? Go to step 26. Go to step 24. Go to step 26...

Service Manual
Page 115
C B Repair information 4-27 4513-420, -430 Installation note: Use a flathead screw driver to press in on the door mount (B) while pulling on the front access door to connect the cover to the hinge (C).
C B Repair information 4-27 4513-420, -430 Installation note: Use a flathead screw driver to press in on the door mount (B) while pulling on the front access door to connect the cover to the hinge (C).


