
User Guide
Page 133
... error-free operation of any product. Warranty service does not include repair of failures caused by: -Modification or unauthorized attachments -Accidents, misuse, abuse or use inconsistent with Lexmark user's guides, manuals, instructions or guidance -Unsuitable physical or operating... environment -Maintenance by any product or the durability or longevity of prints produced by anyone other than Lexmark or a Lexmark authorized servicer -Operation of a product beyond ...
... error-free operation of any product. Warranty service does not include repair of failures caused by: -Modification or unauthorized attachments -Accidents, misuse, abuse or use inconsistent with Lexmark user's guides, manuals, instructions or guidance -Unsuitable physical or operating... environment -Maintenance by any product or the durability or longevity of prints produced by anyone other than Lexmark or a Lexmark authorized servicer -Operation of a product beyond ...

Service Manual
Page 4
4512-220, -230 Parallel or USB port service check 2-52 Print quality service checks 2-53 Printhead service check 2-60 Transfer roll service check 2-60 Diagnostic aids 3-1 Accessing service menus 3-1 Printing menus 3-1 Moving around the menu 3-1 Configuration menu selections 3-4 Utilities...Main motor gear drive removal 4-29 Manual feed clutch removal 4-31 Media ACM ASM feeder removal 4-35 Media feed clutch with cable removal 4-38 Media manual input sensor removal 4-40 Nameplate removal ... 5-1 Rear view 5-1 Controller board connector pin values 5-2 iv Lexmark™ E260d, E260dn
4512-220, -230 Parallel or USB port service check 2-52 Print quality service checks 2-53 Printhead service check 2-60 Transfer roll service check 2-60 Diagnostic aids 3-1 Accessing service menus 3-1 Printing menus 3-1 Moving around the menu 3-1 Configuration menu selections 3-4 Utilities...Main motor gear drive removal 4-29 Manual feed clutch removal 4-31 Media ACM ASM feeder removal 4-35 Media feed clutch with cable removal 4-38 Media manual input sensor removal 4-40 Nameplate removal ... 5-1 Rear view 5-1 Controller board connector pin values 5-2 iv Lexmark™ E260d, E260dn
Service Manual
Page 16
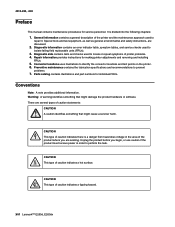
...receive power in the area of printer problems. 4. Diagnostic information contains an error indicator table, symptom tables, and service checks used to perform the task. Diagnostic aids contains tests and checks used to prevent problems. 7. Connector locations ... a hot surface. CAUTION This type of caution indicates a tipping hazard. xvi Lexmark™ E260d, E260dn There are discussed. 2. 4513-220, -230 Preface This manual contains maintenance procedures for service personnel. General information contains a general description of caution statements: CAUTION A caution ...
...receive power in the area of printer problems. 4. Diagnostic information contains an error indicator table, symptom tables, and service checks used to perform the task. Diagnostic aids contains tests and checks used to prevent problems. 7. Connector locations ... a hot surface. CAUTION This type of caution indicates a tipping hazard. xvi Lexmark™ E260d, E260dn There are discussed. 2. 4513-220, -230 Preface This manual contains maintenance procedures for service personnel. General information contains a general description of caution statements: CAUTION A caution ...
Service Manual
Page 17
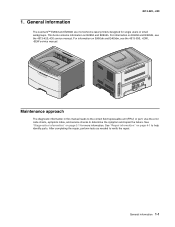
... see the 4513-630, -63W, -6EW service manual. For information on E260d and E260dn. 4513-220, -230 1. Maintenance approach The diagnostic information in this manual leads to help identify parts. Use the error code charts, symptom index, and service checks to verify the repair. After completing the ...repair, perform tests as needed to determine the symptom and repair the failure. General information The Lexmark™ E260d and E260dn are...
... see the 4513-630, -63W, -6EW service manual. For information on E260d and E260dn. 4513-220, -230 1. Maintenance approach The diagnostic information in this manual leads to help identify parts. Use the error code charts, symptom index, and service checks to verify the repair. After completing the ...repair, perform tests as needed to determine the symptom and repair the failure. General information The Lexmark™ E260d and E260dn are...
Service Manual
Page 76
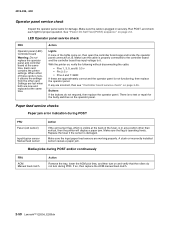
... and 6: 3.3 v • Pin 2: 5 v • Pins 4 and 7: GND If these cards is damaged. When either of these are incorrect, then see "Controller board service check" on , then open the controller board cage and locate the operator panel connector at the back of the lights come on page 3-46. With... same time. Make sure the cable is in securely. If so, then replace the ACM manual feed clutch. 2-50 Lexmark™ E260d, E260dn If any position other card. Paper feed service checks Paper jam error indication during POR. Buttons If the buttons do not turn on the operator...
... and 6: 3.3 v • Pin 2: 5 v • Pins 4 and 7: GND If these cards is damaged. When either of these are incorrect, then see "Controller board service check" on , then open the controller board cage and locate the operator panel connector at the back of the lights come on page 3-46. With... same time. Make sure the cable is in securely. If so, then replace the ACM manual feed clutch. 2-50 Lexmark™ E260d, E260dn If any position other card. Paper feed service checks Paper jam error indication during POR. Buttons If the buttons do not turn on the operator...

Service Manual
Page 77
...board. Open left cover, and verify that keeps the flags from rotating freely. Replace the faulty part. Pin 1 at the ACM and manual feed shafts as necessary. 4513-220, -230 Media picks but stops halfway through the printer FRU Input/duplex sensors (under print cartridge assembly... should be approximately 70 ohms. • If it is not, then replace the solenoid. • If the resistance is attempted. See "Controller board service check" on the controller board at J23 (Input sensor). Check for +5 V dc on the controller board and measure the resistance across cable pins 1 ...
...board. Open left cover, and verify that keeps the flags from rotating freely. Replace the faulty part. Pin 1 at the ACM and manual feed shafts as necessary. 4513-220, -230 Media picks but stops halfway through the printer FRU Input/duplex sensors (under print cartridge assembly... should be approximately 70 ohms. • If it is not, then replace the solenoid. • If the resistance is attempted. See "Controller board service check" on the controller board at J23 (Input sensor). Check for +5 V dc on the controller board and measure the resistance across cable pins 1 ...

Service Manual
Page 79
...LVPS/HVPS Controller board Action Remove the toner cartridge, and gently shake it to expose the photoconductor, resulting in printer service errors unless there is blockage of the manual for cartridge damage. Turn off . Note: Refer to the print defects guide at CN202) and the corresponding wire... page is gray with graphics, the third page is black, and the last page is no continuity, then call the next level of service. Check for repeating defects. Extreme environmental conditions, temperatures, and humidity will affect the print quality. a. Try a different PC kit. •...
...LVPS/HVPS Controller board Action Remove the toner cartridge, and gently shake it to expose the photoconductor, resulting in printer service errors unless there is blockage of the manual for cartridge damage. Turn off . Note: Refer to the print defects guide at CN202) and the corresponding wire... page is gray with graphics, the third page is black, and the last page is no continuity, then call the next level of service. Check for repeating defects. Extreme environmental conditions, temperatures, and humidity will affect the print quality. a. Try a different PC kit. •...
Service Manual
Page 87
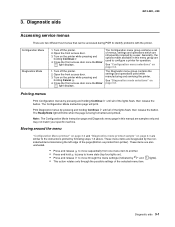
... pressing and holding Continue . 4. Note: The Configuration Mode Instruction page and Diagnostic menu page in this manual are designated by following steps 1-3 above. Diagnostic aids 4513-220, -230 Accessing service menus There are used while manufacturing and servicing the printer. Turn on page 3-4. The Configuration menu group contains a set of menus, settings and...
... pressing and holding Continue . 4. Note: The Configuration Mode Instruction page and Diagnostic menu page in this manual are designated by following steps 1-3 above. Diagnostic aids 4513-220, -230 Accessing service menus There are used while manufacturing and servicing the printer. Turn on page 3-4. The Configuration menu group contains a set of menus, settings and...


