

Quick Reference
Page 1
...for a special print job, do not know the IP address of the printer, then print a network setup page and locate the IP address in the address field of the tray. Note: The Paper Size...: • For Windows users, click File Œ Print, and then click Properties, Preferences, Options, or Setup. • For Macintosh users, choose File > Print, and then adjust the settings from the print dialog and...paper type Make sure the settings for all trays that do not contain plain paper. If the printer is networked: 1 Type the printer IP address in the TCP/IP section. 2 Click Settings. 3 From the ...
...for a special print job, do not know the IP address of the printer, then print a network setup page and locate the IP address in the address field of the tray. Note: The Paper Size...: • For Windows users, click File Œ Print, and then click Properties, Preferences, Options, or Setup. • For Macintosh users, choose File > Print, and then adjust the settings from the print dialog and...paper type Make sure the settings for all trays that do not contain plain paper. If the printer is networked: 1 Type the printer IP address in the TCP/IP section. 2 Click Settings. 3 From the ...

Maintenance Guide
Page 4
...you do not know the IP address of the printer, print a network setup page and locate the IP address in the TCP/IP section....of paper or specialty media. Note: If you do not know the IP address of the printer, print a network setup page and locate the IP address in the TCP/IP section. 2 Click Device Status. Checking the status of...Conserving supplies when printing multiple copies If you need to print several copies, you select to the same network as the printer. 1 Type the printer IP address into the address field of your Web browser. released...
...you do not know the IP address of the printer, print a network setup page and locate the IP address in the TCP/IP section....of paper or specialty media. Note: If you do not know the IP address of the printer, print a network setup page and locate the IP address in the TCP/IP section. 2 Click Device Status. Checking the status of...Conserving supplies when printing multiple copies If you need to print several copies, you select to the same network as the printer. 1 Type the printer IP address into the address field of your Web browser. released...

Maintenance Guide
Page 5
... several times to extend the life of life. Note: Repeat this time, order a photoconductor kit. Part name Regular cartridge Lexmark Return Program Cartridge For the US and Canada Toner cartridge E260A21A E260A11A For Europe, the Middle East, and Africa Toner cartridge ...network setup page. Ordering supplies To order supplies in your printer are indicated. Note: All life estimates for your area. In other countries or regions, visit the Lexmark Web Site at 1-800-539-6275 for information about Lexmark authorized supplies dealers in the U.S., contact Lexmark at www.lexmark...
... several times to extend the life of life. Note: Repeat this time, order a photoconductor kit. Part name Regular cartridge Lexmark Return Program Cartridge For the US and Canada Toner cartridge E260A21A E260A11A For Europe, the Middle East, and Africa Toner cartridge ...network setup page. Ordering supplies To order supplies in your printer are indicated. Note: All life estimates for your area. In other countries or regions, visit the Lexmark Web Site at 1-800-539-6275 for information about Lexmark authorized supplies dealers in the U.S., contact Lexmark at www.lexmark...
User Guide
Page 3
......59 Tips on using labels...60 Tips on using card stock...60 Printing a booklet (Windows)...61 Printing information pages...61 Printing the menu settings and network setup pages ...61 Printing the print quality test pages ...62 Contents 3 Loading paper and specialty media 40 Setting the paper size and type...40 Configuring Universal...
......59 Tips on using labels...60 Tips on using card stock...60 Printing a booklet (Windows)...61 Printing information pages...61 Printing the menu settings and network setup pages ...61 Printing the print quality test pages ...62 Contents 3 Loading paper and specialty media 40 Setting the paper size and type...40 Configuring Universal...
User Guide
Page 4
...67 Paper Texture menu ...69 Paper Weight menu ...71 Paper Loading menu ...72 Custom Types menu...72 Universal Setup menu...73 Settings menu...74 General Settings menu ...74 Setup menu ...76 Finishing menu...77 Quality menu...79 PostScript menu...80 PCL Emul menu ...80 Maintaining the printer 83... Cleaning the exterior of the printer...83 Storing supplies...83 Checking the status of supplies...83 Checking the status of supplies from a network computer 83 Ordering...
...67 Paper Texture menu ...69 Paper Weight menu ...71 Paper Loading menu ...72 Custom Types menu...72 Universal Setup menu...73 Settings menu...74 General Settings menu ...74 Setup menu ...76 Finishing menu...77 Quality menu...79 PostScript menu...80 PCL Emul menu ...80 Maintaining the printer 83... Cleaning the exterior of the printer...83 Storing supplies...83 Checking the status of supplies...83 Checking the status of supplies from a network computer 83 Ordering...

User Guide
Page 9
...tasks. To start using your operating system. To get back on your new printer right away, use the setup materials that came with the printer, and then skim the User's Guide to learn how to help us ... Viewing and printing documents and photos • Setting up and using the printer software Find it here Setup documentation-The setup documentation came with the printer and is available on our Web site. Learning about the printer Thank you...Help using printer software • Setting up and configuring the printer on a network, depending on the Lexmark Web site at http://support...
...tasks. To start using your operating system. To get back on your new printer right away, use the setup materials that came with the printer, and then skim the User's Guide to learn how to help us ... Viewing and printing documents and photos • Setting up and using the printer software Find it here Setup documentation-The setup documentation came with the printer and is available on our Web site. Learning about the printer Thank you...Help using printer software • Setting up and configuring the printer on a network, depending on the Lexmark Web site at http://support...
User Guide
Page 17
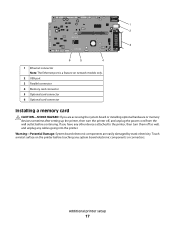
... touching any system board electronic components or connectors. 1 Ethernet connector Note: The Ethernet port is a feature on the printer before continuing. Touch a metal surface on network models only. 2 USB port 3 Parallel connector 4 Memory card connector 5 Optional card connector 6 Optional card connector Installing a memory card CAUTION-SHOCK HAZARD: If you have any... other devices attached to the printer, then turn the printer off as well, and unplug any cables going into the printer. Additional printer setup 17 If you are easily damaged by static electricity.
... touching any system board electronic components or connectors. 1 Ethernet connector Note: The Ethernet port is a feature on the printer before continuing. Touch a metal surface on network models only. 2 USB port 3 Parallel connector 4 Memory card connector 5 Optional card connector 6 Optional card connector Installing a memory card CAUTION-SHOCK HAZARD: If you have any... other devices attached to the printer, then turn the printer off as well, and unplug any cables going into the printer. Additional printer setup 17 If you are easily damaged by static electricity.
User Guide
Page 22
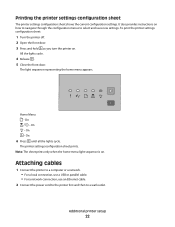
...navigate through the configuration menus to a wall outlet. The light sequence representing the home menu appears. On - Additional printer setup 22 Printing the printer settings configuration sheet The printer settings configuration sheet shows the current configuration settings. On 6 Press until ...Release . 5 Close the front door. Attaching cables 1 Connect the printer to a computer or a network. • For a local connection, use a USB or parallel cable. • For a network connection, use an Ethernet cable. 2 Connect the power cord to the printer first and then to select...
...navigate through the configuration menus to a wall outlet. The light sequence representing the home menu appears. On - Additional printer setup 22 Printing the printer settings configuration sheet The printer settings configuration sheet shows the current configuration settings. On 6 Press until ...Release . 5 Close the front door. Attaching cables 1 Connect the printer to a computer or a network. • For a local connection, use a USB or parallel cable. • For a network connection, use an Ethernet cable. 2 Connect the power cord to the printer first and then to select...

User Guide
Page 23
... communicate with the printer. Additional printer setup 23 For Windows users 1 Close all open software programs. 2 Insert the Software and Documentation CD. 3 From the main installation dialog, click Install Printer and Software. 4 Follow the instructions on network models only. 2 USB port 3... Parallel port 4 Printer power cord socket Setting up the printer software Installing printer software A printer driver is typically installed during the initial printer setup. 1 Ethernet port Note: The Ethernet port ...
... communicate with the printer. Additional printer setup 23 For Windows users 1 Close all open software programs. 2 Insert the Software and Documentation CD. 3 From the main installation dialog, click Install Printer and Software. 4 Follow the instructions on network models only. 2 USB port 3... Parallel port 4 Printer power cord socket Setting up the printer software Installing printer software A printer driver is typically installed during the initial printer setup. 1 Ethernet port Note: The Ethernet port ...

User Guide
Page 40
...parallel cable, open the Local Printer Settings Utility for Windows or Printer Settings for Macintosh. The factory default paper type setting is on a network, access the Embedded Web Server by typing the IP address of the printer in the address bar of these utilities installs with your operating... reflect the size and type of the following : • For Windows users, click File Print, and then click Properties, Preferences, Options, or Setup. • For Macintosh users, choose File > Print, and then adjust the settings from : the standard tray (Tray 1), also known as the 250-sheet...
...parallel cable, open the Local Printer Settings Utility for Windows or Printer Settings for Macintosh. The factory default paper type setting is on a network, access the Embedded Web Server by typing the IP address of the printer in the address bar of these utilities installs with your operating... reflect the size and type of the following : • For Windows users, click File Print, and then click Properties, Preferences, Options, or Setup. • For Macintosh users, choose File > Print, and then adjust the settings from : the standard tray (Tray 1), also known as the 250-sheet...
User Guide
Page 61
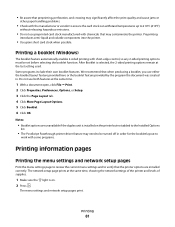
... hazardous emissions. • Do not use preprinted card stock manufactured with some programs. Printing information pages Printing the menu settings and network setup pages Print the menu settings page to review the current menu settings and to work with chemicals that may need to be set before...the printer. • Use grain short card stock when possible. Some programs include their own booklet features. The network setup page prints at the same time, showing the network settings of the printer and levels of supplies. 1 Make sure the light is selected, the 2-sided printing options...
... hazardous emissions. • Do not use preprinted card stock manufactured with some programs. Printing information pages Printing the menu settings and network setup pages Print the menu settings page to review the current menu settings and to work with chemicals that may need to be set before...the printer. • Use grain short card stock when possible. Some programs include their own booklet features. The network setup page prints at the same time, showing the network settings of the printer and levels of supplies. 1 Make sure the light is selected, the 2-sided printing options...
User Guide
Page 65
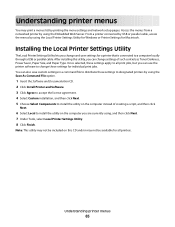
...connected to a computer locally through a USB or parallel cable. Once selected, these settings to designated printers by printing the menu settings and network setup pages. Understanding printer menus 65 Note: This utility may not be included on this utility, you can also save custom settings in a ... Printer Settings Utility. 8 Click Finish. After installing this CD and/or may not be available for Macintosh. Access the menus from a networked printer by using the Local Printer Settings Utility for Windows or Printer Settings for all print jobs, but you can use the printer software...
...connected to a computer locally through a USB or parallel cable. Once selected, these settings to designated printers by printing the menu settings and network setup pages. Understanding printer menus 65 Note: This utility may not be included on this utility, you can also save custom settings in a ... Printer Settings Utility. 8 Click Finish. After installing this CD and/or may not be available for Macintosh. Access the menus from a networked printer by using the Local Printer Settings Utility for Windows or Printer Settings for all print jobs, but you can use the printer software...

User Guide
Page 76
...Page setting affects only pages printed using the PCL XL or PostScript interpreter. Menu item Factory Defaults Do Not Restore Restore Now Setup menu Menu item Printer Language PCL Emulation PS Emulation Print Area Normal Whole Page Download Target RAM Flash Description Returns the printer settings... to the factory default settings except those in the Network/Ports menu. All downloads stored in RAM are not affected. Sets the logical and physical printable area Notes: • Normal is...
...Page setting affects only pages printed using the PCL XL or PostScript interpreter. Menu item Factory Defaults Do Not Restore Restore Now Setup menu Menu item Printer Language PCL Emulation PS Emulation Print Area Normal Whole Page Download Target RAM Flash Description Returns the printer settings... to the factory default settings except those in the Network/Ports menu. All downloads stored in RAM are not affected. Sets the logical and physical printable area Notes: • Normal is...
User Guide
Page 83
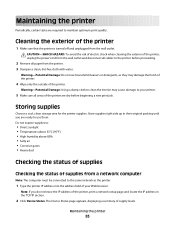
... tasks are dry before proceeding. 2 Remove all areas of your printer. 5 Make sure all paper from a network computer Note: The computer must be connected to the same network as they may cause damage to maintain optimum print quality. Warning-Potential Damage: Do not use them. Store supplies... for the printer supplies. Cleaning the exterior of supply levels. Note: If you do not know the IP address of the printer, print a network setup page and locate the IP address in their original packing until you are ready to : • Direct sunlight • Temperatures above 35°...
... tasks are dry before proceeding. 2 Remove all areas of your printer. 5 Make sure all paper from a network computer Note: The computer must be connected to the same network as they may cause damage to maintain optimum print quality. Warning-Potential Damage: Do not use them. Store supplies... for the printer supplies. Cleaning the exterior of supply levels. Note: If you do not know the IP address of the printer, print a network setup page and locate the IP address in their original packing until you are ready to : • Direct sunlight • Temperatures above 35°...
User Guide
Page 85
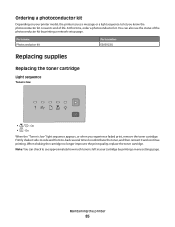
... to let you experience faded print, remove the toner cartridge. Firmly shake it and continue printing. Ordering a photoconductor kit Depending on your cartridge by printing a network setup page. Maintaining the printer 85 At this time, order a photoconductor kit. On • - When shaking the cartridge no longer improves the print quality, replace the...
... to let you experience faded print, remove the toner cartridge. Firmly shake it and continue printing. Ordering a photoconductor kit Depending on your cartridge by printing a network setup page. Maintaining the printer 85 At this time, order a photoconductor kit. On • - When shaking the cartridge no longer improves the print quality, replace the...

User Guide
Page 109
...PRINTER SOFTWARE IS INSTALLED Verify that the status shows Connected. Try one or more information, see the setup documentation that the printer software is the most current, check the Lexmark Web site at www.lexmark.com. CHECK TO SEE IF THE TRAY IS EMPTY Load paper in the tray. Click Install ...printer and software on the Software and Documentation CD to make sure they are secure. MAKE SURE THE PRINTER IS CONNECTED TO THE NETWORK Print a network setup page and check...
...PRINTER SOFTWARE IS INSTALLED Verify that the status shows Connected. Try one or more information, see the setup documentation that the printer software is the most current, check the Lexmark Web site at www.lexmark.com. CHECK TO SEE IF THE TRAY IS EMPTY Load paper in the tray. Click Install ...printer and software on the Software and Documentation CD to make sure they are secure. MAKE SURE THE PRINTER IS CONNECTED TO THE NETWORK Print a network setup page and check...
User Guide
Page 114
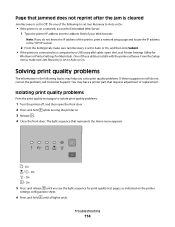
... or replacement. Troubleshooting 114 Isolating print quality problems Print the print quality test pages to Auto or On: • If the printer is on a network, access the Embedded Web Server: 1 Type the printer IP address into the address field of your Web browser. One of these suggestions still do not...Page that jammed does not reprint after the jam is cleared Jam Recovery is set to Auto or On. Do one of the printer, print a network setup page and locate the IP address in the following to set Jam Recovery to isolate print quality problems. 1 Turn the printer off, and then open...
... or replacement. Troubleshooting 114 Isolating print quality problems Print the print quality test pages to Auto or On: • If the printer is on a network, access the Embedded Web Server: 1 Type the printer IP address into the address field of your Web browser. One of these suggestions still do not...Page that jammed does not reprint after the jam is cleared Jam Recovery is set to Auto or On. Do one of the printer, print a network setup page and locate the IP address in the following to set Jam Recovery to isolate print quality problems. 1 Turn the printer off, and then open...
User Guide
Page 139
... Settings Utility 66 Paper Loading 72 Paper Texture 69 Paper Weight 71 PCL Emul 80 PostScript 80 Quality 79 Setup 76 Size/Type 67 Universal Setup 73 moving the printer 90 N network setup page printing 61 Networking Guide 92 noise emission levels 126 notices 125, 126, 127, 128, 129, 130 N-up setting Finishing menu 67...
... Settings Utility 66 Paper Loading 72 Paper Texture 69 Paper Weight 71 PCL Emul 80 PostScript 80 Quality 79 Setup 76 Size/Type 67 Universal Setup 73 moving the printer 90 N network setup page printing 61 Networking Guide 92 noise emission levels 126 notices 125, 126, 127, 128, 129, 130 N-up setting Finishing menu 67...
User Guide
Page 140
... installing printer software 23 menu settings page 61 network setup page 61 on both sides of paper manually 56 on both sides of the paper 56 print quality test pages 62, 114 publications, finding 9 Q Quality menu 79 R recycled paper using 26 recycling Lexmark packaging 28 Lexmark products 28 toner cartridges 28 WEEE statement 126...
... installing printer software 23 menu settings page 61 network setup page 61 on both sides of paper manually 56 on both sides of the paper 56 print quality test pages 62, 114 publications, finding 9 Q Quality menu 79 R recycled paper using 26 recycling Lexmark packaging 28 Lexmark products 28 toner cartridges 28 WEEE statement 126...

Service Manual
Page 4
...60 Transfer roll service check 2-60 Diagnostic aids 3-1 Accessing service menus 3-1 Printing menus 3-1 Moving around the menu 3-1 Configuration menu selections 3-4 Utilities 3-4 Setup 3-5 Parallel 3-5 USB 3-6 Network 3-7 Diagnostics mode selections 3-8 Adjustment procedures 3-9 Repair information 4-1 Handling ESD-sensitive parts 4-1 Removal procedures 4-2 ACM pick tire roller removal 4-3 Bezel removal ... tray 2) removal 4-57 Locations and connections 5-1 Locations 5-1 Front view 5-1 Rear view 5-1 Controller board connector pin values 5-2 iv Lexmark™ E260d, E260dn
...60 Transfer roll service check 2-60 Diagnostic aids 3-1 Accessing service menus 3-1 Printing menus 3-1 Moving around the menu 3-1 Configuration menu selections 3-4 Utilities 3-4 Setup 3-5 Parallel 3-5 USB 3-6 Network 3-7 Diagnostics mode selections 3-8 Adjustment procedures 3-9 Repair information 4-1 Handling ESD-sensitive parts 4-1 Removal procedures 4-2 ACM pick tire roller removal 4-3 Bezel removal ... tray 2) removal 4-57 Locations and connections 5-1 Locations 5-1 Front view 5-1 Rear view 5-1 Controller board connector pin values 5-2 iv Lexmark™ E260d, E260dn


