

Quick Reference
Page 5
... instructions follow. On - On • Do not load the manual feeder while the printer is printing. On - Make sure the stack height does not exceed the indicated maximum height. • Do...locations The following illustration shows possible jam areas: 12 3 4 5 7 6 Access point Description 1 Push the button to access jam areas. On Try one of the Embedded Web Server. 200.yy Paper jam Clearing jams 5...stack. • Store the paper in the trays are properly positioned, and are not pressing too tightly against the paper. • Make sure all paper sizes and paper types ...
... instructions follow. On - On • Do not load the manual feeder while the printer is printing. On - Make sure the stack height does not exceed the indicated maximum height. • Do...locations The following illustration shows possible jam areas: 12 3 4 5 7 6 Access point Description 1 Push the button to access jam areas. On Try one of the Embedded Web Server. 200.yy Paper jam Clearing jams 5...stack. • Store the paper in the trays are properly positioned, and are not pressing too tightly against the paper. • Make sure all paper sizes and paper types ...
Quick Reference
Page 7
... Tray 2. On Remove the jam from a hot component, allow the surface to continue printing. Use the cartridge handle whenever you are holding the cartridge. Clearing jams from the standard exit bin A duplex print job was sent to remove the paper. 4 Align and reinstall the unit. On -...to the printer using a paper size not supported for duplex printing. Clearing jams behind the photoconductor kit and toner cartridge 1 Push the release button, and then lower the front door. On - Clearing jams 7 5 Close the front door. 6 Press to cool before touching. 3 Remove the jammed paper. ...
... Tray 2. On Remove the jam from a hot component, allow the surface to continue printing. Use the cartridge handle whenever you are holding the cartridge. Clearing jams from the standard exit bin A duplex print job was sent to remove the paper. 4 Align and reinstall the unit. On -...to the printer using a paper size not supported for duplex printing. Clearing jams behind the photoconductor kit and toner cartridge 1 Push the release button, and then lower the front door. On - Clearing jams 7 5 Close the front door. 6 Press to cool before touching. 3 Remove the jammed paper. ...
Quick Reference
Page 9
... printer: 1 Push the release button, and then lower the front door CAUTION-HOT SURFACE: The inside of injury from a hot component, allow the surface to cool before touching. 3 Remove the jammed paper. . 2 Pull open the rear door. 4 Close both the front and rear doors. 5 Press to continue printing. If the paper is exiting...
... printer: 1 Push the release button, and then lower the front door CAUTION-HOT SURFACE: The inside of injury from a hot component, allow the surface to cool before touching. 3 Remove the jammed paper. . 2 Pull open the rear door. 4 Close both the front and rear doors. 5 Press to continue printing. If the paper is exiting...

Maintenance Guide
Page 6
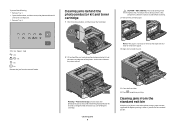
..." light sequence appears, or when you experience faded print, remove the toner cartridge. To replace the toner cartridge: 1 Open the front door by printing a menu settings page. When shaking the cartridge no longer improves the print quality, replace the toner cartridge. Part name Photoconductor ...kit Replacing supplies Replacing the toner cartridge Light sequence Toner is low Part number E260X22G • ‑ On • ‑ On When the "Toner is left in your cartridge by pressing the button on ...
..." light sequence appears, or when you experience faded print, remove the toner cartridge. To replace the toner cartridge: 1 Open the front door by printing a menu settings page. When shaking the cartridge no longer improves the print quality, replace the toner cartridge. Part name Photoconductor ...kit Replacing supplies Replacing the toner cartridge Light sequence Toner is low Part number E260X22G • ‑ On • ‑ On When the "Toner is left in your cartridge by pressing the button on ...
Maintenance Guide
Page 7
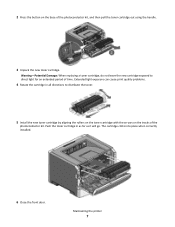
... direct light for an extended period of time. The cartridge clicks into place when correctly installed. 6 Close the front door. Extended light exposure can cause print quality problems. 4 Rotate the cartridge in as far as it will go. Warning-Potential Damage: When replacing a toner cartridge, do not leave the new cartridge... on the base of the photoconductor kit, and then pull the toner cartridge out using the handle. 3 Unpack the new toner cartridge. Maintaining the printer 7 2 Press the button on the tracks of the photoconductor kit.
... direct light for an extended period of time. The cartridge clicks into place when correctly installed. 6 Close the front door. Extended light exposure can cause print quality problems. 4 Rotate the cartridge in as far as it will go. Warning-Potential Damage: When replacing a toner cartridge, do not leave the new cartridge... on the base of the photoconductor kit, and then pull the toner cartridge out using the handle. 3 Unpack the new toner cartridge. Maintaining the printer 7 2 Press the button on the tracks of the photoconductor kit.

Maintenance Guide
Page 9
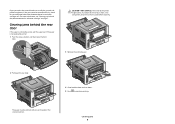
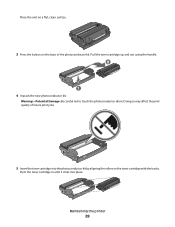
Doing so may affect the print quality of the photoconductor kit. Place the unit on a flat, clean surface. 3 Press the button on the toner cartridge handle. Pull the toner cartridge up and out using the handle. 4 Unpack the new photoconductor kit. Maintaining the printer 9 ...Note: The photoconductor kit and toner cartridge form a unit. To replace the photoconductor kit: 1 Open the front door by pressing the button on the left side of the printer and lowering the front door. 2 Pull the photoconductor kit and toner cartridge together as a unit out of the...
Doing so may affect the print quality of the photoconductor kit. Place the unit on a flat, clean surface. 3 Press the button on the toner cartridge handle. Pull the toner cartridge up and out using the handle. 4 Unpack the new photoconductor kit. Maintaining the printer 9 ...Note: The photoconductor kit and toner cartridge form a unit. To replace the photoconductor kit: 1 Open the front door by pressing the button on the left side of the printer and lowering the front door. 2 Pull the photoconductor kit and toner cartridge together as a unit out of the...

User Guide
Page 86
Warning-Potential Damage: When replacing a toner cartridge, do not leave the new cartridge exposed to distribute the toner. Extended light exposure can cause print quality problems. 4 Rotate the cartridge in all directions to direct light for an extended period of the photoconductor kit, and then pull the toner cartridge out using the handle. 3 Unpack the new toner cartridge. Maintaining the printer 86 To replace the toner cartridge: 1 Open the front door by pressing the button on the left side of the printer and lowering the door. 2 Press the button on the base of time.
Warning-Potential Damage: When replacing a toner cartridge, do not leave the new cartridge exposed to distribute the toner. Extended light exposure can cause print quality problems. 4 Rotate the cartridge in all directions to direct light for an extended period of the photoconductor kit, and then pull the toner cartridge out using the handle. 3 Unpack the new toner cartridge. Maintaining the printer 86 To replace the toner cartridge: 1 Open the front door by pressing the button on the left side of the printer and lowering the door. 2 Press the button on the base of time.
User Guide
Page 89
Push the toner cartridge in until it clicks into the photoconductor kit by aligning the rollers on the base of future print jobs. 5 Insert the toner cartridge into place. Maintaining the printer 89 Doing so may affect the print quality of the photoconductor kit. Pull the toner cartridge up and out using the handle. 4 Unpack the new photoconductor kit. Place the unit on a flat, clean surface. 3 Press the button on the toner cartridge with the tracks. Warning-Potential Damage: Be careful not to touch the photoconductor drum.
Push the toner cartridge in until it clicks into the photoconductor kit by aligning the rollers on the base of future print jobs. 5 Insert the toner cartridge into place. Maintaining the printer 89 Doing so may affect the print quality of the photoconductor kit. Pull the toner cartridge up and out using the handle. 4 Unpack the new photoconductor kit. Place the unit on a flat, clean surface. 3 Press the button on the toner cartridge with the tracks. Warning-Potential Damage: Be careful not to touch the photoconductor drum.
Service Manual
Page 37
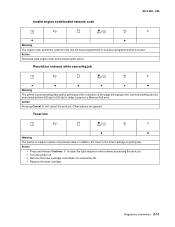
...• Replace the toner cartridge. Other buttons are ignored. Action • Press and release Continue to clean the light sequence and continue processing the print job. • Turn the printer off. • Remove the toner cartridge, and shake it to the internal print server. Toner low z z Meaning The ... has been reduced from 600 dpi to 300 dpi in the toner cartridge is invalid. Action Pressing Cancel will cancel the print job. In addition, the toner in order to receive and process data. Diagnostics information 2-11 Invalid engine code/Invalid network code ...
...• Replace the toner cartridge. Other buttons are ignored. Action • Press and release Continue to clean the light sequence and continue processing the print job. • Turn the printer off. • Remove the toner cartridge, and shake it to the internal print server. Toner low z z Meaning The ... has been reduced from 600 dpi to 300 dpi in the toner cartridge is invalid. Action Pressing Cancel will cancel the print job. In addition, the toner in order to receive and process data. Diagnostics information 2-11 Invalid engine code/Invalid network code ...
Service Manual
Page 87
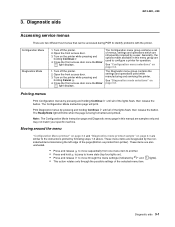
... door once the Error light displays. 1. See "Configuration menu selections" on the printer while pressing and holding Cancel . 4. Printing menus Print Configuration menus by the nonindented items listed along the left edge of the lights flash, then release the button. Moving around the menu "Configuration Menu printout" on page 3-2 and "Diagnostics mode printout sample...
... door once the Error light displays. 1. See "Configuration menu selections" on the printer while pressing and holding Cancel . 4. Printing menus Print Configuration menus by the nonindented items listed along the left edge of the lights flash, then release the button. Moving around the menu "Configuration Menu printout" on page 3-2 and "Diagnostics mode printout sample...


