
Quick Reference
Page 6
... control panel cycles through all the lights. The Load Paper, Toner Low / Replace PC Kit, Ready and Continue lights appear. 8 Release the Continue button. 9 Turn the printer off the printer, unplug the power cord from the wall outlet, and reinstall the option. - If an option is correctly listed under "Printer Information." - Printing the menu settings and network setup pages 6 Printing a test page from the On the menu settings page: - Factory defaults have been reset. Verify that the options you loaded. Verify that the paper trays are correctly listed under Installed...
... control panel cycles through all the lights. The Load Paper, Toner Low / Replace PC Kit, Ready and Continue lights appear. 8 Release the Continue button. 9 Turn the printer off the printer, unplug the power cord from the wall outlet, and reinstall the option. - If an option is correctly listed under "Printer Information." - Printing the menu settings and network setup pages 6 Printing a test page from the On the menu settings page: - Factory defaults have been reset. Verify that the options you loaded. Verify that the paper trays are correctly listed under Installed...
User's Guide
Page 3
... Printer Settings Configuration sheet 37 Configuration menus overview ...38 Network menu ...38 Parallel menu ...39 Setup menu ...39 USB menu ...40 Utilities menu ...40 Chapter 4: Print media tasks and tips 41 What types of the paper (duplex printing 62 Printing multiple page images on one page (N-upprinting 64 Printing a booklet ...65 Printing on preventing jams ...48 Loading the 250-sheet tray ...49 Extending the tray for legal- or folio-size paper 52 Loading the manual feeder ...54 Using the rear exit ...55 Clearing jams ...56 Chapter 5: Printing tasks 60 Manually feeding a print job...
... Printer Settings Configuration sheet 37 Configuration menus overview ...38 Network menu ...38 Parallel menu ...39 Setup menu ...39 USB menu ...40 Utilities menu ...40 Chapter 4: Print media tasks and tips 41 What types of the paper (duplex printing 62 Printing multiple page images on one page (N-upprinting 64 Printing a booklet ...65 Printing on preventing jams ...48 Loading the 250-sheet tray ...49 Extending the tray for legal- or folio-size paper 52 Loading the manual feeder ...54 Using the rear exit ...55 Clearing jams ...56 Chapter 5: Printing tasks 60 Manually feeding a print job...

User's Guide
Page 38
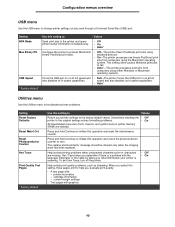
... causes Windows print jobs to process Macintosh binary PostScript print jobs. • Off-The printer filters PostScript print jobs using standard protocol. • On-The printer processes raw binary PostScript print jobs from computers using the Macintosh operating system. Configuration menus overview Configuration menus overview Menus are indicated by Continue , Ready , Toner Low/Replace PC Kit , and Load Paper light sequences. Setting NPA Mode Mac Binary PS Set Card Speed * Factory default Use this setting to Values Send print jobs to the printer and query printer status...
... causes Windows print jobs to process Macintosh binary PostScript print jobs. • Off-The printer filters PostScript print jobs using standard protocol. • On-The printer processes raw binary PostScript print jobs from computers using the Macintosh operating system. Configuration menus overview Configuration menus overview Menus are indicated by Continue , Ready , Toner Low/Replace PC Kit , and Load Paper light sequences. Setting NPA Mode Mac Binary PS Set Card Speed * Factory default Use this setting to Values Send print jobs to the printer and query printer status...
User's Guide
Page 40
...Bus (USB) port. Press and hold Continue to run at full also disables its hi-speed capabilities. • Auto* Utilities menu Use the Utilities menu to troubleshoot printer problems. Setting Reset Factory Defaults Reset Maint Cnt Reset Photoconductor Counter Hex Trace Print Quality Test Pages * Factory default Use this setting, three pages print to the factory default values. Press and hold Continue to initiate this operation and reset the maintenance counter. This setting often causes Windows print jobs to zero. Configuration menus overview USB menu Use the USB menu to...
...Bus (USB) port. Press and hold Continue to run at full also disables its hi-speed capabilities. • Auto* Utilities menu Use the Utilities menu to troubleshoot printer problems. Setting Reset Factory Defaults Reset Maint Cnt Reset Photoconductor Counter Hex Trace Print Quality Test Pages * Factory default Use this setting, three pages print to the factory default values. Press and hold Continue to initiate this operation and reset the maintenance counter. This setting often causes Windows print jobs to zero. Configuration menus overview USB menu Use the USB menu to...
User's Guide
Page 44
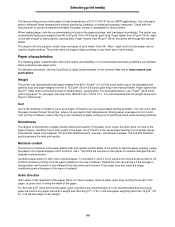
For detailed information, see the Card Stock & Label Guide available on the Lexmark Web site at its edges. If the paper is too smooth, it can cause feeding problems. Smoothness The degree of smoothness of paper directly affects print quality. If the paper is too rough, the toner does not fuse to the paper properly, resulting in poor print quality. Smoothness needs to use it is not recommended...
For detailed information, see the Card Stock & Label Guide available on the Lexmark Web site at its edges. If the paper is too smooth, it can cause feeding problems. Smoothness The degree of smoothness of paper directly affects print quality. If the paper is too rough, the toner does not fuse to the paper properly, resulting in poor print quality. Smoothness needs to use it is not recommended...
User's Guide
Page 78
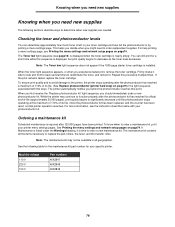
... toner is listed under the Warnings heading, it . Ordering a maintenance kit Scheduled maintenance is installed. See Printing the menu settings and network setup pages on page74. See the following sections describe ways to order replacement supplies. The Toner low light sequence (see Printing the menu settings and network setup pages on page74. If Maintenance is left in all the items necessary to order a maintenance kit, print your specific printer. For help printing a menu settings page, see page16) is displayed when the toner cartridge is by printing a menu settings...
... toner is listed under the Warnings heading, it . Ordering a maintenance kit Scheduled maintenance is installed. See Printing the menu settings and network setup pages on page74. See the following sections describe ways to order replacement supplies. The Toner low light sequence (see Printing the menu settings and network setup pages on page74. If Maintenance is left in all the items necessary to order a maintenance kit, print your specific printer. For help printing a menu settings page, see page16) is displayed when the toner cartridge is by printing a menu settings...
User's Guide
Page 85
... laser printers. • If possible try printing in yet. If the paper still curls, select the Reduce Curl setting from the Configuration menu (See Turning on Reduced Curl mode on . Repeat this procedure multiple times. If print remains faded, replace the toner cartridge. Close the rear exit door. 85 Why am I missing characters when I clear a paper jam? How do I restore the factory defaults? The Load Paper, Toner Low / Replace PC Kit, Ready and Continue lights appear. 8 Release the Continue button. 9 Turn...
... laser printers. • If possible try printing in yet. If the paper still curls, select the Reduce Curl setting from the Configuration menu (See Turning on Reduced Curl mode on . Repeat this procedure multiple times. If print remains faded, replace the toner cartridge. Close the rear exit door. 85 Why am I missing characters when I clear a paper jam? How do I restore the factory defaults? The Load Paper, Toner Low / Replace PC Kit, Ready and Continue lights appear. 8 Release the Continue button. 9 Turn...
User's Guide
Page 86
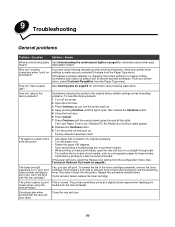
... fonts, the number and complexity of images, and the number of your print job by printing output at the same time. However, before turning this mode on to help alleviate the problem. If you should try the possible solutions offered in Troubleshooting (see The paper is set to Normal (see Using the Local Printer Settings Utility on your needs. The Error light sequence appears. 6 Close the front door. 86 When a printer error occurs, a message...
... fonts, the number and complexity of images, and the number of your print job by printing output at the same time. However, before turning this mode on to help alleviate the problem. If you should try the possible solutions offered in Troubleshooting (see The paper is set to Normal (see Using the Local Printer Settings Utility on your needs. The Error light sequence appears. 6 Close the front door. 86 When a printer error occurs, a message...
User's Guide
Page 88
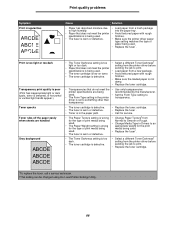
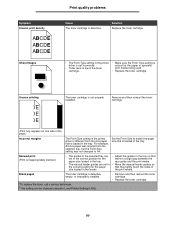
...; The Toner Darkness setting is smeared, or horizontal or vertical light bands appear.) Toner specks Toner rubs off the paper easily when sheets are being used . • Replace the fuser*. Print quality problems Symptom Print irregularities ABCDE ABCDE ABCDE Cause Solution • Paper has absorbed moisture due • Load paper from a fresh package to print. • Replace the toner cartridge. *To replace the fuser, call a service technician. †This setting can be changed using the Local Printer Settings Utility...
...; The Toner Darkness setting is smeared, or horizontal or vertical light bands appear.) Toner specks Toner rubs off the paper easily when sheets are being used . • Replace the fuser*. Print quality problems Symptom Print irregularities ABCDE ABCDE ABCDE Cause Solution • Paper has absorbed moisture due • Load paper from a fresh package to print. • Replace the toner cartridge. *To replace the fuser, call a service technician. †This setting can be changed using the Local Printer Settings Utility...
User's Guide
Page 89
... manual feeder guides are • Adjust the guides in the tray so that they lightly touch the sides of the page.) Incorrect margins The Form Size setting in the printer driver is different from the size paper that is loaded in the tray. Remove and then reinsert the toner cartridge. (Print only appears on one side of size loaded in the tray. Uneven printing DE DE DE The toner cartridge is defective. Symptom Uneven print density ABCDE ABCDE ABCDE Ghost Images Print quality problems...
... manual feeder guides are • Adjust the guides in the tray so that they lightly touch the sides of the page.) Incorrect margins The Form Size setting in the printer driver is different from the size paper that is loaded in the tray. Remove and then reinsert the toner cartridge. (Print only appears on one side of size loaded in the tray. Uneven printing DE DE DE The toner cartridge is defective. Symptom Uneven print density ABCDE ABCDE ABCDE Ghost Images Print quality problems...
User's Guide
Page 97
... another user, warranty service under the terms of the warranty period. To obtain warranty service you transfer this document. You are substantially used with the product. Statement of the Remarketer or Lexmark. To obtain warranty service, you present for repair or replacement (at http://support.lexmark.com. You should transfer proof of products, supplies or parts • Products, supplies, parts, materials (such as toners and inks), software, or interfaces not...
... another user, warranty service under the terms of the warranty period. To obtain warranty service you transfer this document. You are substantially used with the product. Statement of the Remarketer or Lexmark. To obtain warranty service, you present for repair or replacement (at http://support.lexmark.com. You should transfer proof of products, supplies or parts • Products, supplies, parts, materials (such as toners and inks), software, or interfaces not...
User's Guide
Page 99
... (Setup menu) 39 B booklets 65 Busy light 11 C canceling a print job 67 card stock 47 characteristics, print media paper 43 cleaning the printhead lens 91 clearing paper jams 56 configuration menus Parallel MAC Binary PS 39 Mode 2 39 NPA Mode 39 Protocol 39 printing the Printer Settings Configuration sheet 37 Setup Auto CR after LF 39 Auto LF after CR 39 USB MAC Binary PS 38, 40 NPA Mode 38, 40 Utilities Hex Trace 40 Print Quality Test Pages 40 Reset Factory Defaults 40 Reset Photoconductor Counter 40 control panel light...
... (Setup menu) 39 B booklets 65 Busy light 11 C canceling a print job 67 card stock 47 characteristics, print media paper 43 cleaning the printhead lens 91 clearing paper jams 56 configuration menus Parallel MAC Binary PS 39 Mode 2 39 NPA Mode 39 Protocol 39 printing the Printer Settings Configuration sheet 37 Setup Auto CR after LF 39 Auto LF after CR 39 USB MAC Binary PS 38, 40 NPA Mode 38, 40 Utilities Hex Trace 40 Print Quality Test Pages 40 Reset Factory Defaults 40 Reset Photoconductor Counter 40 control panel light...
User's Guide
Page 100
...modes 86 options memory card 72 overlays 66 P paper choosing 43 jams 56 loading 49, 54 recommended types 43 storing 47 unsatisfactory types 45 Parallel menu 39 photoconductor kit changing 82 level 78 light sequences 79 ordering 76 recycling 84 Photoconductor kit near full light 17 ports parallel 39 USB 38, 40 print cartridge See toner cartridge print media guidelines paper 43 print media specifications characteristics 44 print quality problems 87 Print Quality Test Pages (Utilities menu) 40 Printer Settings Configuration sheet printing 37 printhead lens, cleaning 91 printing booklets 65 duplex...
...modes 86 options memory card 72 overlays 66 P paper choosing 43 jams 56 loading 49, 54 recommended types 43 storing 47 unsatisfactory types 45 Parallel menu 39 photoconductor kit changing 82 level 78 light sequences 79 ordering 76 recycling 84 Photoconductor kit near full light 17 ports parallel 39 USB 38, 40 print cartridge See toner cartridge print media guidelines paper 43 print media specifications characteristics 44 print quality problems 87 Print Quality Test Pages (Utilities menu) 40 Printer Settings Configuration sheet printing 37 printhead lens, cleaning 91 printing booklets 65 duplex...
Service Manual
Page 32
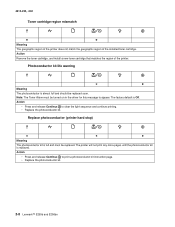
... kit life warning ✷ z Meaning The photoconductor is full and must be replaced soon. Note: The Toner Alarm must be replaced. Replace photoconductor (printer hard stop) ✷ ✷ z Meaning The photoconductor kit is almost full and should be turned on in the driver for this message to appear. Action Remove the toner cartridge, and install a new toner cartridge that matches the region of the installed toner cartridge. Action • Press and release Continue to print...
... kit life warning ✷ z Meaning The photoconductor is full and must be replaced soon. Note: The Toner Alarm must be replaced. Replace photoconductor (printer hard stop) ✷ ✷ z Meaning The photoconductor kit is almost full and should be turned on in the driver for this message to appear. Action Remove the toner cartridge, and install a new toner cartridge that matches the region of the installed toner cartridge. Action • Press and release Continue to print...
Service Manual
Page 49
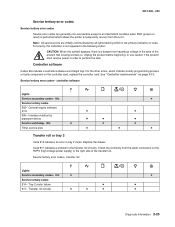
... when POR (power-on reset) is performed which allows the printer to temporarily recover from the error. Service tertiary error codes-controller software Lights Service secondary codes-90x ✷ Service tertiary codes 902-General engine software error ✷ ✷ 905-Interface violation by all lights flashing which indicate a faulty programming process or faulty component on the controller card, replace the controller card. Service tertiary error codes-transfer roll Lights Service secondary codes-91x ✷ Service tertiary codes 914-Tray 2 motor failure...
... when POR (power-on reset) is performed which allows the printer to temporarily recover from the error. Service tertiary error codes-controller software Lights Service secondary codes-90x ✷ Service tertiary codes 902-General engine software error ✷ ✷ 905-Interface violation by all lights flashing which indicate a faulty programming process or faulty component on the controller card, replace the controller card. Service tertiary error codes-transfer roll Lights Service secondary codes-91x ✷ Service tertiary codes 914-Tray 2 motor failure...

Service Manual
Page 56
... media was in the paper path have been flushed to the output bin. Pages in the paper path have been flushed to the output bin. Pages in the paper path have been flushed to feed from tray 1. MISIDENTIFIED NO GAP JAM. Failed to the output bin. Paper jam near the manual feeder. MISIDENTIFIED SMALL GAP JAM. Engine detected no gap at the manual feeder sensor, attempted to the paper path. 4512-220, -230 Paper jam error codes (Continued) Error...
... media was in the paper path have been flushed to the output bin. Pages in the paper path have been flushed to the output bin. Pages in the paper path have been flushed to feed from tray 1. MISIDENTIFIED NO GAP JAM. Failed to the output bin. Paper jam near the manual feeder. MISIDENTIFIED SMALL GAP JAM. Engine detected no gap at the manual feeder sensor, attempted to the paper path. 4512-220, -230 Paper jam error codes (Continued) Error...

Service Manual
Page 74
... replacing the toner cartridge. Vertical streaks Something could be full. Print quality problems Problem Light or blurred characters. The toner cartridge may be getting low on toner: • Remove the toner cartridge and toner cartridge assembly. • Shake it from side to side to redistribute the toner. • Reinstall it and recheck for condition. • Make sure to use the recommended print media (see media types and sizes in the User's Reference). • Use MarkVision™ to define the custom type setting for media type, media...
... replacing the toner cartridge. Vertical streaks Something could be full. Print quality problems Problem Light or blurred characters. The toner cartridge may be getting low on toner: • Remove the toner cartridge and toner cartridge assembly. • Shake it from side to side to redistribute the toner. • Reinstall it and recheck for condition. • Make sure to use the recommended print media (see media types and sizes in the User's Reference). • Use MarkVision™ to define the custom type setting for media type, media...
Service Manual
Page 82
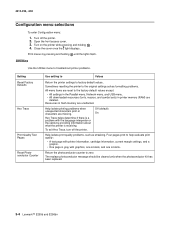
... as streaking. The replace photoconductor message should be cleared only when the photoconductor kit has been replaced. 3-4 Lexmark™ E250d and E250dn Turn on the printer while pressing and holding until the lights flash. Utilities Use the Utilities menu to troubleshoot printer problems. Setting Reset Factory Defaults Hex Trace Print Quality Test Pages Reset Photoconductor Counter Use setting to Values Return the printer settings to the factory default values except: • All settings in the Parallel menu, Network menu, and USB menu. • All downloaded resources (fonts...
... as streaking. The replace photoconductor message should be cleared only when the photoconductor kit has been replaced. 3-4 Lexmark™ E250d and E250dn Turn on the printer while pressing and holding until the lights flash. Utilities Use the Utilities menu to troubleshoot printer problems. Setting Reset Factory Defaults Hex Trace Print Quality Test Pages Reset Photoconductor Counter Use setting to Values Return the printer settings to the factory default values except: • All settings in the Parallel menu, Network menu, and USB menu. • All downloaded resources (fonts...
Service Manual
Page 93
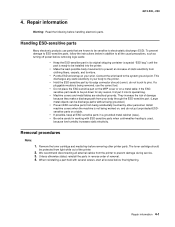
... turning off power before final tightening. Connect the wrist band to the printer. • Hold the ESD-sensitive part by other printer parts. Removal procedures Note: 1. The toner cartridge should be discharge paths without being grounded.) • Prevent ESD-sensitive parts from light while out of removal. 4. Unless otherwise stated, reinstall the parts in its edge connector shroud (cover); If a pluggable module is not being removed, use parts...
... turning off power before final tightening. Connect the wrist band to the printer. • Hold the ESD-sensitive part by other printer parts. Removal procedures Note: 1. The toner cartridge should be discharge paths without being grounded.) • Prevent ESD-sensitive parts from light while out of removal. 4. Unless otherwise stated, reinstall the parts in its edge connector shroud (cover); If a pluggable module is not being removed, use parts...

Service Manual
Page 158
...3-8 print media preventing jams 1-7 trays by model 1-4 types and sizes 1-6 print quality pages 3-4 using 2-46 print quality problems print media 1-7 service check 2-46 solving 2-50 printer symptom table 2-38 printhead removal 4-40 service check 2-53 Protocol 3-5 R removals controller card 4-13 cover open sensor 4-15 covers front access cover 4-2 left side cover 4-4 right side cover 4-5 top cover 4-7 developer drive coupling assembly 4-16 fan 4-21 fuser 4-22 fuser power cable 4-24 LVPS/HVPS card assembly 4-26 paper exit guide assembly 4-37 I-2 Lexmark™ E250d and E250dn paper feed rollers...
...3-8 print media preventing jams 1-7 trays by model 1-4 types and sizes 1-6 print quality pages 3-4 using 2-46 print quality problems print media 1-7 service check 2-46 solving 2-50 printer symptom table 2-38 printhead removal 4-40 service check 2-53 Protocol 3-5 R removals controller card 4-13 cover open sensor 4-15 covers front access cover 4-2 left side cover 4-4 right side cover 4-5 top cover 4-7 developer drive coupling assembly 4-16 fan 4-21 fuser 4-22 fuser power cable 4-24 LVPS/HVPS card assembly 4-26 paper exit guide assembly 4-37 I-2 Lexmark™ E250d and E250dn paper feed rollers...


