
User Manual
Page 4
...the manual feeder...44 Paper and specialty media guide 46 Paper guidelines...46 Paper characteristics...46 Unacceptable paper ...47 Selecting paper...47 Selecting preprinted forms and letterhead...47 Storing paper...48 Supported paper sizes, types, and weights...48 Paper sizes supported by the printer ...48... a font sample list...60 Printing a directory list...60 Printing the print quality test pages ...60 Canceling a print job from the printer control panel ...60 Canceling a print job from the computer ...61 Clearing jams 63 Avoiding jams...63 Understanding jam numbers and locations...64...
...the manual feeder...44 Paper and specialty media guide 46 Paper guidelines...46 Paper characteristics...46 Unacceptable paper ...47 Selecting paper...47 Selecting preprinted forms and letterhead...47 Storing paper...48 Supported paper sizes, types, and weights...48 Paper sizes supported by the printer ...48... a font sample list...60 Printing a directory list...60 Printing the print quality test pages ...60 Canceling a print job from the printer control panel ...60 Canceling a print job from the computer ...61 Clearing jams 63 Avoiding jams...63 Understanding jam numbers and locations...64...
User Manual
Page 11
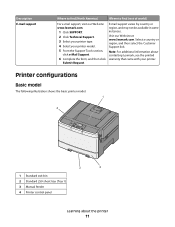
...additional information about the printer 11 Printer configurations Basic model The following illustration shows the basic printer model: 1 4 3 2 1 Standard exit bin 2 Standard 250-sheet tray (Tray 1) 3 Manual feeder 4 Printer control panel Learning about contacting Lexmark, see the printed warranty that came with your printer model. 5 From ... find (rest of world) For e-mail support, visit our Web site: www.lexmark.com. 1 Click SUPPORT. 2 Click Technical Support. 3 Select your printer type. 4 Select your printer. E-mail support varies by country or region, and may not be available in ...
...additional information about the printer 11 Printer configurations Basic model The following illustration shows the basic printer model: 1 4 3 2 1 Standard exit bin 2 Standard 250-sheet tray (Tray 1) 3 Manual feeder 4 Printer control panel Learning about contacting Lexmark, see the printed warranty that came with your printer model. 5 From ... find (rest of world) For e-mail support, visit our Web site: www.lexmark.com. 1 Click SUPPORT. 2 Click Technical Support. 3 Select your printer type. 4 Select your printer. E-mail support varies by country or region, and may not be available in ...
User Manual
Page 27
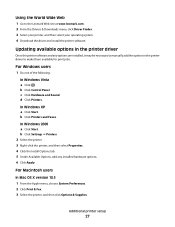
... Click the Install Options tab. 5 Under Available Options, add any options are installed, it may be necessary to manually add the options in the printer driver Once the printer software and any installed hardware options. 6 Click Apply. b Click Control Panel. For Windows users 1 Do one ...of the following: In Windows Vista a Click . Updating available options in the printer driver to the Lexmark Web site at www.lexmark.com. 2 From the Drivers & Downloads menu, click Driver Finder. 3 Select your printer, and then select your operating system. 4 Download the driver and install the...
... Click the Install Options tab. 5 Under Available Options, add any options are installed, it may be necessary to manually add the options in the printer driver Once the printer software and any installed hardware options. 6 Click Apply. b Click Control Panel. For Windows users 1 Do one ...of the following: In Windows Vista a Click . Updating available options in the printer driver to the Lexmark Web site at www.lexmark.com. 2 From the Drivers & Downloads menu, click Driver Finder. 3 Select your printer, and then select your operating system. 4 Download the driver and install the...
User Manual
Page 36
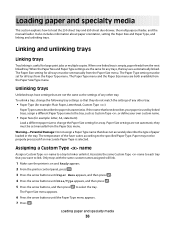
...Paper, Letterhead, Custom Type ) Paper Type names describe the paper characteristics. Unlinking trays Unlinked trays have settings that they must be set manually from the Paper Size menu. If the name that does not accurately describe the type of the fuser varies according to load the 250-... in the tray. Warning-Potential Damage: Do not assign a Paper Type name that best describes your paper is on and Ready appears. 2 From the printer control panel, press . 3 Press the arrow buttons until Paper Menu appears, and then press . 4 Press the arrow buttons until the Paper Type menu...
...Paper, Letterhead, Custom Type ) Paper Type names describe the paper characteristics. Unlinking trays Unlinked trays have settings that they must be set manually from the Paper Size menu. If the name that does not accurately describe the type of the fuser varies according to load the 250-... in the tray. Warning-Potential Damage: Do not assign a Paper Type name that best describes your paper is on and Ready appears. 2 From the printer control panel, press . 3 Press the arrow buttons until Paper Menu appears, and then press . 4 Press the arrow buttons until the Paper Type menu...
User Manual
Page 44
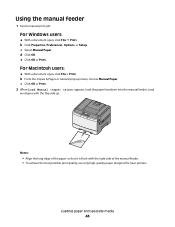
...side of the paper so that it is flush with the flap side up menu, choose Manual Paper. Loading paper and specialty media 44 d Click OK. c Select Manual Paper. Using the manual feeder 1 Send a manual print job: For Windows users: a With a document open , click File > Print. ...c Click OK or Print. 2 When Load Manual appears, load the paper facedown into the manual feeder. Notes: • Align the long edge of the manual feeder. • To achieve the best possible print quality, use only high-quality paper designed for laser printers. b Click Properties, Preferences, Options, or ...
...side of the paper so that it is flush with the flap side up menu, choose Manual Paper. Loading paper and specialty media 44 d Click OK. c Select Manual Paper. Using the manual feeder 1 Send a manual print job: For Windows users: a With a document open , click File > Print. ...c Click OK or Print. 2 When Load Manual appears, load the paper facedown into the manual feeder. Notes: • Align the long edge of the manual feeder. • To achieve the best possible print quality, use only high-quality paper designed for laser printers. b Click Properties, Preferences, Options, or ...
User Manual
Page 48
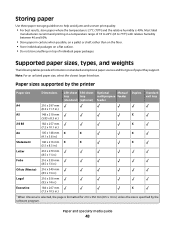
...; For best results, store paper where the temperature is 21°C (70°F) and the relative humidity is specified by the printer Paper size Dimensions 250-sheet 550-sheet Optional Manual tray tray multipurpose feeder (standard) (optional) feeder Duplex Standard exit tray A4 210 x 297 mm (8.3 x 11.7 in.) A5 148 x 210 mm...
...; For best results, store paper where the temperature is 21°C (70°F) and the relative humidity is specified by the printer Paper size Dimensions 250-sheet 550-sheet Optional Manual tray tray multipurpose feeder (standard) (optional) feeder Duplex Standard exit tray A4 210 x 297 mm (8.3 x 11.7 in.) A5 148 x 210 mm...
User Manual
Page 50
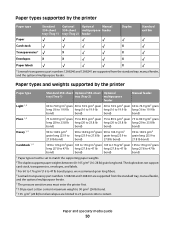
...printer Paper type Paper Standard Optional Optional Manual 250-sheet 550-sheet multipurpose feeder tray (Tray 1) tray (Tray 2) feeder Duplex Standard exit bin Card stock X Transparencies* X X Envelopes X X X Paper labels X * Lexmark transparency part numbers 12A8240 and 12A8241 are supported from the standard tray, manual...content. Paper and specialty media guide 50 Paper types supported by the printer Paper type Standard 250-sheet Optional 550-sheet Optional tray (Tray 1) tray (Tray 2) multipurpose feeder Manual feeder Light 1, 2 60 to 74.9 g/m2 grain 60 to 74...
...printer Paper type Paper Standard Optional Optional Manual 250-sheet 550-sheet multipurpose feeder tray (Tray 1) tray (Tray 2) feeder Duplex Standard exit bin Card stock X Transparencies* X X Envelopes X X X Paper labels X * Lexmark transparency part numbers 12A8240 and 12A8241 are supported from the standard tray, manual...content. Paper and specialty media guide 50 Paper types supported by the printer Paper type Standard 250-sheet Optional 550-sheet Optional tray (Tray 1) tray (Tray 2) multipurpose feeder Manual feeder Light 1, 2 60 to 74.9 g/m2 grain 60 to 74...
User Manual
Page 51
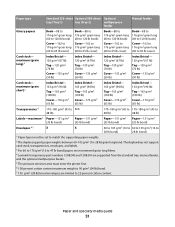
... Envelopes 6,7 X X 60 to 105 g/m2 (16 to 60 to 105 g/m2 (16 to 28 lb bond) 28 lb bond) 1 Paper types must enter the printer first. 6 100 percent cotton content maximum weight is 90 g/m2 (24 lb) bond. 7 105 g/m2 (28 lb) bond envelopes are limited to match the supporting..., and labels. 3 For 60 to 176 g/m2 (16 to 47 lb bond) paper, we recommend grain long fibers. 4 Lexmark transparency part numbers 12A8240 and 12A8241 are supported from the standard tray, manual feeder, and the optional multipurpose feeder. 5 The pressure sensitive area must be set to 25 percent cotton content. Paper...
... Envelopes 6,7 X X 60 to 105 g/m2 (16 to 60 to 105 g/m2 (16 to 28 lb bond) 28 lb bond) 1 Paper types must enter the printer first. 6 100 percent cotton content maximum weight is 90 g/m2 (24 lb) bond. 7 105 g/m2 (28 lb) bond envelopes are limited to match the supporting..., and labels. 3 For 60 to 176 g/m2 (16 to 47 lb bond) paper, we recommend grain long fibers. 4 Lexmark transparency part numbers 12A8240 and 12A8241 are supported from the standard tray, manual feeder, and the optional multipurpose feeder. 5 The pressure sensitive area must be set to 25 percent cotton content. Paper...
User Manual
Page 56
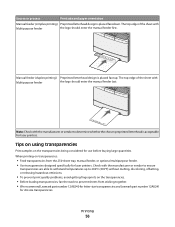
...feeder the logo should enter the manual feeder first. Tips on using transparencies Print samples on transparencies: • Feed transparencies from sticking together. • We recommend Lexmark part number 12A8240 for letter-size transparencies and Lexmark part number 12A8241 for use before ...Check with the manufacturer or vendor to prevent sheets from the 250-sheet tray, manual feeder, or optional multipurpose feeder. • Use transparencies designed specifically for laser printers. Note: Check with the manufacturer or vendor to ensure transparencies are able to withstand...
...feeder the logo should enter the manual feeder first. Tips on using transparencies Print samples on transparencies: • Feed transparencies from sticking together. • We recommend Lexmark part number 12A8240 for letter-size transparencies and Lexmark part number 12A8241 for use before ...Check with the manufacturer or vendor to prevent sheets from the 250-sheet tray, manual feeder, or optional multipurpose feeder. • Use transparencies designed specifically for laser printers. Note: Check with the manufacturer or vendor to ensure transparencies are able to withstand...
User Manual
Page 57
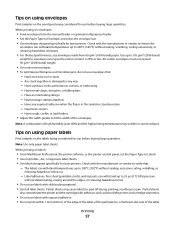
...Partial sheets may wrinkle or seal envelopes. Partial sheets also contaminate the printer and the cartridge with adhesive, and could void the printer and cartridge warranties. • Do not use envelopes made from the manual feeder or optional multipurpose feeder. • Set the Paper Type ...to Envelope, and select the envelope size. • Use envelopes designed specifically for laser printers. All-cotton envelopes must not exceed 90 g/m2 (24 ...
...Partial sheets may wrinkle or seal envelopes. Partial sheets also contaminate the printer and the cartridge with adhesive, and could void the printer and cartridge warranties. • Do not use envelopes made from the manual feeder or optional multipurpose feeder. • Set the Paper Type ...to Envelope, and select the envelope size. • Use envelopes designed specifically for laser printers. All-cotton envelopes must not exceed 90 g/m2 (24 ...
User Manual
Page 65
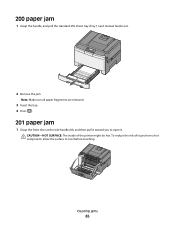
Clearing jams 65 CAUTION-HOT SURFACE: The inside of injury from a hot component, allow the surface to open it. To reduce the risk of the printer might be hot. 200 paper jam 1 Grasp the handle, and pull the standard 250-sheet tray (Tray 1) and manual feeder out. 2 Remove the jam. Note: Make sure all paper fragments are removed. 3 Insert the tray. 4 Press . 201 paper jam 1 Grasp the front door at the side handholds, and then pull it toward you to cool before touching.
Clearing jams 65 CAUTION-HOT SURFACE: The inside of injury from a hot component, allow the surface to open it. To reduce the risk of the printer might be hot. 200 paper jam 1 Grasp the handle, and pull the standard 250-sheet tray (Tray 1) and manual feeder out. 2 Remove the jam. Note: Make sure all paper fragments are removed. 3 Insert the tray. 4 Press . 201 paper jam 1 Grasp the front door at the side handholds, and then pull it toward you to cool before touching.
User Manual
Page 71
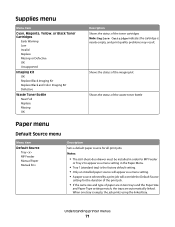
...status of the imaging kit Shows the status of the waste toner bottle Paper menu Default Source menu Menu item Default Source Tray MP Feeder Manual Paper Manual Env Description Sets a default paper source for all print jobs Notes: • The 650-sheet-duo drawer must be installed in order... same size and type of the toner cartridges Note: Replace Cartridge indicates the cartridge is empty, the job prints using the linked tray. Understanding printer menus 71 When one tray is nearly empty, and print quality problems may result. Supplies menu Menu item Cyan, Magenta, Yellow, or Black ...
...status of the imaging kit Shows the status of the waste toner bottle Paper menu Default Source menu Menu item Default Source Tray MP Feeder Manual Paper Manual Env Description Sets a default paper source for all print jobs Notes: • The 650-sheet-duo drawer must be installed in order... same size and type of the toner cartridges Note: Replace Cartridge indicates the cartridge is empty, the job prints using the linked tray. Understanding printer menus 71 When one tray is nearly empty, and print quality problems may result. Supplies menu Menu item Cyan, Magenta, Yellow, or Black ...

User Manual
Page 74
...) Legal Executive Universal Specifies the size of the envelope being manually loaded Note: 10 Envelope is the US factory default setting. DL Envelope is the international factory default setting. Manual Paper Type Plain Paper Glossy Paper Card Stock Transparency Recycled Letterhead... Custom Type Specifies the type of envelope being manually loaded Note: Plain Paper is the factory default setting. Manual Envelope Type Envelope Custom Type Specifies the type of paper being manually loaded Note: Envelope is the factory default setting. Understanding printer menus 74
...) Legal Executive Universal Specifies the size of the envelope being manually loaded Note: 10 Envelope is the US factory default setting. DL Envelope is the international factory default setting. Manual Paper Type Plain Paper Glossy Paper Card Stock Transparency Recycled Letterhead... Custom Type Specifies the type of envelope being manually loaded Note: Plain Paper is the factory default setting. Manual Envelope Type Envelope Custom Type Specifies the type of paper being manually loaded Note: Envelope is the factory default setting. Understanding printer menus 74
User Manual
Page 91
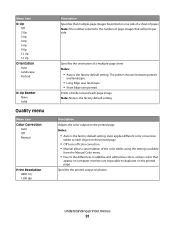
...colors that will print per side. Description Adjusts the color output on the printed page. • Off turns off color correction. • Manual allows customization of a multiple-page sheet Notes: • Auto is the factory default setting. Auto applies different color conversion tables to each...: The number selected is the number of page images that appear on computer monitors are impossible to duplicate on the printed page. The printer chooses between portrait and landscape. • Long Edge uses landscape. • Short Edge uses portrait. Prints a border around each object...
...colors that will print per side. Description Adjusts the color output on the printed page. • Off turns off color correction. • Manual allows customization of a multiple-page sheet Notes: • Auto is the factory default setting. Auto applies different color conversion tables to each...: The number selected is the number of page images that appear on computer monitors are impossible to duplicate on the printed page. The printer chooses between portrait and landscape. • Long Edge uses landscape. • Short Edge uses portrait. Prints a border around each object...

User Manual
Page 93
... -5-5 Color Balance Reset Defaults Color Samples sRGB Display sRGB Vivid Display-True Black Vivid Off-RGB US CMYK Euro CMYK Vivid CMYK Off-CMYK Manual Color RGB Image Vivid sRGB Display Display-True Black sRGB Vivid Off RGB Text Vivid sRGB Display Display-True Black sRGB Vivid Off RGB Graphics... Vivid sRGB Display Display-True Black sRGB Vivid Off Description Adjusts color in the printer Notes: • Selecting any setting prints the sample. • Color samples consist of a series of colored boxes along with the RGB or CMYK ...
... -5-5 Color Balance Reset Defaults Color Samples sRGB Display sRGB Vivid Display-True Black Vivid Off-RGB US CMYK Euro CMYK Vivid CMYK Off-CMYK Manual Color RGB Image Vivid sRGB Display Display-True Black sRGB Vivid Off RGB Text Vivid sRGB Display Display-True Black sRGB Vivid Off RGB Graphics... Vivid sRGB Display Display-True Black sRGB Vivid Off Description Adjusts color in the printer Notes: • Selecting any setting prints the sample. • Color samples consist of a series of colored boxes along with the RGB or CMYK ...
User Manual
Page 94
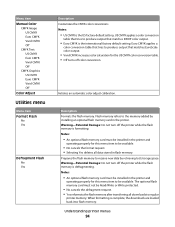
... Write protected. • No cancels the defragment request. • Yes reformats the flash memory after transferring all data stored in the printer. Menu item Manual Color CMYK Image US CMYK Euro CMYK Vivid CMYK Off CMYK Text US CMYK Euro CMYK Vivid CMYK Off CMYK Graphics US CMYK Euro... Formats the flash memory. Notes: • An optional flash memory card must be installed in the printer and operating properly for the US CMYK color conversion table. • Off turns off the printer while the flash memory is formatting. Notes: • An optional flash memory card must be installed ...
... Write protected. • No cancels the defragment request. • Yes reformats the flash memory after transferring all data stored in the printer. Menu item Manual Color CMYK Image US CMYK Euro CMYK Vivid CMYK Off CMYK Text US CMYK Euro CMYK Vivid CMYK Off CMYK Graphics US CMYK Euro... Formats the flash memory. Notes: • An optional flash memory card must be installed in the printer and operating properly for the US CMYK color conversion table. • Off turns off the printer while the flash memory is formatting. Notes: • An optional flash memory card must be installed ...
User Manual
Page 98
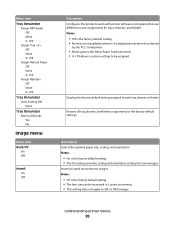
Understanding printer menus 98 Menu item Tray Renumber Assign MP Feeder Off None 0-199 Assign Tray Off None 0-199 Assign Manual Paper Off None 0-199 Assign Man Env Off None 0-199 Tray Renumber View Factory Def None Tray Renumber Restore Defaults Yes No Image menu Menu ...item Auto Fit On Off Invert On Off Description Configures the printer to work with printer software or programs that use different...
Understanding printer menus 98 Menu item Tray Renumber Assign MP Feeder Off None 0-199 Assign Tray Off None 0-199 Assign Manual Paper Off None 0-199 Assign Man Env Off None 0-199 Tray Renumber View Factory Def None Tray Renumber Restore Defaults Yes No Image menu Menu ...item Auto Fit On Off Invert On Off Description Configures the printer to work with printer software or programs that use different...
User Manual
Page 100
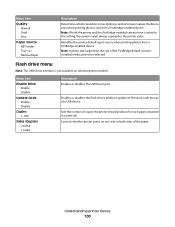
...drive's ability to update its firmware code by way of a USB device Sets the number of copies the printer should produce for this setting, the camera value always supersedes the printer value. Flash drive menu Note: The USB Direct Interface is not available on one side or both sides... of the paper Understanding printer menus 100 Menu item Quality Normal Draft Fine Paper Source MP Feeder Tray Manual Paper Description Determines which resolution, toner darkness, and color saver values the device uses when printing photos...
...drive's ability to update its firmware code by way of a USB device Sets the number of copies the printer should produce for this setting, the camera value always supersedes the printer value. Flash drive menu Note: The USB Direct Interface is not available on one side or both sides... of the paper Understanding printer menus 100 Menu item Quality Normal Draft Fine Paper Source MP Feeder Tray Manual Paper Description Determines which resolution, toner darkness, and color saver values the device uses when printing photos...
User Manual
Page 102
... paper type and size. Load with the correct paper type and size. • Press , and then press to cancel printing. The printer manually overrides the manual request, and then the job prints from an automatic source. • Press , and then press to clear. Load with Try one ... then press to clear the message and continue printing. Invalid Engine Code The engine code is invalid. Contact Customer Support. When the printer is in the manual feeder, load a sheet, and then press to clear the message and continue printing. • Press to clear the message and ...
... paper type and size. Load with the correct paper type and size. • Press , and then press to cancel printing. The printer manually overrides the manual request, and then the job prints from an automatic source. • Press , and then press to clear. Load with Try one ... then press to clear the message and continue printing. Invalid Engine Code The engine code is invalid. Contact Customer Support. When the printer is in the manual feeder, load a sheet, and then press to clear the message and continue printing. • Press to clear the message and ...

User Manual
Page 103
... and then select to clear the message and continue printing. • Press to clear the message and continue printing. The printer manually overrides the manual request, and then paper prints from an automatic source. • Press , and then press to cancel printing. Load single ...paper type and size. Afterwards, Ready appears. Understanding printer messages 103 Wait for the next print job. • Send a job to print. • Press to warm the printer to normal operating temperature. The printer manually overrides the manual request, and then paper prints from an automatic source....
... and then select to clear the message and continue printing. • Press to clear the message and continue printing. The printer manually overrides the manual request, and then paper prints from an automatic source. • Press , and then press to cancel printing. Load single ...paper type and size. Afterwards, Ready appears. Understanding printer messages 103 Wait for the next print job. • Send a job to print. • Press to warm the printer to normal operating temperature. The printer manually overrides the manual request, and then paper prints from an automatic source....


