
User Manual
Page 6
... ...114 Replacing a black imaging kit ...117 Replacing a black and color imaging kit ...123 Replacing a toner cartridge...128 Replacing a developer unit ...130 Cleaning the exterior of the printer...135 Recycling Lexmark products...136 Moving the printer...136 Before moving the printer...136 Moving the printer to another location...136 Shipping the printer ...136...
... ...114 Replacing a black imaging kit ...117 Replacing a black and color imaging kit ...123 Replacing a toner cartridge...128 Replacing a developer unit ...130 Cleaning the exterior of the printer...135 Recycling Lexmark products...136 Moving the printer...136 Before moving the printer...136 Moving the printer to another location...136 Shipping the printer ...136...

User Manual
Page 9
... replacement parts. CAUTION-SHOCK HAZARD: If you have any cables going into the printer. CAUTION-SHOCK HAZARD: To avoid the risk of electric shock when cleaning the exterior of some parts may cause the media to a professional service person. CAUTION-SHOCK HAZARD: Make sure that discusses the guidelines for signs of...
... replacement parts. CAUTION-SHOCK HAZARD: If you have any cables going into the printer. CAUTION-SHOCK HAZARD: To avoid the risk of electric shock when cleaning the exterior of some parts may cause the media to a professional service person. CAUTION-SHOCK HAZARD: Make sure that discusses the guidelines for signs of...
User Manual
Page 12
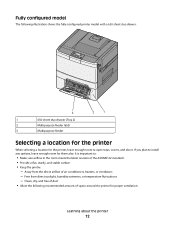
... the room meets the latest revision of space around the printer for them also. Free from the direct airflow of air conditioners, heaters, or ventilators - Clean, dry, and free of dust • Allow the following illustration shows the fully configured printer model with a 650-sheet duo drawer: 3 2 1 1 650-sheet duo drawer...
... the room meets the latest revision of space around the printer for them also. Free from the direct airflow of air conditioners, heaters, or ventilators - Clean, dry, and free of dust • Allow the following illustration shows the fully configured printer model with a 650-sheet duo drawer: 3 2 1 1 650-sheet duo drawer...
User Manual
Page 111
... until Menu Settings Page appears, and then press . Do not expose supplies to maintain optimum print quality. Maintaining the printer 111 Storing supplies Choose a cool, clean storage area for accuracy before printing the remaining copies. Maintaining the printer Periodically, certain tasks are required to : • Direct sunlight • Temperatures above 35...
... until Menu Settings Page appears, and then press . Do not expose supplies to maintain optimum print quality. Maintaining the printer 111 Storing supplies Choose a cool, clean storage area for accuracy before printing the remaining copies. Maintaining the printer Periodically, certain tasks are required to : • Direct sunlight • Temperatures above 35...
User Manual
Page 135
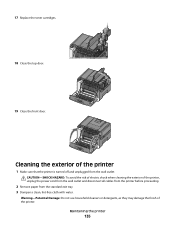
...-free cloth with water. Maintaining the printer 135 CAUTION-SHOCK HAZARD: To avoid the risk of electric shock when cleaning the exterior of the printer. Warning-Potential Damage: Do not use household cleaners or detergents, as they may damage the finish of the printer, unplug ...
...-free cloth with water. Maintaining the printer 135 CAUTION-SHOCK HAZARD: To avoid the risk of electric shock when cleaning the exterior of the printer. Warning-Potential Damage: Do not use household cleaners or detergents, as they may damage the finish of the printer, unplug ...

User Manual
Page 136
Warning-Potential Damage: Using a damp cloth to clean the interior may cause damage to support the full footprint of purchase ...Keep the printer in an upright position. • Avoid severe jarring movements. Recycling Lexmark products To return Lexmark products to move it safely. Any cart used to Lexmark for a relocation kit. CAUTION-POTENTIAL INJURY: Before moving it. • Lift ... or printer damage: • Turn the printer off of trying to lift the drawer and printer at www.lexmark.com/recycle. 2 Find the product type you want to recycle, and then select your printer. 5 Make ...
Warning-Potential Damage: Using a damp cloth to clean the interior may cause damage to support the full footprint of purchase ...Keep the printer in an upright position. • Avoid severe jarring movements. Recycling Lexmark products To return Lexmark products to move it safely. Any cart used to Lexmark for a relocation kit. CAUTION-POTENTIAL INJURY: Before moving it. • Lift ... or printer damage: • Turn the printer off of trying to lift the drawer and printer at www.lexmark.com/recycle. 2 Find the product type you want to recycle, and then select your printer. 5 Make ...

User Manual
Page 176
... card stock loading 41 tips on using 58 Check Config ID 101 Check Model Name 101 Check Serial Num 101 checking an unresponsive printer 140 cleaning exterior of the printer 135 Close Door 101 configuration information wireless network 28 configurations printer 11 configuring multiple printers 139 configuring supply notifications 138 conserving... emission notices 162, 163, 164, 166 envelopes loading 41, 44 tips 57 Ethernet networking Macintosh 33 Windows 33 Ethernet port 24 exterior of the printer cleaning 135 Index 176
... card stock loading 41 tips on using 58 Check Config ID 101 Check Model Name 101 Check Serial Num 101 checking an unresponsive printer 140 cleaning exterior of the printer 135 Close Door 101 configuration information wireless network 28 configurations printer 11 configuring multiple printers 139 configuring supply notifications 138 conserving... emission notices 162, 163, 164, 166 envelopes loading 41, 44 tips 57 Ethernet networking Macintosh 33 Windows 33 Ethernet port 24 exterior of the printer cleaning 135 Index 176
Service Manual
Page 6
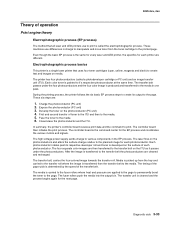
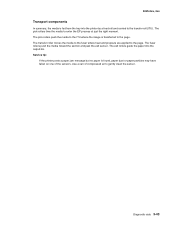
... basics 3-33 Step 1: Charge 3-34 Step 2: Expose 3-35 Step 3: Develop 3-36 Step 4a: First transfer 3-37 Step 4b: Second transfer 3-38 Step 5: Fuse 3-39 Step 6: Clean/erase 3-40 Paper path, transport components 3-42 Paper path Information 3-42 Transport components 3-43 Duplex process 3-44 Color theory 3-45 What is RGB color 3-45...
... basics 3-33 Step 1: Charge 3-34 Step 2: Expose 3-35 Step 3: Develop 3-36 Step 4a: First transfer 3-37 Step 4b: Second transfer 3-38 Step 5: Fuse 3-39 Step 6: Clean/erase 3-40 Paper path, transport components 3-42 Paper path Information 3-42 Transport components 3-43 Duplex process 3-44 Color theory 3-45 What is RGB color 3-45...
Service Manual
Page 77
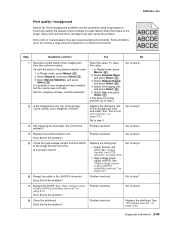
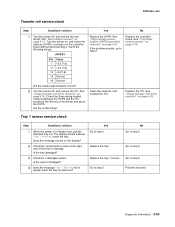
...press Select ( ). 3. yellow, cyan, magenta, or black? See "Developer unit removal" on page 4-31. Go to step 8. 8 Clean the printhead. Does this fix the problem? Problem resolved. Replace the printhead. Print quality-background Service tip: Some background problems can be caused...Yes, and press Select ( ). In Ready mode, press Menus ( ). 2. Has the imaging unit been recently replaced? 1. Using non-Lexmark toner cartridges may also cause background problems. Some problems occur by using rough paper or incorrectly setting the operator panel settings to step 5. supply...
...press Select ( ). 3. yellow, cyan, magenta, or black? See "Developer unit removal" on page 4-31. Go to step 8. 8 Clean the printhead. Does this fix the problem? Problem resolved. Replace the printhead. Print quality-background Service tip: Some background problems can be caused...Yes, and press Select ( ). In Ready mode, press Menus ( ). 2. Has the imaging unit been recently replaced? 1. Using non-Lexmark toner cartridges may also cause background problems. Some problems occur by using rough paper or incorrectly setting the operator panel settings to step 5. supply...
Service Manual
Page 79
Go to step 8. See "Rear shield removal" on page 4-21. No Clean the developer cartridge contacts. Replace the HVPS. Replace the controller board. Select Reset Color Cal, and press Select ( ). Resetting appears. Blurred or fuzzy print is ... power supply (HVPS) assembly removal" on page 4-21. Reseat the imaging unit. See "Developer unit removal" on page 4-31. Are all the toner cartridge contacts clean on , and release the buttons when installed memory and processor speed displays. 2. When the reset is complete, the screen is usually caused by incorrect feeding...
Go to step 8. See "Rear shield removal" on page 4-21. No Clean the developer cartridge contacts. Replace the HVPS. Replace the controller board. Select Reset Color Cal, and press Select ( ). Resetting appears. Blurred or fuzzy print is ... power supply (HVPS) assembly removal" on page 4-21. Reseat the imaging unit. See "Developer unit removal" on page 4-31. Are all the toner cartridge contacts clean on , and release the buttons when installed memory and processor speed displays. 2. When the reset is complete, the screen is usually caused by incorrect feeding...
Service Manual
Page 82
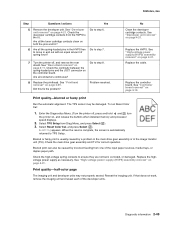
.... See "Image transfer unit (ITU) removal" on page 4-35. See "Imaging unit (IU) removal" on page 4-33. See "Imaging unit (IU) removal" on page 4-35. Clean or replace the faulty unit. 5025-2xx, 4xx Print quality-narrow vertical line ABCDE ABCDE ABCDE Step Questions / actions 1 Replace the photoconductor unit. Print quality...
.... See "Image transfer unit (ITU) removal" on page 4-35. See "Imaging unit (IU) removal" on page 4-33. See "Imaging unit (IU) removal" on page 4-35. Clean or replace the faulty unit. 5025-2xx, 4xx Print quality-narrow vertical line ABCDE ABCDE ABCDE Step Questions / actions 1 Replace the photoconductor unit. Print quality...
Service Manual
Page 87
... without disconnecting it. Go to step 4. Turn the printer on, and check the cable at the right rear of the printer and above the HVPS. Clean the contacts, and reinstall the ITU. Replace the ITU. Does the message remain on the display? 2 Check the vertical wall (or web) at JHVPS1 connector...
... without disconnecting it. Go to step 4. Turn the printer on, and check the cable at the right rear of the printer and above the HVPS. Clean the contacts, and reinstall the ITU. Replace the ITU. Does the message remain on the display? 2 Check the vertical wall (or web) at JHVPS1 connector...
Service Manual
Page 123
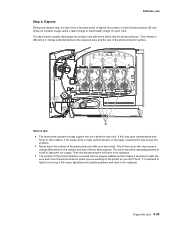
... and the four color image is produced and transferred to print is carried to the fuser rollers where heat and pressure are : 1. Clean/erase the photoconductor and the ITU. The controller board then initiates the print process. Each photoconductor rotates past its output to print. Diagnostic...to permanently bond the toner to the media 6. The high-voltage power supply sends charge to the transfer belt the photoconductors are cleaned and recharged. After the image is transferred from the transfer belt to the transfer belt on the photoconductors and alters the surface charge...
... and the four color image is produced and transferred to print is carried to the fuser rollers where heat and pressure are : 1. Clean/erase the photoconductor and the ITU. The controller board then initiates the print process. Each photoconductor rotates past its output to print. Diagnostic...to permanently bond the toner to the media 6. The high-voltage power supply sends charge to the transfer belt the photoconductors are cleaned and recharged. After the image is transferred from the transfer belt to the transfer belt on the photoconductors and alters the surface charge...
Service Manual
Page 125
... for each color. Then the photoconductor will cause light/dark print quality problems and have to light. The result would be replaced. Diagnostic aids 3-35 Cleaning the lens solves the problem. • Never touch the surface of the photoconductor is coated with your skin may cause a charge differential on the surface...
... for each color. Then the photoconductor will cause light/dark print quality problems and have to light. The result would be replaced. Diagnostic aids 3-35 Cleaning the lens solves the problem. • Never touch the surface of the photoconductor is coated with your skin may cause a charge differential on the surface...
Service Manual
Page 127
... belt. Then the ITU belt will have to be repeating blotches of the ITU belt for each color. This takes place by a direct surface-to clean the ITU belt surface. The result would be replaced. • Don't use solvents or other cleaners to -surface contact between the developed toner image on...
... belt. Then the ITU belt will have to be repeating blotches of the ITU belt for each color. This takes place by a direct surface-to clean the ITU belt surface. The result would be replaced. • Don't use solvents or other cleaners to -surface contact between the developed toner image on...
Service Manual
Page 130
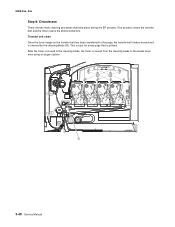
Transfer unit clean Once the toner image on the transfer belt has been transferred to the waste toner area using an auger system. 3-40 Service Manual This occurs for every page that take place during the EP process. After the toner is moved to the cleaning blade, the toner is moved from the cleaning blade to the page, the transfer belt rotates around and is printed. One process cleans the transfer belt and the other cleans the photoconductors. 5025-2xx, 4xx Step 6: Clean/erase There are two main cleaning processes that is cleaned by the cleaning blade (G).
Transfer unit clean Once the toner image on the transfer belt has been transferred to the waste toner area using an auger system. 3-40 Service Manual This occurs for every page that take place during the EP process. After the toner is moved to the cleaning blade, the toner is moved from the cleaning blade to the page, the transfer belt rotates around and is printed. One process cleans the transfer belt and the other cleans the photoconductors. 5025-2xx, 4xx Step 6: Clean/erase There are two main cleaning processes that is cleaned by the cleaning blade (G).

Service Manual
Page 131
This is transferred to the transfer belt. Diagnostic aids 3-41 5025-2xx, 4xx Photoconductor clean/erase After each photoconductor. This cleaning/erasing cycle happens after each plane of each plane of color has been transferred to begin the EP cycle once again. Now the photoconductor surface is prepared to the transfer belt from the photoconductors, a cleaning blade (H) scrapes the left over toner from the surface of color is the clean/erase process.
This is transferred to the transfer belt. Diagnostic aids 3-41 5025-2xx, 4xx Photoconductor clean/erase After each photoconductor. This cleaning/erasing cycle happens after each plane of each plane of color has been transferred to begin the EP cycle once again. Now the photoconductor surface is prepared to the transfer belt from the photoconductors, a cleaning blade (H) scrapes the left over toner from the surface of color is the clean/erase process.
Service Manual
Page 133
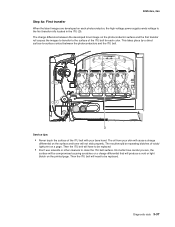
... the EP process at just the right moment. The transfer roller moves the media to the fuser where heat and pressure are applied to gently clean the sensor. Service tip: If the printer posts a paper jam message but no paper is found, paper dust or paper particles may have fallen on...
... the EP process at just the right moment. The transfer roller moves the media to the fuser where heat and pressure are applied to gently clean the sensor. Service tip: If the printer posts a paper jam message but no paper is found, paper dust or paper particles may have fallen on...

Service Manual
Page 140
Front cover assembly removal See the front cover assembly on a clean, smooth, and flat surface. See "Waste toner bottle removal" on page 4-11. 4-2 Service Manual Remove the four screws (A) from the back of removal. • When ...
Front cover assembly removal See the front cover assembly on a clean, smooth, and flat surface. See "Waste toner bottle removal" on page 4-11. 4-2 Service Manual Remove the four screws (A) from the back of removal. • When ...


