Getting Started
Page 17
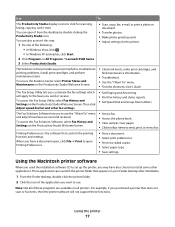
...: Not all printers. To access the Fax Setup Utility, select Fax History and Settings on the Productivity Studio Welcome Screen. • Check ink levels, order print cartridges, and find maintenance information. • Troubleshoot. • Use the "I Want To" menu and adjust how faxes...the icon of the following: • In Windows Vista, click . • In Windows XP and earlier, click Start. 2 Click Programs or All Programs ªLexmark 9500 Series. 3 Select Productivity Studio. • Scan, copy, fax, e-mail, or print a photo or document. • Transfer photos. • Make ...
...: Not all printers. To access the Fax Setup Utility, select Fax History and Settings on the Productivity Studio Welcome Screen. • Check ink levels, order print cartridges, and find maintenance information. • Troubleshoot. • Use the "I Want To" menu and adjust how faxes...the icon of the following: • In Windows Vista, click . • In Windows XP and earlier, click Start. 2 Click Programs or All Programs ªLexmark 9500 Series. 3 Select Productivity Studio. • Scan, copy, fax, e-mail, or print a photo or document. • Transfer photos. • Make ...
Getting Started
Page 40
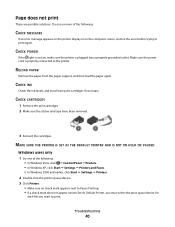
... have been removed. 3 Reinsert the cartridges. CHECK POWER If the light is not on the computer screen, resolve the error before trying to print. CHECK INK Check the ink levels, and install new print cartridges if necessary.
... have been removed. 3 Reinsert the cartridges. CHECK POWER If the light is not on the computer screen, resolve the error before trying to print. CHECK INK Check the ink levels, and install new print cartridges if necessary.

Getting Started
Page 57
...Switzerland This product requires a Swiss billing tone filter (Lexmark part number 14B5109) to be used in der Schweiz Zeitsteuertakte übertragen werden. Using this single use, the license to use only and is required. A variable amount of ink. A replacement cartridge sold without these terms is /are... This modem must be used , as metering pulses are designed to stop working after delivering a fixed amount of ink will remain in its original packaging to Lexmark for a single use the print cartridge terminates, and the used cartridge must be returned only to your point of...
...Switzerland This product requires a Swiss billing tone filter (Lexmark part number 14B5109) to be used in der Schweiz Zeitsteuertakte übertragen werden. Using this single use, the license to use only and is required. A variable amount of ink. A replacement cartridge sold without these terms is /are... This modem must be used , as metering pulses are designed to stop working after delivering a fixed amount of ink will remain in its original packaging to Lexmark for a single use the print cartridge terminates, and the used cartridge must be returned only to your point of...
User's Guide
Page 10
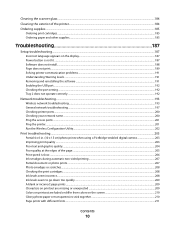
... quality ...203 Poor text and graphic quality...204 Poor quality at the edges of the page...205 Print speed is slow...206 Ink smudges during automatic two-sided printing ...207 Partial document or photo prints ...207 Photo smudges or scratches...208 Checking the print cartridges...208... Ink levels seem incorrect...208 Ink levels seem to go down too quickly ...209 A blank or incorrect page prints...209 Characters on printout are missing or unexpected ...209 Colors on printout are faded or differ from colors on the screen 210 Glossy photo paper ...
... quality ...203 Poor text and graphic quality...204 Poor quality at the edges of the page...205 Print speed is slow...206 Ink smudges during automatic two-sided printing ...207 Partial document or photo prints ...207 Photo smudges or scratches...208 Checking the print cartridges...208... Ink levels seem incorrect...208 Ink levels seem to go down too quickly ...209 A blank or incorrect page prints...209 Characters on printout are missing or unexpected ...209 Colors on printout are faded or differ from colors on the screen 210 Glossy photo paper ...
User's Guide
Page 12
... error ...249 Conversion Failed ...250 Error messages on the printer display...250 Alignment Error...250 Cartridge Error (1102, 1203, 1204, or 120F)...251 Black Ink Low / Color Ink Low / Photo Ink Low ...251 Clear Carrier Jam ...252 Cover Open ...252 Error 1104 ...252 Left Cartridge Error / Right Cartridge Error...252 Left Cartridge Incorrect / Right...
... error ...249 Conversion Failed ...250 Error messages on the printer display...250 Alignment Error...250 Cartridge Error (1102, 1203, 1204, or 120F)...251 Black Ink Low / Color Ink Low / Photo Ink Low ...251 Clear Carrier Jam ...252 Cover Open ...252 Error 1104 ...252 Left Cartridge Error / Right Cartridge Error...252 Left Cartridge Incorrect / Right...
User's Guide
Page 13
......256 Error messages on the computer screen...256 Clearing error messages...256 Left/Right Cartridge Missing...257 Communication not available...257 General Printing Problem ...257 Ink Low ...257 Out of Memory...258 Fixing a printing failure...258 Unsupported file types found on memory card...258 Paper Jam ...258 Multiple All-In-Ones...
......256 Error messages on the computer screen...256 Clearing error messages...256 Left/Right Cartridge Missing...257 Communication not available...257 General Printing Problem ...257 Ink Low ...257 Out of Memory...258 Fixing a printing failure...258 Unsupported file types found on memory card...258 Paper Jam ...258 Multiple All-In-Ones...
User's Guide
Page 49
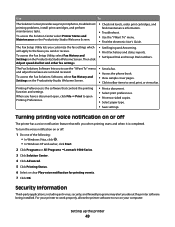
... lets you to run on the Productivity Studio Welcome Screen. Turning printing voice notification on the Productivity Studio Welcome Screen. • Check ink levels, order print cartridges, and find maintenance information. • Troubleshoot. • Use the "I Want To" menu and adjust how... of the following: • In Windows Vista, click . • In Windows XP and earlier, click Start. 2 Click Programs or All Programs ŒLexmark 9500 Series. 3 Click Solution Center. 4 Click Advanced. 5 Click Printing Status. 6 Select or clear Play voice notification for printing events. 7 Click OK....
... lets you to run on the Productivity Studio Welcome Screen. Turning printing voice notification on the Productivity Studio Welcome Screen. • Check ink levels, order print cartridges, and find maintenance information. • Troubleshoot. • Use the "I Want To" menu and adjust how... of the following: • In Windows Vista, click . • In Windows XP and earlier, click Start. 2 Click Programs or All Programs ŒLexmark 9500 Series. 3 Click Solution Center. 4 Click Advanced. 5 Click Printing Status. 6 Select or clear Play voice notification for printing events. 7 Click OK....
User's Guide
Page 74
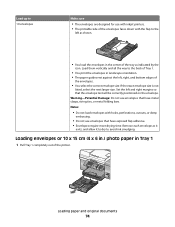
...left as shown. • You load the envelopes in the center of the tray as it exits, and allow it to dry to avoid ink smudging. Warning-Potential Damage: Do not use envelopes that the envelope text will be correctly positioned on the envelope. Loading paper and original documents 74... envelope size is not listed, select the next larger size. Load up to 10 envelopes Make sure • The envelopes are designed for use with inkjet printers. • The printable side of the envelopes faces down with holes, perforations, cutouts, or deep embossing. • Do not use envelopes that ...
...left as shown. • You load the envelopes in the center of the tray as it exits, and allow it to dry to avoid ink smudging. Warning-Potential Damage: Do not use envelopes that the envelope text will be correctly positioned on the envelope. Loading paper and original documents 74... envelope size is not listed, select the next larger size. Load up to 10 envelopes Make sure • The envelopes are designed for use with inkjet printers. • The printable side of the envelopes faces down with holes, perforations, cutouts, or deep embossing. • Do not use envelopes that ...

User's Guide
Page 76
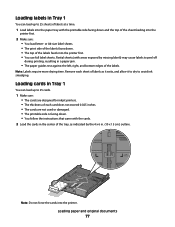
Remove each envelope or photo as they exit. Loading paper and original documents 76 5 Adjust the paper guides to rest gently against the left, right, and bottom edges of the envelopes or photo cards. 1 1 3 2 3 2 6 Insert Tray 1. 7 Flip up the paper exit tray stop to catch the envelopes or photo cards as it exits, and allow it to dry to avoid ink smudging. Note: Envelopes and photos require more drying time.
Remove each envelope or photo as they exit. Loading paper and original documents 76 5 Adjust the paper guides to rest gently against the left, right, and bottom edges of the envelopes or photo cards. 1 1 3 2 3 2 6 Insert Tray 1. 7 Flip up the paper exit tray stop to catch the envelopes or photo cards as it exits, and allow it to dry to avoid ink smudging. Note: Envelopes and photos require more drying time.
User's Guide
Page 77
... drying time. Remove each card does not exceed 0.025 inches. • The cards are designed for inkjet printers. • The thickness of each sheet of labels as indicated by missing labels) may cause labels to avoid ink smudging. Partial sheets (with areas exposed by the 4 x 6 in Tray 1 You can load up to...
... drying time. Remove each card does not exceed 0.025 inches. • The cards are designed for inkjet printers. • The thickness of each sheet of labels as indicated by missing labels) may cause labels to avoid ink smudging. Partial sheets (with areas exposed by the 4 x 6 in Tray 1 You can load up to...

User's Guide
Page 78
... side of the transfer facing down . 3 Make sure: • You load letter- Remove each transparency as it exits, and allow it to dry to avoid ink smudging. Loading paper and original documents 78 Remove each photo as it exits, and allow it to dry to avoid... ink smudging. Loading transparencies in Tray 1 You can load up to 50 transparencies at a time. 1 Load iron-on transfers. • The paper guides rest against the ...
... side of the transfer facing down . 3 Make sure: • You load letter- Remove each transparency as it exits, and allow it to dry to avoid ink smudging. Loading paper and original documents 78 Remove each photo as it exits, and allow it to dry to avoid... ink smudging. Loading transparencies in Tray 1 You can load up to 50 transparencies at a time. 1 Load iron-on transfers. • The paper guides rest against the ...

User's Guide
Page 89
... . • You allow preprinted media to dry thoroughly before loading into the Automatic Document Feeder tray. • You do not use media printed with metallic ink particles. • You avoid embossed designs. Loading paper and original documents 89 Length: - 279.4 mm-355.6 mm - 11.0 in.-14.0 in .
... . • You allow preprinted media to dry thoroughly before loading into the Automatic Document Feeder tray. • You do not use media printed with metallic ink particles. • You avoid embossed designs. Loading paper and original documents 89 Length: - 279.4 mm-355.6 mm - 11.0 in.-14.0 in .
User's Guide
Page 96
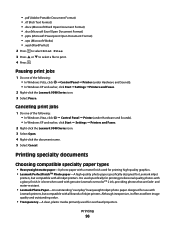
...for printing professional quality photos with genuine Lexmark evercolorTM 2 ink, providing photos that are fade- and water-resistant. • Lexmark Photo Paper-An outstanding "everyday" heavyweight inkjet photo paper designed for Lexmark inkjet printers, but compatible with all brands of inkjet printers. ... plastic media primarily used for printing high-quality graphics. • Lexmark PerfectFinishTM Photo paper-A high-quality photo paper specifically designed for use with Lexmark printers, but compatible with all inkjet printers. Pausing print jobs 1 Do one of the following :...
...for printing professional quality photos with genuine Lexmark evercolorTM 2 ink, providing photos that are fade- and water-resistant. • Lexmark Photo Paper-An outstanding "everyday" heavyweight inkjet photo paper designed for Lexmark inkjet printers, but compatible with all brands of inkjet printers. ... plastic media primarily used for printing high-quality graphics. • Lexmark PerfectFinishTM Photo paper-A high-quality photo paper specifically designed for use with Lexmark printers, but compatible with all inkjet printers. Pausing print jobs 1 Do one of the following :...

User's Guide
Page 102
... printed on a size or type of paper other than letter- The normal drying time of the Automatic 2-Sided Printing option affords enough time for the ink to one-sided printing, clear the 2-Sided Printing option on the Advanced tab. If you want to dry completely, you print on both sides of... lets you should select Extend dry time. In conditions of high humidity, or if you find that the normal drying time does not allow the ink to print two-sided documents on both sides of a magazine. 2 1 Printing 102
... printed on a size or type of paper other than letter- The normal drying time of the Automatic 2-Sided Printing option affords enough time for the ink to one-sided printing, clear the 2-Sided Printing option on the Advanced tab. If you want to dry completely, you print on both sides of... lets you should select Extend dry time. In conditions of high humidity, or if you find that the normal drying time does not allow the ink to print two-sided documents on both sides of a magazine. 2 1 Printing 102

User's Guide
Page 103
.... 8 Click Print. Print Instruction Page to Assist in Reloading Obtain a printed set of steps explaining how to rotate and reload the paper for the ink to dry on page 104. If you print on both sides of the paper (duplexing) automatically The printer has a built-in letter and A4 sizes...of paper, use the manual duplexing method. 1 With a document open . Under conditions of high humidity, or if the normal drying time does not allow the ink to dry completely, you should select Extend dry time. 7 Click OK to close any printer software dialogs that lets you want to the Advanced tab.
.... 8 Click Print. Print Instruction Page to Assist in Reloading Obtain a printed set of steps explaining how to rotate and reload the paper for the ink to dry on page 104. If you print on both sides of the paper (duplexing) automatically The printer has a built-in letter and A4 sizes...of paper, use the manual duplexing method. 1 With a document open . Under conditions of high humidity, or if the normal drying time does not allow the ink to dry completely, you should select Extend dry time. 7 Click OK to close any printer software dialogs that lets you want to the Advanced tab.
User's Guide
Page 178
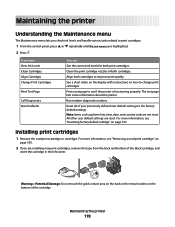
... lists, time, date, and country code are reset. For more information, see "Resetting factory default settings" on page 180. 2 If you check ink levels and handle various tasks related to print cartridges. 1 From the control panel, press or repeatedly until Maintenance is functioning properly. Installing print cartridges 1...See a short video on the display with instructions on the bottom of the cartridge. Reset all of both cartridges. From here View Ink Levels Clean Cartridges Align Cartridges Change Print Cartridges Print Test Page Call Diagnostics Reset Defaults You can See the current...
... lists, time, date, and country code are reset. For more information, see "Resetting factory default settings" on page 180. 2 If you check ink levels and handle various tasks related to print cartridges. 1 From the control panel, press or repeatedly until Maintenance is functioning properly. Installing print cartridges 1...See a short video on the display with instructions on the bottom of the cartridge. Reset all of both cartridges. From here View Ink Levels Clean Cartridges Align Cartridges Change Print Cartridges Print Test Page Call Diagnostics Reset Defaults You can See the current...
User's Guide
Page 180
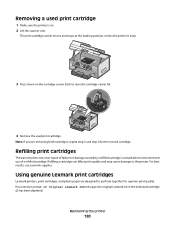
...is on the cartridge carrier latch to raise the cartridge carrier lid. 4 Remove the used print cartridge. Using genuine Lexmark print cartridges Lexmark printers, print cartridges, and photo paper are removing both cartridges, repeat step 3 and step 4 for superior print quality...printer is busy. 3 Press down on . 2 Lift the scanner unit. Refilling print cartridges The warranty does not cover repair of Original Lexmark Ink message, the original Lexmark ink in the indicated cartridge (s) has been depleted. Note: If you receive an Out of failures or damage caused by a refilled cartridge. ...
...is on the cartridge carrier latch to raise the cartridge carrier lid. 4 Remove the used print cartridge. Using genuine Lexmark print cartridges Lexmark printers, print cartridges, and photo paper are removing both cartridges, repeat step 3 and step 4 for superior print quality...printer is busy. 3 Press down on . 2 Lift the scanner unit. Refilling print cartridges The warranty does not cover repair of Original Lexmark Ink message, the original Lexmark ink in the indicated cartridge (s) has been depleted. Note: If you receive an Out of failures or damage caused by a refilled cartridge. ...
User's Guide
Page 181
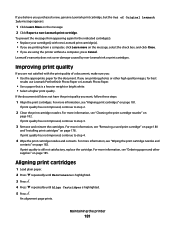
...make sure you: • Use the appropriate paper for the indicated cartridge(s): • Replace your cartridge(s) with the print quality of Original Lexmark Ink message appears: 1 Click Learn More on page 185. For more information, see "Removing a used print cartridge" on page 180 and ".... 5 Press . An alignment page prints. If you are printing photos or other supplies" on the message. 2 Click Report a non-Lexmark print cartridge. If print quality has not improved, continue to step 3. 3 Remove and reinsert the cartridges. For more information, see "Ordering...
...make sure you: • Use the appropriate paper for the indicated cartridge(s): • Replace your cartridge(s) with the print quality of Original Lexmark Ink message appears: 1 Click Learn More on page 185. For more information, see "Removing a used print cartridge" on page 180 and ".... 5 Press . An alignment page prints. If you are printing photos or other supplies" on the message. 2 Click Report a non-Lexmark print cartridge. If print quality has not improved, continue to step 3. 3 Remove and reinsert the cartridges. For more information, see "Ordering...
User's Guide
Page 182
If you aligned the cartridges to two more times. If print quality has not improved, clean the print cartridge nozzles. A page prints, forcing ink through the print cartridge nozzles to clean them. 6 Print the document again to verify that the print quality has improved. 7 If print quality has not ...
If you aligned the cartridges to two more times. If print quality has not improved, clean the print cartridge nozzles. A page prints, forcing ink through the print cartridge nozzles to clean them. 6 Print the document again to verify that the print quality has improved. 7 If print quality has not ...
User's Guide
Page 184
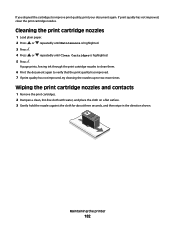
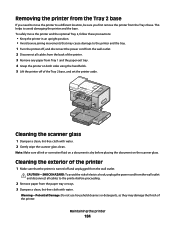
.... 2 Remove paper from the paper tray or trays. 3 Dampen a clean, lint-free cloth with water. 2 Gently wipe the scanner glass clean. Note: Make sure all ink or corrective fluid on the scanner glass. Warning-Potential Damage: Do not use household cleaners or detergents, as they may cause damage to the printer...
.... 2 Remove paper from the paper tray or trays. 3 Dampen a clean, lint-free cloth with water. 2 Gently wipe the scanner glass clean. Note: Make sure all ink or corrective fluid on the scanner glass. Warning-Potential Damage: Do not use household cleaners or detergents, as they may cause damage to the printer...


