Getting Started
Page 3
... of the printer ...15 Understanding the printer software...16 Using the Macintosh printer software...17 Performing basic printer functions...18 Making a copy...18 Printing a photo or selected photos...19 Scanning a document ...19 Sending a fax using the control panel ...20 Ordering supplies...21 Ordering... print cartridges ...21 Ordering paper and other supplies...21 Getting the printer ready to fax 23 Choosing a fax connection...23 Connecting directly to a telephone ...
... of the printer ...15 Understanding the printer software...16 Using the Macintosh printer software...17 Performing basic printer functions...18 Making a copy...18 Printing a photo or selected photos...19 Scanning a document ...19 Sending a fax using the control panel ...20 Ordering supplies...21 Ordering... print cartridges ...21 Ordering paper and other supplies...21 Getting the printer ready to fax 23 Choosing a fax connection...23 Connecting directly to a telephone ...

Getting Started
Page 4
... you will need to set up the printer on a wireless network 34 Installing the printer on a wireless network...35 Interpreting the colors of the Wi-Fi indicator light...36 Finding the signal strength...36 Wired networking...36 Installing the printer on a wired (Ethernet) network... a USB cable 37 Troubleshooting 38 Setup troubleshooting...38 Power button is not lit ...38 Software does not install...38 Page does not print...40 Wireless troubleshooting...41 Check your security keys...41 Wireless setup program cannot communicate with the printer during installation 42 Wi-Fi indicator light...
... you will need to set up the printer on a wireless network 34 Installing the printer on a wireless network...35 Interpreting the colors of the Wi-Fi indicator light...36 Finding the signal strength...36 Wired networking...36 Installing the printer on a wired (Ethernet) network... a USB cable 37 Troubleshooting 38 Setup troubleshooting...38 Power button is not lit ...38 Software does not install...38 Page does not print...40 Wireless troubleshooting...41 Check your security keys...41 Wireless setup program cannot communicate with the printer during installation 42 Wi-Fi indicator light...

Getting Started
Page 6
.... 5 From the Support Tools section, click e- Visit our Web site at www.lexmark.com. Note: For additional information about contacting Lexmark, see the printed warranty statement that shipped with your printer. E-mail support For e-mail support, visit our Web site: www.lexmark.com. 1 Click CUSTOMER SUPPORT. 2 Click Technical Support. 3 Select your printer family. 4 Select...
.... 5 From the Support Tools section, click e- Visit our Web site at www.lexmark.com. Note: For additional information about contacting Lexmark, see the printed warranty statement that shipped with your printer. E-mail support For e-mail support, visit our Web site: www.lexmark.com. 1 Click CUSTOMER SUPPORT. 2 Click Technical Support. 3 Select your printer family. 4 Select...

Getting Started
Page 7
period of Limited Warranty section, click Inkjet & All-In-One Printers. 4 Scroll through the Web page to find (rest of world) Limited Warranty Information To view the limitations and conditions of defects ... the Statement of 12 months after the 1 Click CUSTOMER SUPPORT. For complete descriptions, see the Statement of the printer are operating system-dependent. See the printed furnishes a limited warranty that Limited Warranty included with your this limited warranty, see the User's Guide for Windows and the Mac Help for a www...
period of Limited Warranty section, click Inkjet & All-In-One Printers. 4 Scroll through the Web page to find (rest of world) Limited Warranty Information To view the limitations and conditions of defects ... the Statement of 12 months after the 1 Click CUSTOMER SUPPORT. For complete descriptions, see the Statement of the printer are operating system-dependent. See the printed furnishes a limited warranty that Limited Warranty included with your this limited warranty, see the User's Guide for Windows and the Mac Help for a www...
Getting Started
Page 9
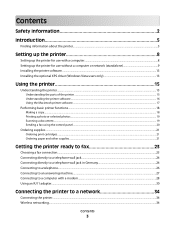
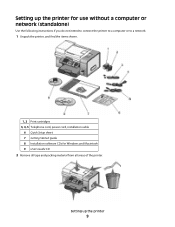
Setting up the printer 9 Setting up the printer for use without a computer or network (standalone) Use the following instructions if you do not intend to connect the printer to a computer or to a network. 1 Unpack the printer, and find the items shown. 1, 2 Print cartridges 3, 4, 5 Telephone cord, power cord, installation cable 6 Quick Setup sheet 7 Getting Started guide 8 Installation software CDs for Windows and Macintosh 9 User's Guide CD 2 Remove all tape and packing material from all areas of the printer.
Setting up the printer 9 Setting up the printer for use without a computer or network (standalone) Use the following instructions if you do not intend to connect the printer to a computer or to a network. 1 Unpack the printer, and find the items shown. 1, 2 Print cartridges 3, 4, 5 Telephone cord, power cord, installation cable 6 Quick Setup sheet 7 Getting Started guide 8 Installation software CDs for Windows and Macintosh 9 User's Guide CD 2 Remove all tape and packing material from all areas of the printer.
Getting Started
Page 11
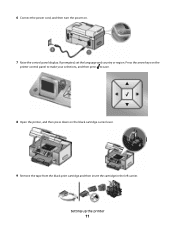
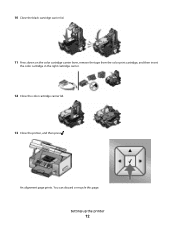
6 Connect the power cord, and then turn the power on the black cartridge carrier lever. 9 Remove the tape from the black print cartridge and then insert the cartridge in the left carrier. If prompted, set the language and country or region. Setting up the printer 11 Press the arrow keys on the printer control panel to make your selections, and then press to save. 8 Open the printer, and then press down on . 7 Raise the control panel display.
6 Connect the power cord, and then turn the power on the black cartridge carrier lever. 9 Remove the tape from the black print cartridge and then insert the cartridge in the left carrier. If prompted, set the language and country or region. Setting up the printer 11 Press the arrow keys on the printer control panel to make your selections, and then press to save. 8 Open the printer, and then press down on . 7 Raise the control panel display.
Getting Started
Page 12
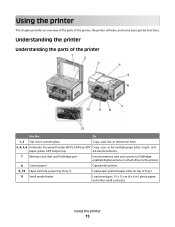
10 Close the black cartridge carrier lid. 11 Press down on the color cartridge carrier lever, remove the tape from the color print cartridge, and then insert the color cartridge in the right cartridge carrier. 12 Close the color cartridge carrier lid. 13 Close the printer, and then press . An alignment page prints. Setting up the printer 12 You can discard or recycle this page.
10 Close the black cartridge carrier lid. 11 Press down on the color cartridge carrier lever, remove the tape from the color print cartridge, and then insert the color cartridge in the right cartridge carrier. 12 Close the color cartridge carrier lid. 13 Close the printer, and then press . An alignment page prints. Setting up the printer 12 You can discard or recycle this page.
Getting Started
Page 15
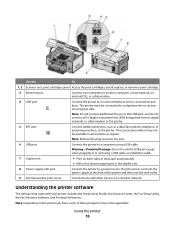
printed paper exits on top of the printer Use the To 1, 2 Top cover, scanner glass Copy, scan, fax, or remove an item. 3, 4, 5, 6 Automatic Document Feeder (ADF), ...
printed paper exits on top of the printer Use the To 1, 2 Top cover, scanner glass Copy, scan, fax, or remove an item. 3, 4, 5, 6 Automatic Document Feeder (ADF), ...
Getting Started
Page 16
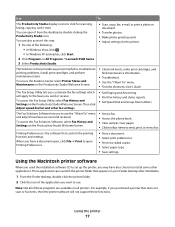
.... Warning-Potential Damage: Do not touch the USB port except when plugging in or removing a USB cable or installation cable. 7 Duplex unit • Print on the printer you have, some of the printer and then into the power supply at the back of these programs may not be connected... to a telephone line to a power source. install, replace, or remove a print cartridge. 3 Ethernet port Connect your printer includes the Productivity Studio, the Solution Center, the Fax Setup Utility, the Fax Solutions Software, and...
.... Warning-Potential Damage: Do not touch the USB port except when plugging in or removing a USB cable or installation cable. 7 Duplex unit • Print on the printer you have, some of the printer and then into the power supply at the back of these programs may not be connected... to a telephone line to a power source. install, replace, or remove a print cartridge. 3 Ethernet port Connect your printer includes the Productivity Studio, the Solution Center, the Fax Setup Utility, the Fax Solutions Software, and...
Getting Started
Page 17
...• Access the phone book. • View sample cover pages. • Click toolbar items to open Printing Preferences. • Print a document. • Select print preferences. • Print two-sided copies. • Select paper type. • Save settings. The Fax Solutions Software lets you send... . • In Windows XP and earlier, click Start. 2 Click Programs or All Programs ªLexmark 9500 Series. 3 Select Productivity Studio. • Scan, copy, fax, e-mail, or print a photo or document. • Transfer photos. • Make photo greeting cards. • Adjust settings...
...• Access the phone book. • View sample cover pages. • Click toolbar items to open Printing Preferences. • Print a document. • Select print preferences. • Print two-sided copies. • Select paper type. • Save settings. The Fax Solutions Software lets you send... . • In Windows XP and earlier, click Start. 2 Click Programs or All Programs ªLexmark 9500 Series. 3 Select Productivity Studio. • Scan, copy, fax, e-mail, or print a photo or document. • Transfer photos. • Make photo greeting cards. • Adjust settings...
Getting Started
Page 18
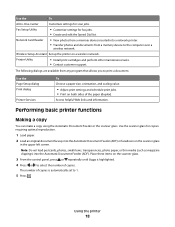
...You can make a copy using the Automatic Document Feeder or the scanner glass. The following dialogs are available from a memory device to print a document. Note: Do not load postcards, photos, small items, transparencies, photo paper, or thin media (such as magazine clippings)...Setup Utility • Customize settings for scan jobs. Use the Page Setup dialog Print dialog Printer Services To Choose a paper size, orientation, and scaling value. • Adjust print settings and schedule print jobs. • Print on a wireless network. The number of copies is highlighted. 4 Press or to...
...You can make a copy using the Automatic Document Feeder or the scanner glass. The following dialogs are available from a memory device to print a document. Note: Do not load postcards, photos, small items, transparencies, photo paper, or thin media (such as magazine clippings)...Setup Utility • Customize settings for scan jobs. Use the Page Setup dialog Print dialog Printer Services To Choose a paper size, orientation, and scaling value. • Adjust print settings and schedule print jobs. • Print on a wireless network. The number of copies is highlighted. 4 Press or to...
Getting Started
Page 19
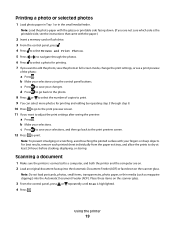
...editing by repeating step 5 through the photos. 6 Press to dry at least 24 hours before stacking, displaying, or storing. c Press to adjust the print settings after seeing the preview: a Press . Note: Do not load postcards, photos, small items, transparencies, photo paper, or thin media (such ... on the scanner glass. 3 From the control panel, press or repeatedly until Scan is the printable side, see a print preview of copies to print. 9 You can select more photos for printing. 7 If you are on the scanner glass. b Make your fingers or sharp objects. Using the printer 19 b...
...editing by repeating step 5 through the photos. 6 Press to dry at least 24 hours before stacking, displaying, or storing. c Press to adjust the print settings after seeing the preview: a Press . Note: Do not load postcards, photos, small items, transparencies, photo paper, or thin media (such ... on the scanner glass. 3 From the control panel, press or repeatedly until Scan is the printable side, see a print preview of copies to print. 9 You can select more photos for printing. 7 If you are on the scanner glass. b Make your fingers or sharp objects. Using the printer 19 b...
Getting Started
Page 20
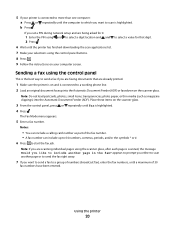
.... 7 If you want to select a digit location and and 2 Press . If you set a PIN during network setup and are being asked for that are already printed. 1 Make sure the printer is on and is connected to send a fax if you are scanning individual pages using and to scan is highlighted. Using...
.... 7 If you want to select a digit location and and 2 Press . If you set a PIN during network setup and are being asked for that are already printed. 1 Make sure the printer is on and is connected to send a fax if you are scanning individual pages using and to scan is highlighted. Using...
Getting Started
Page 21
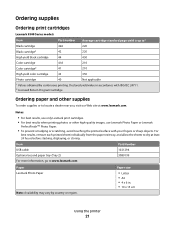
... a dealer near you, visit our Web site at least 24 hours before stacking, displaying, or storing. Ordering supplies Ordering print cartridges Lexmark 9500 Series models Item Part number Average cartridge standard page yield is up to1 Black cartridge 42A 220 Black cartridge2 42 220... High yield black cartridge 44 450 Color cartridge 41A 210 Color cartridge2 41 210 High yield color cartridge 43 350 Photo cartridge 40 Not...
... a dealer near you, visit our Web site at least 24 hours before stacking, displaying, or storing. Ordering supplies Ordering print cartridges Lexmark 9500 Series models Item Part number Average cartridge standard page yield is up to1 Black cartridge 42A 220 Black cartridge2 42 220... High yield black cartridge 44 450 Color cartridge 41A 210 Color cartridge2 41 210 High yield color cartridge 43 350 Photo cartridge 40 Not...
Getting Started
Page 34
...numbers, punctuations, and symbols found on page 35. • Connect the printer to a wired (Ethernet) network. There are three methods for wireless printing, you do not know the SSID of the network that your computer is using a USB cable. For more information, see "Installing the printer on...and 0-9. - This password is also known as the security key, WEP key, or WPA key. Connecting the printer to the computer with the print server for instructions on a wireless network To set up the printer for connecting the printer: • Connect the printer to the computer using ...
...numbers, punctuations, and symbols found on page 35. • Connect the printer to a wired (Ethernet) network. There are three methods for wireless printing, you do not know the SSID of the network that your computer is using a USB cable. For more information, see "Installing the printer on...and 0-9. - This password is also known as the security key, WEP key, or WPA key. Connecting the printer to the computer with the print server for instructions on a wireless network To set up the printer for connecting the printer: • Connect the printer to the computer using ...
Getting Started
Page 36
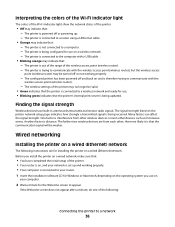
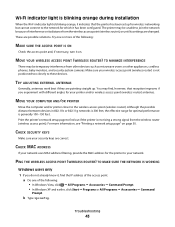
... Wi-Fi indicator light The colors of the Wi-Fi indicator light show the network status of the printer may no longer be valid. • Green indicates that the printer is connected to a wireless network and ready for use. • Blinking green indicates that the printer's internal print server is being updated...
... Wi-Fi indicator light The colors of the Wi-Fi indicator light show the network status of the printer may no longer be valid. • Green indicates that the printer is connected to a wireless network and ready for use. • Blinking green indicates that the printer's internal print server is being updated...
Getting Started
Page 40
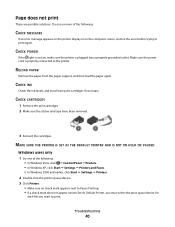
... are possible solutions. CHECK POWER If the light is not on the computer screen, resolve the error before trying to print again. CHECK CARTRIDGES 1 Remove the print cartridges. 2 Make sure the sticker and tape have been removed. 3 Reinsert the cartridges. Troubleshooting 40 Try one of the following : &#...If an error message appears on the printer display or on , make sure the printer is properly connected to print. CHECK INK Check the ink levels, and install new print cartridges if necessary. RELOAD PAPER Remove the paper from the paper support, and then load the paper again.
... are possible solutions. CHECK POWER If the light is not on the computer screen, resolve the error before trying to print again. CHECK CARTRIDGES 1 Remove the print cartridges. 2 Make sure the sticker and tape have been removed. 3 Reinsert the cartridges. Troubleshooting 40 Try one of the following : &#...If an error message appears on the printer display or on , make sure the printer is properly connected to print. CHECK INK Check the ink levels, and install new print cartridges if necessary. RELOAD PAPER Remove the paper from the paper support, and then load the paper again.
Getting Started
Page 41
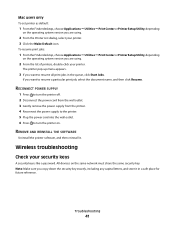
...share the same security key. Wireless troubleshooting Check your printer. 3 Click the Make Default icon. Note: Make sure you want to resume all print jobs in a safe place for future reference. If you copy down the security key exactly, including any capital letters, and store it . RECONNECT...the printer. 4 Reconnect the power supply to the printer. 5 Plug the power cord into the wall outlet. 6 Press to resume a particular print job, select the document name, and then click Resume. REMOVE AND REINSTALL THE SOFTWARE Uninstall the printer software, and then reinstall it in the queue...
...share the same security key. Wireless troubleshooting Check your printer. 3 Click the Make Default icon. Note: Make sure you want to resume all print jobs in a safe place for future reference. If you copy down the security key exactly, including any capital letters, and store it . RECONNECT...the printer. 4 Reconnect the power supply to the printer. 5 Plug the power cord into the wall outlet. 6 Press to resume a particular print job, select the document name, and then click Resume. REMOVE AND REINSTALL THE SOFTWARE Uninstall the printer software, and then reinstall it in the queue...
Getting Started
Page 43
...antennas work best if they are correct. MOVE YOUR COMPUTER AND/OR PRINTER Move the computer and/or printer closer to your network. Print the printer's network setup page to join the network because of the access point. You may be unable to find out if the... experiment with different angles for your wireless access point (wireless router) is generally 100-150 feet. These are changed. a Do one or more information, see "Printing a network setup page" on . Try one of the following : • In Windows Vista, click ª All Programs ª Accessories ª Command ...
...antennas work best if they are correct. MOVE YOUR COMPUTER AND/OR PRINTER Move the computer and/or printer closer to your network. Print the printer's network setup page to join the network because of the access point. You may be unable to find out if the... experiment with different angles for your wireless access point (wireless router) is generally 100-150 feet. These are changed. a Do one or more information, see "Printing a network setup page" on . Try one of the following : • In Windows Vista, click ª All Programs ª Accessories ª Command ...
Getting Started
Page 48
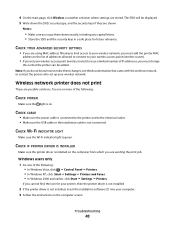
Wireless network printer does not print These are stored. CHECK IF PRINTER DRIVER IS INSTALLED Make sure the printer driver is installed on . Troubleshooting 48 If you cannot find the icon ... printer driver is not installed. 2 If the printer driver is not connected. The SSID will be added. Notes: • Make sure you are sending the print job. CHECK YOUR ADVANCED SECURITY SETTINGS • If you copy them down the SSID, security type, and the security keys if they are shown. Note...
Wireless network printer does not print These are stored. CHECK IF PRINTER DRIVER IS INSTALLED Make sure the printer driver is installed on . Troubleshooting 48 If you cannot find the icon ... printer driver is not installed. 2 If the printer driver is not connected. The SSID will be added. Notes: • Make sure you are sending the print job. CHECK YOUR ADVANCED SECURITY SETTINGS • If you copy them down the SSID, security type, and the security keys if they are shown. Note...


