Clearing Jams Guide
Page 1
...media before you Make sure the guides are not placed too tightly against the stack of the MFP. Note: Do not leave the cartridge exposed to resume printing. 200 and 201 Paper Jam Remove Cartridge 1 Push the release latch, and lower the multipurpose feeder. 2 Push the release latch, ...the document cover, and remove any jammed pages. Lexmark™ X642 Clearing Jams Guide Avoiding jams The following hints can help you are holding the cartridge. 4 Place the print cartridge aside. If jams do * 200 and 201 Paper Jam Remove Cartridge Open the bottom then top front covers, remove the...
...media before you Make sure the guides are not placed too tightly against the stack of the MFP. Note: Do not leave the cartridge exposed to resume printing. 200 and 201 Paper Jam Remove Cartridge 1 Push the release latch, and lower the multipurpose feeder. 2 Push the release latch, ...the document cover, and remove any jammed pages. Lexmark™ X642 Clearing Jams Guide Avoiding jams The following hints can help you are holding the cartridge. 4 Place the print cartridge aside. If jams do * 200 and 201 Paper Jam Remove Cartridge Open the bottom then top front covers, remove the...
Clearing Jams Guide
Page 2
You need to access the print media from the MFP rear door. 8 Close the multipurpose feeder. 3 Remove the jammed media. 1 2 6 Align and reinstall the toner cartridge. 1 2 9 Touch Continue. 202 Paper Jam Open Rear Door 1 If the paper is exiting the MFP, pull the media straight out, and then touch Continue. Otherwise, continue with step 2. 4 Close the rear door. 5 Touch Continue. 23x Paper Jam Open Duplex Rear Door 1 Open the duplex rear door. 7 Close the top front cover. 2 Open the MFP rear door. pull, stop pulling.
You need to access the print media from the MFP rear door. 8 Close the multipurpose feeder. 3 Remove the jammed media. 1 2 6 Align and reinstall the toner cartridge. 1 2 9 Touch Continue. 202 Paper Jam Open Rear Door 1 If the paper is exiting the MFP, pull the media straight out, and then touch Continue. Otherwise, continue with step 2. 4 Close the rear door. 5 Touch Continue. 23x Paper Jam Open Duplex Rear Door 1 Open the duplex rear door. 7 Close the top front cover. 2 Open the MFP rear door. pull, stop pulling.
Clearing Jams Guide
Page 4
b Remove the envelope from the MFP. the bottom envelope will have to be pulled out, remove the envelope feeder. 8 Touch Continue. Note: If you cannot remove the envelope, the print cartridge will be the one that is jammed. 1 Lift the envelope weight. 2 Remove all original ... jammed pages. 1 4 7 2 5 8 3 6 9 0 # 3 Open the document cover, and remove any jammed pages. 1 2 If the jammed envelope has entered the MFP and cannot be removed. 3 Reinstall the envelope feeder. Clearing ADF Jams 290, 291, 292, and 294 Scanner Jams 1 Remove all envelopes. 6 Adjust the guide. 7 Lower...
b Remove the envelope from the MFP. the bottom envelope will have to be pulled out, remove the envelope feeder. 8 Touch Continue. Note: If you cannot remove the envelope, the print cartridge will be the one that is jammed. 1 Lift the envelope weight. 2 Remove all original ... jammed pages. 1 4 7 2 5 8 3 6 9 0 # 3 Open the document cover, and remove any jammed pages. 1 2 If the jammed envelope has entered the MFP and cannot be removed. 3 Reinstall the envelope feeder. Clearing ADF Jams 290, 291, 292, and 294 Scanner Jams 1 Remove all envelopes. 6 Adjust the guide. 7 Lower...

Troubleshooting Guide
Page 4
...light. • The toner may be too dark. To utilize the remaining toner, remove the cartridge by gripping the handles with both hands. See the User's Guide for about 10 seconds while the MFP is within the printer specifications. Hold the buttons for more details. Repeat this procedure multiple times ...hands. repeating defects are printing on the page • Check the print cartridge to make sure it is on the back of the job to be low. Printing the print quality test pages 3 Turn the MFP off the page Toner fog or background shading appears on an uneven print surface...
...light. • The toner may be too dark. To utilize the remaining toner, remove the cartridge by gripping the handles with both hands. See the User's Guide for about 10 seconds while the MFP is within the printer specifications. Hold the buttons for more details. Repeat this procedure multiple times ...hands. repeating defects are printing on the page • Check the print cartridge to make sure it is on the back of the job to be low. Printing the print quality test pages 3 Turn the MFP off the page Toner fog or background shading appears on an uneven print surface...

Troubleshooting Guide
Page 5
... to redistribute the toner. Repeat this procedure multiple times until the print remains faded. Part or all of the page is Class B. Check the print cartridge to see if it is installed correctly. • Make sure the Paper Size setting in the Paper menu is correct. • Make sure the .... Ghost images appear • Make sure the Paper Type setting in the Paper menu is correct. • Verify the environment is Class B. Reinstall the cartridge. Streaks appear on the sides, top, or bottom of the media Move the guides in the tray to the proper positions for the size loaded...
... to redistribute the toner. Repeat this procedure multiple times until the print remains faded. Part or all of the page is Class B. Check the print cartridge to see if it is installed correctly. • Make sure the Paper Size setting in the Paper menu is correct. • Make sure the .... Ghost images appear • Make sure the Paper Type setting in the Paper menu is correct. • Verify the environment is Class B. Reinstall the cartridge. Streaks appear on the sides, top, or bottom of the media Move the guides in the tray to the proper positions for the size loaded...
User's Guide
Page 18
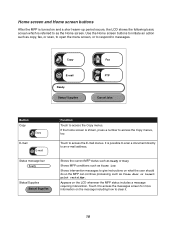
..., to open the menu screen, or to respond to messages. Appears on what the user should do so the MFP can continue processing, such as Close door or insert print cartridge. Copy E-mail Ready. If the home screen is possible to scan a document directly to an e-mail address. ...Shows intervention messages to give instructions on the LCD whenever the MFP status includes a message requiring intervention. Touch it to access ...
..., to open the menu screen, or to respond to messages. Appears on what the user should do so the MFP can continue processing, such as Close door or insert print cartridge. Copy E-mail Ready. If the home screen is possible to scan a document directly to an e-mail address. ...Shows intervention messages to give instructions on the LCD whenever the MFP status includes a message requiring intervention. Touch it to access ...

User's Guide
Page 97
The label fuser cleaner is included with a special label cartridge for more information on the printer requires a special label fuser cleaner. See Ordering supplies for label applications. 250-sheet drawer 500-sheet drawer Multipurpose feeder ...
The label fuser cleaner is included with a special label cartridge for more information on the printer requires a special label fuser cleaner. See Ordering supplies for label applications. 250-sheet drawer 500-sheet drawer Multipurpose feeder ...

User's Guide
Page 104
...the most difficult print media for label applications to maintain MFP feeding reliability: 1 Print five sheets of paper. 2 Wait approximately five seconds. 3 Print five more sheets of envelope at www.lexmark.com/publications. When printing on the Lexmark Web site at a time in letter size, A4 ...pounds per square inch (psi). Have any doubts about the envelopes you replace the print cartridge), complete the following steps to optimize feed reliability. See Ordering supplies for use with laser printers. - After printing approximately 10,000 pages of labels (or each time you are...
...the most difficult print media for label applications to maintain MFP feeding reliability: 1 Print five sheets of paper. 2 Wait approximately five seconds. 3 Print five more sheets of envelope at www.lexmark.com/publications. When printing on the Lexmark Web site at a time in letter size, A4 ...pounds per square inch (psi). Have any doubts about the envelopes you replace the print cartridge), complete the following steps to optimize feed reliability. See Ordering supplies for use with laser printers. - After printing approximately 10,000 pages of labels (or each time you are...

User's Guide
Page 105
...Print five sheets of paper. 2 Wait approximately five seconds. 3 Print five more sheets of the sheet. Partial sheets also contaminate the MFP and your cartridge with a slick backing material. • Use full label sheets. See Supported print media for information on the preferred weight and for... sheets with adhesive, and could void the warranty. • If zone coating of print media. Adhesive material contaminates the MFP and could void the MFP and cartridge warranties. • Use labels that can cause feeding problems and print quality problems. • Do not use labels that...
...Print five sheets of paper. 2 Wait approximately five seconds. 3 Print five more sheets of the sheet. Partial sheets also contaminate the MFP and your cartridge with a slick backing material. • Use full label sheets. See Supported print media for information on the preferred weight and for... sheets with adhesive, and could void the warranty. • If zone coating of print media. Adhesive material contaminates the MFP and could void the MFP and cartridge warranties. • Use labels that can cause feeding problems and print quality problems. • Do not use labels that...
User's Guide
Page 126
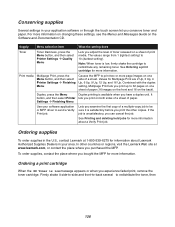
... to send a Verify Print job. See Ordering a print cartridge for more information about Lexmark Authorized Supplies Dealers in your area. Print media Multipage Print, press the Menu button, and then select Printer Settings Æ Finishing Menu Causes the MFP to 32 pages on one side of a sheet. It ...3 Up, 4 Up, 6 Up, 9 Up, 12 Up, and 16 Up. Ordering a print cartridge When the 88 Toner is available when you conserve toner and paper. Ordering supplies To order supplies in the U.S., contact Lexmark at www.lexmark.com, or contact the place where you print on a sheet of paper.
... to send a Verify Print job. See Ordering a print cartridge for more information about Lexmark Authorized Supplies Dealers in your area. Print media Multipage Print, press the Menu button, and then select Printer Settings Æ Finishing Menu Causes the MFP to 32 pages on one side of a sheet. It ...3 Up, 4 Up, 6 Up, 9 Up, 12 Up, and 16 Up. Ordering a print cartridge When the 88 Toner is available when you conserve toner and paper. Ordering supplies To order supplies in the U.S., contact Lexmark at www.lexmark.com, or contact the place where you print on a sheet of paper.

User's Guide
Page 127
The recommended print cartridges specifically designed for the MFP are: Part number Description For the USA and Canada2 X644A11A Return Program Print Cartridge X644H11A High Yield Return Program Print Cartridge Average cartridge yield1 10,000 standard pages 21,000 standard pages X644H01A High Yield Return Program Print Cartridge for Label Applications 21,000 standard pages Other available...
The recommended print cartridges specifically designed for the MFP are: Part number Description For the USA and Canada2 X644A11A Return Program Print Cartridge X644H11A High Yield Return Program Print Cartridge Average cartridge yield1 10,000 standard pages 21,000 standard pages X644H01A High Yield Return Program Print Cartridge for Label Applications 21,000 standard pages Other available...

User's Guide
Page 128
... pages 21,000 standard pages 10,000 standard pages 21,000 standard pages X644H01L High Yield Return Program Print Cartridge for Label Applications 21,000 standard pages Other available print cartridges X644A21L Print Cartridge 1 Declared yield value in accordance with ISO/IEC 19752 2 Designed for use only in the USA and Canada 3 Designed...
... pages 21,000 standard pages 10,000 standard pages 21,000 standard pages X644H01L High Yield Return Program Print Cartridge for Label Applications 21,000 standard pages Other available print cartridges X644A21L Print Cartridge 1 Declared yield value in accordance with ISO/IEC 19752 2 Designed for use only in the USA and Canada 3 Designed...

User's Guide
Page 129
... for X642e Part numbers 40X0102 (100 V) 40X0100 (110 V) 40X0101 (220 V) For information about the print cartridges available for your specific MFP. See Recycling Lexmark products for the MFP, contact the place where you know it is time to replace MFP maintenance items. Order a maintenance kit when 80 Scheduled maintenance advised first appears on the display...
... for X642e Part numbers 40X0102 (100 V) 40X0100 (110 V) 40X0101 (220 V) For information about the print cartridges available for your specific MFP. See Recycling Lexmark products for the MFP, contact the place where you know it is time to replace MFP maintenance items. Order a maintenance kit when 80 Scheduled maintenance advised first appears on the display...

User's Guide
Page 148
...cover, and remove any jammed media. Jams in the front of the MFP occur in two locations and require the removal of the print cartridge. To go to a specific jam, see Understanding jam messages. 250 ... messages The following clearing jam instructions may seem out of numerical sequence. Open the rear door on the MFP, and remove the jam. Open each tray, and remove any jammed pages. Lift the envelope weight,.... Jams inside of the MFP. However, it lightly rests against the edge of the media. 148 Remove all possible jams. Message 200 and 201 Paper Jam Remove Cartridge 202 Paper Jam Open Rear...
...cover, and remove any jammed media. Jams in the front of the MFP occur in two locations and require the removal of the print cartridge. To go to a specific jam, see Understanding jam messages. 250 ... messages The following clearing jam instructions may seem out of numerical sequence. Open the rear door on the MFP, and remove the jam. Open each tray, and remove any jammed pages. Lift the envelope weight,.... Jams inside of the MFP. However, it lightly rests against the edge of the media. 148 Remove all possible jams. Message 200 and 201 Paper Jam Remove Cartridge 202 Paper Jam Open Rear...
User's Guide
Page 149
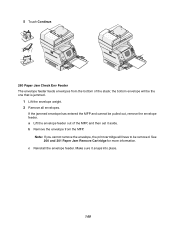
... Jam Check Env Feeder The envelope feeder feeds envelopes from the MFP. If the jammed envelope has entered the MFP and cannot be removed. a Lift the envelope feeder out of the stack; See 200 and 201 Paper Jam Remove Cartridge for more information. Make sure it aside. c Reinstall the ...envelope feeder. Note: If you cannot remove the envelope, the print cartridge will be the one that is jammed. 1 Lift the envelope weight. 2 Remove all envelopes. b Remove the envelope from the bottom of the MFP, and then set it snaps into place. 149 the bottom envelope will have...
... Jam Check Env Feeder The envelope feeder feeds envelopes from the MFP. If the jammed envelope has entered the MFP and cannot be removed. a Lift the envelope feeder out of the stack; See 200 and 201 Paper Jam Remove Cartridge for more information. Make sure it aside. c Reinstall the ...envelope feeder. Note: If you cannot remove the envelope, the print cartridge will be the one that is jammed. 1 Lift the envelope weight. 2 Remove all envelopes. b Remove the envelope from the bottom of the MFP, and then set it snaps into place. 149 the bottom envelope will have...
User's Guide
Page 154
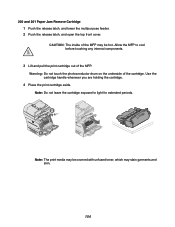
... toner, which may be hot. Use the cartridge handle whenever you are holding the cartridge. 4 Place the print cartridge aside. Warning: Do not touch the photoconductor drum on the underside of the MFP. Note: Do not leave the cartridge exposed to cool before touching any internal components.... 3 Lift and pull the print cartridge out of the cartridge. 200 and 201 Paper Jam Remove Cartridge 1 Push the release latch, and lower the multipurpose...
... toner, which may be hot. Use the cartridge handle whenever you are holding the cartridge. 4 Place the print cartridge aside. Warning: Do not touch the photoconductor drum on the underside of the MFP. Note: Do not leave the cartridge exposed to cool before touching any internal components.... 3 Lift and pull the print cartridge out of the cartridge. 200 and 201 Paper Jam Remove Cartridge 1 Push the release latch, and lower the multipurpose...
User's Guide
Page 155
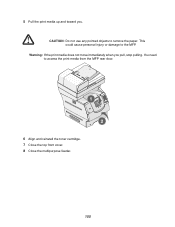
CAUTION: Do not use any pointed objects to the MFP. This could cause personal injury or damage to remove the paper. 5 Pull the print media up and toward you pull, stop pulling. You need to access the print media from the MFP rear door. 1 2 6 Align and reinstall the toner cartridge. 7 Close the top front cover. 8 Close the multipurpose feeder. 155 Warning: If the print media does not move immediately when you .
CAUTION: Do not use any pointed objects to the MFP. This could cause personal injury or damage to remove the paper. 5 Pull the print media up and toward you pull, stop pulling. You need to access the print media from the MFP rear door. 1 2 6 Align and reinstall the toner cartridge. 7 Close the top front cover. 8 Close the multipurpose feeder. 155 Warning: If the print media does not move immediately when you .
User's Guide
Page 160
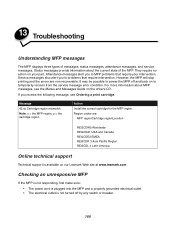
...Cartridge region mismatch Note: x = the MFP region, y = the cartridge region Action Install the correct cartridge for the MFP region. Region codes are non-recoverable. 13 Troubleshooting Understanding MFP messages The MFP displays three types of the MFP... an unresponsive MFP If the MFP is not responding, first make sure: • The power cord is plugged into the MFP and a properly...Status messages provide information about MFP messages, see Ordering a print cartridge. However, the MFP will stop printing and the errors are : MFP regionCartridge regionLocation REGCDW0 Worldwide ...
...Cartridge region mismatch Note: x = the MFP region, y = the cartridge region Action Install the correct cartridge for the MFP region. Region codes are non-recoverable. 13 Troubleshooting Understanding MFP messages The MFP displays three types of the MFP... an unresponsive MFP If the MFP is not responding, first make sure: • The power cord is plugged into the MFP and a properly...Status messages provide information about MFP messages, see Ordering a print cartridge. However, the MFP will stop printing and the errors are : MFP regionCartridge regionLocation REGCDW0 Worldwide ...

User's Guide
Page 171
...the page. See Understanding paper and specialty media guidelines for service. With the cartridge arrows pointing downward, firmly shake the print cartridge side-to-side and front-to-back several to run the MFP setup cycle and clean the transfer roll. 171 Repeat this , do not correct... the problem, call for more details. Open and close the MFP top front cover to redistribute the toner. Action • The toner may be printed. Reinstall the cartridge. When the print remains faded, replace the print cartridge. • Change the Toner Darkness setting in the Quality menu....
...the page. See Understanding paper and specialty media guidelines for service. With the cartridge arrows pointing downward, firmly shake the print cartridge side-to-side and front-to-back several to run the MFP setup cycle and clean the transfer roll. 171 Repeat this , do not correct... the problem, call for more details. Open and close the MFP top front cover to redistribute the toner. Action • The toner may be printed. Reinstall the cartridge. When the print remains faded, replace the print cartridge. • Change the Toner Darkness setting in the Quality menu....

User's Guide
Page 172
... is white. • Make sure the packaging material is installed correctly. • The toner may be low. With the cartridge arrows pointing downward, firmly shake the print cartridge side-to-side and front-to-back several to be sure it is 16 to 32 degrees C (60 to redistribute the... the job lines per inch (lpi) setting is Class B. • Replace the charge rolls. • Replace the print cartridge. To utilize the remaining toner, remove the cartridge by gripping the handles with both hands. Change the Toner Darkness setting in the Quality menu. • Verify the environment is...
... is white. • Make sure the packaging material is installed correctly. • The toner may be low. With the cartridge arrows pointing downward, firmly shake the print cartridge side-to-side and front-to-back several to be sure it is 16 to 32 degrees C (60 to redistribute the... the job lines per inch (lpi) setting is Class B. • Replace the charge rolls. • Replace the print cartridge. To utilize the remaining toner, remove the cartridge by gripping the handles with both hands. Change the Toner Darkness setting in the Quality menu. • Verify the environment is...

