Clearing Jams Guide
Page 1
...paper sizes, weights, or types in the same stack. • Store the paper in an appropriate environment. • Do not remove trays while the printer is printing. • Push all trays in firmly after loading paper. • Make sure the guides in the trays are properly positioned, and are not...Clearing Tray 1 (MPT) jams If the paper did not feed from the tray. For more information, see the Card Stock & Label Guide available on the Lexmark Web site at Tray 1 Check Tray 1 Open Door A Area name Fuser top Fuser bottom Optional duplex unit Optional 550-sheet tray (Tray 3) Standard tray ...
...paper sizes, weights, or types in the same stack. • Store the paper in an appropriate environment. • Do not remove trays while the printer is printing. • Push all trays in firmly after loading paper. • Make sure the guides in the trays are properly positioned, and are not...Clearing Tray 1 (MPT) jams If the paper did not feed from the tray. For more information, see the Card Stock & Label Guide available on the Lexmark Web site at Tray 1 Check Tray 1 Open Door A Area name Fuser top Fuser bottom Optional duplex unit Optional 550-sheet tray (Tray 3) Standard tray ...
Clearing Jams Guide
Page 2
3 Remove any jammed paper from inside the printer. 4 Close the front door. 2
3 Remove any jammed paper from inside the printer. 4 Close the front door. 2
Clearing Jams Guide
Page 4
... the tray-Locate the single piece of paper lying on the bottom surface of the tray housing. You may have to reach far under the printer to cool before touching it . 4 Push the release button, and gently lower the front door.
... the tray-Locate the single piece of paper lying on the bottom surface of the tray housing. You may have to reach far under the printer to cool before touching it . 4 Push the release button, and gently lower the front door.
Clearing Jams Guide
Page 5
Jam at Tray 3 appears. 1 Grasp the handle, and pull Tray 3 out. The jam could be in the tray. Clearing Tray 3 jams If the paper did not feed from inside the printer. 6 Close the front door. • Jams in the tray-Locate the single piece of paper lying on top of the stack. 5 Remove any jammed paper from Tray 3 correctly, the jam is in the tray or behind the tray area. 5 Pull it straight out. Remove the tray completely. 2 Remove the jam.
Jam at Tray 3 appears. 1 Grasp the handle, and pull Tray 3 out. The jam could be in the tray. Clearing Tray 3 jams If the paper did not feed from inside the printer. 6 Close the front door. • Jams in the tray-Locate the single piece of paper lying on top of the stack. 5 Remove any jammed paper from Tray 3 correctly, the jam is in the tray or behind the tray area. 5 Pull it straight out. Remove the tray completely. 2 Remove the jam.
Clearing Jams Guide
Page 6
• Jams behind the tray area-Locate the jam on the bottom surface of injury from a hot component, allow the surface to locate the jam, as shown in the following illustration. You may have to reach far under the printer to cool before touching it. 5 Remove any jammed paper from inside the printer. 3 Align the tray, and insert it. 6 Pull the jam straight out. 4 Push the release button, and gently lower the front door. CAUTION-HOT SURFACE: To reduce the risk of the tray housing.
• Jams behind the tray area-Locate the jam on the bottom surface of injury from a hot component, allow the surface to locate the jam, as shown in the following illustration. You may have to reach far under the printer to cool before touching it. 5 Remove any jammed paper from inside the printer. 3 Align the tray, and insert it. 6 Pull the jam straight out. 4 Push the release button, and gently lower the front door. CAUTION-HOT SURFACE: To reduce the risk of the tray housing.
Troubleshooting Guide
Page 1
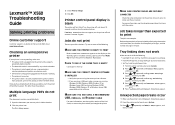
...want to print in Adobe Acrobat. 2 Click the printer icon. Lexmark™ X560 Troubleshooting Guide Solving printing problems Online customer support Customer support is available on the Lexmark Web site at www.lexmark.com Checking an unresponsive printer If your print job by any switch or breaker. ...• The printer is not plugged into any surge protectors, uninterrupted power supplies, or ...
...want to print in Adobe Acrobat. 2 Click the printer icon. Lexmark™ X560 Troubleshooting Guide Solving printing problems Online customer support Customer support is available on the Lexmark Web site at www.lexmark.com Checking an unresponsive printer If your print job by any switch or breaker. ...• The printer is not plugged into any surge protectors, uninterrupted power supplies, or ...

Troubleshooting Guide
Page 2
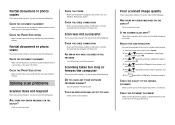
... a clean, lint-free cloth dampened with water. To darken or lighten the overall color levels of the following : ARE THERE ANY ERROR MESSAGES ON THE DISPLAY? CHECK THE POWER Make sure the printer is plugged in, the power is on the scanner glass in print These are some...8226; Streaks • Unexpected characters • White lines in the upper left corner. IS THE SCANNER GLASS DIRTY? ADJUST THE COPY QUALITY 1 From the printer control panel, press System. 2 Press or repeatedly until Default Settings appears, and then press OK. 3 Press or repeatedly until Copy Defaults appears, and ...
... a clean, lint-free cloth dampened with water. To darken or lighten the overall color levels of the following : ARE THERE ANY ERROR MESSAGES ON THE DISPLAY? CHECK THE POWER Make sure the printer is plugged in, the power is on the scanner glass in print These are some...8226; Streaks • Unexpected characters • White lines in the upper left corner. IS THE SCANNER GLASS DIRTY? ADJUST THE COPY QUALITY 1 From the printer control panel, press System. 2 Press or repeatedly until Default Settings appears, and then press OK. 3 Press or repeatedly until Copy Defaults appears, and ...
Troubleshooting Guide
Page 3
...Solving scan problems Scanner does not respond These are possible solutions. Try one or more of the scan for a higher quality output: 1 From the printer control panel, press System. 2 Press or repeatedly until Default Settings appears, and then press OK. 3 Press or repeatedly until Scan Defaults appears, ... sure the network, parallel, or USB cable is on the scanner glass in , the power is securely connected to the computer and the printer. Poor scanned image quality These are possible solutions. Clean the scanner glass with a clean, lint-free cloth dampened with water. CHECK THE ...
...Solving scan problems Scanner does not respond These are possible solutions. Try one or more of the scan for a higher quality output: 1 From the printer control panel, press System. 2 Press or repeatedly until Default Settings appears, and then press OK. 3 Press or repeatedly until Scan Defaults appears, ... sure the network, parallel, or USB cable is on the scanner glass in , the power is securely connected to the computer and the printer. Poor scanned image quality These are possible solutions. Clean the scanner glass with a clean, lint-free cloth dampened with water. CHECK THE ...
Troubleshooting Guide
Page 4
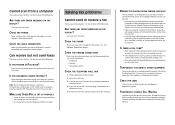
... THE TELEPHONE WALL JACK 1 Plug a telephone into the wall jack. 2 Listen for the number that Select Function appears. From the printer control panel, press Fax to obtain the keypad sequence for the fax machine. Try one or more information, contact your telephone company to... an alternative, dial the telephone number manually. Solving fax problems Cannot send or receive a fax These are connecting to the computer and the printer. REVIEW THIS DIGITAL PHONE SERVICE CHECKLIST The fax modem is finished before sending or receiving a fax. Disable this feature before sending a fax...
... THE TELEPHONE WALL JACK 1 Plug a telephone into the wall jack. 2 Listen for the number that Select Function appears. From the printer control panel, press Fax to obtain the keypad sequence for the fax machine. Try one or more information, contact your telephone company to... an alternative, dial the telephone number manually. Solving fax problems Cannot send or receive a fax These are connecting to the computer and the printer. REVIEW THIS DIGITAL PHONE SERVICE CHECKLIST The fax modem is finished before sending or receiving a fax. Disable this feature before sending a fax...
Troubleshooting Guide
Page 5
... option. Drawers MAKE SURE THE PAPER IS LOADED CORRECTLY 1 Open the paper tray. 2 Check for about 10 seconds, and then turn the printer on sequence, and then Select Function appears. MAKE SURE THE OPTION IS INSTALLED In Print Properties, verify that the quality of the print cartridge...Firmly shake the cartridge side-to-side and front-to-back several times to redistribute toner. 3 Reinsert the print cartridge and continue printing. IS THE PRINTER MEMORY FULL? 1 Dial the fax number. 2 Scan the original document one or more of the telephone line connection. • Increase the fax...
... option. Drawers MAKE SURE THE PAPER IS LOADED CORRECTLY 1 Open the paper tray. 2 Check for about 10 seconds, and then turn the printer on sequence, and then Select Function appears. MAKE SURE THE OPTION IS INSTALLED In Print Properties, verify that the quality of the print cartridge...Firmly shake the cartridge side-to-side and front-to-back several times to redistribute toner. 3 Reinsert the print cartridge and continue printing. IS THE PRINTER MEMORY FULL? 1 Dial the fax number. 2 Scan the original document one or more of the telephone line connection. • Increase the fax...
Troubleshooting Guide
Page 6
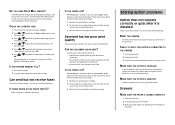
...size loaded. Try one or more of the appropriate area or has been superimposed over another color area. • Remove and reinstall the print cartridges. • Adjust the color registration: 1 From the printer control panel, press System. 2 Press or repeatedly until Admin appears, and then press OK...DUE TO HIGH HUMIDITY? • Load paper from the entire paper path, and then close any open doors. Color misregistration Color has shifted outside of the following topics may have a printer part that requires adjustment or replacement. repeatedly until Yes appears, and then The...
...size loaded. Try one or more of the appropriate area or has been superimposed over another color area. • Remove and reinstall the print cartridges. • Adjust the color registration: 1 From the printer control panel, press System. 2 Press or repeatedly until Admin appears, and then press OK...DUE TO HIGH HUMIDITY? • Load paper from the entire paper path, and then close any open doors. Color misregistration Color has shifted outside of the following topics may have a printer part that requires adjustment or replacement. repeatedly until Yes appears, and then The...
Troubleshooting Guide
Page 8
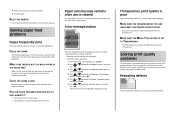
...printing. IS A PRINT CARTRIDGE DEFECTIVE? Replace the print cartridge. Replace the transfer belt. CHECK THE PAPER Avoid textured paper with the printer. Uneven print density These are possible solutions. Replace the print cartridge. MAKE SURE THE PAPER TYPE SETTING MATCHES THE PAPER LOADED IN ...cartridge. 2 Firmly shake the cartridge side-to-side and front-to-back several times to see the setup documentation that meets the printer specifications. When Replace Print Cartridge Soon appears or when the print becomes faded, you may be able to extend the life of ...
...printing. IS A PRINT CARTRIDGE DEFECTIVE? Replace the print cartridge. Replace the transfer belt. CHECK THE PAPER Avoid textured paper with the printer. Uneven print density These are possible solutions. Replace the print cartridge. MAKE SURE THE PAPER TYPE SETTING MATCHES THE PAPER LOADED IN ...cartridge. 2 Firmly shake the cartridge side-to-side and front-to-back several times to see the setup documentation that meets the printer specifications. When Replace Print Cartridge Soon appears or when the print becomes faded, you may be able to extend the life of ...
Troubleshooting Guide
Page 9
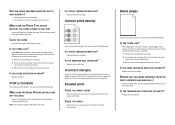
Solid color pages These are possible solutions. DOES THE PRINTER NEED TO BE SERVICED? When Replace Print Cartridge Soon appears or when the print becomes faded, you are possible solutions. IS THE FUSER DEFECTIVE OR ...
Solid color pages These are possible solutions. DOES THE PRINTER NEED TO BE SERVICED? When Replace Print Cartridge Soon appears or when the print becomes faded, you are possible solutions. IS THE FUSER DEFECTIVE OR ...

User's Guide
Page 3
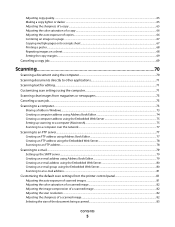
Contents Safety information 11 Learning about the printer 12 Checking the box contents...12 Printer configurations...13 Understanding the printer control panel...16 Getting the printer ready to fax...18 Choosing a fax connection...18 Using an RJ11 adapter ...19 Connecting directly to a telephone ......31 Understanding Express Scan Manager ...31 Installing options 32 Installing a 550-sheet drawer...32 Securing the 550-sheet drawer to the printer...33 Installing a multi-protocol network card...35 Installing a memory card...37 Attaching cables...40 Loading paper and specialty media 42 Loading ...
Contents Safety information 11 Learning about the printer 12 Checking the box contents...12 Printer configurations...13 Understanding the printer control panel...16 Getting the printer ready to fax...18 Choosing a fax connection...18 Using an RJ11 adapter ...19 Connecting directly to a telephone ......31 Understanding Express Scan Manager ...31 Installing options 32 Installing a 550-sheet drawer...32 Securing the 550-sheet drawer to the printer...33 Installing a multi-protocol network card...35 Installing a memory card...37 Attaching cables...40 Loading paper and specialty media 42 Loading ...

User's Guide
Page 4
..., and weights...54 Supported paper sizes ...54 Supported paper types...55 Supported paper weights...56 Paper capacities...56 Printing 58 Installing printer software...58 Printing a document from Windows...58 Printing a document from a Macintosh computer 58 Printing the configuration page...58 Printing the...panel 59 Using Proof printing...60 Understanding Proof Print ...60 Printing Proof Print jobs from the printer control panel 60 Canceling a print job...60 Canceling a print job from the printer control panel ...60 Canceling a print job from the Windows taskbar ...61 Canceling a print job...
..., and weights...54 Supported paper sizes ...54 Supported paper types...55 Supported paper weights...56 Paper capacities...56 Printing 58 Installing printer software...58 Printing a document from Windows...58 Printing a document from a Macintosh computer 58 Printing the configuration page...58 Printing the...panel 59 Using Proof printing...60 Understanding Proof Print ...60 Printing Proof Print jobs from the printer control panel 60 Canceling a print job...60 Canceling a print job from the printer control panel ...60 Canceling a print job from the Windows taskbar ...61 Canceling a print job...
User's Guide
Page 5
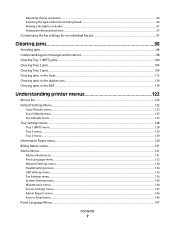
Adjusting copy quality...65 Making a copy lighter or darker ...65 Adjusting the sharpness of a copy ...65 Adjusting the color saturation of a copy...66 Adjusting the auto exposure of copies...66 Centering an image on a page ...67 Copying multiple pages onto a single sheet ...... the Embedded Web Server 80 Scanning to an e-mail address...81 Customizing the default scan settings from the printer control panel 81 Adjusting the auto exposure of scanned images ...81 Adjusting the color saturation of a scanned image ...82 Adjusting the image compression of a scanned image 82 Adjusting the scan ...
Adjusting copy quality...65 Making a copy lighter or darker ...65 Adjusting the sharpness of a copy ...65 Adjusting the color saturation of a copy...66 Adjusting the auto exposure of copies...66 Centering an image on a page ...67 Copying multiple pages onto a single sheet ...... the Embedded Web Server 80 Scanning to an e-mail address...81 Customizing the default scan settings from the printer control panel 81 Adjusting the auto exposure of scanned images ...81 Adjusting the color saturation of a scanned image ...82 Adjusting the image compression of a scanned image 82 Adjusting the scan ...

User's Guide
Page 6
...fax number entry using Address Book Editor 88 Creating a fax number entry using the Embedded Web Server 88 Creating a fax number entry using the printer control panel 89 Creating a fax group using Address Book Editor ...89 Creating a fax group using the Embedded Web Server 90 Creating a fax ...report settings...92 Printing fax reports...93 Sending a fax at a specified time...93 Enabling Color Fax...93 Limiting access to fax and scan operations...94 Limiting who can send faxes to the printer...94 Customizing dial settings...95 Setting the dialing mode ...95 Adjusting the volume...95 Setting...
...fax number entry using Address Book Editor 88 Creating a fax number entry using the Embedded Web Server 88 Creating a fax number entry using the printer control panel 89 Creating a fax group using Address Book Editor ...89 Creating a fax group using the Embedded Web Server 90 Creating a fax ...report settings...92 Printing fax reports...93 Sending a fax at a specified time...93 Enabling Color Fax...93 Limiting access to fax and scan operations...94 Limiting who can send faxes to the printer...94 Customizing dial settings...95 Setting the dialing mode ...95 Adjusting the volume...95 Setting...
User's Guide
Page 7
......104 Clearing Tray 3 jams...109 Clearing jams in the fuser...113 Clearing jams in the duplex unit...116 Clearing jams in the ADF...119 Understanding printer menus 122 Menus list...122 Default Settings Menu...122 Copy Defaults menu ...122 Scan Defaults menu ...125 Fax Defaults menu...127 Tray Settings menu...128...
......104 Clearing Tray 3 jams...109 Clearing jams in the fuser...113 Clearing jams in the duplex unit...116 Clearing jams in the ADF...119 Understanding printer menus 122 Menus list...122 Default Settings Menu...122 Copy Defaults menu ...122 Scan Defaults menu ...125 Fax Defaults menu...127 Tray Settings menu...128...
User's Guide
Page 8
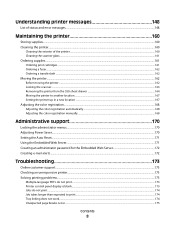
... belt ...162 Moving the printer...162 Before moving the printer...162 Locking the scanner...163 Removing the printer from the 550-sheet drawer ...164 Moving the printer to another location...167 Setting the printer up in a new location ...167 Adjusting the color registration...168 Adjusting the color registration automatically...168 Adjusting the color registration manually...168 Administrative support...
... belt ...162 Moving the printer...162 Before moving the printer...162 Locking the scanner...163 Removing the printer from the 550-sheet drawer ...164 Moving the printer to another location...167 Setting the printer up in a new location ...167 Adjusting the color registration...168 Adjusting the color registration automatically...168 Adjusting the color registration manually...168 Administrative support...

User's Guide
Page 12
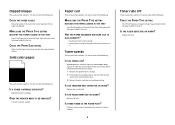
Learning about the printer Checking the box contents The following illustration shows the items included with the printer. 1 2 6 5 1 Printer 2 Print cartridges 3 Phone cord 4 Power cable 5 Setup sheet 6 Software and Documentation CD 4 3 Learning about the printer 12
Learning about the printer Checking the box contents The following illustration shows the items included with the printer. 1 2 6 5 1 Printer 2 Print cartridges 3 Phone cord 4 Power cable 5 Setup sheet 6 Software and Documentation CD 4 3 Learning about the printer 12


