User Manual
Page 3
...up the printer 15 Checking the box contents...15 Understanding the parts of the printer 16 Standalone setup...18 Understanding the printer software 23 Understanding the control panel...26 Using the control panel...26 Navigating the control panel menus ...27 Saving settings...28 Installing the printer... software...29 What do the Wi-Fi indicator lights mean 29 Turning printing voice notification on or off 29 Security Information...30 Networking...
...up the printer 15 Checking the box contents...15 Understanding the parts of the printer 16 Standalone setup...18 Understanding the printer software 23 Understanding the control panel...26 Using the control panel...26 Navigating the control panel menus ...27 Saving settings...28 Installing the printer... software...29 What do the Wi-Fi indicator lights mean 29 Turning printing voice notification on or off 29 Security Information...30 Networking...
User Manual
Page 5
... 55 Changing printer settings...55 Saving and deleting print settings...55 Using the Change Printer Default Settings submenu 56 Resetting printer software to factory default settings 56 Resetting the printer to factory default settings 57 Working with photos 58 Using recommended paper...58 ...Changing the Gamma Value of a photo or image 69 Despeckling a photo ...69 Changing the Brightness / Contrast settings of a photo 70 Applying a color effect to a photo ...70 Changing the Exposure setting of a photo 70 Removing wavy patterns from scanned photos, magazines, or newspapers 70 Printing ...
... 55 Changing printer settings...55 Saving and deleting print settings...55 Using the Change Printer Default Settings submenu 56 Resetting printer software to factory default settings 56 Resetting the printer to factory default settings 57 Working with photos 58 Using recommended paper...58 ...Changing the Gamma Value of a photo or image 69 Despeckling a photo ...69 Changing the Brightness / Contrast settings of a photo 70 Applying a color effect to a photo ...70 Changing the Exposure setting of a photo 70 Removing wavy patterns from scanned photos, magazines, or newspapers 70 Printing ...
User Manual
Page 7
......93 Receiving a fax automatically...93 Sending a fax using the software...93 Maintaining the printer 94 Installing print cartridges...94 Removing a used print cartridge...96 Refilling print cartridges...96 Using genuine Lexmark print cartridges 96 Aligning print cartridges...97 Cleaning the print cartridge nozzles...language appears on the display 101 Power button is not lit ...101 Software does not install ...102 Page does not print ...103 Understanding Warning levels...104 Removing and reinstalling the software...105 Enabling the USB port ...105 Solving printer communication problems 106 ...
......93 Receiving a fax automatically...93 Sending a fax using the software...93 Maintaining the printer 94 Installing print cartridges...94 Removing a used print cartridge...96 Refilling print cartridges...96 Using genuine Lexmark print cartridges 96 Aligning print cartridges...97 Cleaning the print cartridge nozzles...language appears on the display 101 Power button is not lit ...101 Software does not install ...102 Page does not print ...103 Understanding Warning levels...104 Removing and reinstalling the software...105 Enabling the USB port ...105 Solving printer communication problems 106 ...
User Manual
Page 9
... to communicate with the computer 134 Problems when copying, scanning, or faxing 135 Wrong printer is attached ...135 Updating the printer software ...135 Bidirectional communication is not established 135 Experiencing poor quality or incorrect output 136 Checking the port setting...136 Jams and misfeeds ...network 146 Error messages on the printer display 147 Alignment Error...147 Cartridge Error (1102, 1203, 1204, or 120F 147 Black Ink Low / Color Ink Low / Photo Ink Low 148 Clear Carrier Jam ...148 Cover Open ...148 Error 1104...148 Invalid Device ...148 Left Cartridge Error / Right...
... to communicate with the computer 134 Problems when copying, scanning, or faxing 135 Wrong printer is attached ...135 Updating the printer software ...135 Bidirectional communication is not established 135 Experiencing poor quality or incorrect output 136 Checking the port setting...136 Jams and misfeeds ...network 146 Error messages on the printer display 147 Alignment Error...147 Cartridge Error (1102, 1203, 1204, or 120F 147 Black Ink Low / Color Ink Low / Photo Ink Low 148 Clear Carrier Jam ...148 Cover Open ...148 Error 1104...148 Invalid Device ...148 Left Cartridge Error / Right...
User Manual
Page 11
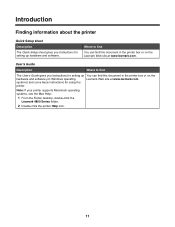
... some basic instructions for setting up You can find this document in the printer box or on the hardware and software (on the Lexmark Web site at www.lexmark.com. Where to find The User's Guide gives you instructions for using the printer. Introduction Finding information about the...Quick Setup sheet gives you instructions for setting up hardware and software. User's Guide Description Where to find You can find this document in the printer box or on Windows operating Lexmark Web site at www.lexmark.com. Note: If your printer supports Macintosh operating systems, ...
... some basic instructions for setting up You can find this document in the printer box or on the hardware and software (on the Lexmark Web site at www.lexmark.com. Where to find The User's Guide gives you instructions for using the printer. Introduction Finding information about the...Quick Setup sheet gives you instructions for setting up hardware and software. User's Guide Description Where to find You can find this document in the printer box or on Windows operating Lexmark Web site at www.lexmark.com. Note: If your printer supports Macintosh operating systems, ...
User Manual
Page 12
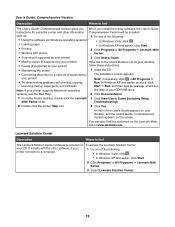
...the User's Guide: Comprehensive Version appears on To access the Lexmark Solution Center: your CD. Lexmark Solution Center Description Where to find The Lexmark Solution Center software is not on the Lexmark Web site at www.lexmark.com. User's Guide: Comprehensive Version Description Where to find... click . • Loading paper • In Windows XP and earlier, click Start. • Printing 2 Click Programs or All Programs Œ Lexmark 4800 • Working with photos Series. • Scanning (if supported by your printer) 3 Click User's Guide. • Making copies (if ...
...the User's Guide: Comprehensive Version appears on To access the Lexmark Solution Center: your CD. Lexmark Solution Center Description Where to find The Lexmark Solution Center software is not on the Lexmark Web site at www.lexmark.com. User's Guide: Comprehensive Version Description Where to find... click . • Loading paper • In Windows XP and earlier, click Start. • Printing 2 Click Programs or All Programs Œ Lexmark 4800 • Working with photos Series. • Scanning (if supported by your printer) 3 Click User's Guide. • Making copies (if ...

User Manual
Page 15
... Guide or Mac Help) can be installed into the printer. Note: Your power cord may look different from the one shown. • Installation software for Windows and Macintosh 5 Getting Started 6 Quick Setup sheet 7 Installation cable WI F I PRINTING 1 2 3 Description Cartridges to be found ... of the printer. Setting up the printer Checking the box contents 7 1 2 3 6 5 4 Name 1 Black print cartridge 2 Color print cartridge 3 Power cord 4 Installation software CD for the printer • Windows Help • User's Guide in electronic format • Mac Help Printed booklet that serves as ...
... Guide or Mac Help) can be installed into the printer. Note: Your power cord may look different from the one shown. • Installation software for Windows and Macintosh 5 Getting Started 6 Quick Setup sheet 7 Installation cable WI F I PRINTING 1 2 3 Description Cartridges to be found ... of the printer. Setting up the printer Checking the box contents 7 1 2 3 6 5 4 Name 1 Black print cartridge 2 Color print cartridge 3 Power cord 4 Installation software CD for the printer • Windows Help • User's Guide in electronic format • Mac Help Printed booklet that serves as ...
User Manual
Page 23
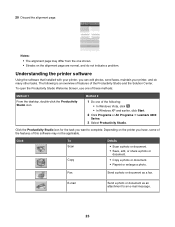
...; Copy a photo or document. • Reprint or enlarge a photo. Notes: • The alignment page may differ from the one of this software may not be applicable. To open the Productivity Studio Welcome Screen, use one of the Productivity Studio and the Solution Center. Fax Send a photo or... complete. The following : • In Windows Vista, click . • In Windows XP and earlier, click Start. 2 Click Programs or All Programs Œ Lexmark 4800 Series. 3 Select Productivity Studio. E-mail Send a photo or document as a fax. Method 2 1 Do one shown. • Streaks on the printer you...
...; Copy a photo or document. • Reprint or enlarge a photo. Notes: • The alignment page may differ from the one of this software may not be applicable. To open the Productivity Studio Welcome Screen, use one of the Productivity Studio and the Solution Center. Fax Send a photo or... complete. The following : • In Windows Vista, click . • In Windows XP and earlier, click Start. 2 Click Programs or All Programs Œ Lexmark 4800 Series. 3 Select Productivity Studio. E-mail Send a photo or document as a fax. Method 2 1 Do one shown. • Streaks on the printer you...
User Manual
Page 25
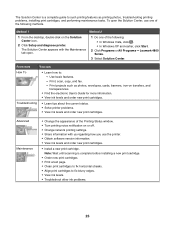
...following : • In Windows Vista, click . • In Windows XP and earlier, click Start. 2 Click Programs or All Programs Œ Lexmark 4800 Series. 3 Select Solution Center. Troubleshooting • Learn tips about the current status. • Solve printer problems. • View ink levels...scan, copy, and fax. - The Solution Center appears with the Maintenance tab open the Solution Center, use the printer. • Obtain software version information. • View ink levels and order new print cartridges. • Install a new print cartridge. Print projects such as printing...
...following : • In Windows Vista, click . • In Windows XP and earlier, click Start. 2 Click Programs or All Programs Œ Lexmark 4800 Series. 3 Select Solution Center. Troubleshooting • Learn tips about the current status. • Solve printer problems. • View ink levels...scan, copy, and fax. - The Solution Center appears with the Maintenance tab open the Solution Center, use the printer. • Obtain software version information. • View ink levels and order new print cartridges. • Install a new print cartridge. Print projects such as printing...

User Manual
Page 29
Using the World Wide Web 1 Go to the Lexmark Web site at www.lexmark.com. 2 From the home page, navigate through the menu selection, and then click Drivers & Downloads. 3 Choose the printer and the printer driver for wireless printing,...that the printer is configured, but it is ready to communicate with the printer: 1 Start Windows. 2 When the desktop appears, insert the software CD. Installing the printer software Using the installation software CD (Windows users only) Using the CD that automatically appears. 4 Double-click the Install icon. 5 Follow the instructions on the computer...
Using the World Wide Web 1 Go to the Lexmark Web site at www.lexmark.com. 2 From the home page, navigate through the menu selection, and then click Drivers & Downloads. 3 Choose the printer and the printer driver for wireless printing,...that the printer is configured, but it is ready to communicate with the printer: 1 Start Windows. 2 When the desktop appears, insert the software CD. Installing the printer software Using the installation software CD (Windows users only) Using the CD that automatically appears. 4 Double-click the Install icon. 5 Follow the instructions on the computer...
User Manual
Page 30
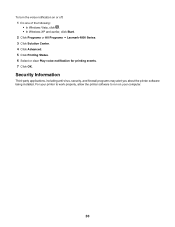
...Third-party applications, including anti-virus, security, and firewall programs may alert you about the printer software being installed. To turn the voice notification on your printer to work properly, allow the printer software to run on or off: 1 Do one of the following: • In Windows Vista..., click . • In Windows XP and earlier, click Start. 2 Click Programs or All Programs Œ Lexmark 4800 Series. 3 Click Solution Center. 4 Click Advanced...
...Third-party applications, including anti-virus, security, and firewall programs may alert you about the printer software being installed. To turn the voice notification on your printer to work properly, allow the printer software to run on or off: 1 Do one of the following: • In Windows Vista..., click . • In Windows XP and earlier, click Start. 2 Click Programs or All Programs Œ Lexmark 4800 Series. 3 Click Solution Center. 4 Click Advanced...
User Manual
Page 34
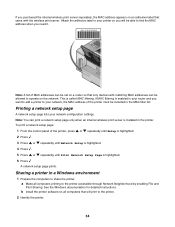
... filtering is enabled in a Windows environment 1 Prepare the computers to the printer accessible through Network Neighborhood by enabling File and Print Sharing. b Install the printer software on all computers printing to share the printer. This is highlighted. 6 Press A network setup page prints. Printing a network setup page A network setup page lists your...
... filtering is enabled in a Windows environment 1 Prepare the computers to the printer accessible through Network Neighborhood by enabling File and Print Sharing. b Install the printer software on all computers printing to share the printer. This is highlighted. 6 Press A network setup page prints. Printing a network setup page A network setup page lists your...
User Manual
Page 35
... computer is the one of the server name and the distinctive printer name that was specified in the form \\server \printer. b Right-click the Lexmark 4800 Series icon. Finding a printer/print server located on an IP network to the printer: a Click Start ΠSettings ΠPrinters or...and Faxes. If the printer and print server are located on another network (called a subnet), you must manually enter an IP address during printer software installation. h Click Close on page 34. c Click Sharing. Devices on an IP network can automatically find the printers that are located on ...
... computer is the one of the server name and the distinctive printer name that was specified in the form \\server \printer. b Right-click the Lexmark 4800 Series icon. Finding a printer/print server located on an IP network to the printer: a Click Start ΠSettings ΠPrinters or...and Faxes. If the printer and print server are located on another network (called a subnet), you must manually enter an IP address during printer software installation. h Click Close on page 34. c Click Sharing. Devices on an IP network can automatically find the printers that are located on ...
User Manual
Page 36
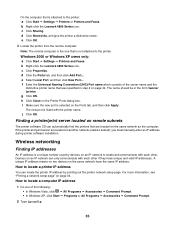
... IP address in the port name. Make sure the selected network is listed as microwave ovens. The print object, created at the end of printer software, the IP address is visible in the printer list only as 192.168.0.100. Finding the signal strength Wireless devices have lost communication with the...
... IP address in the port name. Make sure the selected network is listed as microwave ovens. The print object, created at the end of printer software, the IP address is visible in the printer list only as 192.168.0.100. Finding the signal strength Wireless devices have lost communication with the...
User Manual
Page 37
...the Network Neighborhood until you find and configure newly added printers. 37 A printer object will copy a subset of the client. Note: The software does not automatically configure printers found on the computer screen until installation is complete. Windows 2000 or Windows XP users only: 1 For more ..., select the Peer-to-Peer client option, and then click Next. 6 Select the appropriate printer from the host computer. If the software detects a direct network attached printer, you must first highlight the printer in the window, and then click Configure to manually assign an...
...the Network Neighborhood until you find and configure newly added printers. 37 A printer object will copy a subset of the client. Note: The software does not automatically configure printers found on the computer screen until installation is complete. Windows 2000 or Windows XP users only: 1 For more ..., select the Peer-to-Peer client option, and then click Next. 6 Select the appropriate printer from the host computer. If the software detects a direct network attached printer, you must first highlight the printer in the window, and then click Configure to manually assign an...
User Manual
Page 39
...Connections. 2 Right-click Wireless Network Connections. 3 If Enable appears in the space provided. A network set up this way is to use on that software to set up the ad hoc wireless network. c Go to set up a standalone network between the computer and your wireless settings. Windows Vista will ...Be sure to create an ad hoc network. 39 Note: If the Wireless Networks tab does not appear, your computer has third-party software that software to learn how to use the exact spelling and capitalization. The installer will enable the ad hoc network for that controls your printer....
...Connections. 2 Right-click Wireless Network Connections. 3 If Enable appears in the space provided. A network set up this way is to use on that software to set up the ad hoc wireless network. c Go to set up a standalone network between the computer and your wireless settings. Windows Vista will ...Be sure to create an ad hoc network. 39 Note: If the Wireless Networks tab does not appear, your computer has third-party software that software to learn how to use the exact spelling and capitalization. The installer will enable the ad hoc network for that controls your printer....

User Manual
Page 46
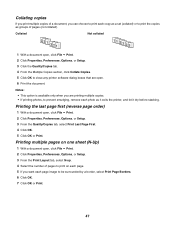
b Select the Advanced tab. The Fast Pics dialog appears. 5 If you want to Photos: a From the Lexmark logo drop-down menu, select Options. Printing multiple copies of a document 1 With a document open . 5 Print the document. 46 For best results, use photo or heavyweight ... Properties, Preferences, Options, or Setup. 3 In the Copies section of the Quality/Copies tab, enter the number of copies you want to close any printer software dialog boxes that came with the paper.) 2 Open a Web page with the glossy or printable side facing you. (If you are not sure which side...
b Select the Advanced tab. The Fast Pics dialog appears. 5 If you want to Photos: a From the Lexmark logo drop-down menu, select Options. Printing multiple copies of a document 1 With a document open . 5 Print the document. 46 For best results, use photo or heavyweight ... Properties, Preferences, Options, or Setup. 3 In the Copies section of the Quality/Copies tab, enter the number of copies you want to close any printer software dialog boxes that came with the paper.) 2 Open a Web page with the glossy or printable side facing you. (If you are not sure which side...
User Manual
Page 47
.... 2 Click Properties, Preferences, Options, or Setup. 3 Click the Quality/Copies tab. 4 From the Multiple Copies section, click Collate Copies. 5 Click OK to close any printer software dialog boxes that are printing multiple copies. • If printing photos, to be surrounded by a border, select Print Page Borders. 6 Click OK. 7 Click OK or...
.... 2 Click Properties, Preferences, Options, or Setup. 3 Click the Quality/Copies tab. 4 From the Multiple Copies section, click Collate Copies. 5 Click OK to close any printer software dialog boxes that are printing multiple copies. • If printing photos, to be surrounded by a border, select Print Page Borders. 6 Click OK. 7 Click OK or...
User Manual
Page 50
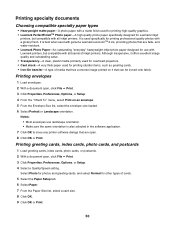
... in the software application. 7 Click OK to close any printer software dialogs that are fade- Notes: • Most envelopes use with Lexmark printers, but compatible with genuine Lexmark evercolorTM 2 .... 9 Click OK or Print. 50 and water-resistant. • Lexmark Photo Paper-An outstanding "everyday" heavyweight inkjet photo paper designed for Lexmark inkjet printers, but compatible with a glossy finish. Printing greeting cards, index... thick paper used for printing professional quality photos with all inkjet printers. Select Photo for photos and greeting cards, and select Normal ...
... in the software application. 7 Click OK to close any printer software dialogs that are fade- Notes: • Most envelopes use with Lexmark printers, but compatible with genuine Lexmark evercolorTM 2 .... 9 Click OK or Print. 50 and water-resistant. • Lexmark Photo Paper-An outstanding "everyday" heavyweight inkjet photo paper designed for Lexmark inkjet printers, but compatible with a glossy finish. Printing greeting cards, index... thick paper used for printing professional quality photos with all inkjet printers. Select Photo for photos and greeting cards, and select Normal ...
User Manual
Page 51
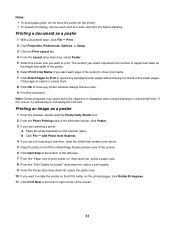
... cause text to be clipped or to print all of the poster to show crop marks. 7 Click Select Pages To Print to reprint any printer software dialogs that it dry before stacking. If this occurs, try decreasing or increasing the font size. Printing a document as it exits, and let it fits...
... cause text to be clipped or to print all of the poster to show crop marks. 7 Click Select Pages To Print to reprint any printer software dialogs that it dry before stacking. If this occurs, try decreasing or increasing the font size. Printing a document as it exits, and let it fits...


