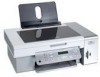

User's Guide
Page 2
...product or the manufacturer's authorized replacement power supply and power supply cord. Connect the power supply cord to a professional service person. Lexmark is designed, tested, and approved to meet strict global safety standards with the use of some parts may not always be obvious....complete descriptions: • Windows users-See the User's Guide. • Macintosh users-If your product supports Macintosh, see the Mac Help installed with this product or make any electrical or cabling connections, such as the power supply cord or telephone, during a lightning storm. Refer service...
...product or the manufacturer's authorized replacement power supply and power supply cord. Connect the power supply cord to a professional service person. Lexmark is designed, tested, and approved to meet strict global safety standards with the use of some parts may not always be obvious....complete descriptions: • Windows users-See the User's Guide. • Macintosh users-If your product supports Macintosh, see the Mac Help installed with this product or make any electrical or cabling connections, such as the power supply cord or telephone, during a lightning storm. Refer service...
User's Guide
Page 3
... about the printer 9 Setting up the printer 12 Checking the box contents...12 Installing another language control panel 13 Networking the printer 14 Installing the printer on a network...14 Installing an internal wireless print server 14 Finding your MAC address...15 Learning about the printer......22 Using the Settings menu ...23 Saving settings ...25 Learning about the software 27 Using the printer software...27 Using the Lexmark Imaging Studio...27 Using the Solution Center...28 Using Printing Preferences...30 Opening Printing Preferences ...30 Using the Printing Preferences tabs ......
... about the printer 9 Setting up the printer 12 Checking the box contents...12 Installing another language control panel 13 Networking the printer 14 Installing the printer on a network...14 Installing an internal wireless print server 14 Finding your MAC address...15 Learning about the printer......22 Using the Settings menu ...23 Saving settings ...25 Learning about the software 27 Using the printer software...27 Using the Lexmark Imaging Studio...27 Using the Solution Center...28 Using Printing Preferences...30 Opening Printing Preferences ...30 Using the Printing Preferences tabs ......
User's Guide
Page 5
......68 Sending a fax using the software...68 Receiving a fax automatically...69 Maintaining the printer 70 Changing print cartridges...70 Removing a used print cartridge...70 Installing print cartridges...70 Achieving better print quality...72 Improving print quality ...72 Aligning print cartridges ...72 Cleaning the print cartridge nozzles ...72 Wiping the print... the print cartridges...74 Cleaning the scanner glass...74 Ordering supplies...74 Ordering print cartridges...74 Ordering paper and other supplies ...75 Using genuine Lexmark print cartridges 75 Refilling a print cartridge...76 5
......68 Sending a fax using the software...68 Receiving a fax automatically...69 Maintaining the printer 70 Changing print cartridges...70 Removing a used print cartridge...70 Installing print cartridges...70 Achieving better print quality...72 Improving print quality ...72 Aligning print cartridges ...72 Cleaning the print cartridge nozzles ...72 Wiping the print... the print cartridges...74 Cleaning the scanner glass...74 Ordering supplies...74 Ordering print cartridges...74 Ordering paper and other supplies ...75 Using genuine Lexmark print cartridges 75 Refilling a print cartridge...76 5
User's Guide
Page 6
Recycling Lexmark products...76 Troubleshooting...77 Setup troubleshooting...77 Incorrect language appears on the display 77 Power button is not lit ...78 Software does not install ...78 Page does not print ...79 Cannot print from digital camera using PictBridge 80 Print troubleshooting...81 Partial 4 x 6 in. (10 x 15 cm) photo prints when......92 Memory card cannot be inserted ...93 Nothing happens when memory card is inserted 93 Error messages...94 Alignment Error...94 Black Ink Low / Color Ink Low / Photo Ink Low 94 Cartridge Error (1102, 1203, 1204, or 120F 94 Clear Carrier Jam ...95 6
Recycling Lexmark products...76 Troubleshooting...77 Setup troubleshooting...77 Incorrect language appears on the display 77 Power button is not lit ...78 Software does not install ...78 Page does not print ...79 Cannot print from digital camera using PictBridge 80 Print troubleshooting...81 Partial 4 x 6 in. (10 x 15 cm) photo prints when......92 Memory card cannot be inserted ...93 Nothing happens when memory card is inserted 93 Error messages...94 Alignment Error...94 Black Ink Low / Color Ink Low / Photo Ink Low 94 Cartridge Error (1102, 1203, 1204, or 120F 94 Clear Carrier Jam ...95 6

User's Guide
Page 9
... printer software, the User's Guide printer and other information such as: will be installed. • Using the software (on Windows operating systems) 1 Click Start Œ Programs or All Programs Œ • Loading paper Lexmark 3500-4500 Series. • Printing 2 Click User's Guide. • Working with printing, copying, Troubleshooting). Getting Started booklet Description...
... printer software, the User's Guide printer and other information such as: will be installed. • Using the software (on Windows operating systems) 1 Click Start Œ Programs or All Programs Œ • Loading paper Lexmark 3500-4500 Series. • Printing 2 Click User's Guide. • Working with printing, copying, Troubleshooting). Getting Started booklet Description...
User's Guide
Page 10
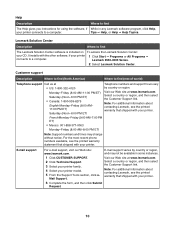
... or region, and then select the Customer Support link. Customer support Description Where to find (North America) Where to find The Lexmark Solution Center software is included on To access the Lexmark Solution Center: your CD. Select a country or region, and then select the Customer Support link. French Monday-Friday (9:00 AM... Technical Support. 3 Select your printer family. 4 Select your printer model. 5 From the Support Tools section, click e- Tips ΠHelp, or Help ΠHelp Topics. It installs with your printer.
... or region, and then select the Customer Support link. Customer support Description Where to find (North America) Where to find The Lexmark Solution Center software is included on To access the Lexmark Solution Center: your CD. Select a country or region, and then select the Customer Support link. French Monday-Friday (9:00 AM... Technical Support. 3 Select your printer family. 4 Select your printer model. 5 From the Support Tools section, click e- Tips ΠHelp, or Help ΠHelp Topics. It installs with your printer.
User's Guide
Page 12
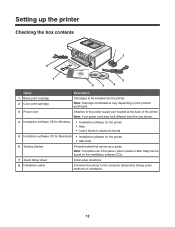
...Note: Complete user information (User's Guide or Mac Help) can be installed into the printer. Note: Cartridge combinations vary depending on the installation software CDs. 7 Quick Setup sheet Initial setup directions 8 Installation cable Connects the printer to the power supply port located at the back ...of installation. 12 Setting up the printer Checking the box contents Name Description 1 Black print cartridge 2 Color print cartridge Cartridges to be found on the product purchased. 3 Power cord Attaches ...
...Note: Complete user information (User's Guide or Mac Help) can be installed into the printer. Note: Cartridge combinations vary depending on the installation software CDs. 7 Quick Setup sheet Initial setup directions 8 Installation cable Connects the printer to the power supply port located at the back ...of installation. 12 Setting up the printer Checking the box contents Name Description 1 Black print cartridge 2 Color print cartridge Cartridges to be found on the product purchased. 3 Power cord Attaches ...
User's Guide
Page 13
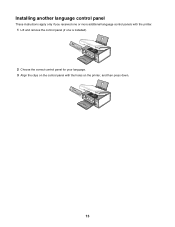
Installing another language control panel These instructions apply only if you received one or more additional language control panels with the printer. 1 Lift and remove the control panel (if one is installed). 2 Choose the correct control panel for your language. 3 Align the clips on the control panel with the holes on the printer, and then press down. 13
Installing another language control panel These instructions apply only if you received one or more additional language control panels with the printer. 1 Lift and remove the control panel (if one is installed). 2 Choose the correct control panel for your language. 3 Align the clips on the control panel with the holes on the printer, and then press down. 13
User's Guide
Page 14
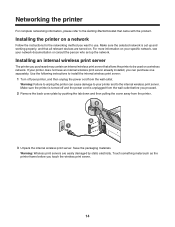
...person who set up the network. Make sure the printer is turned off your printer does not have an internal wireless print server already installed, you purchased may contain an internal wireless print server that allows the printer to be used on . Save the packaging materials. Touch .... If your printer, and then unplug the power cord from the printer. 3 Unpack the internal wireless print server. Use the following instructions to install the internal wireless print server: 1 Turn off and the power cord is set up and working properly, and that came with the product. Warning...
...person who set up the network. Make sure the printer is turned off your printer does not have an internal wireless print server already installed, you purchased may contain an internal wireless print server that allows the printer to be used on . Save the packaging materials. Touch .... If your printer, and then unplug the power cord from the printer. 3 Unpack the internal wireless print server. Use the following instructions to install the internal wireless print server: 1 Turn off and the power cord is set up and working properly, and that came with the product. Warning...
User's Guide
Page 16
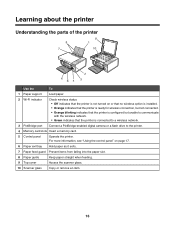
... glass. 10 Scanner glass Copy or remove an item. 16 For more information, see "Using the control panel" on or that no wireless option is installed. • Orange indicates that the printer is ready for wireless connection, but not connected. • Orange blinking indicates that the printer is configured but unable...
... glass. 10 Scanner glass Copy or remove an item. 16 For more information, see "Using the control panel" on or that no wireless option is installed. • Orange indicates that the printer is ready for wireless connection, but not connected. • Orange blinking indicates that the printer is configured but unable...
User's Guide
Page 17
Note: Only the 4500 Series comes with an internal wireless print server installed. 4 USB port Connect the printer to a computer using a USB cable. 5 Power supply with port Connect the printer to a wireless network. Using the control panel buttons ... printer on and off. • Stop the print, copy, or scan process. 17 Use the To 1 Scanner unit Access the print cartridges. 2 Print cartridge carrier Install, replace, or remove a print cartridge. 3 Lexmark N2050 (internal wireless print server) Connect the printer to a power source.
Note: Only the 4500 Series comes with an internal wireless print server installed. 4 USB port Connect the printer to a computer using a USB cable. 5 Power supply with port Connect the printer to a wireless network. Using the control panel buttons ... printer on and off. • Stop the print, copy, or scan process. 17 Use the To 1 Scanner unit Access the print cartridges. 2 Print cartridge carrier Install, replace, or remove a print cartridge. 3 Lexmark N2050 (internal wireless print server) Connect the printer to a power source.

User's Guide
Page 29
...and order new print cartridges. 29 Method 2 1 Click Start Œ Programs or All Programs Œ Lexmark 3500-4500 Series. 2 Select Solution Center. Maintenance Contact Information • Install a new print cartridge. The Solution Center consists of six tabs: From here Printer Status (Main dialog) How... Center appears with the Maintenance tab open the Solution Center, use one of these methods: Method 1 1 From the desktop, double-click the Lexmark Imaging Studio icon. 2 Click Setup and diagnose printer. Print, scan, copy, and fax. - Note: Wait until scanning is Busy Printing....
...and order new print cartridges. 29 Method 2 1 Click Start Œ Programs or All Programs Œ Lexmark 3500-4500 Series. 2 Select Solution Center. Maintenance Contact Information • Install a new print cartridge. The Solution Center consists of six tabs: From here Printer Status (Main dialog) How... Center appears with the Maintenance tab open the Solution Center, use one of these methods: Method 1 1 From the desktop, double-click the Lexmark Imaging Studio icon. 2 Click Setup and diagnose printer. Print, scan, copy, and fax. - Note: Wait until scanning is Busy Printing....

User's Guide
Page 45
...the flash drive. 45 Note: The printer recognizes one memory card, a message appears on the front of the printer. When the flash drive is installed, the message Memory Card Detected appears. When the printer recognizes that a flash drive is not in use. Warning: Do not touch cables, any ...reinsert it . Inserting a flash drive 1 Insert the flash drive into the port. 2 Wait for the printer to remove the memory card that is installed. Warning: Do not touch cables, any network adapter, the memory card, or the printer in the area shown while actively printing, reading, or writing ...
...the flash drive. 45 Note: The printer recognizes one memory card, a message appears on the front of the printer. When the flash drive is installed, the message Memory Card Detected appears. When the printer recognizes that a flash drive is not in use. Warning: Do not touch cables, any ...reinsert it . Inserting a flash drive 1 Insert the flash drive into the port. 2 Wait for the printer to remove the memory card that is installed. Warning: Do not touch cables, any network adapter, the memory card, or the printer in the area shown while actively printing, reading, or writing ...
User's Guide
Page 64
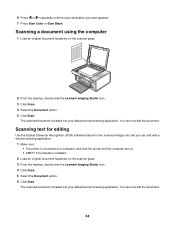
...scanned document is loaded into text you want appears. 7 Press Start Color or Start Black. Scanning a document using the computer 1 Load an original document facedown on the scanner glass. 3 From the desktop, double-click the Lexmark Imaging Studio icon. 4 Click Scan. 5 Select the Document option.... connected to a computer, and both the printer and the computer are on. • ABBYY Fine Reader is installed. 2 Load an original document facedown on the scanner glass. 2 From the desktop, double-click the Lexmark Imaging Studio icon. 3 Click Scan. 4 Select the Document option. 5 Click Start.
...scanned document is loaded into text you want appears. 7 Press Start Color or Start Black. Scanning a document using the computer 1 Load an original document facedown on the scanner glass. 3 From the desktop, double-click the Lexmark Imaging Studio icon. 4 Click Scan. 5 Select the Document option.... connected to a computer, and both the printer and the computer are on. • ABBYY Fine Reader is installed. 2 Load an original document facedown on the scanner glass. 2 From the desktop, double-click the Lexmark Imaging Studio icon. 3 Click Scan. 4 Select the Document option. 5 Click Start.
User's Guide
Page 70
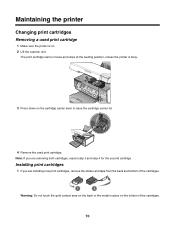
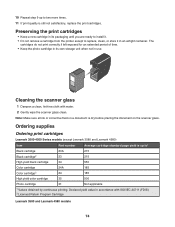
... 1 If you are installing new print cartridges, remove the sticker and tape from the back and bottom of the cartridges. 1 2 Warning: Do not touch the gold contact area on ...
... 1 If you are installing new print cartridges, remove the sticker and tape from the back and bottom of the cartridges. 1 2 Warning: Do not touch the gold contact area on ...
User's Guide
Page 72
...are not satisfied with the print quality of a document, make sure you: • Use the appropriate paper for best results use Lexmark Premium Photo Paper or Lexmark Photo Paper. • Use a paper that is still not satisfactory, replace the cartridge. If print quality has not improved, continue ...Wiping the print cartridge nozzles and contacts" on page 73. For more information, see "Removing a used print cartridge" on page 70 and "Installing print cartridges" on page 72. An alignment page prints. For more information, see "Aligning print cartridges" on page 70. If you want,...
...are not satisfied with the print quality of a document, make sure you: • Use the appropriate paper for best results use Lexmark Premium Photo Paper or Lexmark Photo Paper. • Use a paper that is still not satisfactory, replace the cartridge. If print quality has not improved, continue ...Wiping the print cartridge nozzles and contacts" on page 73. For more information, see "Removing a used print cartridge" on page 70 and "Installing print cartridges" on page 72. An alignment page prints. For more information, see "Aligning print cartridges" on page 70. If you want,...
User's Guide
Page 74
...the photo cartridge in its packaging until you are ready to install it in accordance with water. 2 Gently wipe the scanner glass clean. Ordering supplies Ordering print cartridges Lexmark 3500-4500 Series models (except Lexmark 3580 and Lexmark 4580) Item Part number Average cartridge standard page yield is... step 9 up to1 Black cartridge 23A 215 Black cartridge2 23 215 High yield black cartridge 34 550 Color cartridge 24A 185 Color cartridge2 24 185 High yield color cartridge 35 500 Photo cartridge 31 Not applicable 1 Values obtained by continuous printing.
...the photo cartridge in its packaging until you are ready to install it in accordance with water. 2 Gently wipe the scanner glass clean. Ordering supplies Ordering print cartridges Lexmark 3500-4500 Series models (except Lexmark 3580 and Lexmark 4580) Item Part number Average cartridge standard page yield is... step 9 up to1 Black cartridge 23A 215 Black cartridge2 23 215 High yield black cartridge 34 550 Color cartridge 24A 185 Color cartridge2 24 185 High yield color cartridge 35 500 Photo cartridge 31 Not applicable 1 Values obtained by continuous printing.
User's Guide
Page 75
... for superior print quality. 75 Note: If your printer did not come with an internal wireless print server already installed, installing the Lexmark N2050 in . • 10 x 15 cm •L For information on a wireless network. Item Color cartridge Black cartridge Photo cartridge Part number 2 3 31 Ordering paper and other high-quality images, use only...
... for superior print quality. 75 Note: If your printer did not come with an internal wireless print server already installed, installing the Lexmark N2050 in . • 10 x 15 cm •L For information on a wireless network. Item Color cartridge Black cartridge Photo cartridge Part number 2 3 31 Ordering paper and other high-quality images, use only...
User's Guide
Page 77
... Setup troubleshooting • "Incorrect language appears on the display" on page 77 • "Power button is not lit" on page 78 • "Software does not install" on page 78 • "Page does not print" on page 79 • "Cannot print from digital camera using PictBridge" on page 80 Incorrect language appears...
... Setup troubleshooting • "Incorrect language appears on the display" on page 77 • "Power button is not lit" on page 78 • "Software does not install" on page 78 • "Page does not print" on page 79 • "Cannot print from digital camera using PictBridge" on page 80 Incorrect language appears...
User's Guide
Page 78
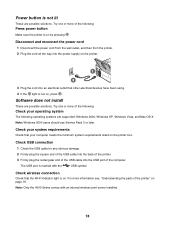
... supported: Windows 2000, Windows XP, Windows Vista, and Mac OS X. Note: Only the 4500 Series comes with the USB symbol. Software does not install These are possible solutions. The USB port is on. Try one or more of the printer" on page 16. Try one or more information see... 3 or later. Check wireless connection Check that your system requirements Check that the Wi-Fi indicator light is marked with an internal wireless print server installed. 78 Power button is not on, press . Check USB connection 1 Check the USB cable for any obvious damage. 2 Firmly plug the square end ...
... supported: Windows 2000, Windows XP, Windows Vista, and Mac OS X. Note: Only the 4500 Series comes with the USB symbol. Software does not install These are possible solutions. The USB port is on. Try one or more of the printer" on page 16. Try one or more information see... 3 or later. Check wireless connection Check that your system requirements Check that the Wi-Fi indicator light is marked with an internal wireless print server installed. 78 Power button is not on, press . Check USB connection 1 Check the USB cable for any obvious damage. 2 Firmly plug the square end ...


