Wireless Setup Guide
Page 26
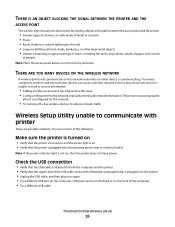
... printer. • Verify that the printer is plugged into the printer. • Unplug the USB cable, and then plug it is configured for the network, manually entering all network information. Troubleshooting wireless setup 26 THERE ARE TOO MANY DEVICES ON THE WIRELESS NETWORK A wireless device will communicate on the front of...
... printer. • Verify that the printer is plugged into the printer. • Unplug the USB cable, and then plug it is configured for the network, manually entering all network information. Troubleshooting wireless setup 26 THERE ARE TOO MANY DEVICES ON THE WIRELESS NETWORK A wireless device will communicate on the front of...

Wireless Setup Guide
Page 33
The BSS type can be assigned manually by you (Static IP address), automatically by the DHCP server (DHCP IP address), or automatically by a network device. A setting for a wireless device that lets it ...
The BSS type can be assigned manually by you (Static IP address), automatically by the DHCP server (DHCP IP address), or automatically by a network device. A setting for a wireless device that lets it ...

Wireless Setup Guide
Page 34
... with the computer at much higher speeds than parallel cables A small, rectangular port on ad hoc wireless networks. Networking glossary 34 An IP address assigned manually by you connect a printer to a wireless network, the printer needs to a network printer or print server by the manufacturer. To find the UAA, print a network...
... with the computer at much higher speeds than parallel cables A small, rectangular port on ad hoc wireless networks. Networking glossary 34 An IP address assigned manually by you connect a printer to a wireless network, the printer needs to a network printer or print server by the manufacturer. To find the UAA, print a network...
User's Guide
Page 2
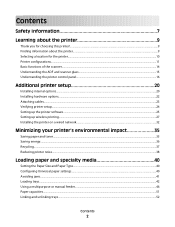
... specialty media 40 Setting the Paper Size and Paper Type...40 Configuring Universal paper settings...40 Avoiding jams...41 Loading trays...42 Using a multipurpose or manual feeder...46 Paper capacities...51 Linking and unlinking trays...52 Contents 2
... specialty media 40 Setting the Paper Size and Paper Type...40 Configuring Universal paper settings...40 Avoiding jams...41 Loading trays...42 Using a multipurpose or manual feeder...46 Paper capacities...51 Linking and unlinking trays...52 Contents 2
User's Guide
Page 12
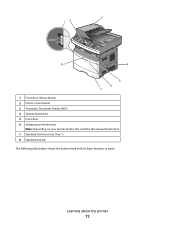
3 12 8 4 5 6 7 1 Front door release button 2 Printer control panel 3 Automatic Document Feeder (ADF) 4 System board door 5 Front door 6 Multipurpose feeder door Note: Depending on your printer model, this could be the manual feeder door. 7 Standard 250-sheet tray (Tray 1) 8 Standard exit bin The following illustration shows the printer back with its basic features or parts: Learning about the printer 12
3 12 8 4 5 6 7 1 Front door release button 2 Printer control panel 3 Automatic Document Feeder (ADF) 4 System board door 5 Front door 6 Multipurpose feeder door Note: Depending on your printer model, this could be the manual feeder door. 7 Standard 250-sheet tray (Tray 1) 8 Standard exit bin The following illustration shows the printer back with its basic features or parts: Learning about the printer 12
User's Guide
Page 26
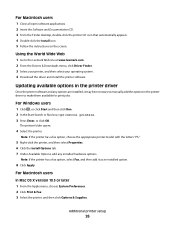
... an installed option. 8 Click Apply. Note: If the printer has a fax option, select Fax, and then add it may be necessary to the Lexmark Web site at www.lexmark.com. 2 From the Drivers & Downloads menu, click Driver Finder. 3 Select your printer, and then select your operating system. 4 Download the driver and install... then click Run. 2 In the Start Search or Run box, type control printers. 3 Press Enter, or click OK. Using the World Wide Web 1 Go to manually add the options in the printer driver Once the printer software and any installed hardware options.
... an installed option. 8 Click Apply. Note: If the printer has a fax option, select Fax, and then add it may be necessary to the Lexmark Web site at www.lexmark.com. 2 From the Drivers & Downloads menu, click Driver Finder. 3 Select your printer, and then select your operating system. 4 Download the driver and install... then click Run. 2 In the Start Search or Run box, type control printers. 3 Press Enter, or click OK. Using the World Wide Web 1 Go to manually add the options in the printer driver Once the printer software and any installed hardware options.
User's Guide
Page 40
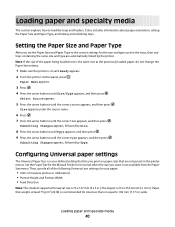
... size you print on and Ready appears. 2 From the printer control panel, press . Configuring Universal paper settings The Universal Paper Size is recommended for the Manual Feeder to load the trays and feeders.
... size you print on and Ready appears. 2 From the printer control panel, press . Configuring Universal paper settings The Universal Paper Size is recommended for the Manual Feeder to load the trays and feeders.

User's Guide
Page 41
... Setup menu. Make sure the stack height does not exceed the indicated maximum height. • Make sure the guides in the paper tray or the manual feeder are properly positioned and are not pressing too tightly against the paper or envelopes. • Push the paper tray in firmly after loading paper.
... Setup menu. Make sure the stack height does not exceed the indicated maximum height. • Make sure the guides in the paper tray or the manual feeder are properly positioned and are not pressing too tightly against the paper or envelopes. • Push the paper tray in firmly after loading paper.

User's Guide
Page 46
... to use the multipurpose feeder when you print on other models have a multipurpose feeder, whereas other specialty media you do not keep in a tray. The manual feeder can be loaded with up to use the multipurpose feeder for single-page print jobs on letterhead or on different sizes and types of...
... to use the multipurpose feeder when you print on other models have a multipurpose feeder, whereas other specialty media you do not keep in a tray. The manual feeder can be loaded with up to use the multipurpose feeder for single-page print jobs on letterhead or on different sizes and types of...

User's Guide
Page 50
Notes: • Load letterhead faceup, with the top of the manual feeder. Using the manual feeder The manual feeder can use the manual feeder to print on paper types or sizes that are not currently loaded in a tray. 1 Open the manual feeder door. 2 Load one sheet of paper at a time. Loading paper and specialty media 50 You can feed only one sheet of paper faceup into the center of the sheet entering first. • Load envelopes with the flap side down and with the stamp area as shown.
Notes: • Load letterhead faceup, with the top of the manual feeder. Using the manual feeder The manual feeder can use the manual feeder to print on paper types or sizes that are not currently loaded in a tray. 1 Open the manual feeder door. 2 Load one sheet of paper at a time. Loading paper and specialty media 50 You can feed only one sheet of paper faceup into the center of the sheet entering first. • Load envelopes with the flap side down and with the stamp area as shown.

User's Guide
Page 51
... or 550 sheets of paper 50 paper labels Multipurpose feeder 50 sheets of paper 15 paper labels 10 transparencies 10 sheets of card stock 7 envelopes Manual feeder 1 sheet of paper 1 sheet of paper labels 1 transparency 1 sheet of paper labels per month. The maximum amount of the trays and feeders ...are supported for occasional use. Loading paper and specialty media 51 3 Feed paper into the manual feeder only to the point where its leading edge can contact the paper guides. Warning-Potential Damage: Do not force the paper into the ...
... or 550 sheets of paper 50 paper labels Multipurpose feeder 50 sheets of paper 15 paper labels 10 transparencies 10 sheets of card stock 7 envelopes Manual feeder 1 sheet of paper 1 sheet of paper labels 1 transparency 1 sheet of paper labels per month. The maximum amount of the trays and feeders ...are supported for occasional use. Loading paper and specialty media 51 3 Feed paper into the manual feeder only to the point where its leading edge can contact the paper guides. Warning-Potential Damage: Do not force the paper into the ...

User's Guide
Page 52
... not accurately describe the type of the tray you want appears, and then press . When one linked tray is selected. Paper may not be set manually from the next linked tray. When the Size and Type settings are the same for any other tray. 1 From the Paper menu, make sure the...
... not accurately describe the type of the tray you want appears, and then press . When one linked tray is selected. Paper may not be set manually from the next linked tray. When the Size and Type settings are the same for any other tray. 1 From the Paper menu, make sure the...

User's Guide
Page 57
or Multipurpose 250-sheet tray 550-sheet tray feeder Manual feeder Duplex path X Bond Letterhead Preprinted Colored Paper Card stock X X X Glossy paper X X X X X Paper labels1 X Transparencies X Envelopes X X X (smooth)2 1 Single-sided paper labels designed for laser printers are not supported. 2 Use envelopes that lie flat when individually placed on card stock and labels, see the...
or Multipurpose 250-sheet tray 550-sheet tray feeder Manual feeder Duplex path X Bond Letterhead Preprinted Colored Paper Card stock X X X Glossy paper X X X X X Paper labels1 X Transparencies X Envelopes X X X (smooth)2 1 Single-sided paper labels designed for laser printers are not supported. 2 Use envelopes that lie flat when individually placed on card stock and labels, see the...
User's Guide
Page 58
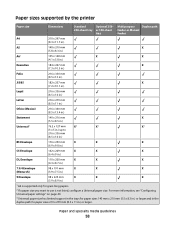
... 58 Paper sizes supported by the printer Paper size Dimensions Standard Optional 250- 250-sheet tray or 550-sheet tray Multipurpose Duplex path feeder or Manual feeder A4 210 x 297 mm (8.3 x 11.7 in.) A5 148 x 210 mm X (5.8 x 8.3 in.) A61 105 x 148 mm X X (4.1 x 5.8 in.) Executive 184 x 267 mm X (7.3 x 10.5 in.) Folio 216...
... 58 Paper sizes supported by the printer Paper size Dimensions Standard Optional 250- 250-sheet tray or 550-sheet tray Multipurpose Duplex path feeder or Manual feeder A4 210 x 297 mm (8.3 x 11.7 in.) A5 148 x 210 mm X (5.8 x 8.3 in.) A61 105 x 148 mm X X (4.1 x 5.8 in.) Executive 184 x 267 mm X (7.3 x 10.5 in.) Folio 216...
User's Guide
Page 59
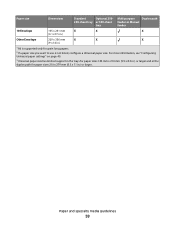
... (5.5 x 8.3 in.) or larger and in .) or larger. Paper size Dimensions Standard Optional 250- 250-sheet tray or 550-sheet tray Multipurpose Duplex path feeder or Manual feeder 10 Envelope 105 x 241 mm X X X (4.1 x 9.5 in.) Other Envelope 229 x 356 mm X X X (9 x 14 in.) 1 A6 is supported only for paper sizes 210 x 279 mm (8.3 x 11...
... (5.5 x 8.3 in.) or larger and in .) or larger. Paper size Dimensions Standard Optional 250- 250-sheet tray or 550-sheet tray Multipurpose Duplex path feeder or Manual feeder 10 Envelope 105 x 241 mm X X X (4.1 x 9.5 in.) Other Envelope 229 x 356 mm X X X (9 x 14 in.) 1 A6 is supported only for paper sizes 210 x 279 mm (8.3 x 11...
User's Guide
Page 63
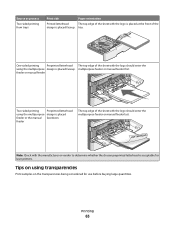
... at the front of the sheet with the logo should enter the using the multipurpose design is placed faceup. feeder or manual feeder Two-sided printing Preprinted letterhead using transparencies Print samples on using the multipurpose design is acceptable for use before buying large... quantities. Tips on the transparencies being considered for laser printers. tray. multipurpose feeder or manual feeder first. feeder The top edge of the design is placed faceup. Note: Check with the logo should ...
... at the front of the sheet with the logo should enter the using the multipurpose design is placed faceup. feeder or manual feeder Two-sided printing Preprinted letterhead using transparencies Print samples on using the multipurpose design is acceptable for use before buying large... quantities. Tips on the transparencies being considered for laser printers. tray. multipurpose feeder or manual feeder first. feeder The top edge of the design is placed faceup. Note: Check with the logo should ...
User's Guide
Page 64
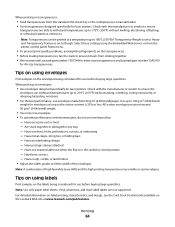
... together. • We recommend Lexmark part number 70X7240 for letter-size transparencies and Lexmark part number 12A5010 for A4-size transparencies. Tips on using labels Print samples on envelopes: • Use envelopes designed specifically for laser printers. When printing on the labels...the standard 250-sheet tray or the multipurpose or manual feeder. • Use transparencies designed specifically for laser printers. Check with the manufacturer or vendor to ensure transparencies are not supported. When printing on the Lexmark Web site at a temperature up to 105 g/...
... together. • We recommend Lexmark part number 70X7240 for letter-size transparencies and Lexmark part number 12A5010 for A4-size transparencies. Tips on using labels Print samples on envelopes: • Use envelopes designed specifically for laser printers. When printing on the labels...the standard 250-sheet tray or the multipurpose or manual feeder. • Use transparencies designed specifically for laser printers. Check with the manufacturer or vendor to ensure transparencies are not supported. When printing on the Lexmark Web site at a temperature up to 105 g/...
User's Guide
Page 80
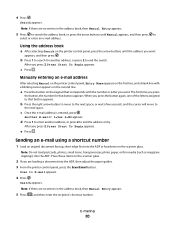
... the number for another address, or press 2 to select or enter an e-mail address. c Once the e-mail address is entered, press . Manually entering an e-mail address After selecting Manual on the printer control panel, Entry Name appears on the second line. b Press the right arrow button to move to the next... appears. c Press . When you want appears, and then press . Search appears. e Press . Note: If there are no entries in the address book, then Manual Entry appears. 5 Press to end the search. Search appears. Note: If there are no entries in the address book, then...
... the number for another address, or press 2 to select or enter an e-mail address. c Once the e-mail address is entered, press . Manually entering an e-mail address After selecting Manual on the printer control panel, Entry Name appears on the second line. b Press the right arrow button to move to the next... appears. c Press . When you want appears, and then press . Search appears. e Press . Note: If there are no entries in the address book, then Manual Entry appears. 5 Press to end the search. Search appears. Note: If there are no entries in the address book, then...
User's Guide
Page 81
... arrow buttons until the address you press 2, Press Start To Begin appears. 8 Press . Canceling appears. The printer clears all pages in the address book, then Manual Entry appears. 5 Press to continue scanning the e-mail.
... arrow buttons until the address you press 2, Press Start To Begin appears. 8 Press . Canceling appears. The printer clears all pages in the address book, then Manual Entry appears. 5 Press to continue scanning the e-mail.

User's Guide
Page 92
Note: See the manual that came with the printer to the printer LINE port . 3 Connect the other end of the telephone cable to an active analog telephone wall jack. 4 Remove the protective plug from the printer EXT port . 5 Connect your computer for the telephone connections. Faxing 92 2 Connect one end of the telephone cable that came with your telephone to the computer telephone jack.
Note: See the manual that came with the printer to the printer LINE port . 3 Connect the other end of the telephone cable to an active analog telephone wall jack. 4 Remove the protective plug from the printer EXT port . 5 Connect your computer for the telephone connections. Faxing 92 2 Connect one end of the telephone cable that came with your telephone to the computer telephone jack.


