Clearing Jams Guide
Page 1
... not use paper that has been cut or trimmed by hand. • Do not mix paper sizes, weights, or types in the printer control panel menu. • Make sure all paper or specialty media must be cleared from the entire paper path. 1 Open doors and covers, and remove trays to show where each jam. 1 Standard exit bin 2 Front door 3 Multipurpose feeder door 4 Tray 1 5 Optional 250- When a jam occurs, a jam message appears, indicating the region of the jam or the number of jam numbers and instructions...
... not use paper that has been cut or trimmed by hand. • Do not mix paper sizes, weights, or types in the printer control panel menu. • Make sure all paper or specialty media must be cleared from the entire paper path. 1 Open doors and covers, and remove trays to show where each jam. 1 Standard exit bin 2 Front door 3 Multipurpose feeder door 4 Tray 1 5 Optional 250- When a jam occurs, a jam message appears, indicating the region of the jam or the number of jam numbers and instructions...
Clearing Jams Guide
Page 2
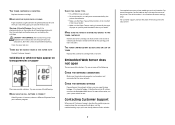
... the following : • Remove Tray 1. • Open the front door, and then remove the photoconductor kit. Open the multipurpose feeder door. 200 paper jam 1 Remove the tray from the standard exit bin. Note: When the photoconductor kit and toner cartridge are together, they are called a unit. 4 Lift the flap in front of the following : • Open the front door, and then open the rear door. Note: For alternative access to access each jam Jam number 200 201 202...
... the following : • Remove Tray 1. • Open the front door, and then remove the photoconductor kit. Open the multipurpose feeder door. 200 paper jam 1 Remove the tray from the standard exit bin. Note: When the photoconductor kit and toner cartridge are together, they are called a unit. 4 Lift the flap in front of the following : • Open the front door, and then open the rear door. Note: For alternative access to access each jam Jam number 200 201 202...
Clearing Jams Guide
Page 3
... area. 1 Open the front door, and then remove the unit. 3 Open the rear door. 2 Lift the flap in front of the printer, and then remove any jammed sheets. 2 Lift the flap in front of the printer, and then remove any jammed sheets. 4 Remove the jam. 3 Align and insert the unit. 4 Close the front door. 5 Press . 5 Close the rear door. 6 Close the front door. 7 Press . 3 201 paper jam CAUTION-HOT SURFACE: The fuser and...
... area. 1 Open the front door, and then remove the unit. 3 Open the rear door. 2 Lift the flap in front of the printer, and then remove any jammed sheets. 2 Lift the flap in front of the printer, and then remove any jammed sheets. 4 Remove the jam. 3 Align and insert the unit. 4 Close the front door. 5 Press . 5 Close the rear door. 6 Close the front door. 7 Press . 3 201 paper jam CAUTION-HOT SURFACE: The fuser and...
Clearing Jams Guide
Page 4
... paper jam A single jam or multiple jams are in : • "231 paper jam" on page 4 • "233 paper jam" on . 231 paper jam CAUTION-HOT SURFACE: The fuser and the inside of the printer when the printer is turned on page 4 2 Locate the lever shown. If this area. 1 Open the front door. 2 Open the rear door. 3 Remove the jam. 4 Close the rear door. 5 Close the front door. 6 Press . 233 paper jam 1 Remove the tray from the printer. 3 Pull the jammed sheets from the duplex...
... paper jam A single jam or multiple jams are in : • "231 paper jam" on page 4 • "233 paper jam" on . 231 paper jam CAUTION-HOT SURFACE: The fuser and the inside of the printer when the printer is turned on page 4 2 Locate the lever shown. If this area. 1 Open the front door. 2 Open the rear door. 3 Remove the jam. 4 Close the rear door. 5 Close the front door. 6 Press . 233 paper jam 1 Remove the tray from the printer. 3 Pull the jammed sheets from the duplex...
Clearing Jams Guide
Page 5
...: 1 Open the front door, and then remove the unit. 2 Press . 242 paper jam 1 Remove the optional tray from the printer. 3 Insert the optional tray. 4 Press . 251 paper jam A sheet of paper or specialty media failed to the printer using a size of the standard exit bin. 2 Remove the jam. If it may be still visible. Part of it is jammed in the standard exit bin. 1 To remove the jam, gently pull the jammed sheet out of paper not supported for duplex printing. 235 paper jam A duplex print job was sent to feed completely...
...: 1 Open the front door, and then remove the unit. 2 Press . 242 paper jam 1 Remove the optional tray from the printer. 3 Insert the optional tray. 4 Press . 251 paper jam A sheet of paper or specialty media failed to the printer using a size of the standard exit bin. 2 Remove the jam. If it may be still visible. Part of it is jammed in the standard exit bin. 1 To remove the jam, gently pull the jammed sheet out of paper not supported for duplex printing. 235 paper jam A duplex print job was sent to feed completely...
Troubleshooting Guide
Page 1
... the standard exit bin. CHECK TO SEE IF THE TRAY IS EMPTY Load paper in the job. MAKE SURE YOU ARE USING A RECOMMENDED USB, PARALLEL, OR ETHERNET CABLE For more information, see the setup documentation that the status shows Connected. Printer control panel display is securely attached to print These are possible solutions. Job takes longer than expected to the printer and the host computer, print server, option, or other network device. • All options are properly installed...
... the standard exit bin. CHECK TO SEE IF THE TRAY IS EMPTY Load paper in the job. MAKE SURE YOU ARE USING A RECOMMENDED USB, PARALLEL, OR ETHERNET CABLE For more information, see the setup documentation that the status shows Connected. Printer control panel display is securely attached to print These are possible solutions. Job takes longer than expected to the printer and the host computer, print server, option, or other network device. • All options are properly installed...

Troubleshooting Guide
Page 2
... : RESET THE PRINTER Turn the printer off and back on the wrong paper CHECK THE PAPER TYPE SETTING Make sure the Paper Type setting matches the paper loaded in the tray. Mac OS 9 users should make sure the printer is listed in the job. Large jobs do not collate These are possible solutions. MAKE SURE THE OPTION IS INSTALLED Print a menu settings page and check to see if the option is set up in each tray. 2 If necessary, adjust the settings from the Embedded Web Server. Turn the printer off...
... : RESET THE PRINTER Turn the printer off and back on the wrong paper CHECK THE PAPER TYPE SETTING Make sure the Paper Type setting matches the paper loaded in the tray. Mac OS 9 users should make sure the printer is listed in the job. Large jobs do not collate These are possible solutions. MAKE SURE THE OPTION IS INSTALLED Print a menu settings page and check to see if the option is set up in each tray. 2 If necessary, adjust the settings from the Embedded Web Server. Turn the printer off...

Troubleshooting Guide
Page 3
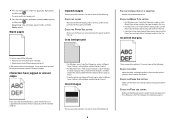
... print quality test pages: 1 Turn the printer off . 2 Load letter- Set Jam Recovery to the correct positions for the paper size loaded. Solving paper feed problems Paper frequently jams These are possible solutions. MAKE SURE THERE IS NOT TOO MUCH PAPER IN THE TRAY OR FEEDER Make sure the stack of the tray as shown with the recommended print side facedown. Try one or more information, see the User's Guide. Page that requires adjustment or replacement. Notice the maximum fill line on . CHECK...
... print quality test pages: 1 Turn the printer off . 2 Load letter- Set Jam Recovery to the correct positions for the paper size loaded. Solving paper feed problems Paper frequently jams These are possible solutions. MAKE SURE THERE IS NOT TOO MUCH PAPER IN THE TRAY OR FEEDER Make sure the stack of the tray as shown with the recommended print side facedown. Try one or more information, see the User's Guide. Page that requires adjustment or replacement. Notice the maximum fill line on . CHECK...
Troubleshooting Guide
Page 4
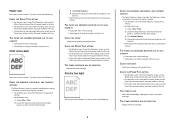
... users: From the print options, Copies & Pages, or General pop-up menu, choose Printer Features, and then choose the setting needed from the Toner Darkness pop-up menu. • From the printer control panel Quality menu, select a different Toner Darkness setting before sending the job to the correct positions for the paper size loaded. Try one or more information, contact Customer Support. CHECK THE MEDIA TYPE SETTING • For Windows users: From Print Properties, make sure the Media Type setting matches the paper loaded in the tray...
... users: From the print options, Copies & Pages, or General pop-up menu, choose Printer Features, and then choose the setting needed from the Toner Darkness pop-up menu. • From the printer control panel Quality menu, select a different Toner Darkness setting before sending the job to the correct positions for the paper size loaded. Try one or more information, contact Customer Support. CHECK THE MEDIA TYPE SETTING • For Windows users: From Print Properties, make sure the Media Type setting matches the paper loaded in the tray...
Troubleshooting Guide
Page 5
... Print Properties, change these settings. • For Macintosh users: 1 Choose File > Print. 2 Locate the drop-down box under the Orientation pictures, and then click the down button. 3 Click Printer Features. 4 Change the settings for Toner Darkness, Brightness, and Contrast. • From the printer control panel Quality menu, change these settings. CHECK THE PAPER TYPE SETTING • For Windows users: From Print Properties, make sure the Media Type setting matches the paper loaded in the tray. • For Macintosh users: From the Print dialog, make sure the Paper Type setting...
... Print Properties, change these settings. • For Macintosh users: 1 Choose File > Print. 2 Locate the drop-down box under the Orientation pictures, and then click the down button. 3 Click Printer Features. 4 Change the settings for Toner Darkness, Brightness, and Contrast. • From the printer control panel Quality menu, change these settings. CHECK THE PAPER TYPE SETTING • For Windows users: From Print Properties, make sure the Media Type setting matches the paper loaded in the tray. • For Macintosh users: From the Print dialog, make sure the Paper Type setting...

Troubleshooting Guide
Page 6
... the printer control panel, select another tray or feeder to feed paper for the paper size loaded. THERE IS TONER IN THE PAPER PATH Contact Customer Support. CHECK THE PAPER TYPE SETTING Load transparencies, and make sure the Paper Type setting is poor CHECK THE TRANSPARENCIES Use only transparencies recommended by the printer manufacturer. Streaked horizontal lines These are possible solutions. Try one or more of the following : THE TONER CARTRIDGE MAY BE DEFECTIVE Replace the toner cartridge. Check the paper path around the fuser area...
... the printer control panel, select another tray or feeder to feed paper for the paper size loaded. THERE IS TONER IN THE PAPER PATH Contact Customer Support. CHECK THE PAPER TYPE SETTING Load transparencies, and make sure the Paper Type setting is poor CHECK THE TRANSPARENCIES Use only transparencies recommended by the printer manufacturer. Streaked horizontal lines These are possible solutions. Try one or more of the following : THE TONER CARTRIDGE MAY BE DEFECTIVE Replace the toner cartridge. Check the paper path around the fuser area...
Troubleshooting Guide
Page 7
...:// before the printer IP address to cool before touching. Try one . THE TONER CARTRIDGE MAY BE DEFECTIVE OR LOW ON TONER Replace the used toner cartridge with a new one or more information, see your printer model type and serial number. The serial number is also listed on and connected to know your system administrator. Clear any paper you are possible solutions. Check the paper path around the fuser area. THE TONER CARTRIDGE IS DEFECTIVE Replace the toner cartridge. For customer support, contact...
...:// before the printer IP address to cool before touching. Try one . THE TONER CARTRIDGE MAY BE DEFECTIVE OR LOW ON TONER Replace the used toner cartridge with a new one or more information, see your printer model type and serial number. The serial number is also listed on and connected to know your system administrator. Clear any paper you are possible solutions. Check the paper path around the fuser area. THE TONER CARTRIDGE IS DEFECTIVE Replace the toner cartridge. For customer support, contact...

Setup Sheet
Page 1
All rights reserved. 4/08 *34S0259* Rev 001 P/N 34S0259 © 2008 Lexmark International, Inc.
All rights reserved. 4/08 *34S0259* Rev 001 P/N 34S0259 © 2008 Lexmark International, Inc.


