Sending a fax using the computer
Page 1
..., and other information as needed to send a fax from a computer. If you receive an error, "No fax modems were found", follow these directions to install the software after setup, follow these instructions: Sending a fax using the computer 1 For Mac OS X version 10.2 and 10.3 users 1 With a document...from the dialog that lets the computer communicate with the printer. This driver may save printing costs since a printed copy will not be installed during the initial printer setup. Getting ready to use. Sending a fax using the computer Faxing from a computer lets you the flexibility ...
..., and other information as needed to send a fax from a computer. If you receive an error, "No fax modems were found", follow these directions to install the software after setup, follow these instructions: Sending a fax using the computer 1 For Mac OS X version 10.2 and 10.3 users 1 With a document...from the dialog that lets the computer communicate with the printer. This driver may save printing costs since a printed copy will not be installed during the initial printer setup. Getting ready to use. Sending a fax using the computer Faxing from a computer lets you the flexibility ...
Sending a fax using the computer
Page 2
...in the Print Emulation column. 8 Click Add Printer. 9 Click Finish, and then follow the instructions on page 2. 3 From the main installation dialog, click Install Printer and Software. 4 Click Agree to accept the licensing agreement. 5 From the Drivers and Utilities dialog, select Custom, and then click... Next. 6 Choose Select Components, and then click Next. 7 From the "Select your printer from the Lexmark Web site at www.lexmark.com. 2...
...in the Print Emulation column. 8 Click Add Printer. 9 Click Finish, and then follow the instructions on page 2. 3 From the main installation dialog, click Install Printer and Software. 4 Click Agree to accept the licensing agreement. 5 From the Drivers and Utilities dialog, select Custom, and then click... Next. 6 Choose Select Components, and then click Next. 7 From the "Select your printer from the Lexmark Web site at www.lexmark.com. 2...
Sending a fax using the computer
Page 3
...Print. 2 From the PDF pop-up menu, choose Job Routing. 3 Select Fax, and then enter the recipient name, number, and other information as an installed option. 8 Click Apply. Note: If the printer has a fax option, choose the appropriate printer model with the letters "PS." 5 Right-click the printer,... a fax using the computer Faxing from your computer, you send electronic documents without leaving your printer. • Verify that the fax option is installed in the To field, and enter other information as needed . Note: If the printer has a fax option, select Fax and then add it...
...Print. 2 From the PDF pop-up menu, choose Job Routing. 3 Select Fax, and then enter the recipient name, number, and other information as an installed option. 8 Click Apply. Note: If the printer has a fax option, choose the appropriate printer model with the letters "PS." 5 Right-click the printer,... a fax using the computer Faxing from your computer, you send electronic documents without leaving your printer. • Verify that the fax option is installed in the To field, and enter other information as needed . Note: If the printer has a fax option, select Fax and then add it...
Troubleshooting Guide
Page 1
... your anti-virus software. If necessary, double-click setup.exe. 3 When the MFP software installation screen appears, click Install or Install Now. 4 Follow the instructions on the computer screen to access the My Computer ...Lexmark™ X34x Troubleshooting Guide Setup troubleshooting Incorrect language appears on the display 1 Press Menu. 2 Press or repeatedly until MACHINE SETUP appears on the display. 3 Press . 4 Press or repeatedly until Language appears on the display. 5 Press . 6 Press or repeatedly until the language you are using . 5 Turn on the MFP. Software will not install...
... your anti-virus software. If necessary, double-click setup.exe. 3 When the MFP software installation screen appears, click Install or Install Now. 4 Follow the instructions on the computer screen to access the My Computer ...Lexmark™ X34x Troubleshooting Guide Setup troubleshooting Incorrect language appears on the display 1 Press Menu. 2 Press or repeatedly until MACHINE SETUP appears on the display. 3 Press . 4 Press or repeatedly until Language appears on the display. 5 Press . 6 Press or repeatedly until the language you are using . 5 Turn on the MFP. Software will not install...

Troubleshooting Guide
Page 2
...sure paper is loaded correctly. • Load a smaller amount of paper into the MFP. or Click Start Control Panel Printers and Other Hardware Printers and Faxes. 2 Double-click the Lexmark X340/X340n/ X342n icon. 3 Click Printer, and make sure the guides are scanning...; Disconnect the USB cable, and then reconnect it back and forth. Print and copy troubleshooting MFP does not print or respond • Remove and reinstall the software. Print speed is installed correctly. Paper or specialty media misfeeds, skews, or multiple sheets stick together • Load ...
...sure paper is loaded correctly. • Load a smaller amount of paper into the MFP. or Click Start Control Panel Printers and Other Hardware Printers and Faxes. 2 Double-click the Lexmark X340/X340n/ X342n icon. 3 Click Printer, and make sure the guides are scanning...; Disconnect the USB cable, and then reconnect it back and forth. Print and copy troubleshooting MFP does not print or respond • Remove and reinstall the software. Print speed is installed correctly. Paper or specialty media misfeeds, skews, or multiple sheets stick together • Load ...
Troubleshooting Guide
Page 3
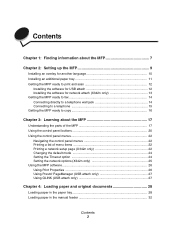
...AaBbCc AaBbCc AaBbCc AaBbCc AaBbCc • Replace the photoconductor. For more information, see the User's Guide. Clean the inside of the MFP. Horizontal stripes AaBbCc AaBbCc AaBbCc AaBbCc AaBbCc Replace the toner cartridge. Toner specs AaBbCc AaBbCc AaBbCc AaBbCc AaBbCc Replace the toner cartridge.... Toner smear • Clean the inside of the MFP. If this does not work , install a new print cartridge. If this does not work , install a new print cartridge. For more information, see the User's Guide. • You may ...
...AaBbCc AaBbCc AaBbCc AaBbCc AaBbCc • Replace the photoconductor. For more information, see the User's Guide. Clean the inside of the MFP. Horizontal stripes AaBbCc AaBbCc AaBbCc AaBbCc AaBbCc Replace the toner cartridge. Toner specs AaBbCc AaBbCc AaBbCc AaBbCc AaBbCc Replace the toner cartridge.... Toner smear • Clean the inside of the MFP. If this does not work , install a new print cartridge. If this does not work , install a new print cartridge. For more information, see the User's Guide. • You may ...
User's Guide
Page 2
...) are the user's responsibility. © 2006 Lexmark International, Inc. UNITED STATES GOVERNMENT RIGHTS This software and any accompanying documentation provided under this product to the public switched telephone network. • Refer service or repairs, other than those expressly designated by the manufacturer, are properly installed in their marked plug-in all external...
...) are the user's responsibility. © 2006 Lexmark International, Inc. UNITED STATES GOVERNMENT RIGHTS This software and any accompanying documentation provided under this product to the public switched telephone network. • Refer service or repairs, other than those expressly designated by the manufacturer, are properly installed in their marked plug-in all external...
User's Guide
Page 3
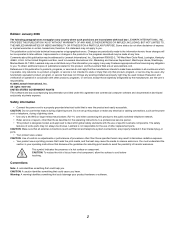
Contents Chapter 1: Finding information about the MFP 7 Chapter 2: Setting up the MFP 9 Installing an overlay for another language 10 Installing an additional paper tray 11 Getting the MFP ready to print and scan 12 Installing the software for USB attach 12 Installing the software for network attach (X342n only 13 Getting the MFP ready to fax 14 Connecting directly...
Contents Chapter 1: Finding information about the MFP 7 Chapter 2: Setting up the MFP 9 Installing an overlay for another language 10 Installing an additional paper tray 11 Getting the MFP ready to print and scan 12 Installing the software for USB attach 12 Installing the software for network attach (X342n only 13 Getting the MFP ready to fax 14 Connecting directly...

User's Guide
Page 5
... options 59 Chapter 9: Maintaining the MFP 61 Removing a toner cartridge 61 Installing a toner cartridge 62 Redistributing toner ...63 Replacing the photoconductor 65 Cleaning the MFP ...67 Cleaning the scanner glass 67 Cleaning the outside of the MFP 67 Cleaning the inside of the MFP 68 Ordering supplies ...70 Recycling Lexmark products 70 Chapter 10: Troubleshooting 71...
... options 59 Chapter 9: Maintaining the MFP 61 Removing a toner cartridge 61 Installing a toner cartridge 62 Redistributing toner ...63 Replacing the photoconductor 65 Cleaning the MFP ...67 Cleaning the scanner glass 67 Cleaning the outside of the MFP 67 Cleaning the inside of the MFP 68 Ordering supplies ...70 Recycling Lexmark products 70 Chapter 10: Troubleshooting 71...
User's Guide
Page 7
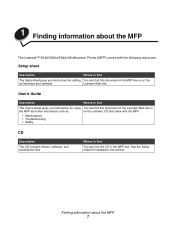
...User's Guide gives you instructions for setting You can find this document in the MFP box. Lexmark Web site. Finding information about the MFP The Lexmark™ X340/X340n/X342n Multifunction Printer (MFP) comes with the following resources: Setup sheet Description Where to find You can ... See the Setup sheet for using You can find this document on the Lexmark Web site or the MFP and other information such as: on the up hardware and software. 1 Finding information about the MFP 7 Where to find The Setup sheet gives you instructions for installation instructions.
...User's Guide gives you instructions for setting You can find this document in the MFP box. Lexmark Web site. Finding information about the MFP The Lexmark™ X340/X340n/X342n Multifunction Printer (MFP) comes with the following resources: Setup sheet Description Where to find You can ... See the Setup sheet for using You can find this document on the Lexmark Web site or the MFP and other information such as: on the up hardware and software. 1 Finding information about the MFP 7 Where to find The Setup sheet gives you instructions for installation instructions.

User's Guide
Page 10
Installing an overlay for another language These instructions apply only if you received one or more additional language overlays with the MFP. 1 Lift and remove the overlay. 2 Choose the correct overlay for another language 10 Installing an overlay for your language. 3 Align the overlay with the buttons on the MFP, and then press down until the overlay locks into place.
Installing an overlay for another language These instructions apply only if you received one or more additional language overlays with the MFP. 1 Lift and remove the overlay. 2 Choose the correct overlay for another language 10 Installing an overlay for your language. 3 Align the overlay with the buttons on the MFP, and then press down until the overlay locks into place.

User's Guide
Page 11
... Æ Control Panel Æ Printers and Other Hardware Æ Printers and Faxes. 5 Select the MFP icon. 6 Click File Æ Properties. 7 Click the Device Settings tab. 8 Select Tray2 from the Installable Options list. 9 Select 550-Sheet Tray from the wall outlet before continuing. 1 Unpack the 550-sheet...4 Click Start Æ Settings Æ Printers or Printers and Faxes. Installing an additional paper tray 11 Installing an additional paper tray Your MFP supports one optional paper tray that lets you have chosen for your MFP. 3 Align the holes in the location you load up to 550 sheets ...
... Æ Control Panel Æ Printers and Other Hardware Æ Printers and Faxes. 5 Select the MFP icon. 6 Click File Æ Properties. 7 Click the Device Settings tab. 8 Select Tray2 from the Installable Options list. 9 Select 550-Sheet Tray from the wall outlet before continuing. 1 Unpack the 550-sheet...4 Click Start Æ Settings Æ Printers or Printers and Faxes. Installing an additional paper tray 11 Installing an additional paper tray Your MFP supports one optional paper tray that lets you have chosen for your MFP. 3 Align the holes in the location you load up to 550 sheets ...
User's Guide
Page 12
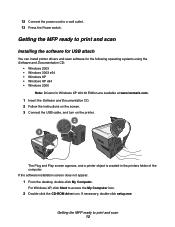
...-click setup.exe. Getting the MFP ready to print and scan 12 If the software installation screen does not appear: 1 From the desktop, double-click My Computer. Getting the MFP ready to print and scan Installing the software for USB attach You can install printer drivers and scan software for... the following operating systems using the Software and Documentation CD: • Windows 2003 • Windows 2003 x64 • Windows XP • Windows XP x64 • Windows 2000 Note: Drivers for Windows XP x64 bit Edition are available at www.lexmark....
...-click setup.exe. Getting the MFP ready to print and scan 12 If the software installation screen does not appear: 1 From the desktop, double-click My Computer. Getting the MFP ready to print and scan Installing the software for USB attach You can install printer drivers and scan software for... the following operating systems using the Software and Documentation CD: • Windows 2003 • Windows 2003 x64 • Windows XP • Windows XP x64 • Windows 2000 Note: Drivers for Windows XP x64 bit Edition are available at www.lexmark....
User's Guide
Page 13
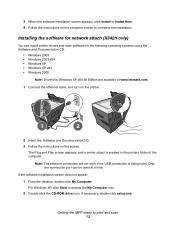
..., and a printer object is being used at www.lexmark.com. 1 Connect the ethernet cable, and turn on the printer. 1 2 2 Insert the Software and Documentation CD. 3 Follow the instructions on the computer screen to complete the installation. Note: The ethernet connection will not work if the..., click Start to print and scan 13 Getting the MFP ready to access the My Computer icon. 2 Double-click the CD-ROM drive icon. If necessary, double-click setup.exe. 3 When the software installation screen appears, click Install or Install Now. 4 Follow the instructions on the screen. Only...
..., and a printer object is being used at www.lexmark.com. 1 Connect the ethernet cable, and turn on the printer. 1 2 2 Insert the Software and Documentation CD. 3 Follow the instructions on the computer screen to complete the installation. Note: The ethernet connection will not work if the..., click Start to print and scan 13 Getting the MFP ready to access the My Computer icon. 2 Double-click the CD-ROM drive icon. If necessary, double-click setup.exe. 3 When the software installation screen appears, click Install or Install Now. 4 Follow the instructions on the screen. Only...

User's Guide
Page 14
...such as ISDN, DSL, or ADSL, a third-party device (such as described in the setup steps. Follow the instructions on page 72. Getting the MFP ready to fax You can be successfully attached to equipment such as a telephone, an answering machine, or a computer modem. If you have a telephone ...cord and a telephone wall jack. 2 Connect one end of the telephone cord into the LINE port of the MFP. See the following table to determine the best way to complete the installation. If problems occur, see Setup troubleshooting on the computer screen to set up the printer. Other devices (such as...
...such as ISDN, DSL, or ADSL, a third-party device (such as described in the setup steps. Follow the instructions on page 72. Getting the MFP ready to fax You can be successfully attached to equipment such as a telephone, an answering machine, or a computer modem. If you have a telephone ...cord and a telephone wall jack. 2 Connect one end of the telephone cord into the LINE port of the MFP. See the following table to determine the best way to complete the installation. If problems occur, see Setup troubleshooting on the computer screen to set up the printer. Other devices (such as...
User's Guide
Page 56
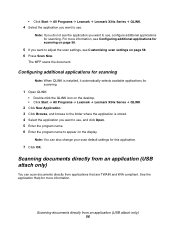
For more information. The MFP scans the document. Scanning documents directly from ...documents directly from applications that are TWAIN and WIA compliant. Configuring additional applications for scanning Note: When QLINK is installed, it automatically selects available applications for scanning. 1 Open QLINK: • Double-click the QLINK icon on ...the desktop. • Click Start Æ All Programs Æ Lexmark Æ Lexmark X34x Series Æ QLINK 2 Click New Application. 3 Click Browse, and browse to the folder where the application...
For more information. The MFP scans the document. Scanning documents directly from ...documents directly from applications that are TWAIN and WIA compliant. Configuring additional applications for scanning Note: When QLINK is installed, it automatically selects available applications for scanning. 1 Open QLINK: • Double-click the QLINK icon on ...the desktop. • Click Start Æ All Programs Æ Lexmark Æ Lexmark X34x Series Æ QLINK 2 Click New Application. 3 Click Browse, and browse to the folder where the application...
User's Guide
Page 57
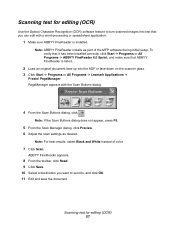
...ABBYY FineReader installs as desired. PageManager appears with a word-processing or spreadsheet application. 1 Make sure ABBYY FineReader is listed. 2 Load an original document face-up into the ADF or face-down on the scanner glass. 3 Click Start Æ Programs or All Programs Æ Lexmark Applications &#...From the Scan Buttons dialog, click . Note: For best results, select Black and White instead of the MFP software during initial setup. To verify that it has been installed correctly, click Start Æ Programs or All Programs Æ ABBYY FineReader 6.0 Sprint, and make sure that...
...ABBYY FineReader installs as desired. PageManager appears with a word-processing or spreadsheet application. 1 Make sure ABBYY FineReader is listed. 2 Load an original document face-up into the ADF or face-down on the scanner glass. 3 Click Start Æ Programs or All Programs Æ Lexmark Applications &#...From the Scan Buttons dialog, click . Note: For best results, select Black and White instead of the MFP software during initial setup. To verify that it has been installed correctly, click Start Æ Programs or All Programs Æ ABBYY FineReader 6.0 Sprint, and make sure that...
User's Guide
Page 62
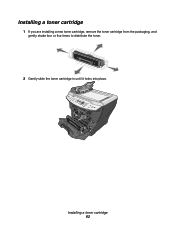
Installing a toner cartridge 1 If you are installing a new toner cartridge, remove the toner cartridge from the packaging, and gently shake four or five times to distribute the toner. 2 Gently slide the toner cartridge in until it locks into place. Installing a toner cartridge 62
Installing a toner cartridge 1 If you are installing a new toner cartridge, remove the toner cartridge from the packaging, and gently shake four or five times to distribute the toner. 2 Gently slide the toner cartridge in until it locks into place. Installing a toner cartridge 62
User's Guide
Page 63
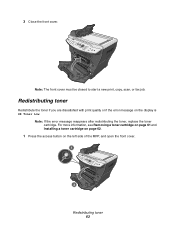
3 Close the front cover. Redistributing toner Redistribute the toner if you are dissatisfied with print quality or if the error message on the left side of the MFP, and open the front cover. 1 2 Redistributing toner 63 Note: The front cover must be closed to start a new print, copy, scan, or fax job. For more information, see Removing a toner cartridge on page 61 and Installing a toner cartridge on page 62. 1 Press the access button on the display is 88 Toner Low. Note: If the error message reappears after redistributing the toner, replace the toner cartridge.
3 Close the front cover. Redistributing toner Redistribute the toner if you are dissatisfied with print quality or if the error message on the left side of the MFP, and open the front cover. 1 2 Redistributing toner 63 Note: The front cover must be closed to start a new print, copy, scan, or fax job. For more information, see Removing a toner cartridge on page 61 and Installing a toner cartridge on page 62. 1 Press the access button on the display is 88 Toner Low. Note: If the error message reappears after redistributing the toner, replace the toner cartridge.
User's Guide
Page 66
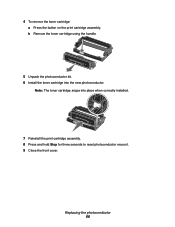
Replacing the photoconductor 66 4 To remove the toner cartridge: a Press the button on the print cartridge assembly. b Remove the toner cartridge using the handle. 5 Unpack the photoconductor kit. 6 Install the toner cartridge into place when correctly installed. 7 Reinstall the print cartridge assembly. 8 Press and hold Stop for three seconds to reset photoconductor recount. 9 Close the front cover. Note: The toner cartridge snaps into the new photoconductor.
Replacing the photoconductor 66 4 To remove the toner cartridge: a Press the button on the print cartridge assembly. b Remove the toner cartridge using the handle. 5 Unpack the photoconductor kit. 6 Install the toner cartridge into place when correctly installed. 7 Reinstall the print cartridge assembly. 8 Press and hold Stop for three seconds to reset photoconductor recount. 9 Close the front cover. Note: The toner cartridge snaps into the new photoconductor.


