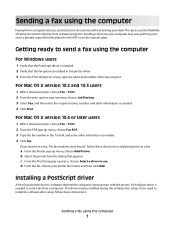
Sending a fax using the computer
Page 1
... the computer For Windows users 1 Verify that the PostScript driver is installed. 2 Verify that the fax option is software that appears. If you receive an error, "No fax modems were found", follow these directions to install the software after setup, follow these instructions: Sending a fax using the computer 1 If you need...
... the computer For Windows users 1 Verify that the PostScript driver is installed. 2 Verify that the fax option is software that appears. If you receive an error, "No fax modems were found", follow these directions to install the software after setup, follow these instructions: Sending a fax using the computer 1 If you need...

Sending a fax using the computer
Page 4
b Select the printer from the dialog that appears. c From the Print Using pop-up menu, choose Add Printer. If you receive an error, "No fax modems were found", follow these directions to use. d From the list, choose your printer as a fax: a From the Printer pop-up menu, choose Select a driver to add your printer fax model, and then click Add. Sending a fax using the computer 4 4 Click Fax.
b Select the printer from the dialog that appears. c From the Print Using pop-up menu, choose Add Printer. If you receive an error, "No fax modems were found", follow these directions to use. d From the list, choose your printer as a fax: a From the Printer pop-up menu, choose Select a driver to add your printer fax model, and then click Add. Sending a fax using the computer 4 4 Click Fax.
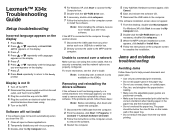
Troubleshooting Guide
Page 1
...not lit 1 Turn off the MFP. 2 Disconnect the power supply cord from the wall outlet, and then from the computer. 2 From the desktop, click Start Programs Lexmark Lexmark Software Uninstall. 3 Follow the instructions on the X342n. Lexmark™ X34x Troubleshooting Guide Setup ... the computer. Removing and reinstalling the drivers software If the software is not functioning properly or a communications error message appears, you want appears on the MFP. For Windows XP, click Start to the Ready prompt. Software will not install If the software does ...
...not lit 1 Turn off the MFP. 2 Disconnect the power supply cord from the wall outlet, and then from the computer. 2 From the desktop, click Start Programs Lexmark Lexmark Software Uninstall. 3 Follow the instructions on the X342n. Lexmark™ X34x Troubleshooting Guide Setup ... the computer. Removing and reinstalling the drivers software If the software is not functioning properly or a communications error message appears, you want appears on the MFP. For Windows XP, click Start to the Ready prompt. Software will not install If the software does ...

Troubleshooting Guide
Page 4
... Waiting. Call a service representative. or Click Start Control Panel Printers and Other Hardware Printers and Faxes. 2 Double-click the Lexmark X340/X340n/ X342n icon. 3 Click Printer, and make sure that the paper size settings match the paper in the printer. • Check to see the...software" on page 1. Fax troubleshooting Cannot send or receive a fax • Check the display. If there is an error message, see the User's Guide. • Make sure the MFP is set as the default printer and is not on the scanner glass. • Make sure that it is working ...
... Waiting. Call a service representative. or Click Start Control Panel Printers and Other Hardware Printers and Faxes. 2 Double-click the Lexmark X340/X340n/ X342n icon. 3 Click Printer, and make sure that the paper size settings match the paper in the printer. • Check to see the...software" on page 1. Fax troubleshooting Cannot send or receive a fax • Check the display. If there is an error message, see the User's Guide. • Make sure the MFP is set as the default printer and is not on the scanner glass. • Make sure that it is working ...
User's Guide
Page 2
... with other than those described in ports. • Your product uses a laser. Evaluation and verification of publications related to release emissions. CAUTION: Do not use of specific Lexmark components. CAUTION: Use of controls or adjustments or performance of procedures other products... symbol indicates the presence of express or implied warranties in your operating instructions that could include technical inaccuracies or typographical errors. Edition: January 2006 The following paragraph does not apply to a properly grounded electrical outlet that is near the product...
... with other than those described in ports. • Your product uses a laser. Evaluation and verification of publications related to release emissions. CAUTION: Do not use of specific Lexmark components. CAUTION: Use of controls or adjustments or performance of procedures other products... symbol indicates the presence of express or implied warranties in your operating instructions that could include technical inaccuracies or typographical errors. Edition: January 2006 The following paragraph does not apply to a properly grounded electrical outlet that is near the product...

User's Guide
Page 5
... the photoconductor 65 Cleaning the MFP ...67 Cleaning the scanner glass 67 Cleaning the outside of the MFP 67 Cleaning the inside of the MFP 68 Ordering supplies ...70 Recycling Lexmark products 70 Chapter 10: Troubleshooting... 71 Setup troubleshooting ...72 Removing and reinstalling the drivers software 74 Jams and misfeeds troubleshooting 75 Clearing a paper jam 76 Print and copy troubleshooting 84 Print quality troubleshooting 85 Scan troubleshooting ...88 Fax troubleshooting ...89 Error...
... the photoconductor 65 Cleaning the MFP ...67 Cleaning the scanner glass 67 Cleaning the outside of the MFP 67 Cleaning the inside of the MFP 68 Ordering supplies ...70 Recycling Lexmark products 70 Chapter 10: Troubleshooting... 71 Setup troubleshooting ...72 Removing and reinstalling the drivers software 74 Jams and misfeeds troubleshooting 75 Clearing a paper jam 76 Print and copy troubleshooting 84 Print quality troubleshooting 85 Scan troubleshooting ...88 Fax troubleshooting ...89 Error...
User's Guide
Page 23
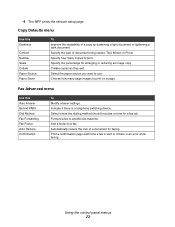
Indicate if there is an error while faxing. Forward a fax to use. Specify the percentage for a fax job. Automatically reduce the size of document being copied: Text, Mixed, or Photo. Choose ... the paper source you want to another fax machine. Print a confirmation page each time a fax is sent or if there is a telephone switching device. 4 The MFP prints the network setup page. Specify the type of a document for faxing. Specify how many page images to a fax. Fax Advanced menu Use this Darkness...
Indicate if there is an error while faxing. Forward a fax to use. Specify the percentage for a fax job. Automatically reduce the size of document being copied: Text, Mixed, or Photo. Choose ... the paper source you want to another fax machine. Print a confirmation page each time a fax is sent or if there is a telephone switching device. 4 The MFP prints the network setup page. Specify the type of a document for faxing. Specify how many page images to a fax. Fax Advanced menu Use this Darkness...
User's Guide
Page 24
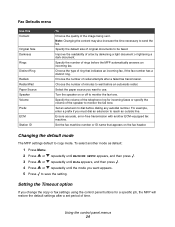
...ID To Choose the quality of a fax by darkening a light document or lightening a dark document. Turn the speaker on the fax header. Ensure accurate, error-free transmission with another mode as default: 1 Press Menu. 2 Press or repeatedly until MACHINE SETUP appears, and then press . 3 Press or repeatedly ... Note: Changing the content may also increase the time necessary to copy mode. Choose the number of original documents to wait before the MFP automatically answers an incoming fax. Choose the number of minutes to be faxed. Set the fax machine number or ID name that indicates ...
...ID To Choose the quality of a fax by darkening a light document or lightening a dark document. Turn the speaker on the fax header. Ensure accurate, error-free transmission with another mode as default: 1 Press Menu. 2 Press or repeatedly until MACHINE SETUP appears, and then press . 3 Press or repeatedly ... Note: Changing the content may also increase the time necessary to copy mode. Choose the number of original documents to wait before the MFP automatically answers an incoming fax. Choose the number of minutes to be faxed. Set the fax machine number or ID name that indicates ...
User's Guide
Page 63
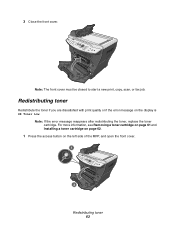
3 Close the front cover. Note: If the error message reappears after redistributing the toner, replace the toner cartridge. For more information, see Removing a toner cartridge on page 61 and Installing a toner cartridge on page 62. 1 Press the access button on the display is 88 Toner Low. Redistributing toner Redistribute the toner if you are dissatisfied with print quality or if the error message on the left side of the MFP, and open the front cover. 1 2 Redistributing toner 63 Note: The front cover must be closed to start a new print, copy, scan, or fax job.
3 Close the front cover. Note: If the error message reappears after redistributing the toner, replace the toner cartridge. For more information, see Removing a toner cartridge on page 61 and Installing a toner cartridge on page 62. 1 Press the access button on the display is 88 Toner Low. Redistributing toner Redistribute the toner if you are dissatisfied with print quality or if the error message on the left side of the MFP, and open the front cover. 1 2 Redistributing toner 63 Note: The front cover must be closed to start a new print, copy, scan, or fax job.
User's Guide
Page 71
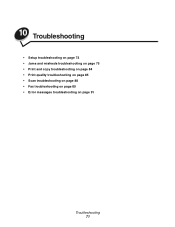
10 Troubleshooting • Setup troubleshooting on page 72 • Jams and misfeeds troubleshooting on page 75 • Print and copy troubleshooting on page 84 • Print quality troubleshooting on page 85 • Scan troubleshooting on page 88 • Fax troubleshooting on page 89 • Error messages troubleshooting on page 91 Troubleshooting 71
10 Troubleshooting • Setup troubleshooting on page 72 • Jams and misfeeds troubleshooting on page 75 • Print and copy troubleshooting on page 84 • Print quality troubleshooting on page 85 • Scan troubleshooting on page 88 • Fax troubleshooting on page 89 • Error messages troubleshooting on page 91 Troubleshooting 71
User's Guide
Page 74
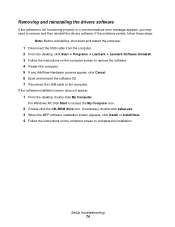
... double-click My Computer. Setup troubleshooting 74 Removing and reinstalling the drivers software If the software is not functioning properly or a communications error message appears, you may need to the computer. If the problems persist, follow these steps: Note: Before reinstalling, shut down and...; Lexmark Software Uninstall. 3 Follow the instructions on the computer screen to access the My Computer icon. 2 Double-click the CD-ROM drive icon. For Windows XP, click Start to complete the installation. If necessary, double-click setup.exe. 3 When the MFP software installation ...
... double-click My Computer. Setup troubleshooting 74 Removing and reinstalling the drivers software If the software is not functioning properly or a communications error message appears, you may need to the computer. If the problems persist, follow these steps: Note: Before reinstalling, shut down and...; Lexmark Software Uninstall. 3 Follow the instructions on the computer screen to access the My Computer icon. 2 Double-click the CD-ROM drive icon. For Windows XP, click Start to complete the installation. If necessary, double-click setup.exe. 3 When the MFP software installation ...

User's Guide
Page 88
... a lower number. 5 Click OK. 6 Click Scan Now. Scan troubleshooting 88 Make sure the MFP is set as the default printer and is done before sending the scan job. For more information,...Æ Control Panel Æ Printers and Other Hardware Æ Printers and Faxes. 2 Double-click the Lexmark X340/X340n/X342n icon. 3 Click Printer, and make sure no check mark appears next to Pause Printing....As Default. Restart the computer. For more information, see Error messages troubleshooting on page 54. If there is an error message, see Scanning on page 91. Partial document scans Solution...
... a lower number. 5 Click OK. 6 Click Scan Now. Scan troubleshooting 88 Make sure the MFP is set as the default printer and is done before sending the scan job. For more information,...Æ Control Panel Æ Printers and Other Hardware Æ Printers and Faxes. 2 Double-click the Lexmark X340/X340n/X342n icon. 3 Click Printer, and make sure no check mark appears next to Pause Printing....As Default. Restart the computer. For more information, see Error messages troubleshooting on page 54. If there is an error message, see Scanning on page 91. Partial document scans Solution...

User's Guide
Page 89
If there is an error message, see whether Fax Forwarding is selected. 1 From the control panel, press Fax. 2 Press Menu. 3 Press or repeatedly until FAX ADVANCED appears. 4 Press . 5 Press or ... and clear any answering machines, computers with modems, or telephone line splitters. Call your telephone company to print any faxes that it directly to see Error messages troubleshooting on page 91. If the telephone line is being used by another device, wait until Off appears. 8 Press .
If there is an error message, see whether Fax Forwarding is selected. 1 From the control panel, press Fax. 2 Press Menu. 3 Press or repeatedly until FAX ADVANCED appears. 4 Press . 5 Press or ... and clear any answering machines, computers with modems, or telephone line splitters. Call your telephone company to print any faxes that it directly to see Error messages troubleshooting on page 91. If the telephone line is being used by another device, wait until Off appears. 8 Press .
User's Guide
Page 91
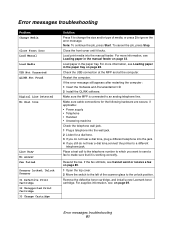
... the front cover until it is connected to make sure that it locks. Restart the computer. Check the USB connection at the MFP and at the computer. Error messages troubleshooting 91 Note: To continue the job, press Start. Make sure cable connections for the following hardware are secure, if applicable... 3 If you still do not hear a dial tone, plug a different telephone into the manual feeder. Remove the defective toner cartridge, and install a new Lexmark toner cartridge. For more information, see on page 28. For supplies information, see Loading paper in the paper tray.
... the front cover until it is connected to make sure that it locks. Restart the computer. Check the USB connection at the MFP and at the computer. Error messages troubleshooting 91 Note: To continue the job, press Start. Make sure cable connections for the following hardware are secure, if applicable... 3 If you still do not hear a dial tone, plug a different telephone into the manual feeder. Remove the defective toner cartridge, and install a new Lexmark toner cartridge. For more information, see on page 28. For supplies information, see Loading paper in the paper tray.
User's Guide
Page 92
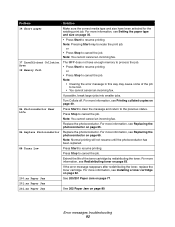
...more information, see Replacing the photoconductor on page 63. If the error message reappears after redistributing the toner, replace the toner cartridge. Note: • Clearing the error message in this way may truncate the print job. Replace the ...photoconductor. For more information, see Redistributing toner on page 65. or • Press Stop to cancel the job. Press Stop to cancel the job. Note: You cannot cancel an incoming fax. 37 Insufficient Collation Area 38 Memory Full The MFP...
...more information, see Replacing the photoconductor on page 63. If the error message reappears after redistributing the toner, replace the toner cartridge. Note: • Clearing the error message in this way may truncate the print job. Replace the ...photoconductor. For more information, see Redistributing toner on page 65. or • Press Stop to cancel the job. Press Stop to cancel the job. Note: You cannot cancel an incoming fax. 37 Insufficient Collation Area 38 Memory Full The MFP...
User's Guide
Page 93
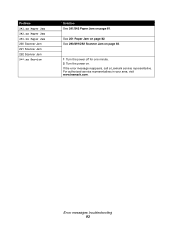
Problem 241.xx Paper Jam 242.xx Paper Jam 251.xx Paper Jam 290 Scanner Jam 291 Scanner Jam 292 Scanner Jam 9**.xx Service Solution See 241/242 Paper Jam on page 82. See 251 Paper Jam on page 81. For authorized service representatives in your area, visit www.lexmark.com. See 290/291/292 Scanner Jam on page 83. 1 Turn the power off for one minute. 2 Turn the power on. Error messages troubleshooting 93 If the error message reappears, call a Lexmark service representative.
Problem 241.xx Paper Jam 242.xx Paper Jam 251.xx Paper Jam 290 Scanner Jam 291 Scanner Jam 292 Scanner Jam 9**.xx Service Solution See 241/242 Paper Jam on page 82. See 251 Paper Jam on page 81. For authorized service representatives in your area, visit www.lexmark.com. See 290/291/292 Scanner Jam on page 83. 1 Turn the power off for one minute. 2 Turn the power on. Error messages troubleshooting 93 If the error message reappears, call a Lexmark service representative.
User's Guide
Page 102
... using Stop button 22 card stock 34 cartridge error 91 cartridge, toner installing 62 ordering 70 recycling 70 redistributing toner 63 removing 61 characters, entering 50 Cleaning outside of MFP 67 cleaning inside of MFP 68 scanner glass 67 collating copies 40, 52 connecting the MFP to a telephone 15 to a telephone wall ...37 printing 39 scanning 55 E electronic emission statement 94 emission statement 94 enlarging an image 53 entering characters 50 envelopes loading 33 printing 39 error messages 200 Paper Jam 92 201 Paper Jam 92 202 Paper Jam 92 241 Paper Jam 93 242 Paper Jam 93 251 Paper Jam 93...
... using Stop button 22 card stock 34 cartridge error 91 cartridge, toner installing 62 ordering 70 recycling 70 redistributing toner 63 removing 61 characters, entering 50 Cleaning outside of MFP 67 cleaning inside of MFP 68 scanner glass 67 collating copies 40, 52 connecting the MFP to a telephone 15 to a telephone wall ...37 printing 39 scanning 55 E electronic emission statement 94 emission statement 94 enlarging an image 53 entering characters 50 envelopes loading 33 printing 39 error messages 200 Paper Jam 92 201 Paper Jam 92 202 Paper Jam 92 241 Paper Jam 93 242 Paper Jam 93 251 Paper Jam 93...
User's Guide
Page 103
... Photoconductor Near Life 92 Qlink Not Found 91 Replace Photoconductor 92 Short Paper 92 Toner Low 92 Unsupported Toner Cartridge 91 USB Not Connected 91 error messages troubleshooting 91 F fax activity reports 47 Fax Advanced menu 23 Fax Call log 47 Fax Defaults menu 24 Fax Job log 47 fax ... labels 33 manual feeder 32 paper 28, 32 paper tray 28 transparencies 33 M menus, control panel Copy Defaults 23 Fax Advanced 23 Fax Defaults 24 MFP 84 mode, changing 24 N network setup 25 noise emission levels 100 O output location front output tray 38 rear paper exit 38 selecting 38 overlay, ...
... Photoconductor Near Life 92 Qlink Not Found 91 Replace Photoconductor 92 Short Paper 92 Toner Low 92 Unsupported Toner Cartridge 91 USB Not Connected 91 error messages troubleshooting 91 F fax activity reports 47 Fax Advanced menu 23 Fax Call log 47 Fax Defaults menu 24 Fax Job log 47 fax ... labels 33 manual feeder 32 paper 28, 32 paper tray 28 transparencies 33 M menus, control panel Copy Defaults 23 Fax Advanced 23 Fax Defaults 24 MFP 84 mode, changing 24 N network setup 25 noise emission levels 100 O output location front output tray 38 rear paper exit 38 selecting 38 overlay, ...


