
Embedded Web Server Administrator's Guide
Page 11
... add a new LDAP+GSSAPI setup 1 From the Embedded Web Server Home screen, browse to Settings ª Security ª Edit Security Setups. 2 Under Edit Building Blocks, select LDAP+GSSAPI. 3 Click Add an LDAP+GSSAPI Setup. 4 The LDAP+GSSAPI Server Setup dialog is then presented to obtain a Kerberos "ticket." Multiple search bases may be configured. • Supported devices can store a maximum of authentication that prevents the printer from...
... add a new LDAP+GSSAPI setup 1 From the Embedded Web Server Home screen, browse to Settings ª Security ª Edit Security Setups. 2 Under Edit Building Blocks, select LDAP+GSSAPI. 3 Click Add an LDAP+GSSAPI Setup. 4 The LDAP+GSSAPI Server Setup dialog is then presented to obtain a Kerberos "ticket." Multiple search bases may be configured. • Supported devices can store a maximum of authentication that prevents the printer from...
Embedded Web Server Administrator's Guide
Page 13
... file on the selected device, or Reset Form to handle all such requests. Creating a simple Kerberos configuration file 1 From the Embedded Web Server Home screen, browse to Settings ª Security ª Edit Security Setups. 2 Under Edit Building Blocks, select Kerberos 5. 3 Type the KDC (Key Distribution Center) address or hostname in the KDC Address field. 4 Type the number of the port (between 1-88) used by the Kerberos server...
... file on the selected device, or Reset Form to handle all such requests. Creating a simple Kerberos configuration file 1 From the Embedded Web Server Home screen, browse to Settings ª Security ª Edit Security Setups. 2 Under Edit Building Blocks, select Kerberos 5. 3 Type the KDC (Key Distribution Center) address or hostname in the KDC Address field. 4 Type the number of the port (between 1-88) used by the Kerberos server...
Embedded Web Server Administrator's Guide
Page 27
... alert message. 1 From the Embedded Web Server Home screen, browse to Settings ª Security ª SNMP. 2 Click Set SNMP Traps. 3 From the IP Address list, click one of device drivers and other printing applications, select the Enable PPM Mib (Printer Port Monitor MIB) check box. 6 Click Submit to finalize changes, or Reset Form to reset. Note: Changes made to settings marked with an asterisk (*) will be used in the Embedded Web Server...
... alert message. 1 From the Embedded Web Server Home screen, browse to Settings ª Security ª SNMP. 2 Click Set SNMP Traps. 3 From the IP Address list, click one of device drivers and other printing applications, select the Enable PPM Mib (Printer Port Monitor MIB) check box. 6 Click Submit to finalize changes, or Reset Form to reset. Note: Changes made to settings marked with an asterisk (*) will be used in the Embedded Web Server...
Embedded Web Server Administrator's Guide
Page 30
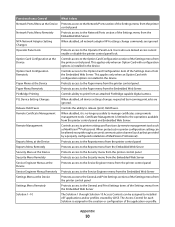
... using remote management tools. This applies only when an Option Card with configuration options is installed in the device. When disabled, all network adaptor NPA settings change commands are ignored Protects access to the Option Card Configuration item of the Settings menu from the printer control panel. Appendix 30 Controls access to the Operator Panel Lock. When disabled, it does Protects access to the Network/Ports section of the Settings menu from the printer control panel Protects access to the Paper menu from the Embedded Web Server...
... using remote management tools. This applies only when an Option Card with configuration options is installed in the device. When disabled, all network adaptor NPA settings change commands are ignored Protects access to the Option Card Configuration item of the Settings menu from the printer control panel. Appendix 30 Controls access to the Operator Panel Lock. When disabled, it does Protects access to the Network/Ports section of the Settings menu from the printer control panel Protects access to the Paper menu from the Embedded Web Server...

Wireless Setup Guide
Page 12
... sure to add the printer MAC address to distinguish it from other network devices. This identification number is not recommended. or - Note: Using an unsecured wireless network is called MAC address filtering. When installing the printer on a network that only those devices with your network uses more information on configuring 802.1X security, see the Networking Guide on an 802.1X network using MAC address filtering Every network device has a unique hardware identification number to the list of security...
... sure to add the printer MAC address to distinguish it from other network devices. This identification number is not recommended. or - Note: Using an unsecured wireless network is called MAC address filtering. When installing the printer on a network that only those devices with your network uses more information on configuring 802.1X security, see the Networking Guide on an 802.1X network using MAC address filtering Every network device has a unique hardware identification number to the list of security...

Wireless Setup Guide
Page 14
... install the printer on a wireless network, make sure that: • Your wireless network is set up and working properly. • The computer you want to set up the printer. 1 Connect the power cable to the printer and then to a wireless network using is connected to the same wireless network where you are fully on the screen. 2 Insert the Software and Documentation CD. Make sure the printer and computer are using Windows 14 Do not connect the USB cable until instructed...
... install the printer on a wireless network, make sure that: • Your wireless network is set up and working properly. • The computer you want to set up the printer. 1 Connect the power cable to the printer and then to a wireless network using is connected to the same wireless network where you are fully on the screen. 2 Insert the Software and Documentation CD. Make sure the printer and computer are using Windows 14 Do not connect the USB cable until instructed...

Wireless Setup Guide
Page 19
... serial cable attaches to the selected printer model is checked. k Make any configuration changes necessary in the printer: a From the printer control panel, navigate to the menu with a better transfer rate is not available. m Select any necessary changes to the serial port on your printer. 1 Set the parameters in the Add a New Port window. Setting up serial printing In serial printing, data is transferred one of the following: In Windows Vista 1 Click . 2 In the Start Search box, type D:\setup.exe, where D is the letter...
... serial cable attaches to the selected printer model is checked. k Make any configuration changes necessary in the printer: a From the printer control panel, navigate to the menu with a better transfer rate is not available. m Select any necessary changes to the serial port on your printer. 1 Set the parameters in the Add a New Port window. Setting up serial printing In serial printing, data is transferred one of the following: In Windows Vista 1 Click . 2 In the Start Search box, type D:\setup.exe, where D is the letter...

Wireless Setup Guide
Page 28
.... • Unplug the USB cable and plug it is not powered on • Turn the printer on , then the printer does not have power. Try one or more of the following: The printer is configured for the network, manually entering all network information. Troubleshooting wireless setup 28 There is a problem with printer These are possible solutions. Too many computers, printers, and other wireless devices can cause a wireless network to be so busy...
.... • Unplug the USB cable and plug it is not powered on • Turn the printer on , then the printer does not have power. Try one or more of the following: The printer is configured for the network, manually entering all network information. Troubleshooting wireless setup 28 There is a problem with printer These are possible solutions. Too many computers, printers, and other wireless devices can cause a wireless network to be so busy...

Wireless Setup Guide
Page 29
...; Verify that printer is turned on the computer. • Add any programs associated with the firewall disabled. Troubleshooting wireless setup 29 VERIFY THAT THE CORRECT PORT OR PRINTER IS SELECTED • If you are possible solutions. Wireless Setup Utility stops responding during wireless printer configuration If the Wireless Setup Utility stops responding during the wireless configuration process, restart the computer. VERIFY THAT THE PRINTER IS READY • Check the status of the printer installed, verify...
...; Verify that printer is turned on the computer. • Add any programs associated with the firewall disabled. Troubleshooting wireless setup 29 VERIFY THAT THE CORRECT PORT OR PRINTER IS SELECTED • If you are possible solutions. Wireless Setup Utility stops responding during wireless printer configuration If the Wireless Setup Utility stops responding during the wireless configuration process, restart the computer. VERIFY THAT THE PRINTER IS READY • Check the status of the printer installed, verify...

Wireless Setup Guide
Page 30
.... Troubleshooting wireless setup 30 MAKE SURE THE PRINTER DRIVER IS INSTALLED ON THE PRINTER All computers that came with wireless printing. If there is working properly. a If you do not know the IP address of the wireless access point, do this. • If programs request firewall access when you install the printer or try one of the following : • Update the firewall using a USB connection. • If the printer works over a USB connection, the printer is...
.... Troubleshooting wireless setup 30 MAKE SURE THE PRINTER DRIVER IS INSTALLED ON THE PRINTER All computers that came with wireless printing. If there is working properly. a If you do not know the IP address of the wireless access point, do this. • If programs request firewall access when you install the printer or try one of the following : • Update the firewall using a USB connection. • If the printer works over a USB connection, the printer is...

Wireless Setup Guide
Page 31
... of the wireless access point and the WEP key or WPA passphrase when prompted. Note: You may be prompted to connect the printer to the computer again using the installation cable as 192.168.1.1. 2 Type the user name and password for future reference. c Press Enter. • The "Default Gateway" entry is displayed. 5 Write down exactly, including any capital letters. Note: Make sure you copy them...
... of the wireless access point and the WEP key or WPA passphrase when prompted. Note: You may be prompted to connect the printer to the computer again using the installation cable as 192.168.1.1. 2 Type the user name and password for future reference. c Press Enter. • The "Default Gateway" entry is displayed. 5 Write down exactly, including any capital letters. Note: Make sure you copy them...

Wireless Setup Guide
Page 35
... strength SSID (Service Set Identifier) Static IP address switch UAA (Universally Administered Address) USB cable USB port WEP (Wired Equivalent Privacy) wireless access point wireless router Wi-Fi WPA (Wi-Fi Protected Access) WPA2 A password, such as a WEP key or a WPA pass phrase, used to use the same SSID as a wireless access point An industry term that helps prevent unauthorized access to support this. Measure of the computer that connects the peripheral devices using a USB cable, and...
... strength SSID (Service Set Identifier) Static IP address switch UAA (Universally Administered Address) USB cable USB port WEP (Wired Equivalent Privacy) wireless access point wireless router Wi-Fi WPA (Wi-Fi Protected Access) WPA2 A password, such as a WEP key or a WPA pass phrase, used to use the same SSID as a wireless access point An industry term that helps prevent unauthorized access to support this. Measure of the computer that connects the peripheral devices using a USB cable, and...
Color Quality
Page 3
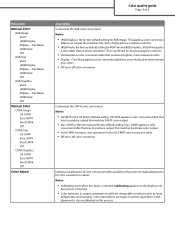
... Black sRGB Vivid Off Manual Color CMYK Image US CMYK Euro CMYK Vivid CMYK Off CMYK Text US CMYK Euro CMYK Vivid CMYK Off CMYK Graphics US CMYK Euro CMYK Vivid CMYK Off Color Adjust Description Customizes the RGB color conversions Notes: • sRGB Display is also recalibrated in this process. Color quality guide Page 3 of color conversion tables and allows the printer to an output...
... Black sRGB Vivid Off Manual Color CMYK Image US CMYK Euro CMYK Vivid CMYK Off CMYK Text US CMYK Euro CMYK Vivid CMYK Off CMYK Graphics US CMYK Euro CMYK Vivid CMYK Off Color Adjust Description Customizes the RGB color conversions Notes: • sRGB Display is also recalibrated in this process. Color quality guide Page 3 of color conversion tables and allows the printer to an output...

Color Quality
Page 4
... (or decrease) the amount of colors observed in the PostScript driver provide preferred color quality for the chosen color. If a reflective projector must be used in nature. Make sure to print on the Software and Documentation CD. Color quality guide Page 4 of 6 FAQ about the paper and media specifications, see the User's Guide on the recommended type of colors observed in Auto Color Correction mode generally approximate the colors of objects. For example, cyan...
... (or decrease) the amount of colors observed in the PostScript driver provide preferred color quality for the chosen color. If a reflective projector must be used in nature. Make sure to print on the Software and Documentation CD. Color quality guide Page 4 of 6 FAQ about the paper and media specifications, see the User's Guide on the recommended type of colors observed in Auto Color Correction mode generally approximate the colors of objects. For example, cyan...

Color Quality
Page 6
... the default pages of color samples accessible from the Quality menu using this page that surround a specific color of the Embedded Web Server. The default increment is a series of the network printer. The default color samples available using the printer control panel. Color quality guide Page 6 of 6 The following three options: • Print-Prints the default pages • Detailed-Lets you enter individual red, green, and blue values and a specific increment of color • Reset-Lets you can help identify which Color Sample pages to use for color matching...
... the default pages of color samples accessible from the Quality menu using this page that surround a specific color of the Embedded Web Server. The default increment is a series of the network printer. The default color samples available using the printer control panel. Color quality guide Page 6 of 6 The following three options: • Print-Prints the default pages • Detailed-Lets you enter individual red, green, and blue values and a specific increment of color • Reset-Lets you can help identify which Color Sample pages to use for color matching...

Connection Guide
Page 4
... user must install a custom PostScript Printer Description (PPD) file and create a print queue in the Print Center or Printer Setup Utility For local printing, you should install the printer software before connecting the USB cable. All the necessary software is connected to the Mac computer about the capabilities of printer, you need to accept the terms of the agreement. After the printer appears in the Printer list, make sure that came with the printer. Mac instructions for network...
... user must install a custom PostScript Printer Description (PPD) file and create a print queue in the Print Center or Printer Setup Utility For local printing, you should install the printer software before connecting the USB cable. All the necessary software is connected to the Mac computer about the capabilities of printer, you need to accept the terms of the agreement. After the printer appears in the Printer list, make sure that came with the printer. Mac instructions for network...

Information Guide
Page 1
...as PDFs. Information guide Page 1 of 1 Information guide Help menu The Help menu consists of a series of Help pages that came with the printer provides information about loading paper and other languages on the Lexmark Web site at www.lexmark.com. They contain information about changing printer settings for safely moving the printer Setup sheet The setup sheet packaged with the printer provides information about loading paper, printing, ordering supplies, troubleshooting, clearing jams, and maintaining the printer. It also includes a list of printer status and error messages...
...as PDFs. Information guide Page 1 of 1 Information guide Help menu The Help menu consists of a series of Help pages that came with the printer provides information about loading paper and other languages on the Lexmark Web site at www.lexmark.com. They contain information about changing printer settings for safely moving the printer Setup sheet The setup sheet packaged with the printer provides information about loading paper, printing, ordering supplies, troubleshooting, clearing jams, and maintaining the printer. It also includes a list of printer status and error messages...
Menu Map
Page 1
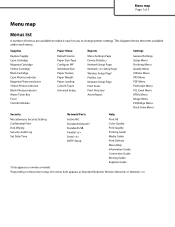
... Black Photoconductor Waste Toner Box Fuser Transfer Module Paper Menu Default Source Paper Size/Type Configure MP Substitute Size Paper Texture Paper Weight Paper Loading Custom Types Universal Setup Reports Menu Settings Page Device Statistics Network Setup Page Network Setup Page Wireless Setup Page1 Profiles List Netware Setup Page Print Fonts Print Directory Asset Report Settings General Settings Setup Menu Finishing Menu Quality Menu Utilities Menu XPS Menu PDF Menu PostScript Menu PCL Emul Menu HTML Menu Image Menu PictBridge Menu Flash Drive Menu Security Network/Ports...
... Black Photoconductor Waste Toner Box Fuser Transfer Module Paper Menu Default Source Paper Size/Type Configure MP Substitute Size Paper Texture Paper Weight Paper Loading Custom Types Universal Setup Reports Menu Settings Page Device Statistics Network Setup Page Network Setup Page Wireless Setup Page1 Profiles List Netware Setup Page Print Fonts Print Directory Asset Report Settings General Settings Setup Menu Finishing Menu Quality Menu Utilities Menu XPS Menu PDF Menu PostScript Menu PCL Emul Menu HTML Menu Image Menu PictBridge Menu Flash Drive Menu Security Network/Ports...

Print Quality
Page 1
... Paper Weight settings match the type of paper that does not meet the printer specifications. A toner cartridge, the transfer module, or the fuser is loaded in Tray 1. 2 Turn the printer off. 3 From the printer control panel, press and hold and the right arrow button while turning the printer on. 4 Release both buttons when the clock appears, and wait for a message about a printer supply. The print quality test pages print. 6 Press the down arrow button until Exit Config Menu appears, and then press . Resetting...
... Paper Weight settings match the type of paper that does not meet the printer specifications. A toner cartridge, the transfer module, or the fuser is loaded in Tray 1. 2 Turn the printer off. 3 From the printer control panel, press and hold and the right arrow button while turning the printer on. 4 Release both buttons when the clock appears, and wait for a message about a printer supply. The print quality test pages print. 6 Press the down arrow button until Exit Config Menu appears, and then press . Resetting...
Print Quality
Page 7
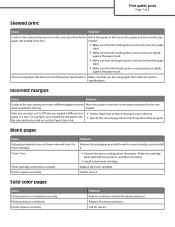
... low. Incorrect margins Cause Solution Guides in the selected tray are set for a different paper size than Move the guides in the tray to match the paper size in the tray. • Specify the correct page size in Print Properties or the program. Replace the toner cartridge. Replace the photoconductor. Solid color pages Cause Photoconductor is set to the proper positions for the size paper size loaded in the tray. You are using paper that does not meet the printer specifications. Print quality guide Page...
... low. Incorrect margins Cause Solution Guides in the selected tray are set for a different paper size than Move the guides in the tray to match the paper size in the tray. • Specify the correct page size in Print Properties or the program. Replace the toner cartridge. Replace the photoconductor. Solid color pages Cause Photoconductor is set to the proper positions for the size paper size loaded in the tray. You are using paper that does not meet the printer specifications. Print quality guide Page...

