
User's Guide
Page 2
Lexmark is not responsible for the use of other than those described in the user documentation, to a professional ...electrical outlet that is designed, tested, and approved to keep your product supports Macintosh, see the Mac Help installed with the printer software. Do not set up this product or the manufacturer's authorized replacement power supply and power supply cord. Operating system notice...global safety standards with the use the fax feature during a lightning storm. The safety features of specific Lexmark components. This product is near the product and easily accessible.
Lexmark is not responsible for the use of other than those described in the user documentation, to a professional ...electrical outlet that is designed, tested, and approved to keep your product supports Macintosh, see the Mac Help installed with the printer software. Do not set up this product or the manufacturer's authorized replacement power supply and power supply cord. Operating system notice...global safety standards with the use the fax feature during a lightning storm. The safety features of specific Lexmark components. This product is near the product and easily accessible.
User's Guide
Page 3
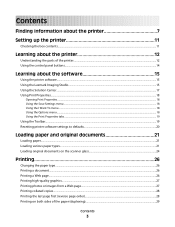
Contents Finding information about the printer 7 Setting up the printer 11 Checking the box contents...11 Learning about the printer 12 Understanding the parts of the printer...12 Using the control panel buttons...14 Learning about the software 15 Using the printer software...15 Using the Lexmark Imaging Studio...15 Using the Solution Center...17 Using Print...
Contents Finding information about the printer 7 Setting up the printer 11 Checking the box contents...11 Learning about the printer 12 Understanding the parts of the printer...12 Using the control panel buttons...14 Learning about the software 15 Using the printer software...15 Using the Lexmark Imaging Studio...15 Using the Solution Center...17 Using Print...
User's Guide
Page 5
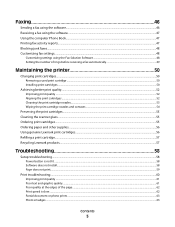
...Customizing settings using the Fax Solution Software ...48 Setting the number of rings before receiving a fax automatically 49 Maintaining the printer 50 Changing print cartridges...50 Removing a used print cartridge ...50 Installing print cartridges...50 Achieving better print quality...52 Improving ...the scanner glass...55 Ordering print cartridges...55 Ordering paper and other supplies...56 Using genuine Lexmark print cartridges...56 Refilling a print cartridge...57 Recycling Lexmark products...57 Troubleshooting 58 Setup troubleshooting...58 Power button is not lit ...58 Software does not...
...Customizing settings using the Fax Solution Software ...48 Setting the number of rings before receiving a fax automatically 49 Maintaining the printer 50 Changing print cartridges...50 Removing a used print cartridge ...50 Installing print cartridges...50 Achieving better print quality...52 Improving ...the scanner glass...55 Ordering print cartridges...55 Ordering paper and other supplies...56 Using genuine Lexmark print cartridges...56 Refilling a print cartridge...57 Recycling Lexmark products...57 Troubleshooting 58 Setup troubleshooting...58 Power button is not lit ...58 Software does not...
User's Guide
Page 6
...66 Fax troubleshooting...66 Cannot send or receive a fax...66 Can send but not receive faxes...67 Can receive but not send faxes...67 Printer receives a blank fax...67 Received fax has poor print quality...68 Jams and misfeeds troubleshooting...68 Paper jams...68 Paper or specialty media misfeeds......68 Printer does not feed paper, envelopes, or specialty media 69 Banner paper jams ...69 Blinking lights on the control panel...70 Error messages...71 ...
...66 Fax troubleshooting...66 Cannot send or receive a fax...66 Can send but not receive faxes...67 Can receive but not send faxes...67 Printer receives a blank fax...67 Received fax has poor print quality...68 Jams and misfeeds troubleshooting...68 Paper jams...68 Paper or specialty media misfeeds......68 Printer does not feed paper, envelopes, or specialty media 69 Banner paper jams ...69 Blinking lights on the control panel...70 Error messages...71 ...
User's Guide
Page 7
... the Finder desktop, double-click the Lexmark 2500 Series folder. 2 Double-click the printer Help icon. Finding information about the printer Setup sheet Description Where to solve printer setup problems. Note: These documents do not ship with all printers. Note: If your printer supports Macintosh operating systems, see the ...up You can find this document in the printer box or on the hardware and software. Lexmark Web site at www.lexmark.com. You can find this document in the printer box or on the Lexmark Web site at www.lexmark.com. The Setup Solutions booklet tells you...
... the Finder desktop, double-click the Lexmark 2500 Series folder. 2 Double-click the printer Help icon. Finding information about the printer Setup sheet Description Where to solve printer setup problems. Note: These documents do not ship with all printers. Note: If your printer supports Macintosh operating systems, see the ...up You can find this document in the printer box or on the hardware and software. Lexmark Web site at www.lexmark.com. You can find this document in the printer box or on the Lexmark Web site at www.lexmark.com. The Setup Solutions booklet tells you...
User's Guide
Page 8
...Guide appears on the screen. 1 From the Finder desktop, double-click the Lexmark You can also find this document on the Lexmark Web site at www.lexmark.com. 2500 Series folder. 2 Double-click the printer Help icon. Tips ΠHelp, or Help ΠHelp Topics. ..., faxing, paper jams, and misfeeds 3 Click Yes. Lexmark Solution Center Description Where to find The Lexmark Solution Center software is not on To access the Lexmark Solution Center: your printer connects to a computer. Lexmark 2500 Series. 2 Select Lexmark Solution Center. It installs with photos If the link to...
...Guide appears on the screen. 1 From the Finder desktop, double-click the Lexmark You can also find this document on the Lexmark Web site at www.lexmark.com. 2500 Series folder. 2 Double-click the printer Help icon. Tips ΠHelp, or Help ΠHelp Topics. ..., faxing, paper jams, and misfeeds 3 Click Yes. Lexmark Solution Center Description Where to find The Lexmark Solution Center software is not on To access the Lexmark Solution Center: your printer connects to a computer. Lexmark 2500 Series. 2 Select Lexmark Solution Center. It installs with photos If the link to...
User's Guide
Page 9
...of world) Telephone support Call us at www.lexmark.com. period of Limited Warranty section, click Inkjet & All-In-One Printers. 4 Scroll through the Web page to view the warranty. Note: For additional information about contacting Lexmark, see the printed warranty statement that shipped with... your this printer will be available in printer, or set forth at www.lexmark.com. ...
...of world) Telephone support Call us at www.lexmark.com. period of Limited Warranty section, click Inkjet & All-In-One Printers. 4 Scroll through the Web page to view the warranty. Note: For additional information about contacting Lexmark, see the printed warranty statement that shipped with... your this printer will be available in printer, or set forth at www.lexmark.com. ...

User's Guide
Page 10
Record the following information (located on the store receipt and the back of the printer), and have it ready when you contact us so that we may serve you faster: • Machine Type number • Serial number • Date purchased • Store where purchased Finding information about the printer 10
Record the following information (located on the store receipt and the back of the printer), and have it ready when you contact us so that we may serve you faster: • Machine Type number • Serial number • Date purchased • Store where purchased Finding information about the printer 10
User's Guide
Page 11
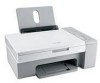
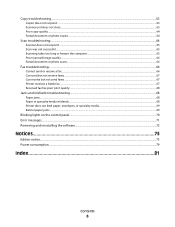
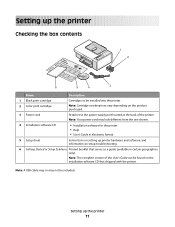
... and software, and information on setup troubleshooting. 6 Getting Started or Setup Solutions Printed booklet that shipped with the printer. Setting up the printer Checking the box contents 1 2 ?? ? 6 5 4 3 Name Description 1 Black print cartridge Cartridges to the power ... shown. 4 Installation software CD • Installation software for the printer • Help • User's Guide in certain geographies only). Note: Your power cord may not be installed into the printer. 2 Color print cartridge Note: Cartridge combinations vary depending on the installation software...
... and software, and information on setup troubleshooting. 6 Getting Started or Setup Solutions Printed booklet that shipped with the printer. Setting up the printer Checking the box contents 1 2 ?? ? 6 5 4 3 Name Description 1 Black print cartridge Cartridges to the power ... shown. 4 Installation software CD • Installation software for the printer • Help • User's Guide in certain geographies only). Note: Your power cord may not be installed into the printer. 2 Color print cartridge Note: Cartridge combinations vary depending on the installation software...

User's Guide
Page 12
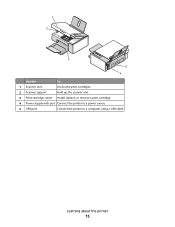
Learning about the printer Understanding the parts of the printer 5 6 4 1 7 3 2 Use the To 1 Paper support Load paper. 2 Control panel Operate the printer. Learning about the printer 12 For more information, see "Using the control panel buttons" on page 14. 3 Paper exit tray Hold paper as it exits. 4 Top cover Access the scanner glass. 5 Paper feed guard Prevent small objects from falling inside. 6 Paper guide Keep paper straight when feeding. 7 Scanner glass Copy, scan, fax, or remove an item.
Learning about the printer Understanding the parts of the printer 5 6 4 1 7 3 2 Use the To 1 Paper support Load paper. 2 Control panel Operate the printer. Learning about the printer 12 For more information, see "Using the control panel buttons" on page 14. 3 Paper exit tray Hold paper as it exits. 4 Top cover Access the scanner glass. 5 Paper feed guard Prevent small objects from falling inside. 6 Paper guide Keep paper straight when feeding. 7 Scanner glass Copy, scan, fax, or remove an item.
User's Guide
Page 13
1 2 3 5 4 Use the To 1 Scanner unit Access the print cartridges. 2 Scanner support Hold up the scanner unit. 3 Print cartridge carrier Install, replace, or remove a print cartridge. 4 Power supply with port Connect the printer to a power source. 5 USB port Connect the printer to a computer using a USB cable. Learning about the printer 13
1 2 3 5 4 Use the To 1 Scanner unit Access the print cartridges. 2 Scanner support Hold up the scanner unit. 3 Print cartridge carrier Install, replace, or remove a print cartridge. 4 Power supply with port Connect the printer to a power source. 5 USB port Connect the printer to a computer using a USB cable. Learning about the printer 13
User's Guide
Page 14
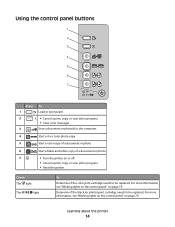
... black (or photo) print cartridge needs to be replaced. Learning about the printer 14 Check The light The light To Determine if the color print cartridge needs to the computer. 4 Start a 4 x 6 color photo copy. 5 Start a color copy of a document or photo. 6 Start a black-and-white copy of... a document or photo. 7 • Turn the printer on or off. • Cancel a print,...
... black (or photo) print cartridge needs to be replaced. Learning about the printer 14 Check The light The light To Determine if the color print cartridge needs to the computer. 4 Start a 4 x 6 color photo copy. 5 Start a color copy of a document or photo. 6 Start a black-and-white copy of... a document or photo. 7 • Turn the printer on or off. • Cancel a print,...
User's Guide
Page 15
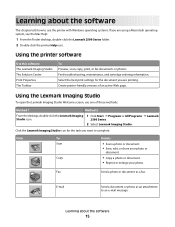
...fax. Learning about the software This chapter tells how to an e-mail message. Using the Lexmark Imaging Studio To open the Lexmark Imaging Studio Welcome screen, use the printer with Windows operating systems. If you are printing. Find troubleshooting, maintenance, and cartridge ordering information..., see the Mac Help: 1 From the Finder desktop, double-click the Lexmark 2500 Series folder. 2 Double-click the printer Help icon. Using the printer software Use this software The Lexmark Imaging Studio The Solution Center Print Properties The Toolbar To Preview, scan, copy...
...fax. Learning about the software This chapter tells how to an e-mail message. Using the Lexmark Imaging Studio To open the Lexmark Imaging Studio Welcome screen, use the printer with Windows operating systems. If you are printing. Find troubleshooting, maintenance, and cartridge ordering information..., see the Mac Help: 1 From the Finder desktop, double-click the Lexmark 2500 Series folder. 2 Double-click the printer Help icon. Using the printer software Use this software The Lexmark Imaging Studio The Solution Center Print Properties The Toolbar To Preview, scan, copy...
User's Guide
Page 16
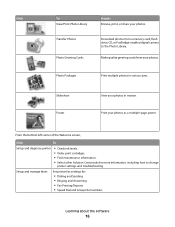
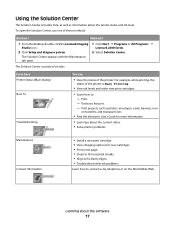
...settings for more information, including how to the Photo Library. From the bottom left corner of the Welcome screen, Click To Setup and diagnose printer • Check ink levels. • Order print cartridges. • Find maintenance information. • Select other Solution Center tabs for : ... sizes. Make quality greeting cards from a memory card, flash drive, CD, or PictBridge-enabled digital camera to change printer settings and troubleshooting. Print your photos. Download photos from your photos as a multiple-page poster. Photo Packages Print multiple photos in motion...
...settings for more information, including how to the Photo Library. From the bottom left corner of the Welcome screen, Click To Setup and diagnose printer • Check ink levels. • Order print cartridges. • Find maintenance information. • Select other Solution Center tabs for : ... sizes. Make quality greeting cards from a memory card, flash drive, CD, or PictBridge-enabled digital camera to change printer settings and troubleshooting. Print your photos. Download photos from your photos as a multiple-page poster. Photo Packages Print multiple photos in motion...
User's Guide
Page 17
... the status of these methods: Method 1 Method 2 1 From the desktop, double-click the Lexmark Imaging Studio icon. 2 Click Setup and diagnose printer. 1 Click Start ΠPrograms or All Programs ΠLexmark 2500 Series. 2 Select Solution Center. Learning about the printer status and ink level. To open . Print. - on the World Wide Web. For example...
... the status of these methods: Method 1 Method 2 1 From the desktop, double-click the Lexmark Imaging Studio icon. 2 Click Setup and diagnose printer. 1 Click Start ΠPrograms or All Programs ΠLexmark 2500 Series. 2 Select Solution Center. Learning about the printer status and ink level. To open . Print. - on the World Wide Web. For example...
User's Guide
Page 18
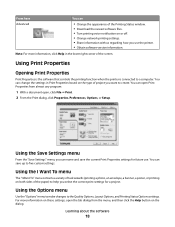
...use . Learning about the software 18 Using Print Properties Opening Print Properties Print Properties is the software that controls the printing function when the printer is connected to help you can save the current Print Properties settings for a project. You can name and save up to the Quality... settings. Using the Save Settings menu From the "Save Settings" menu, you select the correct print settings for future use the printer. • Obtain software version information. Using the Options menu Use the "Options" menu to make changes to five custom settings.
...use . Learning about the software 18 Using Print Properties Opening Print Properties Print Properties is the software that controls the printing function when the printer is connected to help you can save the current Print Properties settings for a project. You can name and save up to the Quality... settings. Using the Save Settings menu From the "Save Settings" menu, you select the correct print settings for future use the printer. • Obtain software version information. Using the Options menu Use the "Options" menu to make changes to five custom settings.
User's Guide
Page 19
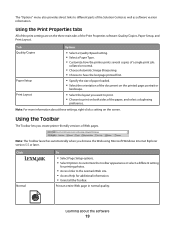
Tab Quality/Copies Paper Setup Print Layout Options • Select a Quality/Speed setting. • Select a Paper Type. • Customize how the printer prints several copies of a single print job: collated or normal. • Choose Automatic Image Sharpening. • Choose to have the last page ...on the three main tabs of Web pages. Print an entire Web page in normal quality. The "Options" menu also provides direct links to the Lexmark Web site. • Access Help for additional information. • Uninstall the Toolbar. Learning about these settings, right-click a setting on both ...
Tab Quality/Copies Paper Setup Print Layout Options • Select a Quality/Speed setting. • Select a Paper Type. • Customize how the printer prints several copies of a single print job: collated or normal. • Choose Automatic Image Sharpening. • Choose to have the last page ...on the three main tabs of Web pages. Print an entire Web page in normal quality. The "Options" menu also provides direct links to the Lexmark Web site. • Access Help for additional information. • Uninstall the Toolbar. Learning about these settings, right-click a setting on both ...
User's Guide
Page 20
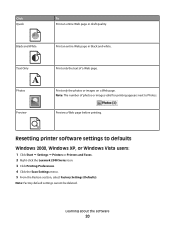
... or images valid for printing appears next to defaults Windows 2000, Windows XP, or Windows Vista users: 1 Click Start ΠSettings ΠPrinters or Printers and Faxes. 2 Right-click the Lexmark 2500 Series icon. 3 Click Printing Preferences. 4 Click the Save Settings menu. 5 From the Restore section, select Factory Settings (Defaults). Note: The number...
... or images valid for printing appears next to defaults Windows 2000, Windows XP, or Windows Vista users: 1 Click Start ΠSettings ΠPrinters or Printers and Faxes. 2 Right-click the Lexmark 2500 Series icon. 3 Click Printing Preferences. 4 Click the Save Settings menu. 5 From the Restore section, select Factory Settings (Defaults). Note: The number...

User's Guide
Page 21
...guides rest against the edges of the paper. Loading paper and original documents Loading paper 1 Make sure: • You use paper designed for use with inkjet printers. • The paper is loaded in the center of the paper support. • The paper guides rest against the edges of the paper. 25 sheets... side, see the instructions that came with it to dry to Make sure 100 sheets of plain paper • The paper is designed for inkjet printers. • If you are using specialty paper, you adjust the paper guides. Loading various paper types Load up to avoid ink smudging.
...guides rest against the edges of the paper. Loading paper and original documents Loading paper 1 Make sure: • You use paper designed for use with inkjet printers. • The paper is loaded in the center of the paper support. • The paper guides rest against the edges of the paper. 25 sheets... side, see the instructions that came with it to dry to Make sure 100 sheets of plain paper • The paper is designed for inkjet printers. • If you are using specialty paper, you adjust the paper guides. Loading various paper types Load up to avoid ink smudging.

User's Guide
Page 22
Notes: - Partial sheets (with inkjet printers. • The envelopes are loaded in the center of the paper support. • The ... smudging. 25 sheets of labels 25 transparencies • The print side of the labels faces you and down toward the printer. • The transparencies are loaded in the center of the paper support. • The paper guides rest against the... that have a removable strip, each strip faces away from you . • The top of the labels feeds into the printer first. • The adhesive on the labels does not extend to within 1 mm of the edge of the label. •...
Notes: - Partial sheets (with inkjet printers. • The envelopes are loaded in the center of the paper support. • The ... smudging. 25 sheets of labels 25 transparencies • The print side of the labels faces you and down toward the printer. • The transparencies are loaded in the center of the paper support. • The paper guides rest against the... that have a removable strip, each strip faces away from you . • The top of the labels feeds into the printer first. • The adhesive on the labels does not extend to within 1 mm of the edge of the label. •...


