User's Guide
Page 7
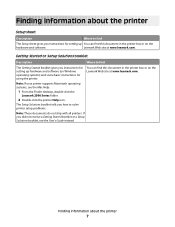
... did not receive a Getting Started booklet or a Setup Solutions booklet, see the Mac Help: 1 From the Finder desktop, double-click the Lexmark 2500 Series folder. 2 Double-click the printer Help icon. Getting Started or Setup Solutions booklet Description Where to solve printer setup problems. Note: These documents do not ship with all printers. Note: If your printer supports Macintosh operating systems, see the User's Guide instead. The Setup Solutions booklet tells you instructions for setting up hardware...
... did not receive a Getting Started booklet or a Setup Solutions booklet, see the Mac Help: 1 From the Finder desktop, double-click the Lexmark 2500 Series folder. 2 Double-click the printer Help icon. Getting Started or Setup Solutions booklet Description Where to solve printer setup problems. Note: These documents do not ship with all printers. Note: If your printer supports Macintosh operating systems, see the User's Guide instead. The Setup Solutions booklet tells you instructions for setting up hardware...
User's Guide
Page 8
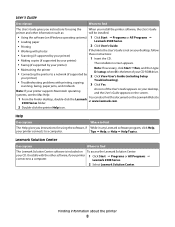
... printer supports Macintosh operating systems, see the Mac Help: An icon of your CD-ROM drive. 2 Click View User's Guide (including Setup Troubleshooting). • Troubleshooting problems with the other information such as: will be installed. • Using the software (on Windows operating systems) 1 Click Start Œ Programs or All Programs Œ • Loading paper Lexmark 2500 Series. • Printing 2 Click User's Guide. • Working with photos If the link to the User's Guide is included on To access the Lexmark Solution Center: your CD. Help...
... printer supports Macintosh operating systems, see the Mac Help: An icon of your CD-ROM drive. 2 Click View User's Guide (including Setup Troubleshooting). • Troubleshooting problems with the other information such as: will be installed. • Using the software (on Windows operating systems) 1 Click Start Œ Programs or All Programs Œ • Loading paper Lexmark 2500 Series. • Printing 2 Click User's Guide. • Working with photos If the link to the User's Guide is included on To access the Lexmark Solution Center: your CD. Help...

User's Guide
Page 11
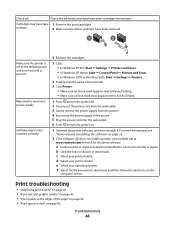
... a guide (available in electronic format 5 Setup sheet Instructions on setting up printer hardware and software, and information on the product purchased. 3 Power cord Attaches to the power supply port located at the back of the printer. Setting up the printer 11 Note: Your power cord may not be included. Setting up the printer Checking the box contents 1 2 ?? ? 6 5 4 3 Name Description 1 Black print cartridge Cartridges to be installed into the printer. 2 Color print cartridge Note: Cartridge combinations vary depending on setup troubleshooting...
... a guide (available in electronic format 5 Setup sheet Instructions on setting up printer hardware and software, and information on the product purchased. 3 Power cord Attaches to the power supply port located at the back of the printer. Setting up the printer 11 Note: Your power cord may not be included. Setting up the printer Checking the box contents 1 2 ?? ? 6 5 4 3 Name Description 1 Black print cartridge Cartridges to be installed into the printer. 2 Color print cartridge Note: Cartridge combinations vary depending on setup troubleshooting...
User's Guide
Page 13
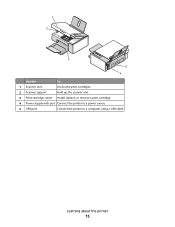
1 2 3 5 4 Use the To 1 Scanner unit Access the print cartridges. 2 Scanner support Hold up the scanner unit. 3 Print cartridge carrier Install, replace, or remove a print cartridge. 4 Power supply with port Connect the printer to a power source. 5 USB port Connect the printer to a computer using a USB cable. Learning about the printer 13
1 2 3 5 4 Use the To 1 Scanner unit Access the print cartridges. 2 Scanner support Hold up the scanner unit. 3 Print cartridge carrier Install, replace, or remove a print cartridge. 4 Power supply with port Connect the printer to a power source. 5 USB port Connect the printer to a computer using a USB cable. Learning about the printer 13
User's Guide
Page 15
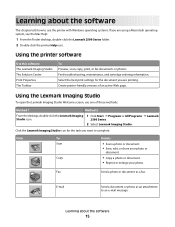
... the Mac Help: 1 From the Finder desktop, double-click the Lexmark 2500 Series folder. 2 Double-click the printer Help icon. Click To Scan Copy Details • Scan a photo or document. • Save, edit, or share your photo or document. • Copy a photo or document. • Reprint or enlarge your photo. Click the Lexmark Imaging Studio icon for the document you want to an e-mail message. Find troubleshooting, maintenance, and cartridge ordering information. E-mail Send a document or photo as a fax. Using the printer software Use this software The Lexmark Imaging...
... the Mac Help: 1 From the Finder desktop, double-click the Lexmark 2500 Series folder. 2 Double-click the printer Help icon. Click To Scan Copy Details • Scan a photo or document. • Save, edit, or share your photo or document. • Copy a photo or document. • Reprint or enlarge your photo. Click the Lexmark Imaging Studio icon for the document you want to an e-mail message. Find troubleshooting, maintenance, and cartridge ordering information. E-mail Send a document or photo as a fax. Using the printer software Use this software The Lexmark Imaging...
User's Guide
Page 58
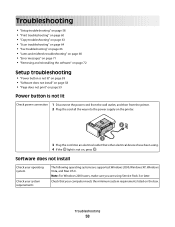
...2000 users, make sure you are supported: Windows 2000, Windows XP, Windows Vista, and Mac OS X. Check that other electrical devices have been using Service Pack 3 or later. Troubleshooting • "Setup troubleshooting" on page 58 • "Print troubleshooting" on page 60 • "Copy troubleshooting" on page 63 • "Scan troubleshooting" on page 64 • "Fax troubleshooting" on page 66 • "Jams and misfeeds troubleshooting" on page 68 • "Error messages" on page 71 • "Removing and reinstalling the software" on page 72 Setup troubleshooting • "Power button...
...2000 users, make sure you are supported: Windows 2000, Windows XP, Windows Vista, and Mac OS X. Check that other electrical devices have been using Service Pack 3 or later. Troubleshooting • "Setup troubleshooting" on page 58 • "Print troubleshooting" on page 60 • "Copy troubleshooting" on page 63 • "Scan troubleshooting" on page 64 • "Fax troubleshooting" on page 66 • "Jams and misfeeds troubleshooting" on page 68 • "Error messages" on page 71 • "Removing and reinstalling the software" on page 72 Setup troubleshooting • "Power button...
User's Guide
Page 60
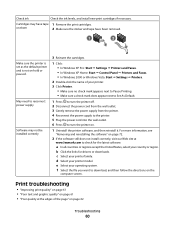
... printer model. Check ink Check the ink levels, and install new print cartridges if necessary. For more information, see "Removing and reinstalling the software" on page 61 • "Poor quality at www.lexmark.com to reconnect power supply Software may have been removed. 1 2 Make sure the printer is set as the default printer and is not on the computer screen. d Select your printer. 3 Click Printer. • Make sure no check mark appears next to Pause Printing. • Make sure a check...
... printer model. Check ink Check the ink levels, and install new print cartridges if necessary. For more information, see "Removing and reinstalling the software" on page 61 • "Poor quality at www.lexmark.com to reconnect power supply Software may have been removed. 1 2 Make sure the printer is set as the default printer and is not on the computer screen. d Select your printer. 3 Click Printer. • Make sure no check mark appears next to Pause Printing. • Make sure a check...

User's Guide
Page 61
... document or photo prints" on page 63 Improving print quality Check paper • Use the appropriate paper for best results use Lexmark Premium Photo Paper or Lexmark Photo Paper. • Use a paper that is still not satisfactory, replace the print cartridges. If print quality has not improved, continue to step 2. 2 Clean the print cartridge nozzles. For more information, see "Ordering paper and other high-quality images, for the document. If print quality is a heavier weight or bright white. See "Improving print...
... document or photo prints" on page 63 Improving print quality Check paper • Use the appropriate paper for best results use Lexmark Premium Photo Paper or Lexmark Photo Paper. • Use a paper that is still not satisfactory, replace the print cartridges. If print quality has not improved, continue to step 2. 2 Clean the print cartridge nozzles. For more information, see "Ordering paper and other high-quality images, for the document. If print quality is a heavier weight or bright white. See "Improving print...
User's Guide
Page 68
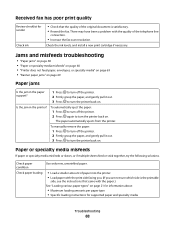
... manually remove the paper: 1 Press to turn off the printer. 2 Firmly grasp the paper, and gently pull it out. 3 Press to turn the printer back on page 21 for information about: • Maximum loading amounts per paper type • Specific loading instructions for sender Check ink • Check that came with the print side facing you. (If you are not sure which side is satisfactory. • Resend the fax. Check paper condition Use only new, unwrinkled paper. Check...
... manually remove the paper: 1 Press to turn off the printer. 2 Firmly grasp the paper, and gently pull it out. 3 Press to turn the printer back on page 21 for information about: • Maximum loading amounts per paper type • Specific loading instructions for sender Check ink • Check that came with the print side facing you. (If you are not sure which side is satisfactory. • Resend the fax. Check paper condition Use only new, unwrinkled paper. Check...
User's Guide
Page 71
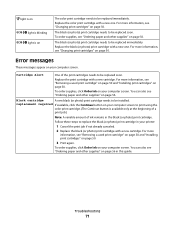
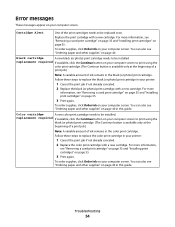
...computer screen to print using the color print cartridge. (The Continue button is on page 50. To order supplies, click Order Ink on page 56. To order supplies, see "Removing a used print cartridge" on page 50 and "Installing print cartridges" on your computer screen. Replace the print cartridge with a new one . Troubleshooting 71 The black (or photo) print cartridge needs to be replaced soon. Replace the black (or photo) print cartridge with a new cartridge. For more information, see "Ordering paper and other supplies" on your printer: 1 Cancel the print job if...
...computer screen to print using the color print cartridge. (The Continue button is on page 50. To order supplies, click Order Ink on page 56. To order supplies, see "Removing a used print cartridge" on page 50 and "Installing print cartridges" on your computer screen. Replace the print cartridge with a new one . Troubleshooting 71 The black (or photo) print cartridge needs to be replaced soon. Replace the black (or photo) print cartridge with a new cartridge. For more information, see "Ordering paper and other supplies" on your printer: 1 Cancel the print job if...
User's Guide
Page 72
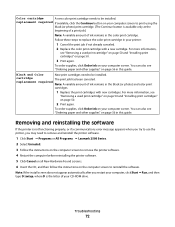
... "Removing a used print cartridge" on page 50 and "Installing print cartridges" on your computer screen to print using the black (or photo) print cartridge. (The Continue button is the letter of your CD-ROM drive. Black and Color New print cartridges need to remove and reinstall the printer software. 1 Click Start ΠPrograms or All Programs ΠLexmark 2500 Series. 2 Select Uninstall. 3 Follow the instructions on the computer screen to remove the printer software. 4 Restart the computer before reinstalling the printer software. 5 Click Cancel on all New Hardware Found screens...
... "Removing a used print cartridge" on page 50 and "Installing print cartridges" on your computer screen to print using the black (or photo) print cartridge. (The Continue button is the letter of your CD-ROM drive. Black and Color New print cartridges need to remove and reinstall the printer software. 1 Click Start ΠPrograms or All Programs ΠLexmark 2500 Series. 2 Select Uninstall. 3 Follow the instructions on the computer screen to remove the printer software. 4 Restart the computer before reinstalling the printer software. 5 Click Cancel on all New Hardware Found screens...
User's Guide
Page 83
parts control panel 12 paper exit tray 12 paper guide 12 paper support 12 power supply port 13 print cartridge carrier 13 scanner glass 12 scanner support 13 scanner unit 13 top cover 12 USB port 13 Phone Book (computer), using 47 photo cards, loading 23 Photo Greeting Cards button 15 Photo Library printing photos 33 scanning a photo 41 Photo Packages 34 Photo Packages button 15 photo paper, loading 21 photos copying 39 copying 4x6 photos 37 loading on the scanner glass 24 printing all photos from a media device using the computer 33 printing from a Web page 27 printing from the Photo Library ...
parts control panel 12 paper exit tray 12 paper guide 12 paper support 12 power supply port 13 print cartridge carrier 13 scanner glass 12 scanner support 13 scanner unit 13 top cover 12 USB port 13 Phone Book (computer), using 47 photo cards, loading 23 Photo Greeting Cards button 15 Photo Library printing photos 33 scanning a photo 41 Photo Packages 34 Photo Packages button 15 photo paper, loading 21 photos copying 39 copying 4x6 photos 37 loading on the scanner glass 24 printing all photos from a media device using the computer 33 printing from a Web page 27 printing from the Photo Library ...
User's Guide
Page 84
... scanning multiple photos at one time using computer 42 multiple photos using the computer 42 saving scanned image 40 using the control panel 40 scanning a document 41 scanning takes too long or freezes the computer 65 setup troubleshooting page does not print 59 power button is not lit 58 software does not install 58 slideshow creating and viewing 35 software Lexmark Imaging Studio 15 Print Properties 18 removing and reinstalling 72 Solution Center 17 Toolbar 19 using 15 software does not install 58 software settings, printer resetting to defaults...
... scanning multiple photos at one time using computer 42 multiple photos using the computer 42 saving scanned image 40 using the control panel 40 scanning a document 41 scanning takes too long or freezes the computer 65 setup troubleshooting page does not print 59 power button is not lit 58 software does not install 58 slideshow creating and viewing 35 software Lexmark Imaging Studio 15 Print Properties 18 removing and reinstalling 72 Solution Center 17 Toolbar 19 using 15 software does not install 58 software settings, printer resetting to defaults...
Getting Started
Page 5
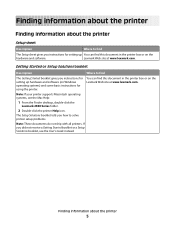
Note: If your printer supports Macintosh operating systems, see the User's Guide instead. If you did not receive a Getting Started booklet or a Setup Solutions booklet, see the Mac Help: 1 From the Finder desktop, double-click the Lexmark 2500 Series folder. 2 Double-click the printer Help icon. The Setup Solutions booklet tells you how to find The Getting Started booklet gives you instructions for using the printer. Finding information about the printer Finding information about...
Note: If your printer supports Macintosh operating systems, see the User's Guide instead. If you did not receive a Getting Started booklet or a Setup Solutions booklet, see the Mac Help: 1 From the Finder desktop, double-click the Lexmark 2500 Series folder. 2 Double-click the printer Help icon. The Setup Solutions booklet tells you how to find The Getting Started booklet gives you instructions for using the printer. Finding information about the printer Finding information about...

Getting Started
Page 6
...; Scanning (if supported by your printer) these instructions: • Making copies (if supported by your printer) 1 Insert the CD. • Faxing (if supported by your printer) 2 Click View User's Guide (including Setup Troubleshooting). • Troubleshooting problems with photos If the link to a computer. Tips Œ Help, or Help Œ Help Topics. User's Guide Description Where to find The User's Guide gives you instructions for using the When you instructions for using the software, if While in any Lexmark software program, click Help, your printer connects to...
...; Scanning (if supported by your printer) these instructions: • Making copies (if supported by your printer) 1 Insert the CD. • Faxing (if supported by your printer) 2 Click View User's Guide (including Setup Troubleshooting). • Troubleshooting problems with photos If the link to a computer. Tips Œ Help, or Help Œ Help Topics. User's Guide Description Where to find The User's Guide gives you instructions for using the When you instructions for using the software, if While in any Lexmark software program, click Help, your printer connects to...

Getting Started
Page 9
... 1 Black print cartridge Cartridges to be installed into the printer. 2 Color print cartridge Note: Cartridge combinations vary depending on the product purchased. 3 Power cord Attaches to the power supply port located at the back of the User's Guide can be included. Setting up printer hardware and software, and information on setup troubleshooting. 6 Getting Started or Setup Solutions Printed booklet that shipped with the printer. Note: Your power cord may not be found on setting up the printer 9 Note: A USB cable...
... 1 Black print cartridge Cartridges to be installed into the printer. 2 Color print cartridge Note: Cartridge combinations vary depending on the product purchased. 3 Power cord Attaches to the power supply port located at the back of the User's Guide can be included. Setting up printer hardware and software, and information on setup troubleshooting. 6 Getting Started or Setup Solutions Printed booklet that shipped with the printer. Note: Your power cord may not be found on setting up the printer 9 Note: A USB cable...

Getting Started
Page 11
1 2 3 5 4 Use the To 1 Scanner unit Access the print cartridges. 2 Scanner support Hold up the scanner unit. 3 Print cartridge carrier Install, replace, or remove a print cartridge. 4 Power supply with port Connect the printer to a power source. 5 USB port Connect the printer to a computer using a USB cable. Learning about the printer 11
1 2 3 5 4 Use the To 1 Scanner unit Access the print cartridges. 2 Scanner support Hold up the scanner unit. 3 Print cartridge carrier Install, replace, or remove a print cartridge. 4 Power supply with port Connect the printer to a power source. 5 USB port Connect the printer to a computer using a USB cable. Learning about the printer 11
Getting Started
Page 44
...; In Windows XP Pro: Start Œ Settings Œ Printers and Faxes. • In Windows XP Home: Start Œ Control Panel Œ Printers and Faxes. • In Windows 2000 or Windows Vista: Start Œ Settings Œ Printers. 2 Double-click the name of the page" on page 46 • "Print speed is not on the computer screen. e Select your printer family. Check ink Check the ink levels, and install new print cartridges if necessary. For more information, see "Removing and reinstalling the software" on page 55...
...; In Windows XP Pro: Start Œ Settings Œ Printers and Faxes. • In Windows XP Home: Start Œ Control Panel Œ Printers and Faxes. • In Windows 2000 or Windows Vista: Start Œ Settings Œ Printers. 2 Double-click the name of the page" on page 46 • "Print speed is not on the computer screen. e Select your printer family. Check ink Check the ink levels, and install new print cartridges if necessary. For more information, see "Removing and reinstalling the software" on page 55...

Getting Started
Page 45
...; Blank pages • Dark print • Faded print • Incorrect colors • Light and dark bands in print • Skewed lines • Smudges • Streaks • White lines in print Check ink Review steps to step 2. 2 Clean the print cartridge nozzles. • "Partial document or photo prints" on page 47 • "Photo smudges" on page 47 Improving print quality Check paper • Use the appropriate paper for best results use Lexmark Premium Photo Paper or Lexmark Photo Paper. • Use a paper that is still not satisfactory, replace...
...; Blank pages • Dark print • Faded print • Incorrect colors • Light and dark bands in print • Skewed lines • Smudges • Streaks • White lines in print Check ink Review steps to step 2. 2 Clean the print cartridge nozzles. • "Partial document or photo prints" on page 47 • "Photo smudges" on page 47 Improving print quality Check paper • Use the appropriate paper for best results use Lexmark Premium Photo Paper or Lexmark Photo Paper. • Use a paper that is still not satisfactory, replace...
Getting Started
Page 54
... screen. Color cartridge A new color print cartridge needs to replace the color print cartridge in the black (or photo) print cartridge. To order supplies, click Order Ink on your computer screen. Error messages These messages appear on your computer screen. You can also see "Ordering paper and other supplies" on page 35. Follow these steps to print using the color print cartridge. (The Continue button is available only at the beginning of a print job.) Note: A variable amount of ink remains in your printer: 1 Cancel...
... screen. Color cartridge A new color print cartridge needs to replace the color print cartridge in the black (or photo) print cartridge. To order supplies, click Order Ink on your computer screen. Error messages These messages appear on your computer screen. You can also see "Ordering paper and other supplies" on page 35. Follow these steps to print using the color print cartridge. (The Continue button is available only at the beginning of a print job.) Note: A variable amount of ink remains in your printer: 1 Cancel...


