
User's Guide
Page 2
Connect the power supply cord to a professional service person. CAUTION-SHOCK HAZARD: Do not use of specific Lexmark components. CAUTION-POTENTIAL INJURY: When closing the scanner unit, make any electrical or cabling connections, such as the power supply cord or telephone, during a lightning ...For complete descriptions: • Windows users-See the User's Guide. • Macintosh users-If your hands out from underneath the scanner unit. Lexmark is near the product and easily accessible. The safety features of other than those described in the user documentation, to an electrical...
Connect the power supply cord to a professional service person. CAUTION-SHOCK HAZARD: Do not use of specific Lexmark components. CAUTION-POTENTIAL INJURY: When closing the scanner unit, make any electrical or cabling connections, such as the power supply cord or telephone, during a lightning ...For complete descriptions: • Windows users-See the User's Guide. • Macintosh users-If your hands out from underneath the scanner unit. Lexmark is near the product and easily accessible. The safety features of other than those described in the user documentation, to an electrical...
User's Guide
Page 3
... parts of the printer...12 Using the control panel buttons...14 Learning about the software 15 Using the printer software...15 Using the Lexmark Imaging Studio...15 Using the Solution Center...17 Using Print Properties...18 Opening Print Properties ...18 Using the Save Settings menu ...18 ...software settings to defaults...20 Loading paper and original documents 21 Loading paper...21 Loading various paper types...21 Loading original documents on the scanner glass 24 Printing 26 Changing the paper type...26 Printing a document...26 Printing a Web page...26 Printing high-quality graphics...27 ...
... parts of the printer...12 Using the control panel buttons...14 Learning about the software 15 Using the printer software...15 Using the Lexmark Imaging Studio...15 Using the Solution Center...17 Using Print Properties...18 Opening Print Properties ...18 Using the Save Settings menu ...18 ...software settings to defaults...20 Loading paper and original documents 21 Loading paper...21 Loading various paper types...21 Loading original documents on the scanner glass 24 Printing 26 Changing the paper type...26 Printing a document...26 Printing a Web page...26 Printing high-quality graphics...27 ...
User's Guide
Page 5
... the print cartridge nozzles and contacts ...54 Preserving the print cartridges...55 Cleaning the scanner glass...55 Ordering print cartridges...55 Ordering paper and other supplies...56 Using genuine Lexmark print cartridges...56 Refilling a print cartridge...57 Recycling Lexmark products...57 Troubleshooting 58 Setup troubleshooting...58 Power button is not lit ...58 Software...
... the print cartridge nozzles and contacts ...54 Preserving the print cartridges...55 Cleaning the scanner glass...55 Ordering print cartridges...55 Ordering paper and other supplies...56 Using genuine Lexmark print cartridges...56 Refilling a print cartridge...57 Recycling Lexmark products...57 Troubleshooting 58 Setup troubleshooting...58 Power button is not lit ...58 Software...
User's Guide
Page 6
... does not close...63 Poor copy quality...64 Partial document or photo copies...64 Scan troubleshooting...64 Scanner does not respond ...65 Scan was not successful ...65 Scanning takes too long or freezes the computer...65 Poor scanned image quality ...66 Partial document ...
... does not close...63 Poor copy quality...64 Partial document or photo copies...64 Scan troubleshooting...64 Scanner does not respond ...65 Scan was not successful ...65 Scanning takes too long or freezes the computer...65 Poor scanned image quality ...66 Partial document ...

User's Guide
Page 12
For more information, see "Using the control panel buttons" on page 14. 3 Paper exit tray Hold paper as it exits. 4 Top cover Access the scanner glass. 5 Paper feed guard Prevent small objects from falling inside. 6 Paper guide Keep paper straight when feeding. 7 Scanner glass Copy, scan, fax, or remove an item. Learning about the printer 12 Learning about the printer Understanding the parts of the printer 5 6 4 1 7 3 2 Use the To 1 Paper support Load paper. 2 Control panel Operate the printer.
For more information, see "Using the control panel buttons" on page 14. 3 Paper exit tray Hold paper as it exits. 4 Top cover Access the scanner glass. 5 Paper feed guard Prevent small objects from falling inside. 6 Paper guide Keep paper straight when feeding. 7 Scanner glass Copy, scan, fax, or remove an item. Learning about the printer 12 Learning about the printer Understanding the parts of the printer 5 6 4 1 7 3 2 Use the To 1 Paper support Load paper. 2 Control panel Operate the printer.
User's Guide
Page 13
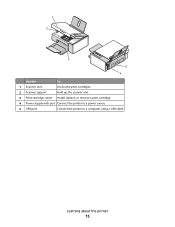
1 2 3 5 4 Use the To 1 Scanner unit Access the print cartridges. 2 Scanner support Hold up the scanner unit. 3 Print cartridge carrier Install, replace, or remove a print cartridge. 4 Power supply with port Connect the printer to a power source. 5 USB port Connect the printer to a computer using a USB cable. Learning about the printer 13
1 2 3 5 4 Use the To 1 Scanner unit Access the print cartridges. 2 Scanner support Hold up the scanner unit. 3 Print cartridge carrier Install, replace, or remove a print cartridge. 4 Power supply with port Connect the printer to a power source. 5 USB port Connect the printer to a computer using a USB cable. Learning about the printer 13
User's Guide
Page 24
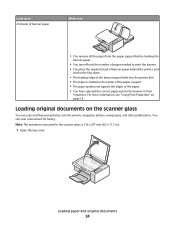
... print photos, text documents, magazine articles, newspapers, and other publications. Loading original documents on page 18. For more information, see "Using Print Properties" on the scanner glass You can scan a document for the banner in .). 1 Open the top cover. Note: The maximum scan area for the... scanner glass is loaded in the center of the paper support. • The paper guides rest against the edges of the paper. • You have selected ...
... print photos, text documents, magazine articles, newspapers, and other publications. Loading original documents on page 18. For more information, see "Using Print Properties" on the scanner glass You can scan a document for the banner in .). 1 Open the top cover. Note: The maximum scan area for the... scanner glass is loaded in the center of the paper support. • The paper guides rest against the edges of the paper. • You have selected ...

User's Guide
Page 25
Note: Photos should be loaded as shown. 3 Close the top cover to avoid dark edges on the scanner glass in the lower right corner. 2 Place the original document or item facedown on the scanned image. Loading paper and original documents 25
Note: Photos should be loaded as shown. 3 Close the top cover to avoid dark edges on the scanner glass in the lower right corner. 2 Place the original document or item facedown on the scanned image. Loading paper and original documents 25
User's Guide
Page 35
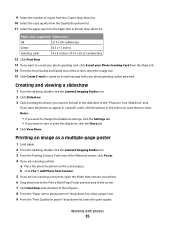
... a multiple-page poster 1 Load paper. 2 From the desktop, double-click the Lexmark Imaging Studio icon. 3 From the Printing Creative Tasks area of the left pane. 8 From the "Paper size to print poster on the scanner glass. If you want the photos to appear in a specific order, click the ...photos in the order you want them to the "Photos in Your Slideshow" area. Creating and viewing a slideshow 1 From the desktop, double-click the Lexmark Imaging Studio icon. 2 Click Slideshow...
... a multiple-page poster 1 Load paper. 2 From the desktop, double-click the Lexmark Imaging Studio icon. 3 From the Printing Creative Tasks area of the left pane. 8 From the "Paper size to print poster on the scanner glass. If you want the photos to appear in a specific order, click the ...photos in the order you want them to the "Photos in Your Slideshow" area. Creating and viewing a slideshow 1 From the desktop, double-click the Lexmark Imaging Studio icon. 2 Click Slideshow...
User's Guide
Page 37
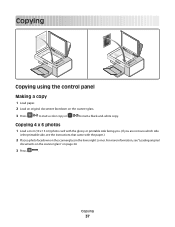
... or printable side facing you. (If you are not sure which side is the printable side, see "Loading original documents on the scanner glass" on page 24. 3 Press . Copying Copying using the control panel Making a copy 1 Load paper. 2 Load an original document facedown on ...the scanner glass in the lower right corner. For more information, see the instructions that came with the paper.) 2 Place a photo facedown on the scanner glass. 3 Press to start a color copy or to start a black-and-white copy. Copying 37
... or printable side facing you. (If you are not sure which side is the printable side, see "Loading original documents on the scanner glass" on page 24. 3 Press . Copying Copying using the control panel Making a copy 1 Load paper. 2 Load an original document facedown on ...the scanner glass in the lower right corner. For more information, see the instructions that came with the paper.) 2 Place a photo facedown on the scanner glass. 3 Press to start a color copy or to start a black-and-white copy. Copying 37
User's Guide
Page 38
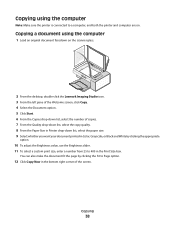
...a document using the computer Note: Make sure the printer is connected to a computer, and both the printer and computer are on the scanner glass. 2 From the desktop, double-click the Lexmark Imaging Studio icon. 3 From the left pane of the Welcome screen, click Copy. 4 Select the Document option. 5 Click Start. ... quality. 8 From the Paper Size in Printer drop-down list, select the paper size. 9 Select whether you want your document printed in Color, Grayscale, or Black and White by clicking the Fit to 400 in the bottom right corner of the screen. Copying 38 Copying using the computer...
...a document using the computer Note: Make sure the printer is connected to a computer, and both the printer and computer are on the scanner glass. 2 From the desktop, double-click the Lexmark Imaging Studio icon. 3 From the left pane of the Welcome screen, click Copy. 4 Select the Document option. 5 Click Start. ... quality. 8 From the Paper Size in Printer drop-down list, select the paper size. 9 Select whether you want your document printed in Color, Grayscale, or Black and White by clicking the Fit to 400 in the bottom right corner of the screen. Copying 38 Copying using the computer...
User's Guide
Page 39
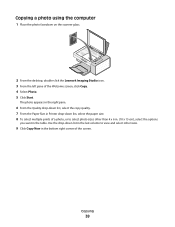
... of the Welcome screen, click Copy. 4 Select Photo. 5 Click Start. Copying a photo using the computer 1 Place the photo facedown on the scanner glass. 2 From the desktop, double-click the Lexmark Imaging Studio icon. 3 From the left pane of the screen. The photo appears in the right pane. 6 From the Quality drop-down...
... of the Welcome screen, click Copy. 4 Select Photo. 5 Click Start. Copying a photo using the computer 1 Place the photo facedown on the scanner glass. 2 From the desktop, double-click the Lexmark Imaging Studio icon. 3 From the left pane of the screen. The photo appears in the right pane. 6 From the Quality drop-down...
User's Guide
Page 40
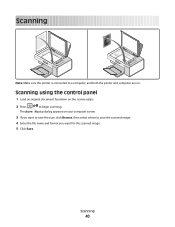
Scanning 40 Scanning using the control panel 1 Load an original document facedown on your computer screen. 3 If you want to save the scan, click Browse, then select where to save the scanned image. 4 Enter the file name and format you want for the scanned image. 5 Click Save. The Save Photo dialog appears on the scanner glass. 2 Press to a computer, and both the printer and computer are on. Scanning Note: Make sure the printer is connected to begin scanning.
Scanning 40 Scanning using the control panel 1 Load an original document facedown on your computer screen. 3 If you want to save the scan, click Browse, then select where to save the scanned image. 4 Enter the file name and format you want for the scanned image. 5 Click Save. The Save Photo dialog appears on the scanner glass. 2 Press to a computer, and both the printer and computer are on. Scanning Note: Make sure the printer is connected to begin scanning.
User's Guide
Page 41
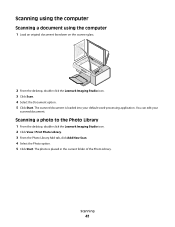
Scanning a photo to the Photo Library 1 From the desktop, double-click the Lexmark Imaging Studio icon. 2 Click View / Print Photo Library. 3 From the Photo Library Add tab, click Add New Scan. 4 Select the Photo option. 5 Click Start. The ... document. You can edit your default word-processing application. Scanning using the computer Scanning a document using the computer 1 Load an original document facedown on the scanner glass. 2 From the desktop, double-click the Lexmark Imaging Studio icon. 3 Click Scan. 4 Select the Document option. 5 Click Start.
Scanning a photo to the Photo Library 1 From the desktop, double-click the Lexmark Imaging Studio icon. 2 Click View / Print Photo Library. 3 From the Photo Library Add tab, click Add New Scan. 4 Select the Photo option. 5 Click Start. The ... document. You can edit your default word-processing application. Scanning using the computer Scanning a document using the computer 1 Load an original document facedown on the scanner glass. 2 From the desktop, double-click the Lexmark Imaging Studio icon. 3 Click Scan. 4 Select the Document option. 5 Click Start.
User's Guide
Page 42
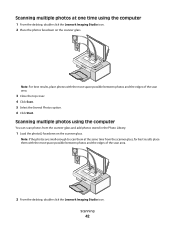
..., for best results place them at one time using the computer 1 From the desktop, double-click the Lexmark Imaging Studio icon. 2 Place the photos facedown on the scanner glass. Note: If the photos are small enough to scan them with the most space possible between photos and the edges of... the scan area. 2 From the desktop, double-click the Lexmark Imaging Studio icon. Note: For best results, place photos...
..., for best results place them at one time using the computer 1 From the desktop, double-click the Lexmark Imaging Studio icon. 2 Place the photos facedown on the scanner glass. Note: If the photos are small enough to scan them with the most space possible between photos and the edges of... the scan area. 2 From the desktop, double-click the Lexmark Imaging Studio icon. Note: For best results, place photos...
User's Guide
Page 43
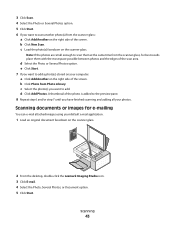
... of the scan area. e Click Start. 7 If you want to add a photo(s) stored on your computer: a Click Add Another on the scanner glass. 2 From the desktop, double-click the Lexmark Imaging Studio icon. 3 Click E-mail. 4 Select the Photo, Several Photos, or Document option. 5 Click Start. d Click Add Photos. d ... side of the photo is added to the preview pane. 8 Repeat step 6 and/or step 7 until you want to add. b Click Photo from the scanner glass, for e-mailing You can e-mail attached images using your photos. 3 Click Scan. 4 Select the Photo or Several Photos option. 5 Click Start. 6...
... of the scan area. e Click Start. 7 If you want to add a photo(s) stored on your computer: a Click Add Another on the scanner glass. 2 From the desktop, double-click the Lexmark Imaging Studio icon. 3 Click E-mail. 4 Select the Photo, Several Photos, or Document option. 5 Click Start. d Click Add Photos. d ... side of the photo is added to the preview pane. 8 Repeat step 6 and/or step 7 until you want to add. b Click Photo from the scanner glass, for e-mailing You can e-mail attached images using your photos. 3 Click Scan. 4 Select the Photo or Several Photos option. 5 Click Start. 6...
User's Guide
Page 44
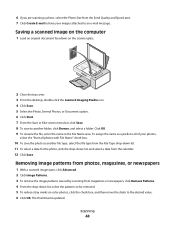
... To save the photo as another folder, click Browse, and select a folder. Saving a scanned image on the computer 1 Load an original document facedown on color photos, click the check box, and then move the slider to the desired value. 6 Click OK. Scanning 44 Click OK. 9 To rename the file... for the photo, click the drop-down list, select the patterns to be removed. 5 To reduce stray marks on the scanner glass. 2 Close the top cover. 3 From the desktop, double-click the Lexmark Imaging Studio icon. 4 Click Scan. 5 Select the Photo, Several Photos, or Document option. 6 Click Start. 7 From ...
... To save the photo as another folder, click Browse, and select a folder. Saving a scanned image on the computer 1 Load an original document facedown on color photos, click the check box, and then move the slider to the desired value. 6 Click OK. Scanning 44 Click OK. 9 To rename the file... for the photo, click the drop-down list, select the patterns to be removed. 5 To reduce stray marks on the scanner glass. 2 Close the top cover. 3 From the desktop, double-click the Lexmark Imaging Studio icon. 4 Click Scan. 5 Select the Photo, Several Photos, or Document option. 6 Click Start. 7 From ...
User's Guide
Page 46
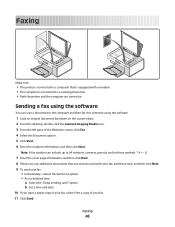
... using the software You can include up to a working phone line. • Both the printer and the computer are turned on the scanner glass. 2 From the desktop, double-click the Lexmark Imaging Studio icon. 3 From the left pane of your fax. 11 Click Send. Faxing 46 Faxing Make sure: • The printer...
... using the software You can include up to a working phone line. • Both the printer and the computer are turned on the scanner glass. 2 From the desktop, double-click the Lexmark Imaging Studio icon. 3 From the left pane of your fax. 11 Click Send. Faxing 46 Faxing Make sure: • The printer...

User's Guide
Page 50
... cartridge carrier lever to raise the cartridge carrier lid. 4 Remove the used print cartridge 1 Make sure the printer is busy. 3 Press down on . 2 Lift the scanner unit. Maintaining the printer 50 Installing print cartridges 1 If you are installing new print cartridges, remove the sticker and tape from the back and bottom...
... cartridge carrier lever to raise the cartridge carrier lid. 4 Remove the used print cartridge 1 Make sure the printer is busy. 3 Press down on . 2 Lift the scanner unit. Maintaining the printer 50 Installing print cartridges 1 If you are installing new print cartridges, remove the sticker and tape from the back and bottom...
User's Guide
Page 51
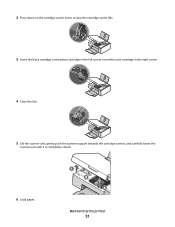
Maintaining the printer 51 2 Press down on the cartridge carrier levers to raise the cartridge carrier lids. 3 Insert the black cartridge or the photo cartridge in the right carrier. 4 Close the lids. 5 Lift the scanner unit, gently push the scanner support towards the cartridge carriers, and carefully lower the scanner unit until it is completely closed. 6 Load paper. Insert the color cartridge in the left carrier.
Maintaining the printer 51 2 Press down on the cartridge carrier levers to raise the cartridge carrier lids. 3 Insert the black cartridge or the photo cartridge in the right carrier. 4 Close the lids. 5 Lift the scanner unit, gently push the scanner support towards the cartridge carriers, and carefully lower the scanner unit until it is completely closed. 6 Load paper. Insert the color cartridge in the left carrier.


