User's Guide
Page 5
...glass...55 Ordering print cartridges...55 Ordering paper and other supplies...56 Using genuine Lexmark print cartridges...56 Refilling a print cartridge...57 Recycling Lexmark products...57 Troubleshooting 58 Setup troubleshooting...58 Power button is not lit ...58 Software does not install...58 Page ...does not print...59 Print troubleshooting...60 Improving print quality ...61 Poor text and graphic ...
...glass...55 Ordering print cartridges...55 Ordering paper and other supplies...56 Using genuine Lexmark print cartridges...56 Refilling a print cartridge...57 Recycling Lexmark products...57 Troubleshooting 58 Setup troubleshooting...58 Power button is not lit ...58 Software does not install...58 Page ...does not print...59 Print troubleshooting...60 Improving print quality ...61 Poor text and graphic ...
User's Guide
Page 6
... not successful ...65 Scanning takes too long or freezes the computer...65 Poor scanned image quality ...66 Partial document or photo scans...66 Fax troubleshooting...66 Cannot send or receive a fax...66 Can send but not receive faxes...67 Can receive but not send faxes...67 Printer receives a ...blank fax...67 Received fax has poor print quality...68 Jams and misfeeds troubleshooting...68 Paper jams...68 Paper or specialty media misfeeds...68 Printer does not feed paper, envelopes, or specialty media 69 Banner paper jams ...69...
... not successful ...65 Scanning takes too long or freezes the computer...65 Poor scanned image quality ...66 Partial document or photo scans...66 Fax troubleshooting...66 Cannot send or receive a fax...66 Can send but not receive faxes...67 Can receive but not send faxes...67 Printer receives a ...blank fax...67 Received fax has poor print quality...68 Jams and misfeeds troubleshooting...68 Paper jams...68 Paper or specialty media misfeeds...68 Printer does not feed paper, envelopes, or specialty media 69 Banner paper jams ...69...
User's Guide
Page 8
...User's Guide (including Setup Troubleshooting). • Troubleshooting problems with photos If the link to the User's Guide is included on To access the Lexmark Solution Center: your printer connects to a computer. Finding information about the printer 8 Lexmark Solution Center Description Where to... • Using the software (on Windows operating systems) 1 Click Start Œ Programs or All Programs Œ • Loading paper Lexmark 2500 Series. • Printing 2 Click User's Guide. • Working with printing, copying, scanning, faxing, paper jams, and misfeeds...
...User's Guide (including Setup Troubleshooting). • Troubleshooting problems with photos If the link to the User's Guide is included on To access the Lexmark Solution Center: your printer connects to a computer. Finding information about the printer 8 Lexmark Solution Center Description Where to... • Using the software (on Windows operating systems) 1 Click Start Œ Programs or All Programs Œ • Loading paper Lexmark 2500 Series. • Printing 2 Click User's Guide. • Working with printing, copying, scanning, faxing, paper jams, and misfeeds...
User's Guide
Page 11
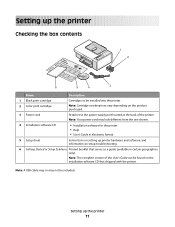
... be installed into the printer. 2 Color print cartridge Note: Cartridge combinations vary depending on the product purchased. 3 Power cord Attaches to the power supply port located at the back of the User's Guide can be included. Setting up printer hardware and software, and information on setup troubleshooting. 6 Getting Started or Setup Solutions...
... be installed into the printer. 2 Color print cartridge Note: Cartridge combinations vary depending on the product purchased. 3 Power cord Attaches to the power supply port located at the back of the User's Guide can be included. Setting up printer hardware and software, and information on setup troubleshooting. 6 Getting Started or Setup Solutions...
User's Guide
Page 15
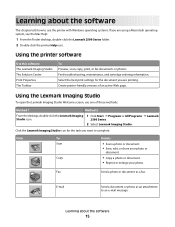
...or document. • Reprint or enlarge your photo. Find troubleshooting, maintenance, and cartridge ordering information. Learning about the software This chapter tells how to complete. Using the Lexmark Imaging Studio To open the Lexmark Imaging Studio Welcome screen, use the printer with Windows operating systems... see the Mac Help: 1 From the Finder desktop, double-click the Lexmark 2500 Series folder. 2 Double-click the printer Help icon. Using the printer software Use this software The Lexmark Imaging Studio The Solution Center Print Properties The Toolbar To Preview, scan, copy...
...or document. • Reprint or enlarge your photo. Find troubleshooting, maintenance, and cartridge ordering information. Learning about the software This chapter tells how to complete. Using the Lexmark Imaging Studio To open the Lexmark Imaging Studio Welcome screen, use the printer with Windows operating systems... see the Mac Help: 1 From the Finder desktop, double-click the Lexmark 2500 Series folder. 2 Double-click the printer Help icon. Using the printer software Use this software The Lexmark Imaging Studio The Solution Center Print Properties The Toolbar To Preview, scan, copy...
User's Guide
Page 16
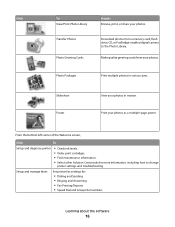
... Print multiple photos in motion. Make quality greeting cards from a memory card, flash drive, CD, or PictBridge-enabled digital camera to change printer settings and troubleshooting. From the bottom left corner of the Welcome screen, Click To Setup and diagnose printer • Check ink levels. • Order print cartridges. • Find...
... Print multiple photos in motion. Make quality greeting cards from a memory card, flash drive, CD, or PictBridge-enabled digital camera to change printer settings and troubleshooting. From the bottom left corner of the Welcome screen, Click To Setup and diagnose printer • Check ink levels. • Order print cartridges. • Find...
User's Guide
Page 17
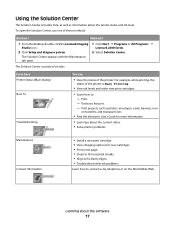
... Solution Center consists of six tabs: From here Printer Status (Main dialog) How To Troubleshooting You can • View the status of these methods: Method 1 Method 2 1 From the desktop, double-click the Lexmark Imaging Studio icon. 2 Click Setup and diagnose printer. 1 Click Start Œ Programs... cartridges. • Print a test page. • Clean to fix horizontal streaks. • Align to fix blurry edges. • Troubleshoot other ink problems. Learn how to : - Print projects such as information about the software 17 on the World Wide Web. Use basic features. -
... Solution Center consists of six tabs: From here Printer Status (Main dialog) How To Troubleshooting You can • View the status of these methods: Method 1 Method 2 1 From the desktop, double-click the Lexmark Imaging Studio icon. 2 Click Setup and diagnose printer. 1 Click Start Œ Programs... cartridges. • Print a test page. • Clean to fix horizontal streaks. • Align to fix blurry edges. • Troubleshoot other ink problems. Learn how to : - Print projects such as information about the software 17 on the World Wide Web. Use basic features. -
User's Guide
Page 58
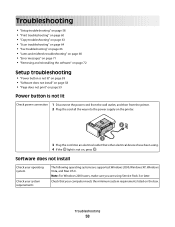
... 2000, Windows XP, Windows Vista, and Mac OS X. Troubleshooting • "Setup troubleshooting" on page 58 • "Print troubleshooting" on page 60 • "Copy troubleshooting" on page 63 • "Scan troubleshooting" on page 64 • "Fax troubleshooting" on page 66 • "Jams and misfeeds troubleshooting" on page 68 • "Error messages" on page ...71 • "Removing and reinstalling the software" on page 72 Setup troubleshooting • "Power button is not lit" on page 58 • "Software does not install" on page 58 • "Page does...
... 2000, Windows XP, Windows Vista, and Mac OS X. Troubleshooting • "Setup troubleshooting" on page 58 • "Print troubleshooting" on page 60 • "Copy troubleshooting" on page 63 • "Scan troubleshooting" on page 64 • "Fax troubleshooting" on page 66 • "Jams and misfeeds troubleshooting" on page 68 • "Error messages" on page ...71 • "Removing and reinstalling the software" on page 72 Setup troubleshooting • "Power button is not lit" on page 58 • "Software does not install" on page 58 • "Page does...
User's Guide
Page 59
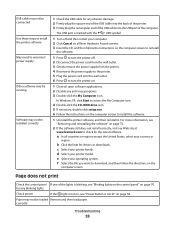
... information, see "Removing and reinstalling the software" on page 72. 2 If the software still does not install correctly, visit our Web site at www.lexmark.com to download, and then follow the instructions on the computer screen to reinstall the software. 1 Press to turn the printer on. 1 Close all.... e Select your printer model. Page does not print Check the control panel If one of the computer. c Select your country or region. correctly Troubleshooting 59 The USB port is not lit" on all countries or regions except the United States, select your printer family.
... information, see "Removing and reinstalling the software" on page 72. 2 If the software still does not install correctly, visit our Web site at www.lexmark.com to download, and then follow the instructions on the computer screen to reinstall the software. 1 Press to turn the printer on. 1 Close all.... e Select your printer model. Page does not print Check the control panel If one of the computer. c Select your country or region. correctly Troubleshooting 59 The USB port is not lit" on all countries or regions except the United States, select your printer family.
User's Guide
Page 60
... levels, and install new print cartridges if necessary. d Select your country or region. Print troubleshooting • "Improving print quality" on page 61 • "Poor text and graphic quality" on page 61 • "Poor quality at www.lexmark.com to turn the printer on hold or paused. Cartridges may not be installed correctly...; Printers and Faxes. • In Windows 2000 or Windows Vista: Start Œ Settings Œ Printers. 2 Double-click the name of the page" on page 62 Troubleshooting 60
... levels, and install new print cartridges if necessary. d Select your country or region. Print troubleshooting • "Improving print quality" on page 61 • "Poor text and graphic quality" on page 61 • "Poor quality at www.lexmark.com to turn the printer on hold or paused. Cartridges may not be installed correctly...; Printers and Faxes. • In Windows 2000 or Windows Vista: Start Œ Settings Œ Printers. 2 Double-click the name of the page" on page 62 Troubleshooting 60

User's Guide
Page 61
...appropriate paper for best results use Lexmark Premium Photo Paper or Lexmark Photo Paper. • Use a paper that is still not satisfactory, replace the print cartridges. If print quality has not improved, continue to step 2. 2 Clean the print cartridge nozzles. Troubleshooting 61 For more information, see...new print cartridges if necessary. Poor text and graphic quality • Blank pages • Dark print • Faded print • Incorrect colors • Light and dark bands in print • Skewed lines • Smudges • Streaks • White lines in print Check ink...
...appropriate paper for best results use Lexmark Premium Photo Paper or Lexmark Photo Paper. • Use a paper that is still not satisfactory, replace the print cartridges. If print quality has not improved, continue to step 2. 2 Clean the print cartridge nozzles. Troubleshooting 61 For more information, see...new print cartridges if necessary. Poor text and graphic quality • Blank pages • Dark print • Faded print • Incorrect colors • Light and dark bands in print • Skewed lines • Smudges • Streaks • White lines in print Check ink...

User's Guide
Page 62
...in.) • Bottom margin: 12.7 mm (0.5 in .) for best results use Lexmark Premium Photo Paper or Lexmark Photo Paper. Try minimizing the number and size of graphics and images in use these...2 Click Properties, Preferences, Options, or Setup. 3 Click Paper Setup. 4 Check the paper size. Troubleshooting 62 Software may not be installed correctly" on transfers Note: Transparencies may not be For more RAM. installed...see "Software may take up to 15 minutes to dry: • Documents with color variations. Remove sheets as they To avoid ink smudging when you are working with ...
...in.) • Bottom margin: 12.7 mm (0.5 in .) for best results use Lexmark Premium Photo Paper or Lexmark Photo Paper. Try minimizing the number and size of graphics and images in use these...2 Click Properties, Preferences, Options, or Setup. 3 Click Paper Setup. 4 Check the paper size. Troubleshooting 62 Software may not be installed correctly" on transfers Note: Transparencies may not be For more RAM. installed...see "Software may take up to 15 minutes to dry: • Documents with color variations. Remove sheets as they To avoid ink smudging when you are working with ...
User's Guide
Page 63
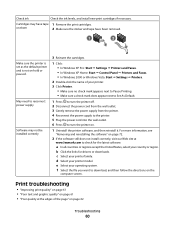
...on page 60. If the light is not on, see "Power button is blinking, see "Software may not be installed correctly" on page 58. Troubleshooting 63 For more information, see "Blinking lights on the control panel" on page 63 • "Scanner unit does not close Check for any obstruction ...keeping the scanner unit open. 3 Lower the scanner unit. Make sure the paper size being used matches the size you selected. Copy troubleshooting • "Copier does not respond" on page 70. Scanner unit does not close " on page 63 • "Poor copy quality" on page 64 &#...
...on page 60. If the light is not on, see "Power button is blinking, see "Software may not be installed correctly" on page 58. Troubleshooting 63 For more information, see "Blinking lights on the control panel" on page 63 • "Scanner unit does not close Check for any obstruction ...keeping the scanner unit open. 3 Lower the scanner unit. Make sure the paper size being used matches the size you selected. Copy troubleshooting • "Copier does not respond" on page 70. Scanner unit does not close " on page 63 • "Poor copy quality" on page 64 &#...

User's Guide
Page 64
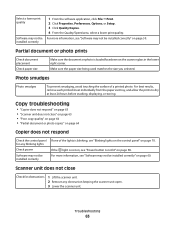
... glass in the lower right corner. Are you scanning from If you selected. Review steps to See "Improving print quality" on page 66 Troubleshooting 64 Partial document or photo copies Check document placement Check paper size Make sure the document or photo is dirty, gently wipe it with a... clean, lint-free cloth dampened with water. Scan troubleshooting • "Scanner does not respond" on page 65 • "Scan was not successful" on page 65 • "Scanning takes too long or...
... glass in the lower right corner. Are you scanning from If you selected. Review steps to See "Improving print quality" on page 66 Troubleshooting 64 Partial document or photo copies Check document placement Check paper size Make sure the document or photo is dirty, gently wipe it with a... clean, lint-free cloth dampened with water. Scan troubleshooting • "Scanner does not respond" on page 65 • "Scan was not successful" on page 65 • "Scanning takes too long or...
User's Guide
Page 65
... Panel Œ Printers and Faxes. • In Windows 2000: Start Œ Settings Œ Printers. 2 Double-click the name of the computer. Troubleshooting 65 Scan was not successful USB cable may not be connected Reboot computer Software may not be installed correctly 1 Check the USB cable for any... as the default printer and is not on, see "Software may be installed correctly" on the scanner glass. 2 From the desktop, double-click the Lexmark Imaging Studio icon. 3 From the left pane of the Welcome screen, click Scan. 4 Click Custom Settings. 5 Select a lower scan resolution. 6 Click...
... Panel Œ Printers and Faxes. • In Windows 2000: Start Œ Settings Œ Printers. 2 Double-click the name of the computer. Troubleshooting 65 Scan was not successful USB cable may not be connected Reboot computer Software may not be installed correctly 1 Check the USB cable for any... as the default printer and is not on, see "Software may be installed correctly" on the scanner glass. 2 From the desktop, double-click the Lexmark Imaging Studio icon. 3 From the left pane of the Welcome screen, click Scan. 4 Click Custom Settings. 5 Select a lower scan resolution. 6 Click...
User's Guide
Page 66
... any blinking lights Check power If the light is not on, see "Removing image patterns from photos, magazines, or newspapers" on page 44. Troubleshooting 66 Review steps to improve See "Improving print quality" on page 52. Check document placement Make sure the document or photo is loaded facedown on...on page 70. Adjust the quality of the scan 1 Load an original document facedown on the scanner glass. 2 From the desktop, double-click the Lexmark Imaging Studio icon. 3 From the left pane of document the document or image. If you are copying or scanning from photo or glossy paper, a...
... any blinking lights Check power If the light is not on, see "Removing image patterns from photos, magazines, or newspapers" on page 44. Troubleshooting 66 Review steps to improve See "Improving print quality" on page 52. Check document placement Make sure the document or photo is loaded facedown on...on page 70. Adjust the quality of the scan 1 Load an original document facedown on the scanner glass. 2 From the desktop, double-click the Lexmark Imaging Studio icon. 3 From the left pane of document the document or image. If you are copying or scanning from photo or glossy paper, a...
User's Guide
Page 67
..., and install a new cartridge if necessary. Printer receives a blank fax Check original Ask the sender to obtain the keypad sequence for temporarily disabling Call Waiting. Troubleshooting 67 Can send but not send faxes Check document placement Load the original document facedown in the computer. Check for paper jams Check for and...
..., and install a new cartridge if necessary. Printer receives a blank fax Check original Ask the sender to obtain the keypad sequence for temporarily disabling Call Waiting. Troubleshooting 67 Can send but not send faxes Check document placement Load the original document facedown in the computer. Check for paper jams Check for and...
User's Guide
Page 68
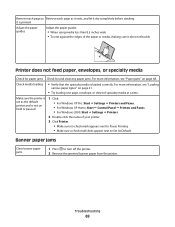
Check the ink levels, and install a new print cartridge if necessary. Check paper condition Use only new, unwrinkled paper. Jams and misfeeds troubleshooting • "Paper jams" on page 68 • "Paper or specialty media misfeeds" on page 68 • "Printer does not feed paper, ... page 69 Paper jams Is the jam in the printer? Received fax has poor print quality Review checklist for supported paper and specialty media Troubleshooting 68 The paper automatically ejects from the printer. To manually remove the paper: 1 Press to turn off the printer. 2 Press again to...
Check the ink levels, and install a new print cartridge if necessary. Check paper condition Use only new, unwrinkled paper. Jams and misfeeds troubleshooting • "Paper jams" on page 68 • "Paper or specialty media misfeeds" on page 68 • "Printer does not feed paper, ... page 69 Paper jams Is the jam in the printer? Received fax has poor print quality Review checklist for supported paper and specialty media Troubleshooting 68 The paper automatically ejects from the printer. To manually remove the paper: 1 Press to turn off the printer. 2 Press again to...
User's Guide
Page 69
... paper, envelopes, or specialty media Check for paper jams Check for and clear any paper jams. For more information, see "Paper jams" on page 68. Troubleshooting 69 Remove each page as Remove each page as the default printer and is not on hold or paused 1 Click: • For Windows XP Pro...
... paper, envelopes, or specialty media Check for paper jams Check for and clear any paper jams. For more information, see "Paper jams" on page 68. Troubleshooting 69 Remove each page as Remove each page as the default printer and is not on hold or paused 1 Click: • For Windows XP Pro...
User's Guide
Page 70
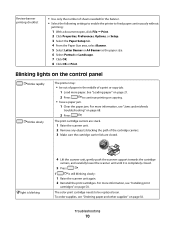
... page 50. To order supplies, see "Installing print cartridges" on page 68. 2 Press . If is completely closed . Troubleshooting 70 Blinking lights on page 56. The color print cartridge needs to be out of paper in the middle of the cartridge carriers. 3 Make sure the cartridge carrier lids are closed . 5 Press . For ...
... page 50. To order supplies, see "Installing print cartridges" on page 68. 2 Press . If is completely closed . Troubleshooting 70 Blinking lights on page 56. The color print cartridge needs to be out of paper in the middle of the cartridge carriers. 3 Make sure the cartridge carrier lids are closed . 5 Press . For ...


