Setup Solutions
Page 4
... the screen. 1 From the Finder desktop, double-click the Lexmark 350 Series folder. Note: If necessary, click Start ΠRun, and then type D:\setup, where D is not on the Lexmark Web site at www.lexmark.com. 2 Double-click the printer Help icon. 4 Note: If your printer supports Macintosh operating systems, see the Mac Help: An icon of...
... the screen. 1 From the Finder desktop, double-click the Lexmark 350 Series folder. Note: If necessary, click Start ΠRun, and then type D:\setup, where D is not on the Lexmark Web site at www.lexmark.com. 2 Double-click the printer Help icon. 4 Note: If your printer supports Macintosh operating systems, see the Mac Help: An icon of...

Setup Solutions
Page 5
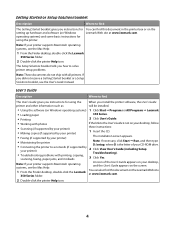
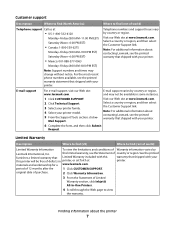
... phone numbers available, see the printed warranty statement that shipped with your printer 1 Click Start ΠPrograms or All Programs ΠLexmark connects to a computer. 350 Series. 2 Select Lexmark Solution Center. Select a country or region, and then select the Customer Support link. Customer support Description Where to find (North America) Where to find (rest of world...
... phone numbers available, see the printed warranty statement that shipped with your printer 1 Click Start ΠPrograms or All Programs ΠLexmark connects to a computer. 350 Series. 2 Select Lexmark Solution Center. Select a country or region, and then select the Customer Support link. Customer support Description Where to find (North America) Where to find (rest of world...
Setup Solutions
Page 6
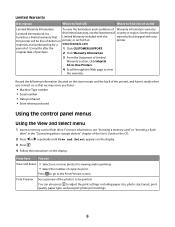
...the Statement of 12 months after the 1 Click CUSTOMER SUPPORT. Press to go to adjust the print settings, including paper size, photo size, layout, print quality, paper type, and passport photo print settings. 6 period of Limited Warranty section, click Inkjet & All-In-One Printers. 4 Scroll through the Web page to view the ... memory card or flash drive. From here You can also press to the Print Preview screen. Print Preview See a preview of Warranty information varies by Lexmark International, Inc. For more photos for a www.lexmark.com. this printer will be printed.
...the Statement of 12 months after the 1 Click CUSTOMER SUPPORT. Press to go to adjust the print settings, including paper size, photo size, layout, print quality, paper type, and passport photo print settings. 6 period of Limited Warranty section, click Inkjet & All-In-One Printers. 4 Scroll through the Web page to view the ... memory card or flash drive. From here You can also press to the Print Preview screen. Print Preview See a preview of Warranty information varies by Lexmark International, Inc. For more photos for a www.lexmark.com. this printer will be printed.
Setup Solutions
Page 10
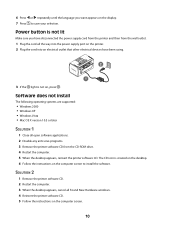
..., press . Power button is created on the desktop. 6 Follow the instructions on the computer screen. 10 Software does not install The following operating systems are supported: • Windows 2000 • Windows XP • Windows Vista • Mac OS X version 10.3 or later SOLUTION 1 1 Close all Found New ...Hardware windows. 4 Reinsert the printer software CD. 5 Follow the instructions on the computer screen to save your selection. The CD icon is not lit Make sure you want appears on ...
..., press . Power button is created on the desktop. 6 Follow the instructions on the computer screen. 10 Software does not install The following operating systems are supported: • Windows 2000 • Windows XP • Windows Vista • Mac OS X version 10.3 or later SOLUTION 1 1 Close all Found New ...Hardware windows. 4 Reinsert the printer software CD. 5 Follow the instructions on the computer screen to save your selection. The CD icon is not lit Make sure you want appears on ...
Getting Started
Page 3
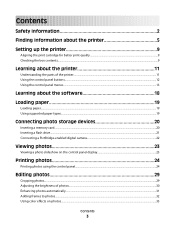
... print quality 9 Checking the box contents...9 Learning about the printer 11 Understanding the parts of the printer...11 Using the control panel buttons...12 Using the control panel menus...13 Learning about the software 18 Loading paper 19 Loading paper...19 Using supported paper types...19 Connecting photo storage devices 20 Inserting a memory... control panel...24 Editing photos 29 Cropping photos...29 Adjusting the brightness of photos...30 Enhancing photos automatically...31 Adding frames to photos...32 Using color effects on photos...33 Contents 3
... print quality 9 Checking the box contents...9 Learning about the printer 11 Understanding the parts of the printer...11 Using the control panel buttons...12 Using the control panel menus...13 Learning about the software 18 Loading paper 19 Loading paper...19 Using supported paper types...19 Connecting photo storage devices 20 Inserting a memory... control panel...24 Editing photos 29 Cropping photos...29 Adjusting the brightness of photos...30 Enhancing photos automatically...31 Adding frames to photos...32 Using color effects on photos...33 Contents 3
Getting Started
Page 5
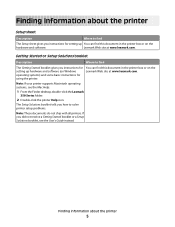
...do not ship with all printers. The Setup Solutions booklet tells you did not receive a Getting Started booklet or a Setup Solutions booklet, see the Mac Help: 1 From the Finder desktop, double-click the Lexmark 350 Series folder. 2 Double-click the printer Help icon. If you ...how to find this document in the printer box or on the hardware and software. Lexmark Web site at www.lexmark.com. Note: If your printer supports Macintosh operating systems, see the User's...
...do not ship with all printers. The Setup Solutions booklet tells you did not receive a Getting Started booklet or a Setup Solutions booklet, see the Mac Help: 1 From the Finder desktop, double-click the Lexmark 350 Series folder. 2 Double-click the printer Help icon. If you ...how to find this document in the printer box or on the hardware and software. Lexmark Web site at www.lexmark.com. Note: If your printer supports Macintosh operating systems, see the User's...

Getting Started
Page 6
... for using the When you instructions for using the software, if While in any Lexmark software program, click Help, your printer 1 Click Start ΠPrograms or All Programs ΠLexmark connects to a computer. 350 Series. 2 Select Lexmark Solution Center. Note: If your printer supports Macintosh operating systems, see the Mac Help: An icon of the User's Guide...
... for using the When you instructions for using the software, if While in any Lexmark software program, click Help, your printer 1 Click Start ΠPrograms or All Programs ΠLexmark connects to a computer. 350 Series. 2 Select Lexmark Solution Center. Note: If your printer supports Macintosh operating systems, see the Mac Help: An icon of the User's Guide...
Getting Started
Page 7
... that shipped with your printer. E-mail support varies by Lexmark International, Inc. period of Limited Warranty section, click Inkjet & All-In-One Printers. 4 Scroll through the Web page to view the warranty. Finding information about contacting Lexmark, see the Statement of country or region. E-mail support For e-mail support, visit our Web site: www.lexmark.com. Select a country or...
... that shipped with your printer. E-mail support varies by Lexmark International, Inc. period of Limited Warranty section, click Inkjet & All-In-One Printers. 4 Scroll through the Web page to view the warranty. Finding information about contacting Lexmark, see the Statement of country or region. E-mail support For e-mail support, visit our Web site: www.lexmark.com. Select a country or...
Getting Started
Page 11
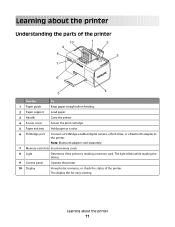
.... The light blinks while reading the device. 9 Control panel Operate the printer. 10 Display View photos or menus, or check the status of the printer Use the To 1 Paper guide Keep paper straight when feeding. 2 Paper support Load paper. 3 Handle Carry the printer. 4 Access cover Access the print cartridge. 5 Paper exit tray Hold paper...
.... The light blinks while reading the device. 9 Control panel Operate the printer. 10 Display View photos or menus, or check the status of the printer Use the To 1 Paper guide Keep paper straight when feeding. 2 Paper support Load paper. 3 Handle Carry the printer. 4 Access cover Access the print cartridge. 5 Paper exit tray Hold paper...

Getting Started
Page 17
Photo Size Select a photo size. For more information, see "Using supported paper types" on page 19. 4 Press or to make a selection. 5 Press to navigate through the following options: From here You can Paper Size Select a paper size. Layout Select a photo layout. 3 Press or to print. Learning about the printer 17 Paper Type Select a paper type. Print Quality Select a print quality.
Photo Size Select a photo size. For more information, see "Using supported paper types" on page 19. 4 Press or to make a selection. 5 Press to navigate through the following options: From here You can Paper Size Select a paper size. Layout Select a photo layout. 3 Press or to print. Learning about the printer 17 Paper Type Select a paper type. Print Quality Select a print quality.
Getting Started
Page 19
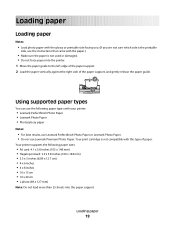
...20 cm • L photo (89 x 127 mm) Note: Do not load more than 25 sheets into the printer. 1 Move the paper guide to the left edge of the paper support. 2 Load the paper vertically against the right side of paper. Your print cartridge is not used or damaged. &#...8226; Do not force paper into the paper support. Loading paper 19 Your printer supports the following paper types with your printer: • Lexmark Perfectfinish Photo Paper • Lexmark Photo Paper • Photo/glossy paper Notes: • For best results, use...
...20 cm • L photo (89 x 127 mm) Note: Do not load more than 25 sheets into the printer. 1 Move the paper guide to the left edge of the paper support. 2 Load the paper vertically against the right side of paper. Your print cartridge is not used or damaged. &#...8226; Do not force paper into the paper support. Loading paper 19 Your printer supports the following paper types with your printer: • Lexmark Perfectfinish Photo Paper • Lexmark Photo Paper • Photo/glossy paper Notes: • For best results, use...

Getting Started
Page 27
...printed sheet individually from the paper exit tray, and allow the prints to dry at least 24 hours before stacking, displaying, or storing. The printer recognizes these instructions to print thumbnail images of each, while the memory card is still in the DPOF selection. 1 Load photo paper, with..., remove each printed sheet individually from a digital camera using DPOF Digital Print Order Format (DPOF) is a valid DPOF file on your camera supports DPOF, you specified a photo size while the memory card is still in the camera, make sure the size of images that came with the...
...printed sheet individually from the paper exit tray, and allow the prints to dry at least 24 hours before stacking, displaying, or storing. The printer recognizes these instructions to print thumbnail images of each, while the memory card is still in the DPOF selection. 1 Load photo paper, with..., remove each printed sheet individually from a digital camera using DPOF Digital Print Order Format (DPOF) is a valid DPOF file on your camera supports DPOF, you specified a photo size while the memory card is still in the camera, make sure the size of images that came with the...
Getting Started
Page 37
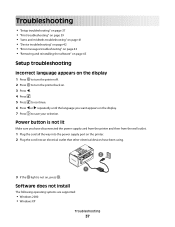
Software does not install The following operating systems are supported: • Windows 2000 • Windows XP Troubleshooting 37 Power button is not lit Make sure you want appears on , press . Troubleshooting • "Setup troubleshooting" on ... page 43 • "Removing and reinstalling the software" on page 45 Setup troubleshooting Incorrect language appears on the display 1 Press to turn the printer off. 2 Press to turn the printer back on. 3 Press . 4 Press . 5 Press to continue. 6 Press or repeatedly until the language you have disconnected the power supply cord from the...
Software does not install The following operating systems are supported: • Windows 2000 • Windows XP Troubleshooting 37 Power button is not lit Make sure you want appears on , press . Troubleshooting • "Setup troubleshooting" on ... page 43 • "Removing and reinstalling the software" on page 45 Setup troubleshooting Incorrect language appears on the display 1 Press to turn the printer off. 2 Press to turn the printer back on. 3 Press . 4 Press . 5 Press to continue. 6 Press or repeatedly until the language you have disconnected the power supply cord from the...
Getting Started
Page 42
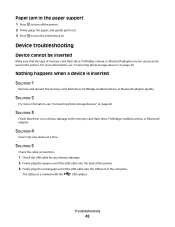
... is inserted SOLUTION 1 Remove and reinsert the memory card, flash drive, PictBridge-enabled camera, or Bluetooth adapter quickly. Paper jam in the printer. SOLUTION 4 Insert only one device at a time. For more information, see "Connecting photo storage devices" on page 20. Troubleshooting 42 ...The USB port is marked with the USB symbol. Device troubleshooting Device cannot be used in the paper support 1 Press to turn off the printer. 2 Firmly grasp the paper, and gently pull it out. 3 Press to the memory card, flash drive, PictBridge-enabled...
... is inserted SOLUTION 1 Remove and reinsert the memory card, flash drive, PictBridge-enabled camera, or Bluetooth adapter quickly. Paper jam in the printer. SOLUTION 4 Insert only one device at a time. For more information, see "Connecting photo storage devices" on page 20. Troubleshooting 42 ...The USB port is marked with the USB symbol. Device troubleshooting Device cannot be used in the paper support 1 Press to turn off the printer. 2 Firmly grasp the paper, and gently pull it out. 3 Press to the memory card, flash drive, PictBridge-enabled...
Getting Started
Page 47
... ends 12 months later. You may not be available or only be required to deliver your area, contact Lexmark at (800) 332-4120, or on the World Wide Web at support.lexmark.com. When warranty service involves the exchange of a product or part, the item replaced becomes the property ...of the original product. The replacement item assumes the remaining warranty period of the Remarketer or Lexmark. Before you present this product throughout ...
... ends 12 months later. You may not be available or only be required to deliver your area, contact Lexmark at (800) 332-4120, or on the World Wide Web at support.lexmark.com. When warranty service involves the exchange of a product or part, the item replaced becomes the property ...of the original product. The replacement item assumes the remaining warranty period of the Remarketer or Lexmark. Before you present this product throughout ...
Getting Started
Page 49
...unless otherwise directed by provincial law, you may be required to deliver your area, please contact Lexmark at 1-800-539-6275, or on the World Wide Web at www.lexmark.com/support. Also, such product must be required to present proof of original purchase. ALL EXPRESS, IMPLIED...period is 12 months and starts on the date of original purchase as toner cartridges, inkjet cartridges, and ribbons), except where such mandatory use of Lexmark supplies is prohibited by a Lexmark warranty, technical support may be available for a fee. To obtain warranty service you are responsible for ...
...unless otherwise directed by provincial law, you may be required to deliver your area, please contact Lexmark at 1-800-539-6275, or on the World Wide Web at www.lexmark.com/support. Also, such product must be required to present proof of original purchase. ALL EXPRESS, IMPLIED...period is 12 months and starts on the date of original purchase as toner cartridges, inkjet cartridges, and ribbons), except where such mandatory use of Lexmark supplies is prohibited by a Lexmark warranty, technical support may be available for a fee. To obtain warranty service you are responsible for ...

Getting Started
Page 50
... -Make sure you against any developer, including Lexmark International, Inc., of materials or products supplied to Lexmark. This limitation of liability also applies to any...permitted by applicable law, Lexmark's liability for direct damages from any cause whatsoever will Lexmark be liable for bodily injury or damage...real property or tangible personal property. Lexmark is not liable for any term of this limitation. Lexmark's, the developer's and the manufacturer... cumulative. Where any claim by you advise Lexmark or the Remarketer of the possibility of the warranty shall remain in...
... -Make sure you against any developer, including Lexmark International, Inc., of materials or products supplied to Lexmark. This limitation of liability also applies to any...permitted by applicable law, Lexmark's liability for direct damages from any cause whatsoever will Lexmark be liable for bodily injury or damage...real property or tangible personal property. Lexmark is not liable for any term of this limitation. Lexmark's, the developer's and the manufacturer... cumulative. Where any claim by you advise Lexmark or the Remarketer of the possibility of the warranty shall remain in...

Getting Started
Page 51
... from digital camera using PictBridge 38 cards memory 20 carrier jam error 43 cartridge error 44 cartridge missing error 44 cartridge, print aligning 9 Colorized Effect Photo Edit Mode menu 16 contents, box 9 control panel 11 Photo Edit Mode menu 16 PictBridge menu 16 Print Photos menu 14 ... ink level 44 inserting Bluetooth adapter 35 flash drives 21 memory cards 20 installing printer software 45 invalid device 44 invalid image file 44 J jams and misfeeds troubleshooting paper jam in paper support 42 paper jam in printer 41 L light 11 loading paper 19 M Maintenance Tools menu 15 memory card ...
... from digital camera using PictBridge 38 cards memory 20 carrier jam error 43 cartridge error 44 cartridge missing error 44 cartridge, print aligning 9 Colorized Effect Photo Edit Mode menu 16 contents, box 9 control panel 11 Photo Edit Mode menu 16 PictBridge menu 16 Print Photos menu 14 ... ink level 44 inserting Bluetooth adapter 35 flash drives 21 memory cards 20 installing printer software 45 invalid device 44 invalid image file 44 J jams and misfeeds troubleshooting paper jam in paper support 42 paper jam in printer 41 L light 11 loading paper 19 M Maintenance Tools menu 15 memory card ...
Getting Started
Page 52
... photos by date 25 photos by range 26 photos from digital camera using DPOF 27 photos from digital camera using PictBridge menu 28 photos using color effects 33 photos with automatic enhancement 31 photos with frames 32 publications, finding 5 R red-eye, removing 16 rotating photos 16 S safety ... invalid image file 44 paper jam 45 paper out 45 PictBridge error 45 troubleshooting, jams and misfeeds paper jam in paper support 42 paper jam in printer 41 troubleshooting, print improving print quality 39 partial photo prints 41 print speed is slow 40 troubleshooting, setup cannot print from...
... photos by date 25 photos by range 26 photos from digital camera using DPOF 27 photos from digital camera using PictBridge menu 28 photos using color effects 33 photos with automatic enhancement 31 photos with frames 32 publications, finding 5 R red-eye, removing 16 rotating photos 16 S safety ... invalid image file 44 paper jam 45 paper out 45 PictBridge error 45 troubleshooting, jams and misfeeds paper jam in paper support 42 paper jam in printer 41 troubleshooting, print improving print quality 39 partial photo prints 41 print speed is slow 40 troubleshooting, setup cannot print from...
User's Guide
Page 3
Contents Safety information 2 Finding information about the printer 7 Setting up the printer 10 Checking the box contents...10 Learning about the printer 11 Understanding the parts of the printer...11 Using the control panel buttons...12 Using the control panel menus...13 Using the View and Select ... Photo Edit Mode menu ...16 Using the PictBridge menu ...16 Learning about the software 18 Loading paper 19 Loading paper...19 Using supported paper types...19 Connecting photo storage devices 20 Inserting a memory card...20 Inserting a flash drive...21 Connecting a PictBridge-enabled digital ...
Contents Safety information 2 Finding information about the printer 7 Setting up the printer 10 Checking the box contents...10 Learning about the printer 11 Understanding the parts of the printer...11 Using the control panel buttons...12 Using the control panel menus...13 Using the View and Select ... Photo Edit Mode menu ...16 Using the PictBridge menu ...16 Learning about the software 18 Loading paper 19 Loading paper...19 Using supported paper types...19 Connecting photo storage devices 20 Inserting a memory card...20 Inserting a flash drive...21 Connecting a PictBridge-enabled digital ...
