User's Guide
Page 3
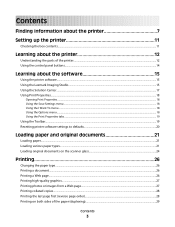
... parts of the printer...12 Using the control panel buttons...14 Learning about the software 15 Using the printer software...15 Using the Lexmark Imaging Studio...15 Using the Solution Center...17 Using Print Properties...18 Opening Print Properties ...18 Using the Save Settings menu ...18 Using the I Want To menu ...18 Using the Options menu...18 Using the Print Properties tabs ...19 Using the Toolbar...19 Resetting printer software settings to defaults...20 Loading paper and original documents 21 Loading paper...21 Loading various paper types...21 Loading original documents on the scanner...
... parts of the printer...12 Using the control panel buttons...14 Learning about the software 15 Using the printer software...15 Using the Lexmark Imaging Studio...15 Using the Solution Center...17 Using Print Properties...18 Opening Print Properties ...18 Using the Save Settings menu ...18 Using the I Want To menu ...18 Using the Options menu...18 Using the Print Properties tabs ...19 Using the Toolbar...19 Resetting printer software settings to defaults...20 Loading paper and original documents 21 Loading paper...21 Loading various paper types...21 Loading original documents on the scanner...
User's Guide
Page 7
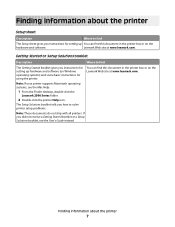
... hardware and software. Note: If your printer supports Macintosh operating systems, see the User's Guide instead. Finding information about the printer Setup sheet Description Where to solve printer setup problems. Note: These documents do not ship with all printers. Lexmark Web site at www.lexmark.com. The Setup Solutions booklet tells you instructions for using the printer. If you instructions for setting up hardware and software (on Windows operating systems) and some basic instructions for setting up You...
... hardware and software. Note: If your printer supports Macintosh operating systems, see the User's Guide instead. Finding information about the printer Setup sheet Description Where to solve printer setup problems. Note: These documents do not ship with all printers. Lexmark Web site at www.lexmark.com. The Setup Solutions booklet tells you instructions for using the printer. If you instructions for setting up hardware and software (on Windows operating systems) and some basic instructions for setting up You...
User's Guide
Page 8
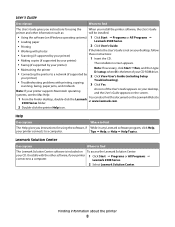
...: If your printer supports Macintosh operating systems, see the Mac Help: An icon of your printer connects to a computer. Tips Œ Help, or Help Œ Help Topics. It installs with the other information such as: will be installed. • Using the software (on Windows operating systems) 1 Click Start Œ Programs or All Programs Œ • Loading paper Lexmark 2500 Series. • Printing 2 Click User's Guide. • Working with printing, copying, scanning, faxing, paper jams, and misfeeds 3 Click Yes. Lexmark 2500 Series. 2 Select Lexmark Solution Center. Help...
...: If your printer supports Macintosh operating systems, see the Mac Help: An icon of your printer connects to a computer. Tips Œ Help, or Help Œ Help Topics. It installs with the other information such as: will be installed. • Using the software (on Windows operating systems) 1 Click Start Œ Programs or All Programs Œ • Loading paper Lexmark 2500 Series. • Printing 2 Click User's Guide. • Working with printing, copying, scanning, faxing, paper jams, and misfeeds 3 Click Yes. Lexmark 2500 Series. 2 Select Lexmark Solution Center. Help...
User's Guide
Page 11
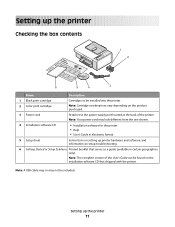
...; Help • User's Guide in electronic format 5 Setup sheet Instructions on setting up printer hardware and software, and information on the installation software CD that serves as a guide (available in certain geographies only). Setting up the printer 11 Note: The complete version of the printer. Setting up the printer Checking the box contents 1 2 ?? ? 6 5 4 3 Name Description 1 Black print cartridge Cartridges to the power supply port located at the back of the User's Guide can be found on setup troubleshooting. 6 Getting Started...
...; Help • User's Guide in electronic format 5 Setup sheet Instructions on setting up printer hardware and software, and information on the installation software CD that serves as a guide (available in certain geographies only). Setting up the printer 11 Note: The complete version of the printer. Setting up the printer Checking the box contents 1 2 ?? ? 6 5 4 3 Name Description 1 Black print cartridge Cartridges to the power supply port located at the back of the User's Guide can be found on setup troubleshooting. 6 Getting Started...
User's Guide
Page 13
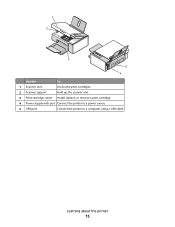
Learning about the printer 13 1 2 3 5 4 Use the To 1 Scanner unit Access the print cartridges. 2 Scanner support Hold up the scanner unit. 3 Print cartridge carrier Install, replace, or remove a print cartridge. 4 Power supply with port Connect the printer to a power source. 5 USB port Connect the printer to a computer using a USB cable.
Learning about the printer 13 1 2 3 5 4 Use the To 1 Scanner unit Access the print cartridges. 2 Scanner support Hold up the scanner unit. 3 Print cartridge carrier Install, replace, or remove a print cartridge. 4 Power supply with port Connect the printer to a power source. 5 USB port Connect the printer to a computer using a USB cable.
User's Guide
Page 15
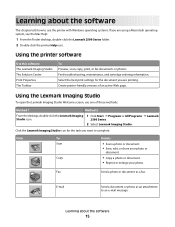
... for the document you are using a Macintosh operating system, see the Mac Help: 1 From the Finder desktop, double-click the Lexmark 2500 Series folder. 2 Double-click the printer Help icon. E-mail Send a document or photo as a fax. Using the Lexmark Imaging Studio To open the Lexmark Imaging Studio Welcome screen, use the printer with Windows operating systems. If you are printing. Select the best print settings for the task you want to complete. Learning about the software 15 Find troubleshooting, maintenance, and cartridge ordering...
... for the document you are using a Macintosh operating system, see the Mac Help: 1 From the Finder desktop, double-click the Lexmark 2500 Series folder. 2 Double-click the printer Help icon. E-mail Send a document or photo as a fax. Using the Lexmark Imaging Studio To open the Lexmark Imaging Studio Welcome screen, use the printer with Windows operating systems. If you are printing. Select the best print settings for the task you want to complete. Learning about the software 15 Find troubleshooting, maintenance, and cartridge ordering...
User's Guide
Page 17
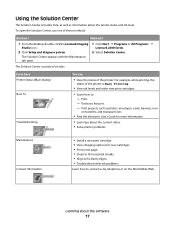
... electronic User's Guide for new cartridges. • Print a test page. • Clean to fix horizontal streaks. • Align to fix blurry edges. • Troubleshoot other ink problems. Learn how to : - Print. - To open . Print projects such as information about the current status. • Solve printer problems. Maintenance Contact Information • Install a new print cartridge. • View shopping options for more information. • Learn tips about the printer status and ink level. The Solution Center consists of six tabs: From here Printer Status...
... electronic User's Guide for new cartridges. • Print a test page. • Clean to fix horizontal streaks. • Align to fix blurry edges. • Troubleshoot other ink problems. Learn how to : - Print. - To open . Print projects such as information about the current status. • Solve printer problems. Maintenance Contact Information • Install a new print cartridge. • View shopping options for more information. • Learn tips about the printer status and ink level. The Solution Center consists of six tabs: From here Printer Status...
User's Guide
Page 19
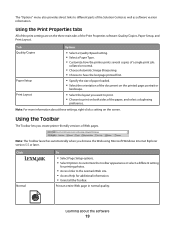
... you browse the Web using Microsoft Windows Internet Explorer version 5.5 or later. Click Normal To • Select Page Setup options. • Select Options to customize the toolbar appearance or select a different setting for printing photos. • Access links to the Lexmark Web site. • Access Help for additional information. • Uninstall the Toolbar. The "Options" menu also provides direct links to different parts of the paper, and select a duplexing preference.
... you browse the Web using Microsoft Windows Internet Explorer version 5.5 or later. Click Normal To • Select Page Setup options. • Select Options to customize the toolbar appearance or select a different setting for printing photos. • Access links to the Lexmark Web site. • Access Help for additional information. • Uninstall the Toolbar. The "Options" menu also provides direct links to different parts of the paper, and select a duplexing preference.

User's Guide
Page 48
... block faxes from specific phone numbers: a Click Manage Block List. Blocking junk faxes 1 From the desktop, double-click the Lexmark Imaging Studio icon. 2 From the left pane of the Welcome screen, click Fax. 5 Choose a date range. 6 Click Print. The Fax Solution Software appears. 3 Click Tools ΠPreferences and Settings. 4 Click the Receiving Faxes tab. 5 From the "Block Junk Faxes" area, select the check box beside Enable Fax Blocking. 6 If you send or receive. 1 From...
... block faxes from specific phone numbers: a Click Manage Block List. Blocking junk faxes 1 From the desktop, double-click the Lexmark Imaging Studio icon. 2 From the left pane of the Welcome screen, click Fax. 5 Choose a date range. 6 Click Print. The Fax Solution Software appears. 3 Click Tools ΠPreferences and Settings. 4 Click the Receiving Faxes tab. 5 From the "Block Junk Faxes" area, select the check box beside Enable Fax Blocking. 6 If you send or receive. 1 From...
User's Guide
Page 58
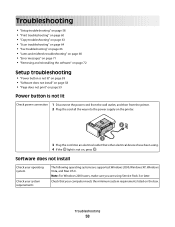
Troubleshooting 58 Troubleshooting • "Setup troubleshooting" on page 58 • "Print troubleshooting" on page 60 • "Copy troubleshooting" on page 63 • "Scan troubleshooting" on page 64 • "Fax troubleshooting" on page 66 • "Jams and misfeeds troubleshooting" on page 68 • "Error messages" on page 71 • "Removing and reinstalling the software" on page 72 Setup troubleshooting • "Power button is not lit" on page 58 • "Software does not install" on page 58 • "Page does not print" on page 59 Power button is not lit Check power connection...
Troubleshooting 58 Troubleshooting • "Setup troubleshooting" on page 58 • "Print troubleshooting" on page 60 • "Copy troubleshooting" on page 63 • "Scan troubleshooting" on page 64 • "Fax troubleshooting" on page 66 • "Jams and misfeeds troubleshooting" on page 68 • "Error messages" on page 71 • "Removing and reinstalling the software" on page 72 Setup troubleshooting • "Power button is not lit" on page 58 • "Software does not install" on page 58 • "Page does not print" on page 59 Power button is not lit Check power connection...
User's Guide
Page 60
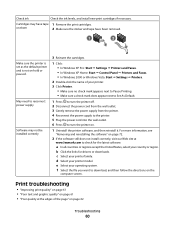
... reconnect power supply Software may have been removed. 1 2 Make sure the printer is set as the default printer and is not on page 62 Troubleshooting 60 c Select your operating system. e Select your printer family. Print troubleshooting • "Improving print quality" on page 61 • "Poor text and graphic quality" on page 61 • "Poor quality at www.lexmark.com to turn the printer on the computer screen. Check ink Check the ink levels, and install new print cartridges if...
... reconnect power supply Software may have been removed. 1 2 Make sure the printer is set as the default printer and is not on page 62 Troubleshooting 60 c Select your operating system. e Select your printer family. Print troubleshooting • "Improving print quality" on page 61 • "Poor text and graphic quality" on page 61 • "Poor quality at www.lexmark.com to turn the printer on the computer screen. Check ink Check the ink levels, and install new print cartridges if...

User's Guide
Page 61
... information, see "Removing a used print cartridge" on page 50 and "Installing print cartridges" on page 50. For more information, see "Cleaning the print cartridge nozzles" on page 53. For more information, see "Ordering paper and other high-quality images, for the document. Troubleshooting 61 • "Print speed is slow" on page 62 • "Partial document or photo prints" on page 63 Improving print quality Check paper • Use the appropriate paper for best results use Lexmark Premium Photo Paper or Lexmark Photo Paper. • Use a paper that is...
... information, see "Removing a used print cartridge" on page 50 and "Installing print cartridges" on page 50. For more information, see "Cleaning the print cartridge nozzles" on page 53. For more information, see "Ordering paper and other high-quality images, for the document. Troubleshooting 61 • "Print speed is slow" on page 62 • "Partial document or photo prints" on page 63 Improving print quality Check paper • Use the appropriate paper for best results use Lexmark Premium Photo Paper or Lexmark Photo Paper. • Use a paper that is...
User's Guide
Page 63
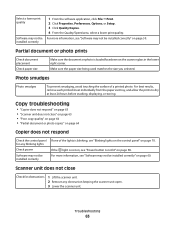
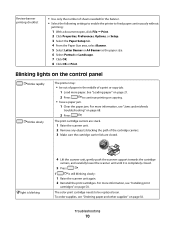
.... Partial document or photo prints Check document placement Check paper size Make sure the document or photo is not lit" on page 60. Copy troubleshooting • "Copier does not respond" on page 59. For more information, see "Power button is loaded facedown on page 64 Copier does not respond Check the control panel for obstructions 1 Lift the scanner unit. 2 Remove any blinking lights Check power Software may not be installed correctly 1 From the software application, click File Œ Print. 2 Click Properties, Preferences, Options, or Setup. 3 Click Quality/Copies...
.... Partial document or photo prints Check document placement Check paper size Make sure the document or photo is not lit" on page 60. Copy troubleshooting • "Copier does not respond" on page 59. For more information, see "Power button is loaded facedown on page 64 Copier does not respond Check the control panel for obstructions 1 Lift the scanner unit. 2 Remove any blinking lights Check power Software may not be installed correctly 1 From the software application, click File Œ Print. 2 Click Properties, Preferences, Options, or Setup. 3 Click Quality/Copies...

User's Guide
Page 64
... page 44. Are you scanning from photos, magazines, or newspapers" on page 52. Make sure the paper size being used matches the size you are copying or scanning from photo or glossy paper, a magazine, or a newspaper, photo or glossy paper, see "Blinking lights on the control panel" on the scanner glass in the lower right corner. Check document placement Make sure the document or photo is blinking, see "Removing image patterns from If you selected. Scan troubleshooting • "Scanner...
... page 44. Are you scanning from photos, magazines, or newspapers" on page 52. Make sure the paper size being used matches the size you are copying or scanning from photo or glossy paper, a magazine, or a newspaper, photo or glossy paper, see "Blinking lights on the control panel" on the scanner glass in the lower right corner. Check document placement Make sure the document or photo is blinking, see "Removing image patterns from If you selected. Scan troubleshooting • "Scanner...
User's Guide
Page 68
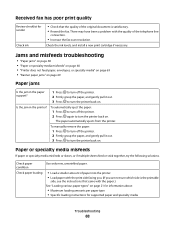
... turn the printer back on page 21 for information about: • Maximum loading amounts per paper type • Specific loading instructions for sender Check ink • Check that came with the quality of the original document is the printable side, see the instructions that the quality of the telephone line connection. • Increase the fax scan resolution. Check paper condition Use only new, unwrinkled paper. Check paper loading • Load a smaller amount of paper into the printer. • Load paper with the print side...
... turn the printer back on page 21 for information about: • Maximum loading amounts per paper type • Specific loading instructions for sender Check ink • Check that came with the quality of the original document is the printable side, see the instructions that the quality of the telephone line connection. • Increase the fax scan resolution. Check paper condition Use only new, unwrinkled paper. Check paper loading • Load a smaller amount of paper into the printer. • Load paper with the print side...
User's Guide
Page 70
... without jamming: 1 With a document open, click File ΠPrint. 2 Click Properties, Preferences, Options, or Setup. 3 Select the Paper Setup tab. 4 From the Paper Size area, select Banner. 5 Select Letter Banner or A4 Banner as the paper size. 6 Select Portrait or Landscape. 7 Click OK. 8 Click OK or Print. See "Loading paper" on page 50. The print cartridge carriers are stuck. 1 Raise the scanner unit. 2 Remove any objects blocking the path of the cartridge carriers. 3 Make...
... without jamming: 1 With a document open, click File ΠPrint. 2 Click Properties, Preferences, Options, or Setup. 3 Select the Paper Setup tab. 4 From the Paper Size area, select Banner. 5 Select Letter Banner or A4 Banner as the paper size. 6 Select Portrait or Landscape. 7 Click OK. 8 Click OK or Print. See "Loading paper" on page 50. The print cartridge carriers are stuck. 1 Raise the scanner unit. 2 Remove any objects blocking the path of the cartridge carriers. 3 Make...
User's Guide
Page 71
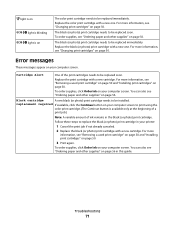
... guide. To order supplies, click Order Ink on page 56. To order supplies, see "Changing print cartridges" on page 56 in the black (or photo) print cartridge. For more information, see "Ordering paper and other supplies" on your computer screen. replacement required If available, click the Continue button on your computer screen. Error messages These messages appear on your computer screen. For more information, see "Removing a used print cartridge" on page 50 and "Installing print cartridges" on The color print cartridge...
... guide. To order supplies, click Order Ink on page 56. To order supplies, see "Changing print cartridges" on page 56 in the black (or photo) print cartridge. For more information, see "Ordering paper and other supplies" on your computer screen. replacement required If available, click the Continue button on your computer screen. Error messages These messages appear on your computer screen. For more information, see "Removing a used print cartridge" on page 50 and "Installing print cartridges" on The color print cartridge...
User's Guide
Page 72
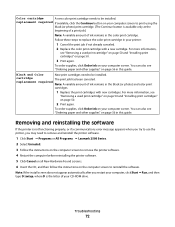
... guide. replacement required If available, click the Continue button on the computer screen to be installed. Removing and reinstalling the software If the printer is not functioning properly, or if a communications error message appears when you try to print using the black (or photo) print cartridge. (The Continue button is the letter of your CD-ROM drive. Black and Color New print cartridges need to remove and reinstall the printer software. 1 Click Start ΠPrograms or All Programs ΠLexmark 2500 Series...
... guide. replacement required If available, click the Continue button on the computer screen to be installed. Removing and reinstalling the software If the printer is not functioning properly, or if a communications error message appears when you try to print using the black (or photo) print cartridge. (The Continue button is the letter of your CD-ROM drive. Black and Color New print cartridges need to remove and reinstall the printer software. 1 Click Start ΠPrograms or All Programs ΠLexmark 2500 Series...
User's Guide
Page 83
... not feed paper, envelopes, or specialty media 69 printer receives blank fax 67 printer software reinstalling 72 removing 72 using 15 printer software settings resetting to defaults 20 Printer Status dialog 17 Index 83 printing all photos from a media device using the computer 33 blocked fax list 48 cards 30 changing paper type 26 collated copies 28 document 26 envelopes 29 greeting cards 30 high-quality graphics 27 index cards 30 iron-on transfers 30 last page first 28 multiple pages on one sheet 31 on both sides...
... not feed paper, envelopes, or specialty media 69 printer receives blank fax 67 printer software reinstalling 72 removing 72 using 15 printer software settings resetting to defaults 20 Printer Status dialog 17 Index 83 printing all photos from a media device using the computer 33 blocked fax list 48 cards 30 changing paper type 26 collated copies 28 document 26 envelopes 29 greeting cards 30 high-quality graphics 27 index cards 30 iron-on transfers 30 last page first 28 multiple pages on one sheet 31 on both sides...
User's Guide
Page 84
... transparencies loading 22 printing 29 Troubleshooting tab 17 troubleshooting, copy copier does not respond 63 partial document or photo copies 64 poor copy quality 64 scanner unit does not close 63 troubleshooting, error messages Black and Color cartridge replacement required 71 Black cartridge replacement required 71 Cartridge Alert 71 Color cartridge replacement required 71 troubleshooting, fax can receive but not send fax 67 can send but not receive fax 67 cannot send or receive fax 66 printer receives blank fax 67 received fax has poor print quality 68 Index 84 troubleshooting, jams and...
... transparencies loading 22 printing 29 Troubleshooting tab 17 troubleshooting, copy copier does not respond 63 partial document or photo copies 64 poor copy quality 64 scanner unit does not close 63 troubleshooting, error messages Black and Color cartridge replacement required 71 Black cartridge replacement required 71 Cartridge Alert 71 Color cartridge replacement required 71 troubleshooting, fax can receive but not send fax 67 can send but not receive fax 67 cannot send or receive fax 66 printer receives blank fax 67 received fax has poor print quality 68 Index 84 troubleshooting, jams and...

