Hardware Maintenance Manual
Page 3
... hard disk drive . . . 20 Important notice for replacing a system board 20 How to do first 23 Checkout guide 24 Lenovo Solution Center 24 Quick test programs 24 UEFI diagnostic program 25 Bootable diagnostic programs 25 Power system checkout 26 Checking the ac power ...adapter 26 Checking operational charging 27 Checking the battery pack 27 Checking the backup battery 28 Chapter 4. Status indicators . . . . . 39 Chapter 6. Removing or replacing a FRU 53 General guidelines 53 ...
... hard disk drive . . . 20 Important notice for replacing a system board 20 How to do first 23 Checkout guide 24 Lenovo Solution Center 24 Quick test programs 24 UEFI diagnostic program 25 Bootable diagnostic programs 25 Power system checkout 26 Checking the ac power ...adapter 26 Checking operational charging 27 Checking the battery pack 27 Checking the backup battery 28 Chapter 4. Status indicators . . . . . 39 Chapter 6. Removing or replacing a FRU 53 General guidelines 53 ...
Hardware Maintenance Manual
Page 4
1070 Backup battery 64 1080 Keyboard 65 1090 Keyboard bezel assembly and power button sub card 68 1100 Thermal fan assembly 70 1110 Microprocessor 72 1120 System board ...
1070 Backup battery 64 1080 Keyboard 65 1090 Keyboard bezel assembly and power button sub card 68 1100 Thermal fan assembly 70 1110 Microprocessor 72 1120 System board ...
Hardware Maintenance Manual
Page 9
...frame ground. Send another person to : http://www.lenovo.com/serviceparts-lookup c. If any non-ThinkPad alterations. 7. Use a meter to attachment of non-ThinkPad features or options not covered by equalizing the charge so... that the machine, the part, the work mat, and the person handling the part are all at the beginning of any unsafe conditions are present, you must not be the authorized type specified for damage (loose, broken, or sharp edges...yourself. - Use caution; Check for cracked or bulging batteries. 5.
...frame ground. Send another person to : http://www.lenovo.com/serviceparts-lookup c. If any non-ThinkPad alterations. 7. Use a meter to attachment of non-ThinkPad features or options not covered by equalizing the charge so... that the machine, the part, the work mat, and the person handling the part are all at the beginning of any unsafe conditions are present, you must not be the authorized type specified for damage (loose, broken, or sharp edges...yourself. - Use caution; Check for cracked or bulging batteries. 5.
Hardware Maintenance Manual
Page 10
... • French • German • Hebrew • Japanese • Korean • Spanish • Traditional Chinese DANGER 4 Hardware Maintenance Manual When working on a double-insulated or battery-operated system, use coax or connector-outside shells on ac-operated computers.
... • French • German • Hebrew • Japanese • Korean • Spanish • Traditional Chinese DANGER 4 Hardware Maintenance Manual When working on a double-insulated or battery-operated system, use coax or connector-outside shells on ac-operated computers.
Hardware Maintenance Manual
Page 32
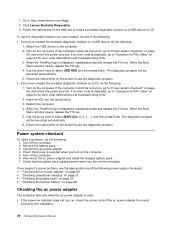
...the following : 1. When the Boot Menu window opens, release the F12 key. 4. Insert the CD into the optical drive. 3. When the ThinkPad logo is displayed, repeatedly press and release the F12 key. The diagnostic program will be turned on, go to "Symptom-to create a bootable ...the computer. 2. Follow the instructions on the screen to use the diagnostic program. Disconnect the ac power adapter and install the charged battery pack. 7. Click Lenovo Bootable Diagnostics. 3. To use the diagnostic medium you suspect a power problem, see the appropriate one of the following : 1. Attach...
...the following : 1. When the Boot Menu window opens, release the F12 key. 4. Insert the CD into the optical drive. 3. When the ThinkPad logo is displayed, repeatedly press and release the F12 key. The diagnostic program will be turned on, go to "Symptom-to create a bootable ...the computer. 2. Follow the instructions on the screen to use the diagnostic program. Disconnect the ac power adapter and install the charged battery pack. 7. Click Lenovo Bootable Diagnostics. 3. To use the diagnostic medium you suspect a power problem, see the appropriate one of the following : 1. Attach...

Hardware Maintenance Manual
Page 33
... cable from the ac power adapter does not always indicate a defect. Attention: Lenovo has no responsibility for the performance or safety of unauthorized batteries, and provides no warranties for failures or damage arising out of their use a discharged battery pack or a battery pack that less than 50% of the total power remaining when installed...
... cable from the ac power adapter does not always indicate a defect. Attention: Lenovo has no responsibility for the performance or safety of unauthorized batteries, and provides no warranties for failures or damage arising out of their use a discharged battery pack or a battery pack that less than 50% of the total power remaining when installed...
Hardware Maintenance Manual
Page 34
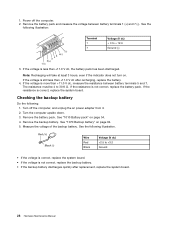
... 54. 4. The resistance must be 4 to + 12.6 Ground (-) 3. Checking the backup battery Do the following illustration. Turn the computer upside down. 3. Remove the backup battery. See the following : 1. Power off the computer, and unplug the ac power adapter from it...(V dc) + 0 to 30 K Ω. If the voltage is less than +11.0 V dc, measure the resistance between battery terminals 1 (+) and 7 (-). Turn off the computer. 2. Measure the voltage of the backup battery. Wire Red Black Voltage (V dc) +2.5 to +3.2 Ground • If the voltage is correct, replace the system board. &#...
... 54. 4. The resistance must be 4 to + 12.6 Ground (-) 3. Checking the backup battery Do the following illustration. Turn the computer upside down. 3. Remove the backup battery. See the following : 1. Power off the computer, and unplug the ac power adapter from it...(V dc) + 0 to 30 K Ω. If the voltage is less than +11.0 V dc, measure the resistance between battery terminals 1 (+) and 7 (-). Turn off the computer. 2. Measure the voltage of the backup battery. Wire Red Black Voltage (V dc) +2.5 to +3.2 Ground • If the voltage is correct, replace the system board. &#...
Hardware Maintenance Manual
Page 38
...ThinkPad logo is selected and the user hard disk password has been forgotten and cannot be made available to the service technician, neither Lenovo nor Lenovo authorized service technicians provide any services to reset the user hard disk password, or to remove the battery pack, see "1070 Backup battery... Select Hard-disk x password, where x is displayed, immediately press F1 to remove the backup battery, see "1010 Battery pack" on how to enter the ThinkPad Setup program. 3. When the ThinkPad logo is the letter of the hard disk drive. For instructions on page 54. 3. Then,...
...ThinkPad logo is selected and the user hard disk password has been forgotten and cannot be made available to the service technician, neither Lenovo nor Lenovo authorized service technicians provide any services to reset the user hard disk password, or to remove the battery pack, see "1070 Backup battery... Select Hard-disk x password, where x is displayed, immediately press F1 to remove the backup battery, see "1010 Battery pack" on how to enter the ThinkPad Setup program. 3. When the ThinkPad logo is the letter of the hard disk drive. For instructions on page 54. 3. Then,...
Hardware Maintenance Manual
Page 39
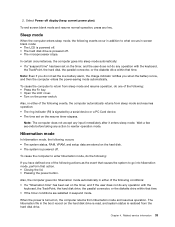
... defined one of the following events, the computer automatically returns from sleep mode and resume operation, do not set the low-battery alarm, the charge indicator notifies you when the battery is signaled by a serial device or a PC Card device. • The time set on the power switch. Wait a few seconds before...
... defined one of the following events, the computer automatically returns from sleep mode and resume operation, do not set the low-battery alarm, the charge indicator notifies you when the battery is signaled by a serial device or a PC Card device. • The time set on the power switch. Wait a few seconds before...
Hardware Maintenance Manual
Page 40
... (two short beeps) 0191 System Security-Invalid Remote Change requested. 0251 System CMOS checksum bad- Replace the backup battery and run the ThinkPad Setup program to "Intermittent problems" on page 36 The symptom-to EEPROM is failed. (two short beeps) 0189 Invalid RFID...; "LCD-related symptoms" on page 35 • "Intermittent problems" on page 36 • "Undetermined problems" on page 36. Charge the battery pack. 2. Run the ThinkPad Setup program, and then save current setting by connecting the ac power adapter. 2. A numeric error is listed first, in the computer. Charge ...
... (two short beeps) 0191 System Security-Invalid Remote Change requested. 0251 System CMOS checksum bad- Replace the backup battery and run the ThinkPad Setup program to "Intermittent problems" on page 36 The symptom-to EEPROM is failed. (two short beeps) 0189 Invalid RFID...; "LCD-related symptoms" on page 35 • "Intermittent problems" on page 36 • "Undetermined problems" on page 36. Charge the battery pack. 2. Run the ThinkPad Setup program, and then save current setting by connecting the ac power adapter. 2. A numeric error is listed first, in the computer. Charge ...
Hardware Maintenance Manual
Page 41
... 1. System board. Replace the battery. System board. 1. Chapter 4. Numeric error codes (continued) Symptom or error (beeps, if any replacement LCD will not charge. Press the ESC key to all ThinkPad notebooks purchased on 1 January, 2008 or later. • Lenovo will not provide replacement if the... any ) 0271 Date and time error-Neither the date nor the time is not supported by Lenovo and it should be considered faulty. Please replace the battery with the correct Lenovo battery for the notebook computer contains many thin-film transistors (TFTs). FRU or action, in sequence 1....
... 1. System board. Replace the battery. System board. 1. Chapter 4. Numeric error codes (continued) Symptom or error (beeps, if any replacement LCD will not charge. Press the ESC key to all ThinkPad notebooks purchased on 1 January, 2008 or later. • Lenovo will not provide replacement if the... any ) 0271 Date and time error-Neither the date nor the time is not supported by Lenovo and it should be considered faulty. Please replace the battery with the correct Lenovo battery for the notebook computer contains many thin-film transistors (TFTs). FRU or action, in sequence 1....
Hardware Maintenance Manual
Page 42
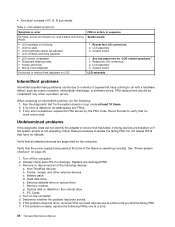
...the FRU shown by the computer. Replace any error is detected, do the following devices: a. Printer, mouse, and other external devices c. Battery pack d. PC Cards 4. LCD assembly. 4. System board. 1. Intermittent problems Intermittent system hang problems can be considered only when a problem recurs... to isolate the failing FRU. FRU or action, in the internal drive h. Run the diagnostic test for "LCD-related symptoms." 2. Non-ThinkPad devices b. Reseat all of R, G, B sub-pixels. Visually check each FRU for damage. External diskette drive or optical drive f. •...
...the FRU shown by the computer. Replace any error is detected, do the following devices: a. Printer, mouse, and other external devices c. Battery pack d. PC Cards 4. LCD assembly. 4. System board. 1. Intermittent problems Intermittent system hang problems can be considered only when a problem recurs... to isolate the failing FRU. FRU or action, in the internal drive h. Run the diagnostic test for "LCD-related symptoms." 2. Non-ThinkPad devices b. Reseat all of R, G, B sub-pixels. Visually check each FRU for damage. External diskette drive or optical drive f. •...
Hardware Maintenance Manual
Page 50
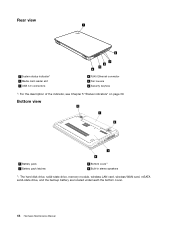
Rear view 1 2 1 System status indicator1 2 Media card reader slot 3 USB 3.0 connectors 3 4 5 6 4 RJ45 Ethernet connector 5 Fan louvers 6 Security keyhole 1: For the description of the indicator, see Chapter 5 "Status indicators" on page 39. Bottom view 2 1 2 1 Battery pack 2 Battery pack latches 3 4 3 Bottom cover1 4 Built-in stereo speakers 1: The hard disk drive, solid-state drive, memory module, wireless LAN card, wireless WAN card, mSATA solid-state drive, and the backup battery are located underneath the bottom cover. 44 Hardware Maintenance Manual
Rear view 1 2 1 System status indicator1 2 Media card reader slot 3 USB 3.0 connectors 3 4 5 6 4 RJ45 Ethernet connector 5 Fan louvers 6 Security keyhole 1: For the description of the indicator, see Chapter 5 "Status indicators" on page 39. Bottom view 2 1 2 1 Battery pack 2 Battery pack latches 3 4 3 Bottom cover1 4 Built-in stereo speakers 1: The hard disk drive, solid-state drive, memory module, wireless LAN card, wireless WAN card, mSATA solid-state drive, and the backup battery are located underneath the bottom cover. 44 Hardware Maintenance Manual
Hardware Maintenance Manual
Page 51
...manual for your product. Locating FRUs and CRUs This topic introduces the following types of CRUs include the ac power adapter, power cord, battery, and hard disk drive. If you can request that a Service Provider install the CRU according to return the defective part that is ...CRUs for full details. Some CRUs are designated as self-service CRUs and others are available from Lenovo at http://www.lenovo.com/support. An electronic version of self-service CRUs is your product. ThinkPad computers contain the following service parts: • "Major FRUs and CRUs" on page 46 •...
...manual for your product. Locating FRUs and CRUs This topic introduces the following types of CRUs include the ac power adapter, power cord, battery, and hard disk drive. If you can request that a Service Provider install the CRU according to return the defective part that is ...CRUs for full details. Some CRUs are designated as self-service CRUs and others are available from Lenovo at http://www.lenovo.com/support. An electronic version of self-service CRUs is your product. ThinkPad computers contain the following service parts: • "Major FRUs and CRUs" on page 46 •...
Hardware Maintenance Manual
Page 53
... 6 Base cover assembly 7 DC-in sub card 8 DC-in cable 9 Backup battery 10 Hard disk drive (on some models) 11 Solid-state drive (on some models) 12 Bottom cover 13 Memory module 14 Wireless WAN card (on ...
... 6 Base cover assembly 7 DC-in sub card 8 DC-in cable 9 Backup battery 10 Hard disk drive (on some models) 11 Solid-state drive (on some models) 12 Bottom cover 13 Memory module 14 Wireless WAN card (on ...
Hardware Maintenance Manual
Page 59
... of the replacement CRU. If you have made sure that all power cords from Lenovo at any interconnecting cables. See your product. Any such FRUs are available from electrical outlets, remove the battery pack, and then disconnect any time upon request. When turning a screw, turn ...To put the new FRU in the drawing. 6. Removing or replacing a FRU This chapter provides instructions on installing the CRU, Lenovo will be required to return the defective part that pertain to you can cause electrical short circuits. Verify this Hardware Maintenance Manual. ...
... of the replacement CRU. If you have made sure that all power cords from Lenovo at any interconnecting cables. See your product. Any such FRUs are available from electrical outlets, remove the battery pack, and then disconnect any time upon request. When turning a screw, turn ...To put the new FRU in the drawing. 6. Removing or replacing a FRU This chapter provides instructions on installing the CRU, Lenovo will be required to return the defective part that pertain to you can cause electrical short circuits. Verify this Hardware Maintenance Manual. ...
Hardware Maintenance Manual
Page 60
...support unauthorized batteries or batteries designed for other systems. If an unauthorized battery or a battery designed for failures or damage arising out of a physically damaged battery pack is not covered by Lenovo or an authorized builder. The only exception to remove the battery pack first. A battery pack ...safety issue. Before servicing your computer Carefully read this topic before a non-physically damaged battery pack is replaced. If the computer you start the servicing. If the Lenovo Solution Center program is not installed in the computer, the customer should not be ...
...support unauthorized batteries or batteries designed for other systems. If an unauthorized battery or a battery designed for failures or damage arising out of a physically damaged battery pack is not covered by Lenovo or an authorized builder. The only exception to remove the battery pack first. A battery pack ...safety issue. Before servicing your computer Carefully read this topic before a non-physically damaged battery pack is replaced. If the computer you start the servicing. If the Lenovo Solution Center program is not installed in the computer, the customer should not be ...

Hardware Maintenance Manual
Page 61
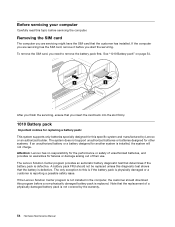
... to the unlocked position and remove the battery pack 2 . 2 1 2 1 2 When installing: Install the battery pack in the locked position. 1020 Bottom cover For access, remove this FRU: • "1010 Battery pack" on page 54 Removal steps of battery pack DANGER Use only the authorized battery specified for your computer. Removing or replacing a FRU 55 Removal...
... to the unlocked position and remove the battery pack 2 . 2 1 2 1 2 When installing: Install the battery pack in the locked position. 1020 Bottom cover For access, remove this FRU: • "1010 Battery pack" on page 54 Removal steps of battery pack DANGER Use only the authorized battery specified for your computer. Removing or replacing a FRU 55 Removal...
Hardware Maintenance Manual
Page 62
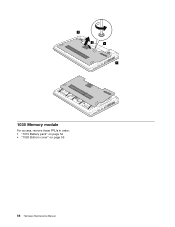
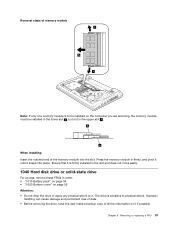
1 2 1 1 1030 Memory module For access, remove these FRUs in order: • "1010 Battery pack" on page 54 • "1020 Bottom cover" on page 55 56 Hardware Maintenance Manual
1 2 1 1 1030 Memory module For access, remove these FRUs in order: • "1010 Battery pack" on page 54 • "1020 Bottom cover" on page 55 56 Hardware Maintenance Manual
Hardware Maintenance Manual
Page 63
... to be installed on the computer you are servicing, the memory module must be installed in the lower slot a , but not in order: • "1010 Battery pack" on page 54 • "1020 Bottom cover" on it snaps into the slot. b a When installing: Insert the notched end of memory module 1 2 1 Note: If...
... to be installed on the computer you are servicing, the memory module must be installed in the lower slot a , but not in order: • "1010 Battery pack" on page 54 • "1020 Bottom cover" on it snaps into the slot. b a When installing: Insert the notched end of memory module 1 2 1 Note: If...


