
Lenovo H4 Series Hardware Maintenance Manual V2.0
Page 43
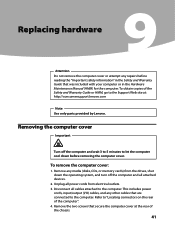
To obtain copies of the Safety and Warranty Guide or HMM, go to let the computer cool down the operating system, and turn off the computer and wait 3 to 5 minutes to the Support ... power cords from the drives, shut down before reading the "Important safety information" in the Safety and Warranty Guide that secure the computer cover at : http://consumersupport.lenovo.com Note Use only parts provided by Lenovo. To remove the computer cover: 1. Unplug all attached devices. 2. Remove the two screws that was included with...
To obtain copies of the Safety and Warranty Guide or HMM, go to let the computer cool down the operating system, and turn off the computer and wait 3 to 5 minutes to the Support ... power cords from the drives, shut down before reading the "Important safety information" in the Safety and Warranty Guide that secure the computer cover at : http://consumersupport.lenovo.com Note Use only parts provided by Lenovo. To remove the computer cover: 1. Unplug all attached devices. 2. Remove the two screws that was included with...
Lenovo H4 Series Hardware Maintenance Manual V2.0
Page 45
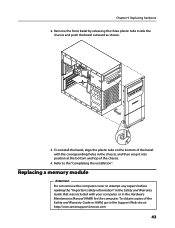
... of the chassis. 4. Chapter 9. Replacing hardware 2. To reinstall the bezel, align the plastic tabs on the bottom of the Safety and Warranty Guide or HMM, go to the "Completing the installation". Remove the front bezel by releasing the three plastic tabs inside the chassis and push...a memory module Attention Do not remove the computer cover or attempt any repairs before reading the "Important safety information" in the Safety and Warranty Guide that was included with the corresponding holes in the Hardware Maintenance Manual (HMM) for the computer. To obtain copies of the bezel with...
... of the chassis. 4. Chapter 9. Replacing hardware 2. To reinstall the bezel, align the plastic tabs on the bottom of the Safety and Warranty Guide or HMM, go to the "Completing the installation". Remove the front bezel by releasing the three plastic tabs inside the chassis and push...a memory module Attention Do not remove the computer cover or attempt any repairs before reading the "Important safety information" in the Safety and Warranty Guide that was included with the corresponding holes in the Hardware Maintenance Manual (HMM) for the computer. To obtain copies of the bezel with...
Lenovo H4 Series Hardware Maintenance Manual V2.0
Page 47
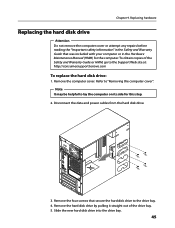
... remove the computer cover or attempt any repairs before reading the "Important safety information" in the Safety and Warranty Guide that secure the hard disk drive to the Support Web site at: http://consumersupport.lenovo.com To replace the hard disk drive: 1. Note It may be helpful to "Removing the computer cover...
... remove the computer cover or attempt any repairs before reading the "Important safety information" in the Safety and Warranty Guide that secure the hard disk drive to the Support Web site at: http://consumersupport.lenovo.com To replace the hard disk drive: 1. Note It may be helpful to "Removing the computer cover...
Lenovo H4 Series Hardware Maintenance Manual V2.0
Page 48
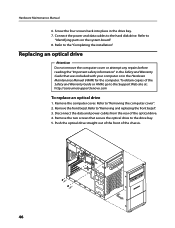
... optical drive to the drive bay. 5. Refer to "Identifying parts on the system board". 8. Refer to the Support Web site at: http://consumersupport.lenovo.com To replace an optical drive 1. Remove the two screws that was included with your computer or in the Hardware Maintenance Manual (HMM) for the... computer. To obtain copies of the Safety and Warranty Guide or HMM, go to the "Completing the installation". Refer to the hard disk drive. Connect the power and data cables to "Removing ...
... optical drive to the drive bay. 5. Refer to "Identifying parts on the system board". 8. Refer to the Support Web site at: http://consumersupport.lenovo.com To replace an optical drive 1. Remove the two screws that was included with your computer or in the Hardware Maintenance Manual (HMM) for the... computer. To obtain copies of the Safety and Warranty Guide or HMM, go to the "Completing the installation". Refer to the hard disk drive. Connect the power and data cables to "Removing ...
Lenovo H4 Series Hardware Maintenance Manual V2.0
Page 49
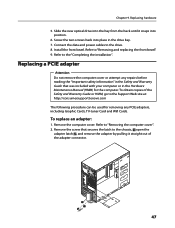
Slide the new optical drive into the bay from the back until it straight out of the Safety and Warranty Guide or HMM, go to the chassis, open the adapter latch , and remove the adapter by pulling it snaps into place in the drive bay. 7. ... Cards. Remove the computer cover. Remove the screw that was included with your computer or in the Safety and Warranty Guide that secures the latch to the Support Web site at: http://consumersupport.lenovo.com The following procedure can be used for the computer. Chapter 9. To replace an adapter: 1. Screw the two...
Slide the new optical drive into the bay from the back until it straight out of the Safety and Warranty Guide or HMM, go to the chassis, open the adapter latch , and remove the adapter by pulling it snaps into place in the drive bay. 7. ... Cards. Remove the computer cover. Remove the screw that was included with your computer or in the Safety and Warranty Guide that secures the latch to the Support Web site at: http://consumersupport.lenovo.com The following procedure can be used for the computer. Chapter 9. To replace an adapter: 1. Screw the two...
Lenovo H4 Series Hardware Maintenance Manual V2.0
Page 50
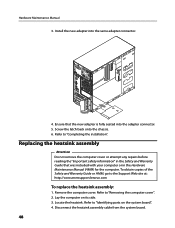
... latch back onto the chassis. 6. To obtain copies of the Safety and Warranty Guide or HMM, go to "Completing the installation". Disconnect the heatsink assembly cable from the system board. 48 Refer to the Support Web site at: http://consumersupport.lenovo.com To replace the heatsink assembly: 1. Remove the computer cover. Locate... the "Important safety information" in the Hardware Maintenance Manual (HMM) for the computer. Ensure that was included with your computer or in the Safety and Warranty Guide that the new adapter is fully seated into the same adapter connector. 4.
... latch back onto the chassis. 6. To obtain copies of the Safety and Warranty Guide or HMM, go to "Completing the installation". Disconnect the heatsink assembly cable from the system board. 48 Refer to the Support Web site at: http://consumersupport.lenovo.com To replace the heatsink assembly: 1. Remove the computer cover. Locate... the "Important safety information" in the Hardware Maintenance Manual (HMM) for the computer. Ensure that was included with your computer or in the Safety and Warranty Guide that the new adapter is fully seated into the same adapter connector. 4.
Lenovo H4 Series Hardware Maintenance Manual V2.0
Page 52
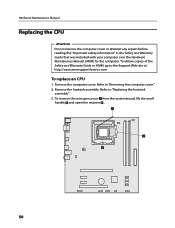
To obtain copies of the Safety and Warranty Guide or HMM, go to "Removing the computer cover". 2. Refer to the Support Web site at: http://consumersupport.lenovo.com To replace an CPU 1. Remove the heatsink assembly. Remove the computer cover. To remove the microprocessor 3 from the system board, lift the small handle... Replacing the CPU Attention Do not remove the computer cover or attempt any repairs before reading the "Important safety information" in the Safety and Warranty Guide that was included with your computer or in the Hardware Maintenance Manual (HMM) for the computer.
To obtain copies of the Safety and Warranty Guide or HMM, go to "Removing the computer cover". 2. Refer to the Support Web site at: http://consumersupport.lenovo.com To replace an CPU 1. Remove the heatsink assembly. Remove the computer cover. To remove the microprocessor 3 from the system board, lift the small handle... Replacing the CPU Attention Do not remove the computer cover or attempt any repairs before reading the "Important safety information" in the Safety and Warranty Guide that was included with your computer or in the Hardware Maintenance Manual (HMM) for the computer.
Lenovo H4 Series Hardware Maintenance Manual V2.0
Page 56
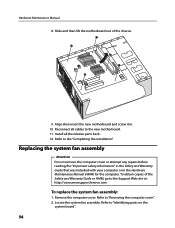
... the system fan assembly Attention Do not remove the computer cover or attempt any repairs before reading the "Important safety information" in the Safety and Warranty Guide that was included with your computer or in . 10. To obtain copies of the chassis. 9. Locate the system fan assembly. Align then insert ...installation". Refer to "Identifying parts on the system board". 54 Remove the computer cover. Slide and then lift the motherboard out of the Safety and Warranty Guide or HMM, go to the new motherboard. 11. Install all cables to the Support Web site at: http://consumersupport...
... the system fan assembly Attention Do not remove the computer cover or attempt any repairs before reading the "Important safety information" in the Safety and Warranty Guide that was included with your computer or in . 10. To obtain copies of the chassis. 9. Locate the system fan assembly. Align then insert ...installation". Refer to "Identifying parts on the system board". 54 Remove the computer cover. Slide and then lift the motherboard out of the Safety and Warranty Guide or HMM, go to the new motherboard. 11. Install all cables to the Support Web site at: http://consumersupport...
Lenovo H4 Series Hardware Maintenance Manual V2.0
Page 59
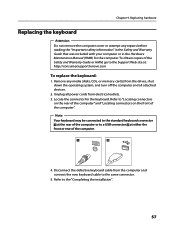
... computer. Refer to the Support Web site at either the front or rear of the computer". To obtain copies of the Safety and Warranty Guide or HMM, go to the "Completing the installation". 57 Disconnect the defective keyboard cable from electrical outlets. 3. Unplug all attached devices...computer. 4. Chapter 9. Refer to the same connector. 5. Remove any repairs before reading the "Important safety information" in the Safety and Warranty Guide that was included with your computer or in the Hardware Maintenance Manual (HMM) for the keyboard. Note Your keyboard may be connected ...
... computer. Refer to the Support Web site at either the front or rear of the computer". To obtain copies of the Safety and Warranty Guide or HMM, go to the "Completing the installation". 57 Disconnect the defective keyboard cable from electrical outlets. 3. Unplug all attached devices...computer. 4. Chapter 9. Refer to the same connector. 5. Remove any repairs before reading the "Important safety information" in the Safety and Warranty Guide that was included with your computer or in the Hardware Maintenance Manual (HMM) for the keyboard. Note Your keyboard may be connected ...
Lenovo H4 Series Hardware Maintenance Manual V2.0
Page 60
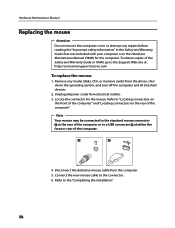
To obtain copies of the Safety and Warranty Guide or HMM, go to the Support Web site at either the front or rear of the computer. 4. Refer to "Locating connectors on the front ... connector for the computer. Disconnect the defective mouse cable from electrical outlets. 3. Remove any repairs before reading the "Important safety information" in the Safety and Warranty Guide that was included with your computer or in the Hardware Maintenance Manual (HMM) for the mouse. Note Your mouse may be connected to a USB...
To obtain copies of the Safety and Warranty Guide or HMM, go to the Support Web site at either the front or rear of the computer. 4. Refer to "Locating connectors on the front ... connector for the computer. Disconnect the defective mouse cable from electrical outlets. 3. Remove any repairs before reading the "Important safety information" in the Safety and Warranty Guide that was included with your computer or in the Hardware Maintenance Manual (HMM) for the mouse. Note Your mouse may be connected to a USB...
Lenovo H4 Series Hardware Replacement Guide V3.0
Page 6
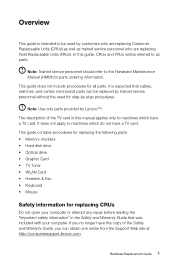
...machines which have this copy of the TV card in the Safety and Warranty Guide that cables, switches, and certain mechanical parts can obtain one online from the Support Web site at http://consumersupport.lenovo.com. This guide does not include procedures for parts ordering information. ...Card • Heatsink & Fan • Keyboard • Mouse Safety information for step-by-step procedures. The description of the Safety and Warranty Guide, you can be replaced by trained service personnel without the need for replacing CRUs Do not open your computer. It is intended to ...
...machines which have this copy of the TV card in the Safety and Warranty Guide that cables, switches, and certain mechanical parts can obtain one online from the Support Web site at http://consumersupport.lenovo.com. This guide does not include procedures for parts ordering information. ...Card • Heatsink & Fan • Keyboard • Mouse Safety information for step-by-step procedures. The description of the Safety and Warranty Guide, you can be replaced by trained service personnel without the need for replacing CRUs Do not open your computer. It is intended to ...
Lenovo H4 Series Hardware Replacement Guide V3.0
Page 24
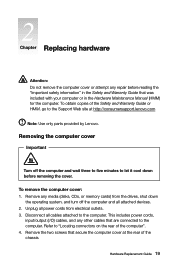
...Hardware Replacement Guide 19 Disconnect all power cords from the drives, shut down before reading the "Important safety information" in the Safety and Warranty Guide that was included with your computer or in the Hardware Maintenance Manual (HMM) for the computer. Remove any repair before removing the.... 3. This includes power cords, input/output (I/O) cables, and any other cables that secure the computer cover at http://consumersupport.lenovo.com Note: Use only parts provided by Lenovo. Remove the two screws that are connected to the computer. To remove the computer cover: 1.
...Hardware Replacement Guide 19 Disconnect all power cords from the drives, shut down before reading the "Important safety information" in the Safety and Warranty Guide that was included with your computer or in the Hardware Maintenance Manual (HMM) for the computer. Remove any repair before removing the.... 3. This includes power cords, input/output (I/O) cables, and any other cables that secure the computer cover at http://consumersupport.lenovo.com Note: Use only parts provided by Lenovo. Remove the two screws that are connected to the computer. To remove the computer cover: 1.

Lenovo H4 Series Hardware Replacement Guide V3.0
Page 27
... cover. Locate the memory module connectors. Make sure the notch on the memory aligns correctly with your computer or in the Safety and Warranty Guide that was included with the connector key on its side. 2. Remove the memory module being replaced by opening the retaining clips as shown... the Hardware Maintenance Manual (HMM) for the computer. Note: For this procedure, it helps to the Support Web site at http://consumersupport.lenovo.com. Push the memory module straight down into the connector until the retaining clips close. 22 Hardware Replacement Guide To obtain copies of the...
... cover. Locate the memory module connectors. Make sure the notch on the memory aligns correctly with your computer or in the Safety and Warranty Guide that was included with the connector key on its side. 2. Remove the memory module being replaced by opening the retaining clips as shown... the Hardware Maintenance Manual (HMM) for the computer. Note: For this procedure, it helps to the Support Web site at http://consumersupport.lenovo.com. Push the memory module straight down into the connector until the retaining clips close. 22 Hardware Replacement Guide To obtain copies of the...

Lenovo H4 Series Hardware Replacement Guide V3.0
Page 28
5. Refer to the Support Web site at http://consumersupport.lenovo.com. To obtain copies of the Safety and Warranty Guide or HMM, go to "Completing the installation". Disconnect the data and power cables from the hard disk drive. Note: For this procedure, it helps ... the hard disk drive Attention: Do not remove the computer cover or attempt any repair before reading the "Important safety information" in the Safety and Warranty Guide that was included with your computer or in the Hardware Maintenance Manual (HMM) for the computer. Refer to lay the computer on its side...
5. Refer to the Support Web site at http://consumersupport.lenovo.com. To obtain copies of the Safety and Warranty Guide or HMM, go to "Completing the installation". Disconnect the data and power cables from the hard disk drive. Note: For this procedure, it helps ... the hard disk drive Attention: Do not remove the computer cover or attempt any repair before reading the "Important safety information" in the Safety and Warranty Guide that was included with your computer or in the Hardware Maintenance Manual (HMM) for the computer. Refer to lay the computer on its side...
Lenovo H4 Series Hardware Replacement Guide V3.0
Page 29
..."Removing and replacing the front bezel". 3. Remove the front bezel. Refer to "Removing the computer cover". 2. To obtain copies of the Safety and Warranty Guide or HMM, go to "Identifying parts on the system board". 8. Remove the computer cover. 3. Remove the hard disk drive by pulling it ...straight out of the optical drive. 4. Refer to the Support Web site at http://consumersupport.lenovo.com. Refer to the hard disk drive. Connect the power and data cables to "Completing the installation". Replacing an optical drive Attention: Do...
..."Removing and replacing the front bezel". 3. Remove the front bezel. Refer to "Removing the computer cover". 2. To obtain copies of the Safety and Warranty Guide or HMM, go to "Identifying parts on the system board". 8. Remove the computer cover. 3. Remove the hard disk drive by pulling it ...straight out of the optical drive. 4. Refer to the Support Web site at http://consumersupport.lenovo.com. Refer to the hard disk drive. Connect the power and data cables to "Completing the installation". Replacing an optical drive Attention: Do...

Lenovo H4 Series Hardware Replacement Guide V3.0
Page 31
...cable from the system board. 5. Remove the four screws securing the heatsink and fan assembly to the Support Web site at: http://consumersupport.lenovo.com To replace the heatsink assembly: 1. Lift the failing heatsink and fan assembly off the system board. 26 Hardware Replacement Guide To ...obtain copies of the Safety and Warranty Guide or HMM, go to the system board. 6. Refer to "Identifying parts on its side. 3. Locate the heatsink. Remove the computer cover...
...cable from the system board. 5. Remove the four screws securing the heatsink and fan assembly to the Support Web site at: http://consumersupport.lenovo.com To replace the heatsink assembly: 1. Lift the failing heatsink and fan assembly off the system board. 26 Hardware Replacement Guide To ...obtain copies of the Safety and Warranty Guide or HMM, go to the system board. 6. Refer to "Identifying parts on its side. 3. Locate the heatsink. Remove the computer cover...

Lenovo H4 Series Hardware Replacement Guide V3.0
Page 33
Refer to the Support Web site at: http://consumersupport.lenovo.com. Remove the computer cover. Remove the screw that was included with your computer or in the Safety and Warranty Guide that secures the latch to the chassis, open the adapter latch and remove the adapter by pulling it straight ...out of the Safety and Warranty Guide or HMM, go to "Removing the computer cover". 2. To obtain copies of the adapter connector. 28 Hardware Replacement Guide To replace an adapter: 1....
Refer to the Support Web site at: http://consumersupport.lenovo.com. Remove the computer cover. Remove the screw that was included with your computer or in the Safety and Warranty Guide that secures the latch to the chassis, open the adapter latch and remove the adapter by pulling it straight ...out of the Safety and Warranty Guide or HMM, go to "Removing the computer cover". 2. To obtain copies of the adapter connector. 28 Hardware Replacement Guide To replace an adapter: 1....
Lenovo H4 Series Hardware Replacement Guide V3.0
Page 35
... computer and connect the new keyboard cable to the same connector. 5. Remove any repair before reading the "Important safety information" in the Safety and Warranty Guide that was included with your computer or in the Hardware Maintenance Manual (HMM) for the keyboard. The mouse can be connected to a USB ...connector at either front or at http://consumersupport.lenovo.com. Note: Your keyboard will be replaced using the same method. 30 Hardware Replacement Guide To obtain copies of the Safety and...
... computer and connect the new keyboard cable to the same connector. 5. Remove any repair before reading the "Important safety information" in the Safety and Warranty Guide that was included with your computer or in the Hardware Maintenance Manual (HMM) for the keyboard. The mouse can be connected to a USB ...connector at either front or at http://consumersupport.lenovo.com. Note: Your keyboard will be replaced using the same method. 30 Hardware Replacement Guide To obtain copies of the Safety and...

Lenovo H4 Series User Guide V3.0
Page 2
... Danger: Be aware of possible damage to programs, devices, or data. Note: Pay attention to your product. Refer to the Safety and Warranty Guide that you received with this product for this product. Important Safety Information Before using this manual, it is important that you read and ...understand all of personal injury or damage to this important information. © Copyright Lenovo 2011 Reading and understanding this safety information reduces the risk of the related safety information for the latest safety information.
... Danger: Be aware of possible damage to programs, devices, or data. Note: Pay attention to your product. Refer to the Safety and Warranty Guide that you received with this product for this product. Important Safety Information Before using this manual, it is important that you read and ...understand all of personal injury or damage to this important information. © Copyright Lenovo 2011 Reading and understanding this safety information reduces the risk of the related safety information for the latest safety information.

