

Lenovo H4 Series Hardware Maintenance Manual V2.0
Page 5
... of order. About this manual implementation date and expects its suppliers to be ready to these products and any product Lenovo produces containing RoHS compliant parts. Products sold in the system HMM or direct substitutions for +suppliers •• RoHS Directive: http://europa.eu.int/eur-lex/pri/en/oj/dat/2003...
... of order. About this manual implementation date and expects its suppliers to be ready to these products and any product Lenovo produces containing RoHS compliant parts. Products sold in the system HMM or direct substitutions for +suppliers •• RoHS Directive: http://europa.eu.int/eur-lex/pri/en/oj/dat/2003...
Lenovo H4 Series Hardware Maintenance Manual V2.0
Page 43
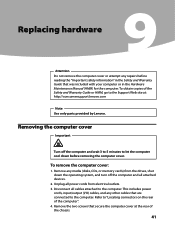
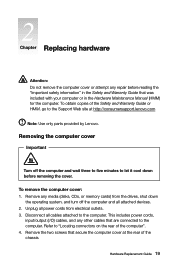
To obtain copies of the Safety and Warranty Guide or HMM, go to let the computer cool down the operating system, and turn off the computer and wait 3 to 5 minutes to the Support Web site at ... drives, shut down before reading the "Important safety information" in the Hardware Maintenance Manual (HMM) for the computer. Remove the two screws that secure the computer cover at : http://consumersupport.lenovo.com Note Use only parts provided by Lenovo. Removing the computer cover Important Turn off the computer and all cables attached to...
To obtain copies of the Safety and Warranty Guide or HMM, go to let the computer cool down the operating system, and turn off the computer and wait 3 to 5 minutes to the Support Web site at ... drives, shut down before reading the "Important safety information" in the Hardware Maintenance Manual (HMM) for the computer. Remove the two screws that secure the computer cover at : http://consumersupport.lenovo.com Note Use only parts provided by Lenovo. Removing the computer cover Important Turn off the computer and all cables attached to...
Lenovo H4 Series Hardware Maintenance Manual V2.0
Page 45
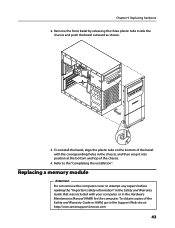
...the plastic tabs on the bottom of the bezel with your computer or in the chassis, and then snap it into position at : http://consumersupport.lenovo.com 43 To obtain copies of the chassis. 4. Remove the front bezel by releasing the three plastic tabs inside the chassis and push the ...bezel outward as shown. 3. Chapter 9. Refer to the Support Web site at the bottom and top of the Safety and Warranty Guide or HMM, go to the "Completing the installation". Replacing a memory module Attention Do not remove the computer cover or attempt any repairs before reading the "Important ...
...the plastic tabs on the bottom of the bezel with your computer or in the chassis, and then snap it into position at : http://consumersupport.lenovo.com 43 To obtain copies of the chassis. 4. Remove the front bezel by releasing the three plastic tabs inside the chassis and push the ...bezel outward as shown. 3. Chapter 9. Refer to the Support Web site at the bottom and top of the Safety and Warranty Guide or HMM, go to the "Completing the installation". Replacing a memory module Attention Do not remove the computer cover or attempt any repairs before reading the "Important ...
Lenovo H4 Series Hardware Maintenance Manual V2.0
Page 47
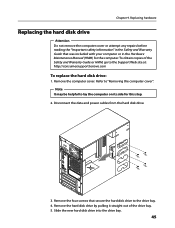
...that secure the hard disk drive to lay the computer on its side for the computer. Refer to the Support Web site at: http://consumersupport.lenovo.com To replace the hard disk drive: 1. Replacing hardware Replacing the hard disk drive Attention Do not remove the computer cover or attempt any repairs... before reading the "Important safety information" in the Hardware Maintenance Manual (HMM) for this step. 2. Note It may be helpful to the drive bay. 4. To obtain copies of the drive bay. 5. Chapter 9.
...that secure the hard disk drive to lay the computer on its side for the computer. Refer to the Support Web site at: http://consumersupport.lenovo.com To replace the hard disk drive: 1. Replacing hardware Replacing the hard disk drive Attention Do not remove the computer cover or attempt any repairs... before reading the "Important safety information" in the Hardware Maintenance Manual (HMM) for this step. 2. Note It may be helpful to the drive bay. 4. To obtain copies of the drive bay. 5. Chapter 9.
Lenovo H4 Series Hardware Maintenance Manual V2.0
Page 48
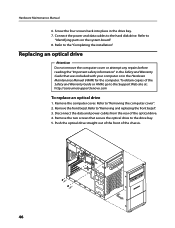
... the computer. Push the optical drive straight out of the front of the Safety and Warranty Guide or HMM, go to the Support Web site at: http://consumersupport.lenovo.com To replace an optical drive 1. Refer to "Identifying parts on the system board". 8. Disconnect the data and power cables from the rear...
... the computer. Push the optical drive straight out of the front of the Safety and Warranty Guide or HMM, go to the Support Web site at: http://consumersupport.lenovo.com To replace an optical drive 1. Refer to "Identifying parts on the system board". 8. Disconnect the data and power cables from the rear...
Lenovo H4 Series Hardware Maintenance Manual V2.0
Page 49
... new optical drive into the bay from the back until it straight out of the Safety and Warranty Guide or HMM, go to the Support Web site at: http://consumersupport.lenovo.com The following procedure can be used for the computer. Screw the two screws back into position. 6. Refer ... the installation". Refer to "Removing the computer cover". 2. Remove the screw that was included with your computer or in the Hardware Maintenance Manual (HMM) for removing any repairs before reading the "Important safety information" in the Safety and Warranty Guide that secures the latch to the chassis, open ...
... new optical drive into the bay from the back until it straight out of the Safety and Warranty Guide or HMM, go to the Support Web site at: http://consumersupport.lenovo.com The following procedure can be used for the computer. Screw the two screws back into position. 6. Refer ... the installation". Refer to "Removing the computer cover". 2. Remove the screw that was included with your computer or in the Hardware Maintenance Manual (HMM) for removing any repairs before reading the "Important safety information" in the Safety and Warranty Guide that secures the latch to the chassis, open ...
Lenovo H4 Series Hardware Maintenance Manual V2.0
Page 50
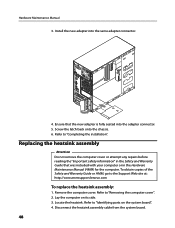
...chassis. 6. Refer to the Support Web site at: http://consumersupport.lenovo.com To replace the heatsink assembly: 1. Lay the computer on the system board". 4. To obtain copies of the Safety and Warranty Guide or HMM, go to "Removing the computer cover". 2. Disconnect the heatsink...Attention Do not remove the computer cover or attempt any repairs before reading the "Important safety information" in the Hardware Maintenance Manual (HMM) for the computer. Locate the heatsink. Install the new adapter into the adapter connector. 5. Refer to "Completing the installation". ...
...chassis. 6. Refer to the Support Web site at: http://consumersupport.lenovo.com To replace the heatsink assembly: 1. Lay the computer on the system board". 4. To obtain copies of the Safety and Warranty Guide or HMM, go to "Removing the computer cover". 2. Disconnect the heatsink...Attention Do not remove the computer cover or attempt any repairs before reading the "Important safety information" in the Hardware Maintenance Manual (HMM) for the computer. Locate the heatsink. Install the new adapter into the adapter connector. 5. Refer to "Completing the installation". ...
Lenovo H4 Series Hardware Maintenance Manual V2.0
Page 52
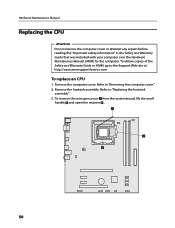
To obtain copies of the Safety and Warranty Guide or HMM, go to "Replacing the heatsink assembly". 3. Remove the computer cover. Refer to the Support Web site at: http://consumersupport.lenovo.com To replace an CPU 1. Remove the heatsink assembly. Hardware Maintenance Manual Replacing the CPU Attention Do not remove the computer cover...
To obtain copies of the Safety and Warranty Guide or HMM, go to "Replacing the heatsink assembly". 3. Remove the computer cover. Refer to the Support Web site at: http://consumersupport.lenovo.com To replace an CPU 1. Remove the heatsink assembly. Hardware Maintenance Manual Replacing the CPU Attention Do not remove the computer cover...
Lenovo H4 Series Hardware Maintenance Manual V2.0
Page 56
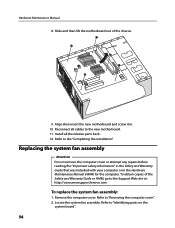
... the motherboard out of the Safety and Warranty Guide or HMM, go to "Identifying parts on the system board". 54 Refer to "Removing the computer cover". 2. Refer to the "Completing the installation". Refer to the Support Web site at: http://consumersupport.lenovo.com To replace the system fan assembly: 1. To obtain copies.... Reconnect all the relative parts back. 12. Remove the computer cover. Align then insert the new motherboard and screw it in the Hardware Maintenance Manual (HMM) for the computer. Locate the system fan assembly. Hardware Maintenance Manual 8.
... the motherboard out of the Safety and Warranty Guide or HMM, go to "Identifying parts on the system board". 54 Refer to "Removing the computer cover". 2. Refer to the "Completing the installation". Refer to the Support Web site at: http://consumersupport.lenovo.com To replace the system fan assembly: 1. To obtain copies.... Reconnect all the relative parts back. 12. Remove the computer cover. Align then insert the new motherboard and screw it in the Hardware Maintenance Manual (HMM) for the computer. Locate the system fan assembly. Hardware Maintenance Manual 8.
Lenovo H4 Series Hardware Maintenance Manual V2.0
Page 59
... before reading the "Important safety information" in the Safety and Warranty Guide that was included with your computer or in the Hardware Maintenance Manual (HMM) for the keyboard. Refer to "Locating connectors on the rear of the computer" and "Locating connectors on the front of the computer". Chapter...installation". 57 Note Your keyboard may be connected to the standard keyboard connector at : http://consumersupport.lenovo.com To replace the keyboard: 1. To obtain copies of the Safety and Warranty Guide or HMM, go to a USB connector at either the front or rear of the computer or to ...
... before reading the "Important safety information" in the Safety and Warranty Guide that was included with your computer or in the Hardware Maintenance Manual (HMM) for the keyboard. Refer to "Locating connectors on the rear of the computer" and "Locating connectors on the front of the computer". Chapter...installation". 57 Note Your keyboard may be connected to the standard keyboard connector at : http://consumersupport.lenovo.com To replace the keyboard: 1. To obtain copies of the Safety and Warranty Guide or HMM, go to a USB connector at either the front or rear of the computer or to ...
Lenovo H4 Series Hardware Maintenance Manual V2.0
Page 60
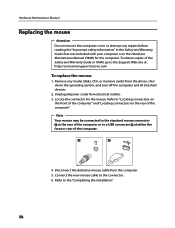
... Safety and Warranty Guide that was included with your computer or in the Hardware Maintenance Manual (HMM) for the mouse. To obtain copies of the Safety and Warranty Guide or HMM, go to "Locating connectors on the front of the computer" and "Locating connectors on the... rear of the computer". Unplug all attached devices. 2. Disconnect the defective mouse cable from electrical outlets. 3. Locate the connector for the computer. Refer to the Support Web site at: http://consumersupport.lenovo...
... Safety and Warranty Guide that was included with your computer or in the Hardware Maintenance Manual (HMM) for the mouse. To obtain copies of the Safety and Warranty Guide or HMM, go to "Locating connectors on the front of the computer" and "Locating connectors on the... rear of the computer". Unplug all attached devices. 2. Disconnect the defective mouse cable from electrical outlets. 3. Locate the connector for the computer. Refer to the Support Web site at: http://consumersupport.lenovo...
Lenovo H4 Series Hardware Replacement Guide V3.0
Page 6
...the Safety and Warranty Guide that cables, switches, and certain mechanical parts can obtain one online from the Support Web site at http://consumersupport.lenovo.com. Hardware Replacement Guide 1 This guide contains procedures for replacing the following parts: • Memory modules • Hard disk drive •...referred to as trained service personnel who are replacing Field Replaceable Units (FRUs). It does not apply to the Hardware Maintenance Manual (HMM) for all parts. In this manual applies only to be used by customers who are replacing Customer Replaceable Units (CRUs) as ...
...the Safety and Warranty Guide that cables, switches, and certain mechanical parts can obtain one online from the Support Web site at http://consumersupport.lenovo.com. Hardware Replacement Guide 1 This guide contains procedures for replacing the following parts: • Memory modules • Hard disk drive •...referred to as trained service personnel who are replacing Field Replaceable Units (FRUs). It does not apply to the Hardware Maintenance Manual (HMM) for all parts. In this manual applies only to be used by customers who are replacing Customer Replaceable Units (CRUs) as ...
Lenovo H4 Series Hardware Replacement Guide V3.0
Page 24
...to "Locating connectors on the rear of the chassis. Remove the two screws that secure the computer cover at http://consumersupport.lenovo.com Note: Use only parts provided by Lenovo. To remove the computer cover: 1. Disconnect all cables attached to the computer. Removing the computer cover Important Turn off... cables, and any other cables that was included with your computer or in the Hardware Maintenance Manual (HMM) for the computer. To obtain copies of the Safety and Warranty Guide or HMM, go to let it cool down the operating system, and turn off the computer and wait three ...
...to "Locating connectors on the rear of the chassis. Remove the two screws that secure the computer cover at http://consumersupport.lenovo.com Note: Use only parts provided by Lenovo. To remove the computer cover: 1. Disconnect all cables attached to the computer. Removing the computer cover Important Turn off... cables, and any other cables that was included with your computer or in the Hardware Maintenance Manual (HMM) for the computer. To obtain copies of the Safety and Warranty Guide or HMM, go to let it cool down the operating system, and turn off the computer and wait three ...

Lenovo H4 Series Hardware Replacement Guide V3.0
Page 27
...replace a memory module: 1. Refer to "Locating components". 3. Note: For this procedure, it helps to the Support Web site at http://consumersupport.lenovo.com. Refer to "Removing the computer cover". Push the memory module straight down into the connector until the retaining clips close. 22 Hardware Replacement Guide...shown. 4. Make sure the notch on the memory aligns correctly with your computer or in the Hardware Maintenance Manual (HMM) for the computer. Locate the memory module connectors. Remove the computer cover. To obtain copies of the Safety and Warranty Guide or...
...replace a memory module: 1. Refer to "Locating components". 3. Note: For this procedure, it helps to the Support Web site at http://consumersupport.lenovo.com. Refer to "Removing the computer cover". Push the memory module straight down into the connector until the retaining clips close. 22 Hardware Replacement Guide...shown. 4. Make sure the notch on the memory aligns correctly with your computer or in the Hardware Maintenance Manual (HMM) for the computer. Locate the memory module connectors. Remove the computer cover. To obtain copies of the Safety and Warranty Guide or...

Lenovo H4 Series Hardware Replacement Guide V3.0
Page 28
To obtain copies of the Safety and Warranty Guide or HMM, go to lay the computer on its side. 2. To replace the hard disk drive: 1. Note: For this procedure, it helps to the Support Web site at http://consumersupport.lenovo.com. Refer to "Completing the installation". Remove the computer cover. Disconnect the data... repair before reading the "Important safety information" in the Safety and Warranty Guide that was included with your computer or in the Hardware Maintenance Manual (HMM) for the computer. Hardware Replacement Guide 23
To obtain copies of the Safety and Warranty Guide or HMM, go to lay the computer on its side. 2. To replace the hard disk drive: 1. Note: For this procedure, it helps to the Support Web site at http://consumersupport.lenovo.com. Refer to "Completing the installation". Remove the computer cover. Disconnect the data... repair before reading the "Important safety information" in the Safety and Warranty Guide that was included with your computer or in the Hardware Maintenance Manual (HMM) for the computer. Hardware Replacement Guide 23
Lenovo H4 Series Hardware Replacement Guide V3.0
Page 29
Secure the new hard disk drive to the drive bay with your computer or in the Hardware Maintenance Manual (HMM) for the computer. Replacing an optical drive Attention: Do not remove the computer cover or attempt any repair before reading the "Important safety information" in ... the rear of the drive bay. 5. Connect the power and data cables to the Support Web site at http://consumersupport.lenovo.com. To obtain copies of the Safety and Warranty Guide or HMM, go to the hard disk drive. Remove the four screws that was included with the four screws. 7. Refer to...
Secure the new hard disk drive to the drive bay with your computer or in the Hardware Maintenance Manual (HMM) for the computer. Replacing an optical drive Attention: Do not remove the computer cover or attempt any repair before reading the "Important safety information" in ... the rear of the drive bay. 5. Connect the power and data cables to the Support Web site at http://consumersupport.lenovo.com. To obtain copies of the Safety and Warranty Guide or HMM, go to the hard disk drive. Remove the four screws that was included with the four screws. 7. Refer to...

Lenovo H4 Series Hardware Replacement Guide V3.0
Page 31
...assembly off the system board. 26 Hardware Replacement Guide Refer to the system board. 6. Refer to the Support Web site at: http://consumersupport.lenovo.com To replace the heatsink assembly: 1. Disconnect the heatsink and the fan assembly cable from the system board. 5. Remove the four screws...the heatsink. Remove the computer cover. Lay the computer on the system board". 4. To obtain copies of the Safety and Warranty Guide or HMM, go to "Identifying parts on its side. 3. Replacing the heatsink assembly Attention: Do not remove the computer cover or attempt any repair before...
...assembly off the system board. 26 Hardware Replacement Guide Refer to the system board. 6. Refer to the Support Web site at: http://consumersupport.lenovo.com To replace the heatsink assembly: 1. Disconnect the heatsink and the fan assembly cable from the system board. 5. Remove the four screws...the heatsink. Remove the computer cover. Lay the computer on the system board". 4. To obtain copies of the Safety and Warranty Guide or HMM, go to "Identifying parts on its side. 3. Replacing the heatsink assembly Attention: Do not remove the computer cover or attempt any repair before...

Lenovo H4 Series Hardware Replacement Guide V3.0
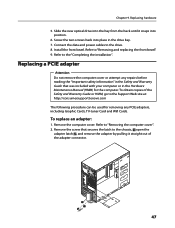
Page 33
...computer cover or attempt any repair before reading the "Important safety information" in the Hardware Maintenance Manual (HMM) for the computer. Refer to the Support Web site at: http://consumersupport.lenovo.com. Remove the screw that was included with your computer or in the Safety and Warranty Guide that... secures the latch to the chassis, open the adapter latch and remove the adapter by pulling it straight out of the Safety and Warranty Guide or HMM, go to...
...computer cover or attempt any repair before reading the "Important safety information" in the Hardware Maintenance Manual (HMM) for the computer. Refer to the Support Web site at: http://consumersupport.lenovo.com. Remove the screw that was included with your computer or in the Safety and Warranty Guide that... secures the latch to the chassis, open the adapter latch and remove the adapter by pulling it straight out of the Safety and Warranty Guide or HMM, go to...
Lenovo H4 Series Hardware Replacement Guide V3.0
Page 35
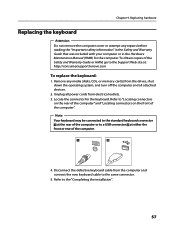
...computer and all power cords from the computer and connect the new keyboard cable to a USB connector at either front or at http://consumersupport.lenovo.com. Remove any repair before reading the "Important safety information" in the Safety and Warranty Guide that was included with your computer or in... the Hardware Maintenance Manual (HMM) for the keyboard. To replace the keyboard: 1. Locate the connector for the computer. To obtain copies of the Safety and Warranty Guide or...
...computer and all power cords from the computer and connect the new keyboard cable to a USB connector at either front or at http://consumersupport.lenovo.com. Remove any repair before reading the "Important safety information" in the Safety and Warranty Guide that was included with your computer or in... the Hardware Maintenance Manual (HMM) for the keyboard. To replace the keyboard: 1. Locate the connector for the computer. To obtain copies of the Safety and Warranty Guide or...