
Lenovo H4 Series Hardware Maintenance Manual V2.0
Page 2
... computer cover 41 Removing and replacing the front bezel 42 Replacing a memory module 43 Replacing the hard disk drive 45 Replacing an optical drive 46 Replacing a PCIE adapter 47 Replacing the heatsink assembly 48 Replacing the CPU 50 Replacing the motherboard 53 Replacing the system fan assembly 54 Replacing the power supply 56 Replacing the keyboard 57 Replacing the mouse 58 Replacing the external speaker 59 Completing the installation 59 Chapter 10. Symptom-to-FRU Index 28 Hard disk drive boot error 28 Power Supply Problems 29 Beep symptoms 30 POST error codes...
... computer cover 41 Removing and replacing the front bezel 42 Replacing a memory module 43 Replacing the hard disk drive 45 Replacing an optical drive 46 Replacing a PCIE adapter 47 Replacing the heatsink assembly 48 Replacing the CPU 50 Replacing the motherboard 53 Replacing the system fan assembly 54 Replacing the power supply 56 Replacing the keyboard 57 Replacing the mouse 58 Replacing the external speaker 59 Completing the installation 59 Chapter 10. Symptom-to-FRU Index 28 Hard disk drive boot error 28 Power Supply Problems 29 Beep symptoms 30 POST error codes...
Lenovo H4 Series Hardware Maintenance Manual V2.0
Page 10
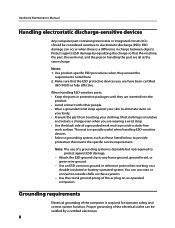
... function. Notes: 1. Make sure that the ESD protective devices you are wearing a wrist strap. •• Use the black side of the ac plug on a double-insulated or battery-operated system. Hardware Maintenance Manual Handling electrostatic discharge-sensitive devices Any computer part containing transistors or integrated circuits (ICs) should be verified by equalizing the charge so that the machine, the part, the work mat, and...
... function. Notes: 1. Make sure that the ESD protective devices you are wearing a wrist strap. •• Use the black side of the ac plug on a double-insulated or battery-operated system. Hardware Maintenance Manual Handling electrostatic discharge-sensitive devices Any computer part containing transistors or integrated circuits (ICs) should be verified by equalizing the charge so that the machine, the part, the work mat, and...
Lenovo H4 Series Hardware Maintenance Manual V2.0
Page 15
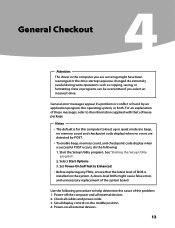
.... General error messages appear if a problem or conflict is for this computer to Enhanced. • Before replacing any FRUs, ensure that software package. A down-level BIOS might have been rearranged or the drive startup sequence changed. See "Starting the Setup Utility program". 2. Power-off the computer and all external devices. 13 Notes • The default is found by POST. • To enable beep, memory count, and checkpoint code display when...
.... General error messages appear if a problem or conflict is for this computer to Enhanced. • Before replacing any FRUs, ensure that software package. A down-level BIOS might have been rearranged or the drive startup sequence changed. See "Starting the Setup Utility program". 2. Power-off the computer and all external devices. 13 Notes • The default is found by POST. • To enable beep, memory count, and checkpoint code display when...
Lenovo H4 Series Hardware Maintenance Manual V2.0
Page 16
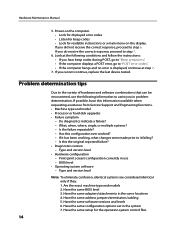
... Service Support and Engineering functions. •• Machine type and model •• Processor or hard disk upgrades •• Failure symptom - Problem determination tips Due to the variety of hardware and software combinations that can be encountered, use - Type and version level •• Hardware configuration - Have the same software versions and levels 6. Power-on the computer. • Look for displayed error codes • Listen for beep codes • Look for the operation system control...
... Service Support and Engineering functions. •• Machine type and model •• Processor or hard disk upgrades •• Failure symptom - Problem determination tips Due to the variety of hardware and software combinations that can be encountered, use - Type and version level •• Hardware configuration - Have the same software versions and levels 6. Power-on the computer. • Look for displayed error codes • Listen for beep codes • Look for the operation system control...

Lenovo H4 Series Hardware Maintenance Manual V2.0
Page 19
... at least one alphabetic character, one numeric character. • Setup Utility program and hard disk drive passwords are set , it deters unauthorized persons from your supervisor password. 17 However, to change any passwords, read the following types of each time you decide to use your computer and data. Chapter 5. Using the Setup Utility keyboard. However, if you try to set a Supervisor Password, a password prompt is displayed each screen. After you set a Supervisor Password.
... at least one alphabetic character, one numeric character. • Setup Utility program and hard disk drive passwords are set , it deters unauthorized persons from your supervisor password. 17 However, to change any passwords, read the following types of each time you decide to use your computer and data. Chapter 5. Using the Setup Utility keyboard. However, if you try to set a Supervisor Password, a password prompt is displayed each screen. After you set a Supervisor Password.
Lenovo H4 Series Hardware Maintenance Manual V2.0
Page 21
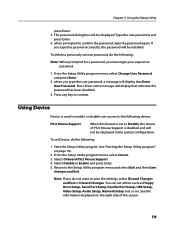
Type the new password, and press Enter. 4. To delete a previously set Device, do the following: 1. To set user password, do not want to contine. From the Setup Utility program menu, select Device. 3. Note: If you do the following device: PS/2 Mouse Support When this feature is set others such as Floppy Drive Setup, Serial Port Setup, Parallet Port Setup, USB Setup, Video Setup, Audio Setup, Network Setup and so on. From the Setup Utility program menu, select Change User Password and press Enter. 2. Press Enter and a message will display that Enter New Password. ...
Type the new password, and press Enter. 4. To delete a previously set Device, do the following: 1. To set user password, do not want to contine. From the Setup Utility program menu, select Device. 3. Note: If you do the following device: PS/2 Mouse Support When this feature is set others such as Floppy Drive Setup, Serial Port Setup, Parallet Port Setup, USB Setup, Video Setup, Audio Setup, Network Setup and so on. From the Setup Utility program menu, select Change User Password and press Enter. 2. Press Enter and a message will display that Enter New Password. ...
Lenovo H4 Series Hardware Maintenance Manual V2.0
Page 25
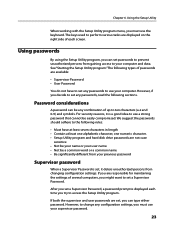
...; Setup Utility program and hard disk drive passwords are not case sensitive • Not be your name or your user name • Not be any combination of passwords are set a Supervisor Password. Chapter 6. Using the Setup Utility When working with the Setup Utility program menu, you can be a common word or a common name • Be significantly different from gaining access to access the Setup Utility program. Using passwords By using the Setup Utility program, you must use the keyboard...
...; Setup Utility program and hard disk drive passwords are not case sensitive • Not be your name or your user name • Not be any combination of passwords are set a Supervisor Password. Chapter 6. Using the Setup Utility When working with the Setup Utility program menu, you can be a common word or a common name • Be significantly different from gaining access to access the Setup Utility program. Using passwords By using the Setup Utility program, you must use the keyboard...
Lenovo H4 Series Hardware Maintenance Manual V2.0
Page 32
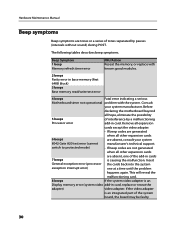
.... This will reveal the malfunctioning card. 8 beeps If the system video adapter is an integrated part of the add-in card. If the video adapter is an Display memory error (system video add-in base memory (first 64KB block) 3 beeps Base memory read/write test error 4 beeps Fatal error indicating a serious Motherboard timer not operational problem with known good modules. 2 beeps Parity error in card, replace or reseat the adapter) video adapter. Insert General exception error (processor the cards back into the system exception...
.... This will reveal the malfunctioning card. 8 beeps If the system video adapter is an integrated part of the add-in card. If the video adapter is an Display memory error (system video add-in base memory (first 64KB block) 3 beeps Base memory read/write test error 4 beeps Fatal error indicating a serious Motherboard timer not operational problem with known good modules. 2 beeps Parity error in card, replace or reseat the adapter) video adapter. Insert General exception error (processor the cards back into the system exception...
Lenovo H4 Series Hardware Maintenance Manual V2.0
Page 33
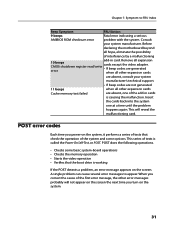
... options. When you power-on the system, it performs a series of tests that check the operation of interference by a malfunctioning add-in cards is called the Power-On Self-Test, or POST. Chapter 7. Remove all hope, eliminate the possibility of the system and some basic system-board operations • Checks the memory operation • Starts the video operation • Verifies that the boot drive is working If the POST detects a problem...
... options. When you power-on the system, it performs a series of tests that check the operation of interference by a malfunctioning add-in cards is called the Power-On Self-Test, or POST. Chapter 7. Remove all hope, eliminate the possibility of the system and some basic system-board operations • Checks the memory operation • Starts the video operation • Verifies that the boot drive is working If the POST detects a problem...
Lenovo H4 Series Hardware Maintenance Manual V2.0
Page 34
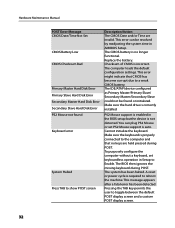
This error can plug PS2 Mouse or set keyboardless operation in Setup to show POST screen Description/Action The CMOS Date and/or Time are held pressed during POST. The CMOS battery is correctly installed. Replace the battery. This error might indicate that no longer functional. Make sure the hard drive is no keys are invalid. Pressing the TAB key permits the user to reboot the machine. The system has been halted. Checksum...
This error can plug PS2 Mouse or set keyboardless operation in Setup to show POST screen Description/Action The CMOS Date and/or Time are held pressed during POST. The CMOS battery is correctly installed. Replace the battery. This error might indicate that no longer functional. Make sure the hard drive is no keys are invalid. Pressing the TAB key permits the user to reboot the machine. The system has been halted. Checksum...
Lenovo H4 Series Hardware Maintenance Manual V2.0
Page 35
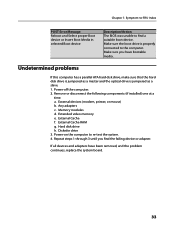
... the hard disk drive is jumpered as a master and the optical drive is properly connected to the computer. Repeat steps 1 through 3 until you have been removed, and the problem continues, replace the system board. 33 Make sure you find a suitable boot device. Any adapters c. External Cache f. Chapter 7. Memory modules d. Extended video memory e. Power-off the computer. 2. Remove or disconnect the following components (if installed) one at a time. If all devices and adapters have bootable media. Hard disk drive...
... the hard disk drive is jumpered as a master and the optical drive is properly connected to the computer. Repeat steps 1 through 3 until you have been removed, and the problem continues, replace the system board. 33 Make sure you find a suitable boot device. Any adapters c. External Cache f. Chapter 7. Memory modules d. Extended video memory e. Power-off the computer. 2. Remove or disconnect the following components (if installed) one at a time. If all devices and adapters have bootable media. Hard disk drive...
Lenovo H4 Series Hardware Maintenance Manual V2.0
Page 56
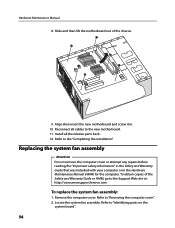
... repairs before reading the "Important safety information" in the Safety and Warranty Guide that was included with your computer or in . 10. Locate the system fan assembly. Remove the computer cover. Refer to the "Completing the installation". Hardware Maintenance Manual 8. To obtain copies of the chassis. 9. Reconnect all the relative parts back. 12. Install all cables to "Removing the computer cover". 2. Align then insert the new motherboard...
... repairs before reading the "Important safety information" in the Safety and Warranty Guide that was included with your computer or in . 10. Locate the system fan assembly. Remove the computer cover. Refer to the "Completing the installation". Hardware Maintenance Manual 8. To obtain copies of the chassis. 9. Reconnect all the relative parts back. 12. Install all cables to "Removing the computer cover". 2. Align then insert the new motherboard...
Lenovo H4 Series Hardware Replacement Guide V3.0
Page 6
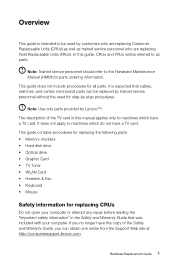
... the Hardware Maintenance Manual (HMM) for all parts. This guide does not include procedures for parts ordering information. This guide contains procedures for replacing the following parts: • Memory modules • Hard disk drive • Optical drive • Graphic Card • TV Tuner • WLAN Card • Heatsink & Fan • Keyboard • Mouse Safety information for step-by trained service personnel without the need for replacing CRUs Do not open your computer or attempt any repair...
... the Hardware Maintenance Manual (HMM) for all parts. This guide does not include procedures for parts ordering information. This guide contains procedures for replacing the following parts: • Memory modules • Hard disk drive • Optical drive • Graphic Card • TV Tuner • WLAN Card • Heatsink & Fan • Keyboard • Mouse Safety information for step-by trained service personnel without the need for replacing CRUs Do not open your computer or attempt any repair...
Lenovo H4 Series Hardware Replacement Guide V3.0
Page 13
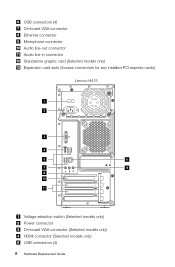
USB connectors (4) On-board VGA connector Ethernet connector Microphone connector Audio line-out connector Audio line-in connector Standalone graphic card (Selected models only) Expansion card slots (Access connectors for any installed PCI express cards) Lenovo H415 Voltage selection switch (Selected models only) Power connector On-board VGA connector (Selected models only) HDMI connector (Selected models only) USB connectors (4) 8 Hardware Replacement Guide
USB connectors (4) On-board VGA connector Ethernet connector Microphone connector Audio line-out connector Audio line-in connector Standalone graphic card (Selected models only) Expansion card slots (Access connectors for any installed PCI express cards) Lenovo H415 Voltage selection switch (Selected models only) Power connector On-board VGA connector (Selected models only) HDMI connector (Selected models only) USB connectors (4) 8 Hardware Replacement Guide
Lenovo H4 Series Hardware Replacement Guide V3.0
Page 16
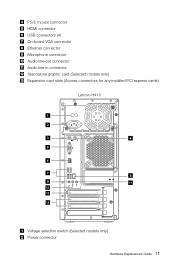
PS/2 mouse connector HDMI connector USB connectors (4) On-board VGA connector Ethernet connector Microphone connector Audio line-out connector Audio line-in connector Standalone graphic card (Selected models only) Expansion card slots (Access connectors for any installed PCI express cards) Lenovo H410 Voltage selection switch (Selected models only) Power connector Hardware Replacement Guide 11
PS/2 mouse connector HDMI connector USB connectors (4) On-board VGA connector Ethernet connector Microphone connector Audio line-out connector Audio line-in connector Standalone graphic card (Selected models only) Expansion card slots (Access connectors for any installed PCI express cards) Lenovo H410 Voltage selection switch (Selected models only) Power connector Hardware Replacement Guide 11

Lenovo H4 Series Hardware Replacement Guide V3.0
Page 17
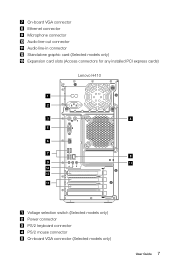
PS/2 keyboard connector PS/2 mouse connector On-board VGA connector (Selected models only) HDMI connector (Selected models only) USB connectors (4) Ethernet connector Microphone connector Audio line-out connector Audio line-in connector PCI Express X 16 graphics adapter connector (Some models are equipped with a graphics card) PCI Express X 1 adapter connector (Some models are equipped with a WIFI card or TV tuner card.) 12 Hardware Replacement Guide
PS/2 keyboard connector PS/2 mouse connector On-board VGA connector (Selected models only) HDMI connector (Selected models only) USB connectors (4) Ethernet connector Microphone connector Audio line-out connector Audio line-in connector PCI Express X 16 graphics adapter connector (Some models are equipped with a graphics card) PCI Express X 1 adapter connector (Some models are equipped with a WIFI card or TV tuner card.) 12 Hardware Replacement Guide
Lenovo H4 Series User Guide V3.0
Page 12
On-board VGA connector Ethernet connector Microphone connector Audio line-out connector Audio line-in connector Standalone graphic card (Selected models only) Expansion card slots (Access connectors for any installed PCI express cards) Lenovo H410 Voltage selection switch (Selected models only) Power connector PS/2 keyboard connector PS/2 mouse connector On-board VGA connector (Selected models only) User Guide 7
On-board VGA connector Ethernet connector Microphone connector Audio line-out connector Audio line-in connector Standalone graphic card (Selected models only) Expansion card slots (Access connectors for any installed PCI express cards) Lenovo H410 Voltage selection switch (Selected models only) Power connector PS/2 keyboard connector PS/2 mouse connector On-board VGA connector (Selected models only) User Guide 7
Lenovo H4 Series User Guide V3.0
Page 22
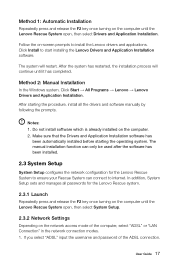
... System Setup. 2.3.2 Network Settings Depending on -screen prompts to install the Lenovo drivers and applications. Method 1: Automatic Installation Repeatedly press and release the F2 key once turning on the computer. 2. Make sure that the Drivers and Application Installation software has been automatically installed before starting the procedure, install all passwords for the Lenovo Rescue System to ensure your Rescue System can connect to start installing the Lenovo Drivers and Application Installation software. User Guide 17 Method 2: Manual Installation In the Windows...
... System Setup. 2.3.2 Network Settings Depending on -screen prompts to install the Lenovo drivers and applications. Method 1: Automatic Installation Repeatedly press and release the F2 key once turning on the computer. 2. Make sure that the Drivers and Application Installation software has been automatically installed before starting the procedure, install all passwords for the Lenovo Rescue System to ensure your Rescue System can connect to start installing the Lenovo Drivers and Application Installation software. User Guide 17 Method 2: Manual Installation In the Windows...
Lenovo H4 Series User Guide V3.0
Page 23
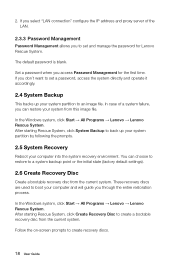
In case of the LAN. 2.3.3 Password Management Password Management allows you don't want to set and manage the password for the first time. You can restore your computer into the system recovery environment. After starting Rescue System, click Create Recovery Disc to boot your system partition to create recovery discs. 18 User Guide After starting Rescue System, click System Backup to a system backup point or the initial state (factory default settings). 2.6 Create Recovery Disc Create a bootable recovery disc from...
In case of the LAN. 2.3.3 Password Management Password Management allows you don't want to set and manage the password for the first time. You can restore your computer into the system recovery environment. After starting Rescue System, click Create Recovery Disc to boot your system partition to create recovery discs. 18 User Guide After starting Rescue System, click System Backup to a system backup point or the initial state (factory default settings). 2.6 Create Recovery Disc Create a bootable recovery disc from...
Lenovo H4 Series User Guide V3.0
Page 29
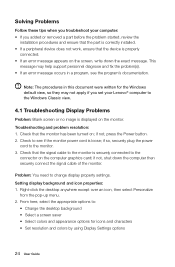
... you added or removed a part before the problem started, review the installation procedures and ensure that the part is correctly installed. • If a peripheral device does not work, ensure that the signal cable to the monitor is securely connected to the connector on the computer graphics card; Check that the monitor has been turned on; This message may not apply if you set your computer: • If you troubleshoot your Lenovo®...
... you added or removed a part before the problem started, review the installation procedures and ensure that the part is correctly installed. • If a peripheral device does not work, ensure that the signal cable to the monitor is securely connected to the connector on the computer graphics card; Check that the monitor has been turned on; This message may not apply if you set your computer: • If you troubleshoot your Lenovo®...


