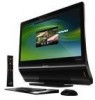
Lenovo IdeaCentre A600 Hardware Replacement Guide V1.1
Page 27
...) from the drives, shut down your operating system, and turn off all attached devices and the computer. 24 Hardware Replacement Guide 31037963_A6_HRG_EN_V1.1.indd 24 2009.4.10 3:38:50 PM Note: Your keyboard and mouse might be connected to the "Completing the installation". Remove any repair before reading the "Important safety information" in... Manual (HMM) for the keyboard and mouse. Disconnect the failing keyboard or mouse cable from electrical outlets. 3. Refer to the USB connector at http://consumersupport.lenovo.com.
Lenovo IdeaCentre A600 Hardware Replacement Guide V1.0
Page 20
Refer to "Completing the installation." Refer to step 2 of the cables from the system board. 31036449_A6_HRG_EN.indd 17 Hardware Replacement Guide 17 2009.1.12 3:50:21 PM Refer to "Removing the computer cover." 2. 10. Replacing an optical drive To replace an optical drive 1. Remove the computer cover. Open the system bay. Disconnect one end of the ODD data and power cable from the rear of the optical drive and the other end of the "Replacing the hard disk drive" section. 3.
Lenovo IdeaCentre A600 Hardware Replacement Guide V1.0
Page 22
Close the system bay. 10. To obtain copies of the "Replacing the hard disk drive" section. 3. Refer to step 2 of the Safety and Warranty Guide or ... memory module 1. Remove the computer cover. Refer to remove it from its socket . 31036449_A6_HRG_EN.indd 19 Hardware Replacement Guide 19 2009.1.12 3:50:29 PM 9. Push out the latches on both sides of the memory socket to release the memory module and gently pull the memory module upward... computer or in the Hardware Maintenance Manual (HMM) for the computer. Refer to the Support Web site at http://consumersupport.lenovo.com.
Lenovo IdeaCentre A600 Hardware Maintenance Manual
Page 52
... installation". Never touch the heat sink with any metal or with your hands. To replace the MXM heat sink 1. Refer to the chassis. 50 Close the system bay. 10. Open the system bay. Loosen the four screws (1 to 4) that secure the MXM heat sink to step 2 of the "Replacing the hard disk...