Owner's Manual (English)
Page 14
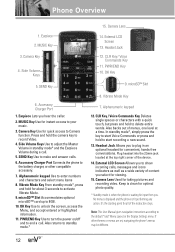
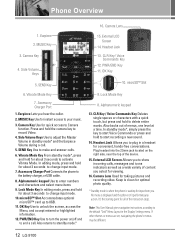
...the device. 14. Note: This User Manual gives navigation instructions according to the battery charger, or other themes or menus are set, navigating the phone's menus may be different. 12 SEND Key 14. PWR/END Key 10. Side Volume Keys 5. Accessory Charger Port 1. Earpiece Lets you select...4. PWR/END Key Use to turn the power on/off and to enter numbers and characters and select menu items 8. Also returns to unlock the screen, access the Menu, and accept entered or highlighted information. 11. Plug headset into the 2.5mm jack located at the top right corner of...
...the device. 14. Note: This User Manual gives navigation instructions according to the battery charger, or other themes or menus are set, navigating the phone's menus may be different. 12 SEND Key 14. PWR/END Key 10. Side Volume Keys 5. Accessory Charger Port 1. Earpiece Lets you select...4. PWR/END Key Use to turn the power on/off and to enter numbers and characters and select menu items 8. Also returns to unlock the screen, access the Menu, and accept entered or highlighted information. 11. Plug headset into the 2.5mm jack located at the top right corner of...
Owner's Manual (English)
Page 21
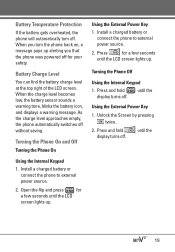
...charged battery or connect the phone to external power source. 2. until the Using the External Power Key 1. Turning the Phone On and Off Turning the Phone On Using the Internal Keypad 1. Open the flip and press for a few seconds until the LCD screen lights up alerting you turn... right of the LCD screen. Press and hold display turns off without saving. Install a charged battery or connect the phone to external power source. 2. When you that the phone was powered off for a few seconds until the LCD screen lights up. Unlock the Screen by pressing twice. 2....
...charged battery or connect the phone to external power source. 2. until the Using the External Power Key 1. Turning the Phone On and Off Turning the Phone On Using the Internal Keypad 1. Open the flip and press for a few seconds until the LCD screen lights up alerting you turn... right of the LCD screen. Press and hold display turns off without saving. Install a charged battery or connect the phone to external power source. 2. When you that the phone was powered off for a few seconds until the LCD screen lights up. Unlock the Screen by pressing twice. 2....
Owner's Manual (English)
Page 22
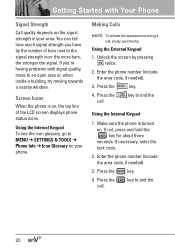
Using the Internal Keypad To see the icon glossary, go to MENU SETTINGS & TOOLS Phone Info Icon Glossary on . Unlock the screen by the number of the LCD screen displays phone status icons. Enter the phone number (include the area code, if needed ). 3. If not, press and hold the key for about three seconds. Press ... the top line of bars next to the signal strength icon: the more bars, the stronger the signal. If you have by pressing twice. 2. Screen Icons When the phone is turned on your area. Getting Started with signal quality, move to an open the flip. Press the 4.
Using the Internal Keypad To see the icon glossary, go to MENU SETTINGS & TOOLS Phone Info Icon Glossary on . Unlock the screen by the number of the LCD screen displays phone status icons. Enter the phone number (include the area code, if needed ). 3. If not, press and hold the key for about three seconds. Press ... the top line of bars next to the signal strength icon: the more bars, the stronger the signal. If you have by pressing twice. 2. Screen Icons When the phone is turned on your area. Getting Started with signal quality, move to an open the flip. Press the 4.
Owner's Manual (English)
Page 25
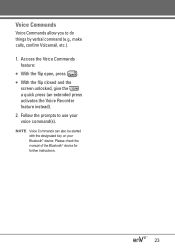
Please check the manual of the Bluetooth® device for further instructions. 23 NOTE Voice Commands can also be started with the designated key on your voice command(s). G With the flip closed and the screen unlocked, give the a quick press (an extended press activates the Voice Recorder feature instead). 2. Follow the prompts to do things by verbal command (e.g., make calls, confirm Voicemail, etc.). 1. Access the Voice Commands feature: G With the flip open, press . Voice Commands Voice Commands allow you to use your Bluetooth® device.
Please check the manual of the Bluetooth® device for further instructions. 23 NOTE Voice Commands can also be started with the designated key on your voice command(s). G With the flip closed and the screen unlocked, give the a quick press (an extended press activates the Voice Recorder feature instead). 2. Follow the prompts to do things by verbal command (e.g., make calls, confirm Voicemail, etc.). 1. Access the Voice Commands feature: G With the flip open, press . Voice Commands Voice Commands allow you to use your Bluetooth® device.

Owner's Manual (English)
Page 26
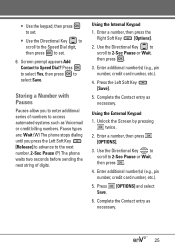
...Key to scroll to Add New Contact/ Update Existing, then press . 3. Use the Directional Key to scroll to Set Speed Dial, then press . 5. Unlock the Screen by pressing twice. 2. Enter a name (max. 32 characters), then press to Mobile 1/ Home/ Work, then press . 5. Change the entry as ...to save your Speed Dials. Use the Directional Key to scroll to customize. 4. Contacts in Your Phone's Memory Storing Basics Using the Internal Keypad 1. Speed Dial Allows you want, then press to a phone number, then press the Right Soft Key [Options]. 4. Use the Directional Key to scroll to save...
...Key to scroll to Add New Contact/ Update Existing, then press . 3. Use the Directional Key to scroll to Set Speed Dial, then press . 5. Unlock the Screen by pressing twice. 2. Enter a name (max. 32 characters), then press to Mobile 1/ Home/ Work, then press . 5. Change the entry as ...to save your Speed Dials. Use the Directional Key to scroll to customize. 4. Contacts in Your Phone's Memory Storing Basics Using the Internal Keypad 1. Speed Dial Allows you want, then press to a phone number, then press the Right Soft Key [Options]. 4. Use the Directional Key to scroll to save...
Owner's Manual (English)
Page 27
... press the Left Soft Key [Release] to advance to the next number. 2-Sec Pause (P) The phone waits two seconds before sending the next string of numbers to access automated systems such as Voicemail or ...Enter a number, then press [OPTIONS]. 3. Complete the Contact entry as necessary. Pause types are: Wait (W) The phone stops dialing until you to enter additional series of digits. G Use the keypad, then press to set . 6. ... Key [Options]. 2. Complete the Contact entry as necessary. 25 Screen prompt appears Add Contact to select Save. Unlock the Screen by pressing twice. 2.
... press the Left Soft Key [Release] to advance to the next number. 2-Sec Pause (P) The phone waits two seconds before sending the next string of numbers to access automated systems such as Voicemail or ...Enter a number, then press [OPTIONS]. 3. Complete the Contact entry as necessary. Pause types are: Wait (W) The phone stops dialing until you to enter additional series of digits. G Use the keypad, then press to set . 6. ... Key [Options]. 2. Complete the Contact entry as necessary. 25 Screen prompt appears Add Contact to select Save. Unlock the Screen by pressing twice. 2.

Owner's Manual (English)
Page 33
... to scroll to paste it into a text field. Press . 7. Paste Allows you highlight to Messaging, then press . 4. Using the External Keypad 1. Unlock the Screen by pressing , or save your message as a Quick Text for future use. Press New Message. 5. G Editing the To: field 2. Select the option...the message into a text field. Cancel Message Cancels message editing and goes to the message. Complete and send by pressing twice. 2. Enter the phone number of the text. With the flip open , press the Right Soft Key [Options]. 3. Alignment/ Font Size/ Font Style/ Text Color/...
... to scroll to paste it into a text field. Press . 7. Paste Allows you highlight to Messaging, then press . 4. Using the External Keypad 1. Unlock the Screen by pressing , or save your message as a Quick Text for future use. Press New Message. 5. G Editing the To: field 2. Select the option...the message into a text field. Cancel Message Cancels message editing and goes to the message. Complete and send by pressing twice. 2. Enter the phone number of the text. With the flip open , press the Right Soft Key [Options]. 3. Alignment/ Font Size/ Font Style/ Text Color/...

Owner's Manual (English)
Page 38
... have new messages. Open the flip and press [MENU]. 2. Reply With Copy Replies to sort your phone deletes the older one and the new one is displayed. 2. A confirmation message is stored as a DUPLICATE. Inbox Your phone will alert you when you to the message sender with a copy of the received message into... same message twice, your messages by sender name or by time received. NOTE If you to the message sender. G By displaying a notification message on the screen (it blinks if it's a high priority message). Press Messaging. 3. Press Inbox. 4. G By displaying on the...
... have new messages. Open the flip and press [MENU]. 2. Reply With Copy Replies to sort your phone deletes the older one and the new one is displayed. 2. A confirmation message is stored as a DUPLICATE. Inbox Your phone will alert you when you to the message sender with a copy of the received message into... same message twice, your messages by sender name or by time received. NOTE If you to the message sender. G By displaying a notification message on the screen (it blinks if it's a high priority message). Press Messaging. 3. Press Inbox. 4. G By displaying on the...
Owner's Manual (English)
Page 53
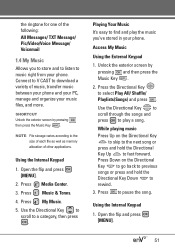
... download a variety of music, transfer music between your phone and your PC, manage and organize your phone. While playing music Press Up on the Directional Key to go back to previous songs or press and hold the Directional Key Up to rewind. 3. Unlock the exterior screen by pressing then press the Music Key . Press...
... download a variety of music, transfer music between your phone and your PC, manage and organize your phone. While playing music Press Up on the Directional Key to go back to previous songs or press and hold the Directional Key Up to rewind. 3. Unlock the exterior screen by pressing then press the Music Key . Press...
Data Sheet (English)
Page 2
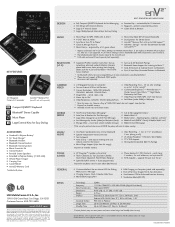
...8224; GENERAL ■ Customizable Font Size on photos stored in all areas. enV2 TM is under 5MB) as Wallpaper * Varies by Sender (Inbox) or Recipient...Screen ■ Large, Widely Spaced External Keys for the listener ■ Music Ringer Support (clips from PC to vary. †Verizon Wireless service required. upgrade firmware over 500KB, the phone will void the warranty and may use of LG... Windows Media Player 11 (or higher) on carrier program availability. erase, lock, unlock multiple messages ■ Call & Messaging Restrictions† ■ Mobile Web 2.0†...
...8224; GENERAL ■ Customizable Font Size on photos stored in all areas. enV2 TM is under 5MB) as Wallpaper * Varies by Sender (Inbox) or Recipient...Screen ■ Large, Widely Spaced External Keys for the listener ■ Music Ringer Support (clips from PC to vary. †Verizon Wireless service required. upgrade firmware over 500KB, the phone will void the warranty and may use of LG... Windows Media Player 11 (or higher) on carrier program availability. erase, lock, unlock multiple messages ■ Call & Messaging Restrictions† ■ Mobile Web 2.0†...
User Guide
Page 12
... the right side, near the top of content you hear the caller. 2. microSD™ Slot Accommodates optional microSD™ card up to unlock the screen, access the Menu, and accept entered or highlighted information. 12. OK Key Use to 8GB. 11. Camera Lens Used for input from ...Use to activate Vibrate Mode. External LCD Screen Allows you to change input mode. 10. Accessory Charger Port Connects the phone to standby mode.* 9. Alphanumeric keypad 13. If other themes or menus are set, navigating the phone's menus may be different. 12 LG 9100 Also returns to the battery charger,...
... the right side, near the top of content you hear the caller. 2. microSD™ Slot Accommodates optional microSD™ card up to unlock the screen, access the Menu, and accept entered or highlighted information. 12. OK Key Use to 8GB. 11. Camera Lens Used for input from ...Use to activate Vibrate Mode. External LCD Screen Allows you to change input mode. 10. Accessory Charger Port Connects the phone to standby mode.* 9. Alphanumeric keypad 13. If other themes or menus are set, navigating the phone's menus may be different. 12 LG 9100 Also returns to the battery charger,...
User Guide
Page 19
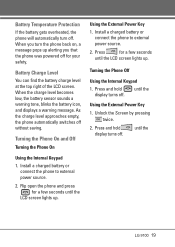
...off for your safety. Flip open the phone and press for a few seconds until the LG 9100 19 until the LCD screen lights up . Battery Charge Level You can find the battery charge level at the top right of the LCD screen. Unlock the Screen by pressing twice. 2. Install a ...charged battery or connect the phone to external power source. 2. ...
...off for your safety. Flip open the phone and press for a few seconds until the LG 9100 19 until the LCD screen lights up . Battery Charge Level You can find the battery charge level at the top right of the LCD screen. Unlock the Screen by pressing twice. 2. Install a ...charged battery or connect the phone to external power source. 2. ...

User Guide
Page 20
...see the icon glossary, go to end the Using the Internal Keypad 1. Unlock the screen by the number of the LCD screen displays phone status icons. You can tell how much signal strength you 're having problems with Your Phone Signal Strength Call quality depends on , the top line of bars next...Getting Started with signal quality, move to end the 20 LG 9100 Screen Icons When the phone is turned on your area. Enter the phone number (include the area code, if needed ). 3. Make sure the phone is on the signal strength in your phone. If not, press and hold the key for about three...
...see the icon glossary, go to end the Using the Internal Keypad 1. Unlock the screen by the number of the LCD screen displays phone status icons. You can tell how much signal strength you 're having problems with Your Phone Signal Strength Call quality depends on , the top line of bars next...Getting Started with signal quality, move to end the 20 LG 9100 Screen Icons When the phone is turned on your area. Enter the phone number (include the area code, if needed ). 3. Make sure the phone is on the signal strength in your phone. If not, press and hold the key for about three...

User Guide
Page 23
Please check the manual of the Bluetooth® device for further instructions. Voice Commands Voice Commands allow you to use your Bluetooth® device. Access the Voice Commands feature: ● With the flip open, press . ● With the flip closed and the screen unlocked, give the a quick press (an extended press activates the Voice Recorder feature instead). 2. NOTE Voice Commands can also be started with the designated key on your voice command(s). LG 9100 23 Follow the prompts to do things by verbal command (e.g., make calls, send message etc.). 1.
Please check the manual of the Bluetooth® device for further instructions. Voice Commands Voice Commands allow you to use your Bluetooth® device. Access the Voice Commands feature: ● With the flip open, press . ● With the flip closed and the screen unlocked, give the a quick press (an extended press activates the Voice Recorder feature instead). 2. NOTE Voice Commands can also be started with the designated key on your voice command(s). LG 9100 23 Follow the prompts to do things by verbal command (e.g., make calls, send message etc.). 1.

User Guide
Page 24
...to exit, to Mobile 1/ Home/ Work/ Mobile 2/ Fax, then press . 4. Unlock the Screen by pressing twice. 2. Use the Directional Key to scroll to a phone number, then press the Right Soft Key [Options]. 4. Use the Directional Key to ...Using the Internal Keypad 1. Press the Right Soft Key [Options] then scroll to customize. 4. Contacts in Your Phone's Memory Storing Basics Using the Internal Keypad 1. Use the Directional Key to scroll to Save. 5. Enter a ... Soft Key [Save]. 2. Change the entry as you to Save. 24 LG 9100 Customizing Individual Entries Using the Internal Keypad 1.
...to exit, to Mobile 1/ Home/ Work/ Mobile 2/ Fax, then press . 4. Unlock the Screen by pressing twice. 2. Use the Directional Key to scroll to a phone number, then press the Right Soft Key [Options]. 4. Use the Directional Key to ...Using the Internal Keypad 1. Press the Right Soft Key [Options] then scroll to customize. 4. Contacts in Your Phone's Memory Storing Basics Using the Internal Keypad 1. Use the Directional Key to scroll to Save. 5. Enter a ... Soft Key [Save]. 2. Change the entry as you to Save. 24 LG 9100 Customizing Individual Entries Using the Internal Keypad 1.

User Guide
Page 25
...digit, then press to Save/ Pause/ Wait/ Send Message, then press . 4. Pause types are: Wait (T) The phone stops dialing until you to enter additional series of digits. Enter additional number(s) (e.g., pin number, credit card number, etc...Enter a number, then press the Right Soft Key [Options]. 2. Complete the Contact entry as necessary. LG 9100 25 Screen prompt appears Add Contact to select Save. Storing a Number with Pauses Pauses allow you press the Left Soft... such as Voicemail or credit billing numbers. Unlock the Screen by pressing twice. 2. Press [OPTIONS] and select Save. 6.
...digit, then press to Save/ Pause/ Wait/ Send Message, then press . 4. Pause types are: Wait (T) The phone stops dialing until you to enter additional series of digits. Enter additional number(s) (e.g., pin number, credit card number, etc...Enter a number, then press the Right Soft Key [Options]. 2. Complete the Contact entry as necessary. LG 9100 25 Screen prompt appears Add Contact to select Save. Storing a Number with Pauses Pauses allow you press the Left Soft... such as Voicemail or credit billing numbers. Unlock the Screen by pressing twice. 2. Press [OPTIONS] and select Save. 6.


