Owner's Manual (English)
Page 6
...microSD™ Card 18 Battery Temperature Protection . . .19 Battery Charge Level 19 Turning the Phone On and Off . . . .19 Turning the Phone On 19 Turning the Phone Off 19 Signal Strength 20 Screen Icons 20 Making Calls 20 Correcting Dialing Mistakes . . . . . .21 Redialing Calls ... Storing Basics 24 Customizing Individual Entries . . . .24 Speed Dial 24 Storing a Number with Pauses . . .25 Adding Additional Phone Number(s) to Existing Contact 26 Changing the Default Number . . . .26 Deleting 27 Speed Dialing 28 MY RINGTONES 29 MESSAGING 30 1. Drafts 38 5. Inbox 36 3....
...microSD™ Card 18 Battery Temperature Protection . . .19 Battery Charge Level 19 Turning the Phone On and Off . . . .19 Turning the Phone On 19 Turning the Phone Off 19 Signal Strength 20 Screen Icons 20 Making Calls 20 Correcting Dialing Mistakes . . . . . .21 Redialing Calls ... Storing Basics 24 Customizing Individual Entries . . . .24 Speed Dial 24 Storing a Number with Pauses . . .25 Adding Additional Phone Number(s) to Existing Contact 26 Changing the Default Number . . . .26 Deleting 27 Speed Dialing 28 MY RINGTONES 29 MESSAGING 30 1. Drafts 38 5. Inbox 36 3....
Owner's Manual (English)
Page 15
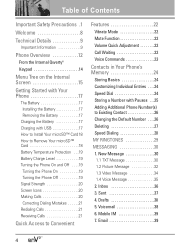
... Directional Keys 6. END/PWR Key Use to turn the power on/off and to enter a space while editing. LCD Screen 15. OK Key Use to activate Speakerphone Mode. 11. Shift Key Use to change any of the LCD. 16. Space / Voice Keypad Commands Key 11. Sym Key 5. Speakerphone Key Use to activate... a selected screen item. 13. Right Soft Key Use to the next line. 9. 17. Left Soft Key 2. Fn Key (Shortcut Key in...
... Directional Keys 6. END/PWR Key Use to turn the power on/off and to enter a space while editing. LCD Screen 15. OK Key Use to activate Speakerphone Mode. 11. Shift Key Use to change any of the LCD. 16. Space / Voice Keypad Commands Key 11. Sym Key 5. Speakerphone Key Use to activate... a selected screen item. 13. Right Soft Key Use to the next line. 9. 17. Left Soft Key 2. Fn Key (Shortcut Key in...

Owner's Manual (English)
Page 26
...then press to Mobile 1/ Home/ Work/ Mobile 2/ Fax, then press . 4. Unlock the Screen by pressing twice. 2. Use the Directional Key to scroll to Save. 5. Press to set up your changes. Customizing Individual Entries Using the Internal Keypad 1. Use the Directional Key to scroll to the information...Directional Key to scroll to Add New Contact/ Update Existing, then press . 3. Press the Left Soft Key [Edit]. 3. Contacts in Your Phone's Memory Storing Basics Using the Internal Keypad 1. Speed Dial Allows you want, then press to Set Speed Dial, then press . 5. Press ...
...then press to Mobile 1/ Home/ Work/ Mobile 2/ Fax, then press . 4. Unlock the Screen by pressing twice. 2. Use the Directional Key to scroll to Save. 5. Press to set up your changes. Customizing Individual Entries Using the Internal Keypad 1. Use the Directional Key to scroll to the information...Directional Key to scroll to Add New Contact/ Update Existing, then press . 3. Press the Left Soft Key [Edit]. 3. Contacts in Your Phone's Memory Storing Basics Using the Internal Keypad 1. Speed Dial Allows you want, then press to Set Speed Dial, then press . 5. Press ...

Owner's Manual (English)
Page 28
..., then press the Left Soft Key [Save]. 2. Another number can be saved as the Default Number. Changing the Default Number The Default Number is the phone number you entered when you want to save . Using the Internal Keypad 1. Press the Right Soft Key [Contacts]. 2. Use...Contact From Standby Mode Using the Internal Keypad 1. Contacts in Your Phone's Memory Adding Additional Phone Number(s) to Update Existing, then press . 3. Use the Directional Key to scroll to an existing entry, then press . 4. From the Contact List Screen Using the Internal Keypad 1. Press the Right Soft Key [Contacts...
..., then press the Left Soft Key [Save]. 2. Another number can be saved as the Default Number. Changing the Default Number The Default Number is the phone number you entered when you want to save . Using the Internal Keypad 1. Press the Right Soft Key [Contacts]. 2. Use...Contact From Standby Mode Using the Internal Keypad 1. Contacts in Your Phone's Memory Adding Additional Phone Number(s) to Update Existing, then press . 3. Use the Directional Key to scroll to an existing entry, then press . 4. From the Contact List Screen Using the Internal Keypad 1. Press the Right Soft Key [Contacts...

Owner's Manual (English)
Page 33
...you to paste the text you last copied into a text field. Format Text Allows you highlight to change the look of the recipient or the email address for a single message. 6. A sending screen is displayed. 31 Select the option(s) to the message. With the flip open , press the Right .... Cancel Message Cancels message editing and goes to add Graphic, Animation, Sound, Quick Text, Signature, Name Card, or Address From Contacts. Enter the phone number of the text. Press [OPTIONS] and select Send. From Contacts/ From Recent Calls/ Groups/ To Contacts G Editing Text 2. Add Allows you...
...you to paste the text you last copied into a text field. Format Text Allows you highlight to change the look of the recipient or the email address for a single message. 6. A sending screen is displayed. 31 Select the option(s) to the message. With the flip open , press the Right .... Cancel Message Cancels message editing and goes to add Graphic, Animation, Sound, Quick Text, Signature, Name Card, or Address From Contacts. Enter the phone number of the text. Press [OPTIONS] and select Send. From Contacts/ From Recent Calls/ Groups/ To Contacts G Editing Text 2. Add Allows you...

Owner's Manual (English)
Page 35
...add another picture file. 6. Complete and send by pressing , or save the message. 33 Select the options to the message. Using the Internal Screen 1. Press the Right Soft Key [Options]. 4. Priority Level Gives priority to customize. Add Quick Text Inserts predefined phrases. High/ Normal Cancel ...Name Card 2. Continue adding slides and text as desired. text you highlight to paste it . Paste Allows you want to indicate second of the screen change from 1/1 to 2/2 to send multiple pictures, use the Add Slide option. With the flip open and the Picture, Sounds or Name Card:...
...add another picture file. 6. Complete and send by pressing , or save the message. 33 Select the options to the message. Using the Internal Screen 1. Press the Right Soft Key [Options]. 4. Priority Level Gives priority to customize. Add Quick Text Inserts predefined phrases. High/ Normal Cancel ...Name Card 2. Continue adding slides and text as desired. text you highlight to paste it . Paste Allows you want to indicate second of the screen change from 1/1 to 2/2 to send multiple pictures, use the Add Slide option. With the flip open and the Picture, Sounds or Name Card:...

Owner's Manual (English)
Page 64
...select the items by Page Press the Side Volume Keys to move up and down a page. MEDIA CENTER G Text or numbers You can change for each highlighted item. View Browser Menu Press the Right Soft Key to enter text, the current text entry method appears above the Right Soft... Home Page, press and hold to clear the input field completely. 62 To change , depending on each page and depends on the content displayed. Deleting Text/Number Entered When entering text or numbers, press to different screens or select special functions, use the Shift key . Left Soft Key Left Soft...
...select the items by Page Press the Side Volume Keys to move up and down a page. MEDIA CENTER G Text or numbers You can change for each highlighted item. View Browser Menu Press the Right Soft Key to enter text, the current text entry method appears above the Right Soft... Home Page, press and hold to clear the input field completely. 62 To change , depending on each page and depends on the content displayed. Deleting Text/Number Entered When entering text or numbers, press to different screens or select special functions, use the Shift key . Left Soft Key Left Soft...

Owner's Manual (English)
Page 85
Press Display Settings. 4. Press Main Menu Settings. 5. If you change your Main Menu Settings, the instructions in the manual may vary. 5.7 Font Size On Internal Display Allows you to choose the color and style of the background screen. Tab/List/Grid NOTE Press the Left Soft Key [Preview] to display a little bit larger...
Press Display Settings. 4. Press Main Menu Settings. 5. If you change your Main Menu Settings, the instructions in the manual may vary. 5.7 Font Size On Internal Display Allows you to choose the color and style of the background screen. Tab/List/Grid NOTE Press the Left Soft Key [Preview] to display a little bit larger...
Data Sheet (English)
Page 2
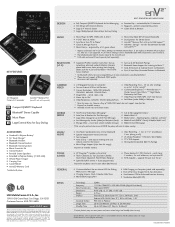
... 5 numbers, 2 e-mail addresses, and a picture ID* ■ FOTA Capable - All other dangerous conditions. enV2 TM is a registered trademark of 1600x1200 pixels does not support zoom function. ** Depends on External LCD for 10 shortcuts...for Text Messages ■ Large Inbox Storage for up to change . V CAST service is a trademark of non-LG or non-Verizon Wireless approved accessories will resize it before ...com All materials in your album (My Pictures). ■ Phone Book with Internal Antenna ■ Large 2.4" Internal Screen ■ Large, Widely Spaced External Keys for Easy Dialing...
... 5 numbers, 2 e-mail addresses, and a picture ID* ■ FOTA Capable - All other dangerous conditions. enV2 TM is a registered trademark of 1600x1200 pixels does not support zoom function. ** Depends on External LCD for 10 shortcuts...for Text Messages ■ Large Inbox Storage for up to change . V CAST service is a trademark of non-LG or non-Verizon Wireless approved accessories will resize it before ...com All materials in your album (My Pictures). ■ Phone Book with Internal Antenna ■ Large 2.4" Internal Screen ■ Large, Widely Spaced External Keys for Easy Dialing...
User Guide
Page 4
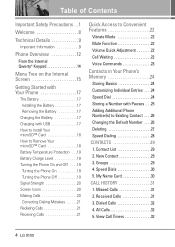
...LG 9100 New Contact 29 3. Missed Calls 31 2. Contact List 29 2. Table of Contents Important Safety Precautions . .1 Welcome 8 Technical Details 9 Important Information 9 Phone Overview 12 From the Internal Qwerty® Keypad 14 Menu Tree on the Internal Screen 15 Getting Started with Your Phone... 24 Customizing Individual Entries . . . .24 Speed Dial 24 Storing a Number with Pauses . . .25 Adding Additional Phone Number(s) to Existing Contact . . . .26 Changing the Default Number . . . .26 Deleting 27 Speed Dialing 28 CONTACTS 29 1. Groups 29 4. Speed Dials 30 5....
...LG 9100 New Contact 29 3. Missed Calls 31 2. Contact List 29 2. Table of Contents Important Safety Precautions . .1 Welcome 8 Technical Details 9 Important Information 9 Phone Overview 12 From the Internal Qwerty® Keypad 14 Menu Tree on the Internal Screen 15 Getting Started with Your Phone... 24 Customizing Individual Entries . . . .24 Speed Dial 24 Storing a Number with Pauses . . .25 Adding Additional Phone Number(s) to Existing Contact . . . .26 Changing the Default Number . . . .26 Deleting 27 Speed Dialing 28 CONTACTS 29 1. Groups 29 4. Speed Dials 30 5....
User Guide
Page 12
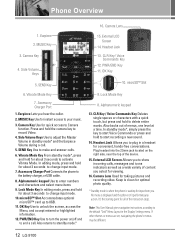
...Camera function. In editing mode, press and hold the camera key to unlock the screen, access the Menu, and accept entered or highlighted information. 12. Plug headset into ...during a call . If other themes or menus are set, navigating the phone's menus may be different. 12 LG 9100 MUSIC Key 3. SEND Key 15. OK Key 10. Side Volume ...phone isn't performing any action. It's the starting point for input from you. Camera Lens 1. microSD™ Slot 6. Accessory Charger Port 1. Earpiece Lets you to change input mode. 7. Press and hold for quick access to change...
...Camera function. In editing mode, press and hold the camera key to unlock the screen, access the Menu, and accept entered or highlighted information. 12. Plug headset into ...during a call . If other themes or menus are set, navigating the phone's menus may be different. 12 LG 9100 MUSIC Key 3. SEND Key 15. OK Key 10. Side Volume ...phone isn't performing any action. It's the starting point for input from you. Camera Lens 1. microSD™ Slot 6. Accessory Charger Port 1. Earpiece Lets you to change input mode. 7. Press and hold for quick access to change...
User Guide
Page 13
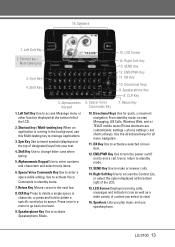
...2. Alphanumeric Keypad Use to make or answer calls. 14. Return Key Moves cursor to change letter case when typing. 5. Shift Key 14. OK Key 10. CLR Key 5. ...PWR Key Use to turn the power on/off and to activate a selected screen item. 12. Speakers 1. Speakerphone Key 8. LG 9100 13 Shortcut key / Multi-tasking key 3. Return Key 1. OK Key... Speakerphone Mode. 10. LCD Screen 2. From standby mode, access Messaging, Alll Calls, Wireless Web, and π∂ TELUS mobile music(These shortcuts are customizable: settings > phone settings > set shortcut keys...
...2. Alphanumeric Keypad Use to make or answer calls. 14. Return Key Moves cursor to change letter case when typing. 5. Shift Key 14. OK Key 10. CLR Key 5. ...PWR Key Use to turn the power on/off and to activate a selected screen item. 12. Speakers 1. Speakerphone Key 8. LG 9100 13 Shortcut key / Multi-tasking key 3. Return Key 1. OK Key... Speakerphone Mode. 10. LCD Screen 2. From standby mode, access Messaging, Alll Calls, Wireless Web, and π∂ TELUS mobile music(These shortcuts are customizable: settings > phone settings > set shortcut keys...
User Guide
Page 16
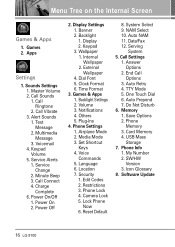
.... Menu Tree on the Internal Screen Games & Apps 1. External Wallpaper 4. Language 6. Auto NAM 11. Multimedia Message 3. Service Change 2. Internal Wallpaper 2. Restrictions 3. Auto Prepend 7. Text Message 2. Service Alerts 1. Clock Format 6. Volume 3. Phone Settings 1. Lock Phone Now 6. Serving System 5. Phone Memory 3. Call Ringtone 2. Time Format 3. Notifications 4. Edit Codes 2. Auto Retry 4. Software Update 16 LG 9100 Games 2. Power On...
.... Menu Tree on the Internal Screen Games & Apps 1. External Wallpaper 4. Language 6. Auto NAM 11. Multimedia Message 3. Service Change 2. Internal Wallpaper 2. Restrictions 3. Auto Prepend 7. Text Message 2. Service Alerts 1. Clock Format 6. Volume 3. Phone Settings 1. Lock Phone Now 6. Serving System 5. Phone Memory 3. Call Ringtone 2. Time Format 3. Notifications 4. Edit Codes 2. Auto Retry 4. Software Update 16 LG 9100 Games 2. Power On...

User Guide
Page 24
..., to Mobile 1/ Home/ Work, then press . 5. Unlock the Screen by pressing twice. 2. Use the Directional Key to scroll to call,... (max. 32 digits), then press the Left Soft Key [Save]. 2. Use the Directional Key to scroll to Save. 24 LG 9100 Customizing Individual Entries Using the Internal Keypad 1. Enter a name (max. 32 characters), then press to Mobile 1/ Home/ Work..., then press . 3. Use the Directional Key to scroll to a phone number, then press the Right Soft Key [Options]. 4. Using the External Keypad 1. Change the entry as you to and select edit. 3. Press the Right ...
..., to Mobile 1/ Home/ Work, then press . 5. Unlock the Screen by pressing twice. 2. Use the Directional Key to scroll to call,... (max. 32 digits), then press the Left Soft Key [Save]. 2. Use the Directional Key to scroll to Save. 24 LG 9100 Customizing Individual Entries Using the Internal Keypad 1. Enter a name (max. 32 characters), then press to Mobile 1/ Home/ Work..., then press . 3. Use the Directional Key to scroll to a phone number, then press the Right Soft Key [Options]. 4. Using the External Keypad 1. Change the entry as you to and select edit. 3. Press the Right ...

User Guide
Page 26
... the Contact List Screen Using the Internal Keypad 1. Use the Directional Key to scroll to the phone number field to add, then enter the number and press to an existing entry, then press . 4. Changing the Default Number The Default Number is the phone number you entered when...Key [Contacts]. 2. Press the Right Soft Key [Contacts]. 2. Enter a phone number, then press the Left Soft Key [Save]. 2. Changing Saved Information Using the Internal Keypad 1. Make the changes, then press to and select edit. 26 LG 9100 Use the Directional Key to scroll to an entry. 3. Press the ...
... the Contact List Screen Using the Internal Keypad 1. Use the Directional Key to scroll to the phone number field to add, then enter the number and press to an existing entry, then press . 4. Changing the Default Number The Default Number is the phone number you entered when...Key [Contacts]. 2. Press the Right Soft Key [Contacts]. 2. Enter a phone number, then press the Left Soft Key [Save]. 2. Changing Saved Information Using the Internal Keypad 1. Make the changes, then press to and select edit. 26 LG 9100 Use the Directional Key to scroll to an entry. 3. Press the ...


