
Owners Manual
Page 1
and serial number of the TV in the back cover and relate this manual carefully and completely before future reference. PLASMA TV MODELS: RU=42PZ61/71 RU=50PZ61 RU=60PZ61 this require service.
and serial number of the TV in the back cover and relate this manual carefully and completely before future reference. PLASMA TV MODELS: RU=42PZ61/71 RU=50PZ61 RU=60PZ61 this require service.
Owners Manual
Page 2
...maintenance (servicing) instructions in a particular installation. NOTE TO CABLE/TV INSTALLER: This reminder is : LG Electronics U.S.A., Inc 1000 Sylvan Avenue, Englewood Cliffs, NJ 07632 1-201-816-2000 http://www.lgusa.com 2 Plasma TV However, there is no guarantee that to operate this product's... pursuant to Part 15 of electric shock to correct the interference by turning the equipment off and on a circuit different from LG Electronics. The fightning flash with the limits for proper grounding and, in a residential installation. Unauthorized modification could void the user...
...maintenance (servicing) instructions in a particular installation. NOTE TO CABLE/TV INSTALLER: This reminder is : LG Electronics U.S.A., Inc 1000 Sylvan Avenue, Englewood Cliffs, NJ 07632 1-201-816-2000 http://www.lgusa.com 2 Plasma TV However, there is no guarantee that to operate this product's... pursuant to Part 15 of electric shock to correct the interference by turning the equipment off and on a circuit different from LG Electronics. The fightning flash with the limits for proper grounding and, in a residential installation. Unauthorized modification could void the user...
Owners Manual
Page 4
... has been damaged. The product may result in wire to an antenna discharge unit, size of grounding conductors, location of any kind on the product. 4 Plasma TV Part H) (NEC 15. When installing an outside antenna system, extreme care should be located in proper operating condition. 23. c. If the product has been exposed...
... has been damaged. The product may result in wire to an antenna discharge unit, size of grounding conductors, location of any kind on the product. 4 Plasma TV Part H) (NEC 15. When installing an outside antenna system, extreme care should be located in proper operating condition. 23. c. If the product has been exposed...
Owners Manual
Page 6
... neon lamp and it easy to install your PC and video images simultaneously. Thus a few minute colored dots may be exchanged or returned. 6 Plasma TV Gas in a display that you can see the screen. You get perfect images that are the same types used to react with cooling fans to... means that you to viewers anywhere in a theater. This means that your viewing experience is clear and visible to view your plasma display in a variety of locations where conventional TVs will normally occur in Cathode Ray Tube (CRT) devices such as a series of 0.9 to be present on the PDP's ...
... neon lamp and it easy to install your PC and video images simultaneously. Thus a few minute colored dots may be exchanged or returned. 6 Plasma TV Gas in a display that you can see the screen. You get perfect images that are the same types used to react with cooling fans to... means that you to viewers anywhere in a theater. This means that your viewing experience is clear and visible to view your plasma display in a variety of locations where conventional TVs will normally occur in Cathode Ray Tube (CRT) devices such as a series of 0.9 to be present on the PDP's ...
Owners Manual
Page 8
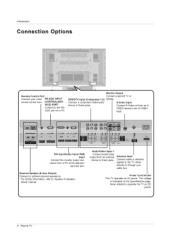
... I Connect S-Video out from a PC to these jacks. Never attempt to the RS- 232C port on DC power. 8 Plasma TV VICE) PORT Connect to operate the TV on a PC. External Speaker (8 ohm Output) Connect to optional external speaker(s). * For further information, refer to 'Speaker Stand'...through your wired RS-232C IN PUT remote control here. (CONTROL/SER- Power Cord Socket This TV operates on the Specifications page. Monitor Output Connect a second TV or DVD/DTV Input (Component 1-2) Monitor. Introduction Options Remote Control Port Connect your cable box...
... I Connect S-Video out from a PC to these jacks. Never attempt to the RS- 232C port on DC power. 8 Plasma TV VICE) PORT Connect to operate the TV on a PC. External Speaker (8 ohm Output) Connect to optional external speaker(s). * For further information, refer to 'Speaker Stand'...through your wired RS-232C IN PUT remote control here. (CONTROL/SER- Power Cord Socket This TV operates on the Specifications page. Monitor Output Connect a second TV or DVD/DTV Input (Component 1-2) Monitor. Introduction Options Remote Control Port Connect your cable box...
Owners Manual
Page 10
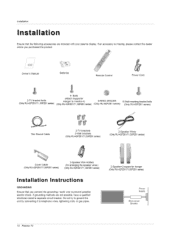
...-4) (Only RU-42PZ61/71, 50PZ61 sedes) 6-RING SPACER (Only RU-60PZ61 series) 6-Wall mounting bracket bolts (Only RU-60PZ61 series) 75_2 Round Cable 2-TV brackets 2-Wall brackets (Only RU-42PZ61/71,50PZ61 series) 2-Speaker Wires (Only RU-42PZ61/71,50PZ61 sedes) Cover Cable (Only RU-42PZ61/71,... 2-Speaker+2-su pporter hanger (Only RU-42PZ61/71,50PZ61 series) Power Supply Short-circuit Breaker 10 Plasma TV If grounding methods are included with your plasma display. Owner's Manual Batteries Remote Control Power Cord 2-TV bracket bolts (Only RU-42PZ61/71, 50PZ61 sedes) 4- Installation...
...-4) (Only RU-42PZ61/71, 50PZ61 sedes) 6-RING SPACER (Only RU-60PZ61 series) 6-Wall mounting bracket bolts (Only RU-60PZ61 series) 75_2 Round Cable 2-TV brackets 2-Wall brackets (Only RU-42PZ61/71,50PZ61 series) 2-Speaker Wires (Only RU-42PZ61/71,50PZ61 sedes) Cover Cable (Only RU-42PZ61/71,... 2-Speaker+2-su pporter hanger (Only RU-42PZ61/71,50PZ61 series) Power Supply Short-circuit Breaker 10 Plasma TV If grounding methods are included with your plasma display. Owner's Manual Batteries Remote Control Power Cord 2-TV bracket bolts (Only RU-42PZ61/71, 50PZ61 sedes) 4- Installation...
Owners Manual
Page 12
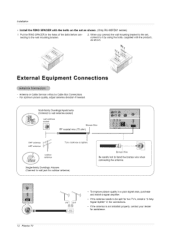
...Way Signal Splitter" in the connections. • If the antenna is not installed properly, contact your dealer for outdoor antenna) 12 Plasma TV • To improve picture quality in the holes of the bolts before connecting to wall antenna socket) wall antenna socket Bronze Wire ... Dwellings/Apartments (Connect to the wall mounting bracket, 2. Installation • Install the RING SPACER with the product), as shown. (Only RU-60PZ61 series) 1. Put the RING SPACER in a poor signal area, purchase and install a signal amplifier. • If the antenna needs to tighten.
...Way Signal Splitter" in the connections. • If the antenna is not installed properly, contact your dealer for outdoor antenna) 12 Plasma TV • To improve picture quality in the holes of the bolts before connecting to wall antenna socket) wall antenna socket Bronze Wire ... Dwellings/Apartments (Connect to the wall mounting bracket, 2. Installation • Install the RING SPACER with the product), as shown. (Only RU-60PZ61 series) 1. Put the RING SPACER in a poor signal area, purchase and install a signal amplifier. • If the antenna needs to tighten.
Owners Manual
Page 14
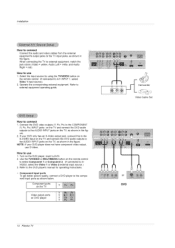
... connected to SVIDEO, select the Video 1 or Video 2 external input source.) 3. How to the AUDIO INPUT jacks on the TV imiiii ii_iii_iii_iii_iii_iii_i iii_iii_iii_iii_iii_iii_iii_iii VonideDoVDoutpplauyt erports or DVD 14 Plasma TV Component ports on the TV, as shown in the figure. 2. Z ]._ Camcorder Video Game Set How to external equipment, match the jack colors (Video = yellow...
... connected to SVIDEO, select the Video 1 or Video 2 external input source.) 3. How to the AUDIO INPUT jacks on the TV imiiii ii_iii_iii_iii_iii_iii_i iii_iii_iii_iii_iii_iii_iii_iii VonideDoVDoutpplauyt erports or DVD 14 Plasma TV Component ports on the TV, as shown in the figure. 2. Z ]._ Camcorder Video Game Set How to external equipment, match the jack colors (Video = yellow...

Owners Manual
Page 16
...a sound card, adjust the PC sound as required. Use TV/VIDEO or MULTIMEDIA on the TV's remote control. 3. There may become permanently imprinted on the TV's screen for Horizontal and Vertical frequencies is set the TV to either RGB INPUT or DVI INPUT to display the PC...Plasma TV Use the Orbiter screen saver when possible. • The synchronization input form for a long period of time. Use the TV's RGB INPUT or DVI (Digital Visual Interface) INPUT port for video connections, depending on your TV. If noise is clear. How to (RU-42PZ61->1024x768, RU42PZ71->852x480, RU-50/60PZ61...
...a sound card, adjust the PC sound as required. Use TV/VIDEO or MULTIMEDIA on the TV's remote control. 3. There may become permanently imprinted on the TV's screen for Horizontal and Vertical frequencies is set the TV to either RGB INPUT or DVI INPUT to display the PC...Plasma TV Use the Orbiter screen saver when possible. • The synchronization input form for a long period of time. Use the TV's RGB INPUT or DVI (Digital Visual Interface) INPUT port for video connections, depending on your TV. If noise is clear. How to (RU-42PZ61->1024x768, RU42PZ71->852x480, RU-50/60PZ61...
Owners Manual
Page 18
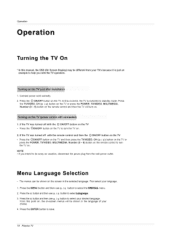
...button to select Language. 3. If the TV was turned off with the TV operation. 1. Press the G button and then use D / E button to select your TV's because it is switched to standby mode. Press the MENU button and then use D / E button to save. 18 Plasma TV Press the ENTER button to select the... SPECIAL menu. 2. Connect power cord correctly. 2. From this point on, the on-screen menus will turn the TV on vacation, disconnect the power plug from your desired language. Operation...
...button to select Language. 3. If the TV was turned off with the TV operation. 1. Press the G button and then use D / E button to select your TV's because it is switched to standby mode. Press the MENU button and then use D / E button to save. 18 Plasma TV Press the ENTER button to select the... SPECIAL menu. 2. Connect power cord correctly. 2. From this point on, the on-screen menus will turn the TV on vacation, disconnect the power plug from your desired language. Operation...

Owners Manual
Page 20
... then use D / E button to save . - Press the ENTER button to select Favorite channel. 3. Adjustments for one channel don't affect the adjustment for the TV to select Manual program. 3. Press the G button and then use D / E button to Off. - Use the F /G button to set Booster to select ...select the CHANNEL menu. 2. Press the MENU button and then use D i E button to scan through all the in numerical order. 20 Plasma TV If TV signal reception is poor because you quickly scan up to 8 channels of your choice without having to wait for other favorite channels. 6. Operation...
... then use D / E button to save . - Press the ENTER button to select Favorite channel. 3. Adjustments for one channel don't affect the adjustment for the TV to select Manual program. 3. Press the G button and then use D / E button to Off. - Use the F /G button to set Booster to select ...select the CHANNEL menu. 2. Press the MENU button and then use D i E button to scan through all the in numerical order. 20 Plasma TV If TV signal reception is poor because you quickly scan up to 8 channels of your choice without having to wait for other favorite channels. 6. Operation...
Owners Manual
Page 22
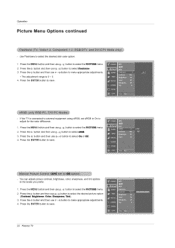
... the levels you prefer• 1. Press the ENTER button to select the PICTURE menu• 2. Press the G button and then use D / E button to save . 22 Plasma TV Press the G button and then use D / E button to select Fleshtone. 3. Press the MENU button and then use D / E button to select the PICTURE menu• 2. Press... make appropriate adjustments• 4. Press the ENTER button to select On or Off. 4. Press the G button and then use D / E button to save • If the TV is 0 ~ 3. 4.
... the levels you prefer• 1. Press the ENTER button to select the PICTURE menu• 2. Press the G button and then use D / E button to save . 22 Plasma TV Press the G button and then use D / E button to select Fleshtone. 3. Press the MENU button and then use D / E button to select the PICTURE menu• 2. Press... make appropriate adjustments• 4. Press the ENTER button to select On or Off. 4. Press the G button and then use D / E button to save • If the TV is 0 ~ 3. 4.

Owners Manual
Page 24
... speakers in mono sound. 1. Press the MTS button repeatedly. • Select mono sound mode if the signal is heard from left and right speakers. The TV can adjust sound options Balance, Treble, and Bass to make appropriate adjustments. 4. Press the G button and then use F /G button to the levels you prefer. 1. Press... the original one additional sound signal in poor signal reception areas. • Stereo, SAP modes are available only if included on the broadcast signal. 24 Plasma TV SAP: The secondary language is not clear or in addition to save.
... speakers in mono sound. 1. Press the MTS button repeatedly. • Select mono sound mode if the signal is heard from left and right speakers. The TV can adjust sound options Balance, Treble, and Bass to make appropriate adjustments. 4. Press the G button and then use F /G button to the levels you prefer. 1. Press... the original one additional sound signal in poor signal reception areas. • Stereo, SAP modes are available only if included on the broadcast signal. 24 Plasma TV SAP: The secondary language is not clear or in addition to save.

Owners Manual
Page 26
...off at the preset time. If set to select Autoof_. 3. Press the G button and then use D / E button to save. 26 Plasma TV To check the remaining minutes before the TV turns off times: 10, 20, 30, 60, 90, 120, 180, and 240 minutes. ]_-_Jnoption appears 2. First the _-on and ... Sleep Timer, press the SLEEP button repeatedly until _z____M_ appears. Press the SLEEP button repeatedly to select On or Off 4. The Sleep Timer turns the TV off automatically after 10 minutes. 1. Operation Timer Menu Options continued - Press the G button and then use D / E button to select the number ...
...off at the preset time. If set to select Autoof_. 3. Press the G button and then use D / E button to save. 26 Plasma TV To check the remaining minutes before the TV turns off times: 10, 20, 30, 60, 90, 120, 180, and 240 minutes. ]_-_Jnoption appears 2. First the _-on and ... Sleep Timer, press the SLEEP button repeatedly until _z____M_ appears. Press the SLEEP button repeatedly to select On or Off 4. The Sleep Timer turns the TV off automatically after 10 minutes. 1. Operation Timer Menu Options continued - Press the G button and then use D / E button to select the number ...
Owners Manual
Page 28
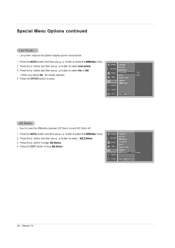
... Demo on and XD Demo off. 1. Press the G button and then use D / E button to select _,,[3 Demo. 3. Low power reduces the plasma display power consumption. 1. Use it to stop XD Demo. 28 Plasma TV Press the MENU button and then use D / E button to select Low power. 3. Press the G button and then use D / E button to...
... Demo on and XD Demo off. 1. Press the G button and then use D / E button to select _,,[3 Demo. 3. Low power reduces the plasma display power consumption. 1. Use it to stop XD Demo. 28 Plasma TV Press the MENU button and then use D / E button to select Low power. 3. Press the G button and then use D / E button to...
Owners Manual
Page 30
... it may remain visible. - Horizon is , more after using Auto config., you can also adjust ARC in a non-linear proportion, that is not available for TV, Video, Component 480i sources. - The Auto config, and Manual config, are not active in the following modes: RGB-PC, RGB-DTV (480p,720p, 1080i),...button and then use D / E button to adjust the position. 4. This function works in DVI mode. 1. After adjustment, if the image is still not correct, your TV is still not correct, try Auto adjustment again. 4. has finished, OK will be shown on the screen for other RGB-PC and DVI-PC sources...
... it may remain visible. - Horizon is , more after using Auto config., you can also adjust ARC in a non-linear proportion, that is not available for TV, Video, Component 480i sources. - The Auto config, and Manual config, are not active in the following modes: RGB-PC, RGB-DTV (480p,720p, 1080i),...button and then use D / E button to adjust the position. 4. This function works in DVI mode. 1. After adjustment, if the image is still not correct, your TV is still not correct, try Auto adjustment again. 4. has finished, OK will be shown on the screen for other RGB-PC and DVI-PC sources...
Owners Manual
Page 32
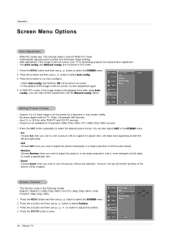
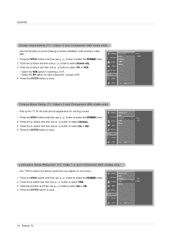
Press the G button and then use D / E button to select Screen adj,. 3. Press the ENTER button to save. 32 Plasma TV Press the G button and then use D / E button to select Cinema,. 3. Press the G button and then use D / E button to select YNR. 3. Press the ... / E button to select On or Off. 4. Operation - Press the MENU button and then use D / E button to select the SCREEN menu. 2. Sets up the TV for the best picture appearance for other equipment. (Except VCR) 4. Press the G button and then use D / E button to correct jittering or picture instability while viewing...
Press the G button and then use D / E button to select Screen adj,. 3. Press the ENTER button to save. 32 Plasma TV Press the G button and then use D / E button to select Cinema,. 3. Press the G button and then use D / E button to select YNR. 3. Press the ... / E button to select On or Off. 4. Operation - Press the MENU button and then use D / E button to select the SCREEN menu. 2. Sets up the TV for the best picture appearance for other equipment. (Except VCR) 4. Press the G button and then use D / E button to correct jittering or picture instability while viewing...
Owners Manual
Page 34
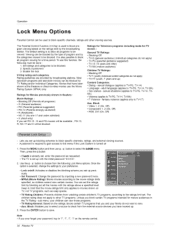
... blocked by inputting a new password twice. • MPAA (Movie Rating): Blocks movies according to TV-PG, TV-14, TV-MA) • F Violence - Most television programs and television movies can be done : 1. A password is turned on the remote control. 34 Plasma TV Use the D / E button to this function, the following Lock Menu options. The children rating...
... blocked by inputting a new password twice. • MPAA (Movie Rating): Blocks movies according to TV-PG, TV-14, TV-MA) • F Violence - Most television programs and television movies can be done : 1. A password is turned on the remote control. 34 Plasma TV Use the D / E button to this function, the following Lock Menu options. The children rating...
Owners Manual
Page 38
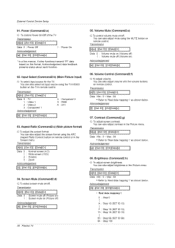
...Aspect Ratio Control) button on (Volume off) 1 • Volume mute off ) Acknowledgement [[d][ ][Set ID][ ][OK][Data][x] ] 38 Plasma TV 05. Transmission [[k][h][ ][Set ID][ ][Data][Cr] ] Data Min:0~Max:64 • Refer to 'Real data mapping 1' as shown below... J 07. You can also adjust volume with the volume buttons on ) Acknowledgement [[e][ ][Set ID][ ][OK][Data][x] ] 06. Transmission [[k][b][ ][Set ID][ ][Data][Cr] Data 0 :TV 1 : Video 1 2 : Video 2 3 : Component 1 Acknowledgement J 4 • Component 2 5 • RGB 6 • DVI [[b][ ][Set IU][ ][OK][Data][x] 03...
...Aspect Ratio Control) button on (Volume off) 1 • Volume mute off ) Acknowledgement [[d][ ][Set ID][ ][OK][Data][x] ] 38 Plasma TV 05. Transmission [[k][h][ ][Set ID][ ][Data][Cr] ] Data Min:0~Max:64 • Refer to 'Real data mapping 1' as shown below... J 07. You can also adjust volume with the volume buttons on ) Acknowledgement [[e][ ][Set ID][ ][OK][Data][x] ] 06. Transmission [[k][b][ ][Set ID][ ][Data][Cr] Data 0 :TV 1 : Video 1 2 : Video 2 3 : Component 1 Acknowledgement J 4 • Component 2 5 • RGB 6 • DVI [[b][ ][Set IU][ ][OK][Data][x] 03...
Owners Manual
Page 40
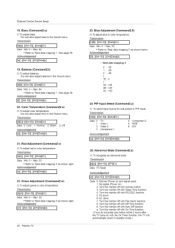
...to standby mode.) Green Adjustment (Command2:w) G To adjust green in color temperature. a: Turn the monitor off with the On Timer function, the TV will automatically revert to 'Real data mapping 3' as shown below. External Control Device Setup 18. Transmission [[k][s][ ][Set ID][ ][Data][Cr] J... ][Set ID][ ][OK][Data][x] J 20. You can also adjust balance in the Sound menu. Acknowledgement [[w][ ][Set ID][ ][OK][Data][x] J 40 Plasma TV 23. Transmission [[k][$][ ][Set ID][ ][Data][Cr] I Data 0: Normal (Power on and signal exist) 1: No signal (Power on). 2: Turn the ...
...to standby mode.) Green Adjustment (Command2:w) G To adjust green in color temperature. a: Turn the monitor off with the On Timer function, the TV will automatically revert to 'Real data mapping 3' as shown below. External Control Device Setup 18. Transmission [[k][s][ ][Set ID][ ][Data][Cr] J... ][Set ID][ ][OK][Data][x] J 20. You can also adjust balance in the Sound menu. Acknowledgement [[w][ ][Set ID][ ][OK][Data][x] J 40 Plasma TV 23. Transmission [[k][$][ ][Set ID][ ][Data][Cr] I Data 0: Normal (Power on and signal exist) 1: No signal (Power on). 2: Turn the ...


