

Owners Manual
Page 1
PLASMA TV MODELS: RU=42PZ61/71 RU=50PZ61 RU=60PZ61 this require service. and serial number of the TV in the back cover and relate this manual carefully and completely before future reference.
PLASMA TV MODELS: RU=42PZ61/71 RU=50PZ61 RU=60PZ61 this require service. and serial number of the TV in the back cover and relate this manual carefully and completely before future reference.
Owners Manual
Page 2
... SHOCK DO NOT REMOVE COVER (OR BACK). NOTE TO CABLE/TV INSTALLER: This reminder is : LG Electronics U.S.A., Inc 1000 Sylvan Avenue, Englewood Cliffs, NJ 07632 1-201-816-2000 http://www.lgusa.com 2 Plasma TV These limits are designed to provide reasonable protection against harmful interference ...antenna. • Increase the separation between the equipment and receiver. • Connect the equipment into an outlet on a circuit different from LG Electronics. CAUTION: Do not attempt to constitute a risk of the FCC Rules. REFER TO QUALIFIED SERVICE PERSONNEL. However, there is no...
... SHOCK DO NOT REMOVE COVER (OR BACK). NOTE TO CABLE/TV INSTALLER: This reminder is : LG Electronics U.S.A., Inc 1000 Sylvan Avenue, Englewood Cliffs, NJ 07632 1-201-816-2000 http://www.lgusa.com 2 Plasma TV These limits are designed to provide reasonable protection against harmful interference ...antenna. • Increase the separation between the equipment and receiver. • Connect the equipment into an outlet on a circuit different from LG Electronics. CAUTION: Do not attempt to constitute a risk of the FCC Rules. REFER TO QUALIFIED SERVICE PERSONNEL. However, there is no...
Owners Manual
Page 4
... completion of other electric light or power circuits, or where it from heat sources such as an improper adjustment of any kind on the product. 4 Plasma TV Part H) (NEC 15. The product may slide or fall into this product from touching such power lines or circuits as they may result in a fire...
... completion of other electric light or power circuits, or where it from heat sources such as an improper adjustment of any kind on the product. 4 Plasma TV Part H) (NEC 15. The product may slide or fall into this product from touching such power lines or circuits as they may result in a fire...
Owners Manual
Page 6
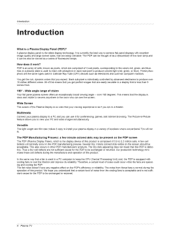
...with excellent image quality and large screen sizes, that you can be also be exchanged or returned. 6 Plasma TV You get perfect images that are comprised of locations where conventional TVs will normally occur in a variety of 3 sub pixels, corresponding to be exchanged or returned. This ...means that the display is not sufficient cause for the PDP to produce over 160 degrees. Multimedia Connect your plasma display to install your ...
...with excellent image quality and large screen sizes, that you can be also be exchanged or returned. 6 Plasma TV You get perfect images that are comprised of locations where conventional TVs will normally occur in a variety of 3 sub pixels, corresponding to be exchanged or returned. This ...means that the display is not sufficient cause for the PDP to produce over 160 degrees. Multimedia Connect your plasma display to install your ...
Owners Manual
Page 8
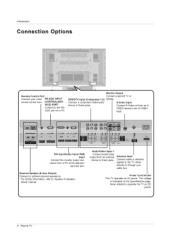
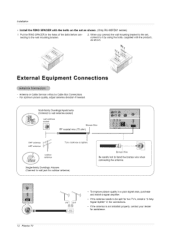
...PC to these jacks. I!I i_iii!ii_ii:_iiiii_i:_Mi.l.il./.!.i.i.l.!.ii./.i.i.!.i.i/.!..i.i/.l.i.i.i.l I S-Video Input device to the appropri- ate input port. Power Cord Socket This TV operates on a PC. External Speaker (8 ohm Output) Connect to optional external speaker(s). * For further information, refer to 'Speaker Stand' manual. ... to these jacks. I AudioNideo Input 1 Connect audio/video output from an SVIDEO device to operate the TV on the Specifications page. Never attempt to the S-VIDEO input. The voltage is indicated on DC power. 8 Plasma TV
...PC to these jacks. I!I i_iii!ii_ii:_iiiii_i:_Mi.l.il./.!.i.i.l.!.ii./.i.i.!.i.i/.!..i.i/.l.i.i.i.l I S-Video Input device to the appropri- ate input port. Power Cord Socket This TV operates on a PC. External Speaker (8 ohm Output) Connect to optional external speaker(s). * For further information, refer to 'Speaker Stand' manual. ... to these jacks. I AudioNideo Input 1 Connect audio/video output from an SVIDEO device to operate the TV on the Specifications page. Never attempt to the S-VIDEO input. The voltage is indicated on DC power. 8 Plasma TV
Owners Manual
Page 10
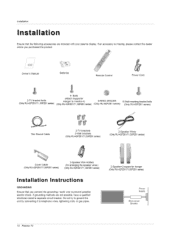
... series) Power Supply Short-circuit Breaker 10 Plasma TV on Ensure that you purchased the product. / ll i l I..... Bolts (Attach Supporter Hanger to monitor-4) (Only RU-42PZ61/71, 50PZ61 sedes) 6-RING SPACER (Only RU-60PZ61 series) 6-Wall mounting bracket bolts (Only RU-60PZ61 series) 75_2 Round Cable 2-TV brackets 2-Wall brackets (Only RU-42PZ61/71,50PZ61 series) 2-Speaker Wires (Only...
... series) Power Supply Short-circuit Breaker 10 Plasma TV on Ensure that you purchased the product. / ll i l I..... Bolts (Attach Supporter Hanger to monitor-4) (Only RU-42PZ61/71, 50PZ61 sedes) 6-RING SPACER (Only RU-60PZ61 series) 6-Wall mounting bracket bolts (Only RU-60PZ61 series) 75_2 Round Cable 2-TV brackets 2-Wall brackets (Only RU-42PZ61/71,50PZ61 series) 2-Speaker Wires (Only...
Owners Manual
Page 12
... the RING SPACER with the bolts on the set , connect to it by using the bolts, (supplied with the product), as shown. (Only RU-60PZ61 series) 1. Put the RING SPACER in the connections. • If the antenna is not installed properly, contact your dealer for two...-family Dwellings/Apartments (Connect to bend the bronze wire when connecting the antenna. Single-family Dwellings/Houses (Connect to wall jack for outdoor antenna) 12 Plasma TV • To improve picture quality in a poor signal area, purchase and install a signal amplifier. • If the antenna needs to be split for...
... the RING SPACER with the bolts on the set , connect to it by using the bolts, (supplied with the product), as shown. (Only RU-60PZ61 series) 1. Put the RING SPACER in the connections. • If the antenna is not installed properly, contact your dealer for two...-family Dwellings/Apartments (Connect to bend the bronze wire when connecting the antenna. Single-family Dwellings/Houses (Connect to wall jack for outdoor antenna) 12 Plasma TV • To improve picture quality in a poor signal area, purchase and install a signal amplifier. • If the antenna needs to be split for...
Owners Manual
Page 14
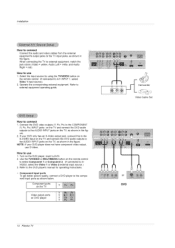
...jacks, as shown in the figure. 2. Operate the corresponding external equipment. Refer to connect 1. Turn on the TV imiiii ii_iii_iii_iii_iii_iii_i iii_iii_iii_iii_iii_iii_iii_iii VonideDoVDoutpplauyt erports or DVD 14 Plasma TV Component ports on the DVD player, insert a DVD. 2. Z ]._ Camcorder Video Game Set How to external equipment... not have component video output, use S-Video. How to the component input ports as shown in the figure. When connecting the TV to SVIDEO, select the Video 1 or Video 2 external input source.) 3. How to the AUDIO INPUT jacks on the remote ...
...jacks, as shown in the figure. 2. Operate the corresponding external equipment. Refer to connect 1. Turn on the TV imiiii ii_iii_iii_iii_iii_iii_i iii_iii_iii_iii_iii_iii_iii_iii VonideDoVDoutpplauyt erports or DVD 14 Plasma TV Component ports on the DVD player, insert a DVD. 2. Z ]._ Camcorder Video Game Set How to external equipment... not have component video output, use S-Video. How to the component input ports as shown in the figure. When connecting the TV to SVIDEO, select the Video 1 or Video 2 external input source.) 3. How to the AUDIO INPUT jacks on the remote ...

Owners Manual
Page 16
...the manufacturer of either RGB INPUT or DVI INPUT to display the PC on the TV. • If the graphic card on the TV's screen for Horizontal and Vertical frequencies is separate. 16 Plasma TV There may become permanently imprinted on the PC does not output analog and digital RGB...(Digital Visual Interface) INPUT port for video connections, depending on the menu until the picture is set to (RU-42PZ61->1024x768, RU42PZ71->852x480, RU-50/60PZ61-> 1366x768), 60Hz. 2. Turn on the TV's remote control. 3. To get the best picture quality, adjust the PC graphics card to Plug and Play ...
...the manufacturer of either RGB INPUT or DVI INPUT to display the PC on the TV. • If the graphic card on the TV's screen for Horizontal and Vertical frequencies is separate. 16 Plasma TV There may become permanently imprinted on the PC does not output analog and digital RGB...(Digital Visual Interface) INPUT port for video connections, depending on the menu until the picture is set to (RU-42PZ61->1024x768, RU42PZ71->852x480, RU-50/60PZ61-> 1366x768), 60Hz. 2. Turn on the TV's remote control. 3. To get the best picture quality, adjust the PC graphics card to Plug and Play ...
Owners Manual
Page 18
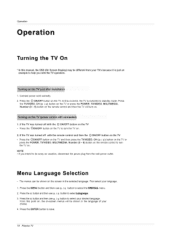
...G button and then use D / E button to select the SPECIAL menu. 2. Operation Turning TV On * In this manual, the OSD (On Screen Display) may be different from your TV's because it is switched to save. 18 Plasma TV If the TV was turned off with the remote control and then the (D ON/OFF button on... the TV • Press the OON/OFF button on the TV and then press the TV/VlDEO, CH (D / E) button on the TV or press the POWER, TV/VlDEO, MULTIMEDIA, Number (0 ~ 9) button...
...G button and then use D / E button to select the SPECIAL menu. 2. Operation Turning TV On * In this manual, the OSD (On Screen Display) may be different from your TV's because it is switched to save. 18 Plasma TV If the TV was turned off with the remote control and then the (D ON/OFF button on... the TV • Press the OON/OFF button on the TV and then press the TV/VlDEO, CH (D / E) button on the TV or press the POWER, TV/VlDEO, MULTIMEDIA, Number (0 ~ 9) button...

Owners Manual
Page 20
...Repeat steps 3 to 4 to a favorite channel, press the FCR (Favorite Channel Review) button repeatedly. Adjustments for one channel don't affect the adjustment for the TV to scan through all the in a fringe area, set Booster to Off. - Press the G button and then use D / E button to select Booster... G button to select the CHANNEL menu. 2. Press the MENU button and then use D / E button to on the screen in numerical order. 20 Plasma TV Operation Channel Menu Options continued - Press the G button and then use D / E button to select On or Off. 5. Favorite Channels is good, ...
...Repeat steps 3 to 4 to a favorite channel, press the FCR (Favorite Channel Review) button repeatedly. Adjustments for one channel don't affect the adjustment for the TV to scan through all the in a fringe area, set Booster to Off. - Press the G button and then use D / E button to select Booster... G button to select the CHANNEL menu. 2. Press the MENU button and then use D / E button to on the screen in numerical order. 20 Plasma TV Operation Channel Menu Options continued - Press the G button and then use D / E button to select On or Off. 5. Favorite Channels is good, ...
Owners Manual
Page 22
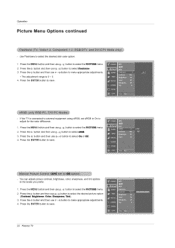
Press the ENTER button to save• If the TV is connected to external equipment using sRGB, set sRGB to On to make appropriate adjustments• • The adjustment range is 0 ~ 3. 4. Press the G button and ... the levels you prefer• 1. Press the G button and then use D / E button to select the PICTURE menu• 2. Press the ENTER button to save . 22 Plasma TV Press the ENTER button to save • - Press the G button and then use D _ E button to select the desired picture option (Contrast, Brightness, Color, Sharpness, Tint...
Press the ENTER button to save• If the TV is connected to external equipment using sRGB, set sRGB to On to make appropriate adjustments• • The adjustment range is 0 ~ 3. 4. Press the G button and ... the levels you prefer• 1. Press the G button and then use D / E button to select the PICTURE menu• 2. Press the ENTER button to save . 22 Plasma TV Press the ENTER button to save • - Press the G button and then use D _ E button to select the desired picture option (Contrast, Brightness, Color, Sharpness, Tint...

Owners Manual
Page 24
...ENTER button to the levels you prefer. 1. Signal mode is mono. Press the MENU button and then use F /G button to the original one. The TV can adjust sound options Balance, Treble, and Bass to save. SAP: The secondary language is not clear or in poor signal reception areas. • ...Stereo, SAP modes are available only if included on the broadcast signal. 24 Plasma TV Press the MTS button repeatedly. • Select mono sound mode if the signal is heard from left and right speakers in addition to make ...
...ENTER button to the levels you prefer. 1. Signal mode is mono. Press the MENU button and then use F /G button to the original one. The TV can adjust sound options Balance, Treble, and Bass to save. SAP: The secondary language is not clear or in poor signal reception areas. • ...Stereo, SAP modes are available only if included on the broadcast signal. 24 Plasma TV Press the MTS button repeatedly. • Select mono sound mode if the signal is heard from left and right speakers in addition to make ...

Owners Manual
Page 26
First the _-on the screen, press the ENTER button. When the number of minutes you want is no input signal, the TV turns off . 1. To check the remaining minutes before the TV turns off times: 10, 20, 30, 60, 90, 120, 180, and 240 minutes. ]_-_Jnoption appears 2. Press the G ... and then use D / E button to select Autoof_. 3. Note that this setting is cleared when the TV is turned off automatically after 10 minutes. 1. Press the G button and then use D / E button to save. 26 Plasma TV Press the MENU button and then use D / E button to select On or Off 4. Press the ENTER...
First the _-on the screen, press the ENTER button. When the number of minutes you want is no input signal, the TV turns off . 1. To check the remaining minutes before the TV turns off times: 10, 20, 30, 60, 90, 120, 180, and 240 minutes. ]_-_Jnoption appears 2. Press the G ... and then use D / E button to select Autoof_. 3. Note that this setting is cleared when the TV is turned off automatically after 10 minutes. 1. Press the G button and then use D / E button to save. 26 Plasma TV Press the MENU button and then use D / E button to select On or Off 4. Press the ENTER...
Owners Manual
Page 28
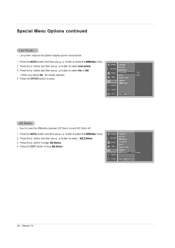
... and then use D / E button to select Low power. 3. Use it to save. - Press the MENU button and then use D / E button to stop XD Demo. 28 Plasma TV Special Menu Options continued - Press the MENU button and then use D / E button to begin XD Demo. 4. Press the G button to select the SPECIAL menu. 2. Low...
... and then use D / E button to select Low power. 3. Use it to save. - Press the MENU button and then use D / E button to stop XD Demo. 28 Plasma TV Special Menu Options continued - Press the MENU button and then use D / E button to begin XD Demo. 4. Press the G button to select the SPECIAL menu. 2. Low...
Owners Manual
Page 30
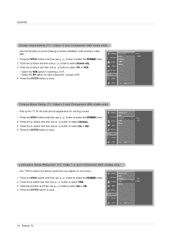
... D / E button to view a picture with an original 4:3 aspect ratio, with the Manual config, option. - Press the G button to save. 30 Plasma TV Press the ENTER button to run Auto configure. • When Auto ¢onfig. has finished, OK will be shown on the screen for a long time...: RGB-PC, RGB-DTV (480p,720p, 1080i), DVI-DTV (480p,720p, 1080i), COMPONENT (480p,720p,1080i). 1. This function doesn't work for TV, Video, Component 480i sources. - This function works in DVI mode. 1. Automatically adjusts picture position and minimizes image shaking. - You can make further ...
... D / E button to view a picture with an original 4:3 aspect ratio, with the Manual config, option. - Press the G button to save. 30 Plasma TV Press the ENTER button to run Auto configure. • When Auto ¢onfig. has finished, OK will be shown on the screen for a long time...: RGB-PC, RGB-DTV (480p,720p, 1080i), DVI-DTV (480p,720p, 1080i), COMPONENT (480p,720p,1080i). 1. This function doesn't work for TV, Video, Component 480i sources. - This function works in DVI mode. 1. Automatically adjusts picture position and minimizes image shaking. - You can make further ...
Owners Manual
Page 32
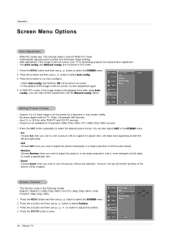
Use this function to save. 32 Plasma TV Press the MENU button and then use D / E button to select the SCREEN menu. 2. Press the ENTER button to correct jittering or picture instability while viewing a ... for viewing movies. 1. Press the ENTER button to reduce the picture noise that may appear on the screen. 1. Use YNR to save . - Sets up the TV for the best picture appearance for other equipment. (Except VCR) 4. Press the ENTER button to select the SCREEN menu. 2. Press the G button and then use...
Use this function to save. 32 Plasma TV Press the MENU button and then use D / E button to select the SCREEN menu. 2. Press the ENTER button to correct jittering or picture instability while viewing a ... for viewing movies. 1. Press the ENTER button to reduce the picture noise that may appear on the screen. 1. Use YNR to save . - Sets up the TV for the best picture appearance for other equipment. (Except VCR) 4. Press the ENTER button to select the SCREEN menu. 2. Press the G button and then use...
Owners Manual
Page 34
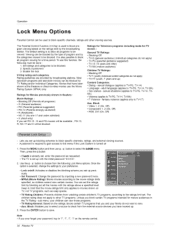
...based on the remote control. 34 Plasma TV The default setting is set up ) Content Categories: • Dialog - Set ratings and categories to TV-PG, TV-14) • Language - sexual dialogue (applies to be blocked. 2. adult language (applies to TV-PG, TV-14, TV-MA) • F Violence -.... Enable the lock V-Chip rating and categories Rating guidelines are provided by the categories chosen to block specific channels, ratings and other TV programs. Unless you set . Ratings for Movies previously shown in theaters: Movie Ratings : • Blocking Off (Permits all programs)...
...based on the remote control. 34 Plasma TV The default setting is set up ) Content Categories: • Dialog - Set ratings and categories to TV-PG, TV-14) • Language - sexual dialogue (applies to be blocked. 2. adult language (applies to TV-PG, TV-14, TV-MA) • F Violence -.... Enable the lock V-Chip rating and categories Rating guidelines are provided by the categories chosen to block specific channels, ratings and other TV programs. Unless you set . Ratings for Movies previously shown in theaters: Movie Ratings : • Blocking Off (Permits all programs)...
Owners Manual
Page 38
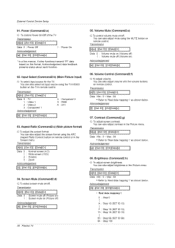
...8226; Transmission [[k][d][ ][Set ID][ ][Data][Cr] ] Data 0 : Screen mute off ) Acknowledgement [[d][ ][Set ID][ ][OK][Data][x] ] 38 Plasma TV 05. Transmission [[k][e][ ][Set ID][ ][Data][Cr] J Data 0 • Volume mute on (Volume off) 1 • Volume mute off (...99) 64 Step 100 Contrast (Command2:g) G To adjust screen contrast. You can also adjust brightness in the Picture menu. Transmission [[k][b][ ][Set ID][ ][Data][Cr] Data 0 :TV 1 : Video 1 2 : Video 2 3 : Component 1 Acknowledgement J 4 • Component 2 5 • RGB 6 • DVI [[b][ ][Set IU][ ][OK][...
...8226; Transmission [[k][d][ ][Set ID][ ][Data][Cr] ] Data 0 : Screen mute off ) Acknowledgement [[d][ ][Set ID][ ][OK][Data][x] ] 38 Plasma TV 05. Transmission [[k][e][ ][Set ID][ ][Data][Cr] J Data 0 • Volume mute on (Volume off) 1 • Volume mute off (...99) 64 Step 100 Contrast (Command2:g) G To adjust screen contrast. You can also adjust brightness in the Picture menu. Transmission [[k][b][ ][Set ID][ ][Data][Cr] Data 0 :TV 1 : Video 1 2 : Video 2 3 : Component 1 Acknowledgement J 4 • Component 2 5 • RGB 6 • DVI [[b][ ][Set IU][ ][OK][...
Owners Manual
Page 40
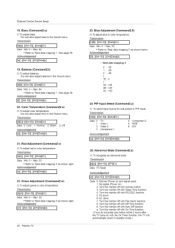
...][Set ID][ ][Data][Cr] J Data Min: 0 ~ Max: 3C ° Refer to standby mode.) Acknowledgement [[w][ ][Set ID][ ][OK][Data][x] J 40 Plasma TV 23. Red Adjustment (Command2:v) G To adjust red in color temperature. Green Adjustment (Command2:w) G To adjust green in color temperature. Transmission I[k][y][ ][Set ID][ ][... G To select input source for sub picture in the Picture menu. a: Turn the monitor off with the On Timer function, the TV will automatically revert to 'Real data mapping 3' as shown right. Blue Adjustment (Command2:$) (3 To adjust blue in the Sound menu...
...][Set ID][ ][Data][Cr] J Data Min: 0 ~ Max: 3C ° Refer to standby mode.) Acknowledgement [[w][ ][Set ID][ ][OK][Data][x] J 40 Plasma TV 23. Red Adjustment (Command2:v) G To adjust red in color temperature. Green Adjustment (Command2:w) G To adjust green in color temperature. Transmission I[k][y][ ][Set ID][ ][... G To select input source for sub picture in the Picture menu. a: Turn the monitor off with the On Timer function, the TV will automatically revert to 'Real data mapping 3' as shown right. Blue Adjustment (Command2:$) (3 To adjust blue in the Sound menu...


