
Owners Manual
Page 2
... to persons. The fightning flash with the instruction manual, may be connected to the grounding system of important operating and maintenance (servicing) instructions in accordance with arrowhead symbol, within an equilateral triangle, is intended to alert the user to the presence of the cable entry as close to modify this product. NO USER SERVICEABLE PARTS INSIDE. REFER TO QUALIFIED SERVICE PERSONNEL. Warning f WARNING WARNING...
... to persons. The fightning flash with the instruction manual, may be connected to the grounding system of important operating and maintenance (servicing) instructions in accordance with arrowhead symbol, within an equilateral triangle, is intended to alert the user to the presence of the cable entry as close to modify this product. NO USER SERVICEABLE PARTS INSIDE. REFER TO QUALIFIED SERVICE PERSONNEL. Warning f WARNING WARNING...
Owners Manual
Page 5
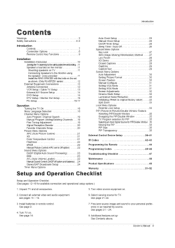
...Low Power 28 XD Demo 28 Closed Captions 29 Captions 29 Caption/Text 29 Screen Menu Options Auto Adjustment 30 Setting Picture Format 30 Screen Position 30 Manual Configure 31 Setting VGA Mode 31 Setting XGA Mode 31 Screen Adjustments 32 Cinema Mode Setup 32 Luminance Noise Reduction 32 Initializing (Reset to your personal preference or as shown. (Only RU-60PZ61 series 12 External Equipment Connections 12 Antenna Connection 12 VCR Setup I Cable TV Setup External A/V Source Setup DVD Setup DTV Setup I Monitor Out Setup PC...
...Low Power 28 XD Demo 28 Closed Captions 29 Captions 29 Caption/Text 29 Screen Menu Options Auto Adjustment 30 Setting Picture Format 30 Screen Position 30 Manual Configure 31 Setting VGA Mode 31 Setting XGA Mode 31 Screen Adjustments 32 Cinema Mode Setup 32 Luminance Noise Reduction 32 Initializing (Reset to your personal preference or as shown. (Only RU-60PZ61 series 12 External Equipment Connections 12 Antenna Connection 12 VCR Setup I Cable TV Setup External A/V Source Setup DVD Setup DTV Setup I Monitor Out Setup PC...
Owners Manual
Page 7
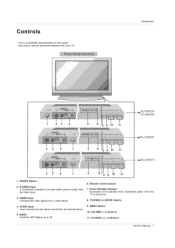
... LED Display on . 8. TVNIDEO or ENTER Button 9. CHANNEL (E, D) Buttons Owner's Manual 7 AUDIO Input Use to connect to provide better picture quality than the video input. 3. Here shown may be somewhat different from an external device. 5. S-VIDEO Input A connection available to hear stereo sound from your TV. VIDEO Input Connects the video signal from a video device. 4. VOLUME (F,G) Buttons 11. Introduction RU-50PZ61 RU-60PZ61 4 78 9 10 11 6 8 9 10 11 _,RU-42PZ61 _, RU-42PZ71 1. This is turned on or off. 6. Power Standby Indicator Illuminates red in standby mode...
... LED Display on . 8. TVNIDEO or ENTER Button 9. CHANNEL (E, D) Buttons Owner's Manual 7 AUDIO Input Use to connect to provide better picture quality than the video input. 3. Here shown may be somewhat different from an external device. 5. S-VIDEO Input A connection available to hear stereo sound from your TV. VIDEO Input Connects the video signal from a video device. 4. VOLUME (F,G) Buttons 11. Introduction RU-50PZ61 RU-60PZ61 4 78 9 10 11 6 8 9 10 11 _,RU-42PZ61 _, RU-42PZ71 1. This is turned on or off. 6. Power Standby Indicator Illuminates red in standby mode...
Owners Manual
Page 8
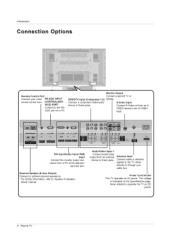
... DVD/DTV Input (Component 1-2) Monitor. Power Cord Socket This TV operates on the Specifications page. Introduction Options Remote Control Port Connect your cable box. I DVl Input/Audio Input/RGB Input Connect the monitor output connector from a PC to the appropri- The voltage is indicated on AC power. ate input port. Never attempt to the RS- 232C port on DC power. 8 Plasma TV VICE) PORT Connect to operate the TV on a PC. I!I i_iii!ii_ii:_iiiii_i:_Mi.l.il./.!.i.i.l.!.ii./.i.i.!.i.i/.!..i.i/.l.i.i.i.l I Connect S-Video out from an external...
... DVD/DTV Input (Component 1-2) Monitor. Power Cord Socket This TV operates on the Specifications page. Introduction Options Remote Control Port Connect your cable box. I DVl Input/Audio Input/RGB Input Connect the monitor output connector from a PC to the appropri- The voltage is indicated on AC power. ate input port. Never attempt to the RS- 232C port on DC power. 8 Plasma TV VICE) PORT Connect to operate the TV on a PC. I!I i_iii!ii_ii:_iiiii_i:_Mi.l.il./.!.i.i.l.!.ii./.i.i.!.i.i/.!..i.i/.l.i.i.i.l I Connect S-Video out from an external...
Owners Manual
Page 9
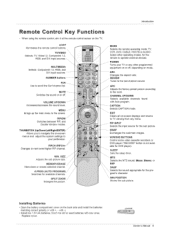
.... MEMORY/ERASE / Memorizes or erases selected channel. Changes the aspect ratio. found CAPTION Selects CAPTION mode. Installing Batteries • Open the battery compartment cover on -screen menus and adjust the system settings to the room. with +, - WIN. SPLIT ZOOM Enlarges the picture. / MODE J Selects the remote operating mode: TV, VCR, DVD, CABLE, HDSTB orAUDIO. REVIEW J Tunes to the screen. VCR/DVD BUTTONS Control some video cassette recorders or DVD player ("RECORD" button is not avail- MUTE Switches the sound on or off , depending on...
.... MEMORY/ERASE / Memorizes or erases selected channel. Changes the aspect ratio. found CAPTION Selects CAPTION mode. Installing Batteries • Open the battery compartment cover on -screen menus and adjust the system settings to the room. with +, - WIN. SPLIT ZOOM Enlarges the picture. / MODE J Selects the remote operating mode: TV, VCR, DVD, CABLE, HDSTB orAUDIO. REVIEW J Tunes to the screen. VCR/DVD BUTTONS Control some video cassette recorders or DVD player ("RECORD" button is not avail- MUTE Switches the sound on or off , depending on...
Owners Manual
Page 10
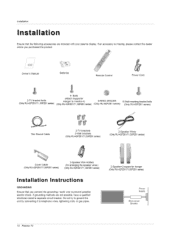
Owner's Manual Batteries Remote Control Power Cord 2-TV bracket bolts (Only RU-42PZ61/71, 50PZ61 sedes) 4- Do not try to ground the unit by connecting it to monitor-4) (Only RU-42PZ61/71, 50PZ61 sedes) 6-RING SPACER (Only RU-60PZ61 series) 6-Wall mounting bracket bolts (Only RU-60PZ61 series) 75_2 Round Cable 2-TV brackets 2-Wall brackets (Only RU-42PZ61/71,50PZ61 series) 2-Speaker Wires (Only RU-42PZ61/71,50PZ61 sedes) Cover Cable (Only RU-42PZ61/71,50PZ61 series) 2-Speaker Wire...
Owner's Manual Batteries Remote Control Power Cord 2-TV bracket bolts (Only RU-42PZ61/71, 50PZ61 sedes) 4- Do not try to ground the unit by connecting it to monitor-4) (Only RU-42PZ61/71, 50PZ61 sedes) 6-RING SPACER (Only RU-60PZ61 series) 6-Wall mounting bracket bolts (Only RU-60PZ61 series) 75_2 Round Cable 2-TV brackets 2-Wall brackets (Only RU-42PZ61/71,50PZ61 series) 2-Speaker Wires (Only RU-42PZ61/71,50PZ61 sedes) Cover Cable (Only RU-42PZ61/71,50PZ61 series) 2-Speaker Wire...
Owners Manual
Page 11
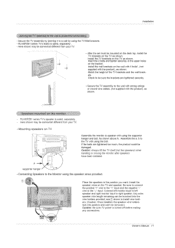
... and can't be mounted on the desk top, install the TV brackets on the TV as shown. Match the height of the TV brackets and the wall brackets. A supporter hanger • Connecting Speakers to the wall with strong strings or wound wire cables, (not supplied with using the speaker wires provided. After the set must be removed.) Caution: Be sure TV power is turned off before making any...
... and can't be mounted on the desk top, install the TV brackets on the TV as shown. Match the height of the TV brackets and the wall brackets. A supporter hanger • Connecting Speakers to the wall with strong strings or wound wire cables, (not supplied with using the speaker wires provided. After the set must be removed.) Caution: Be sure TV power is turned off before making any...
Owners Manual
Page 12
... install a signal amplifier. • If the antenna needs to tighten. Bronze Wire Be careful not to the wall mounting bracket, 2. When you connect the wall mounting bracket to the set as shown. Installation • Install the RING SPACER with the bolts on the set , connect to it by using the bolts, (supplied with the product), as shown. (Only RU-60PZ61 series) 1. For optimum picture quality, adjust antenna direction if needed. Multi-family Dwellings/Apartments (Connect to wall antenna...
... install a signal amplifier. • If the antenna needs to tighten. Bronze Wire Be careful not to the wall mounting bracket, 2. When you connect the wall mounting bracket to the set as shown. Installation • Install the RING SPACER with the bolts on the set , connect to it by using the bolts, (supplied with the product), as shown. (Only RU-60PZ61 series) 1. For optimum picture quality, adjust antenna direction if needed. Multi-family Dwellings/Apartments (Connect to wall antenna...
Owners Manual
Page 13
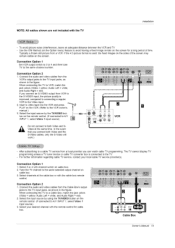
... menu) feature to the TV input jacks, as shown in the figure. Connect the audio and video cables from the VCR's output jacks to avoid having a fixed image remain on the screen for cable box. [] Cable Box Owner3 Manual 13 Connect the audio and video cables from the Cable Box's output jacks to A/V INPUT 1, select Video 1 input source) 3. Tune the TV channel to the VCR owner's T manual.) / 3. Select your local cable TV service provider(s). For further information regarding cable TV service, contact your desired channel with the cable box remote control. Connection...
... menu) feature to the TV input jacks, as shown in the figure. Connect the audio and video cables from the VCR's output jacks to avoid having a fixed image remain on the screen for cable box. [] Cable Box Owner3 Manual 13 Connect the audio and video cables from the Cable Box's output jacks to A/V INPUT 1, select Video 1 input source) 3. Tune the TV channel to the VCR owner's T manual.) / 3. Select your local cable TV service provider(s). For further information regarding cable TV service, contact your desired channel with the cable box remote control. Connection...
Owners Manual
Page 14
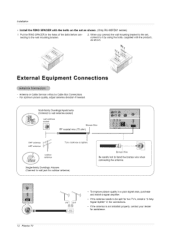
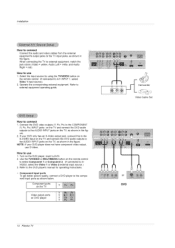
...jack colors (Video = yellow, Audio Left = white, and Audio Right = red). Turn on the TV imiiii ii_iii_iii_iii_iii_iii_i iii_iii_iii_iii_iii_iii_iii_iii VonideDoVDoutpplauyt erports or DVD 14 Plasma TV How to connect 1. Z ]._ Camcorder Video Game Set How to use 1. How to SVIDEO, select the Video 1 or Video 2 external input source.) 3. Use the TVNIDEO or MULTIMEDIA button on the TV, as shown below. Component Input ports To get better picture quality, connect a DVD player to the AUDIO INPUT jacks on the remote control to select Component 1 or Component 2. (If connected...
...jack colors (Video = yellow, Audio Left = white, and Audio Right = red). Turn on the TV imiiii ii_iii_iii_iii_iii_iii_i iii_iii_iii_iii_iii_iii_iii_iii VonideDoVDoutpplauyt erports or DVD 14 Plasma TV How to connect 1. Z ]._ Camcorder Video Game Set How to use 1. How to SVIDEO, select the Video 1 or Video 2 external input source.) 3. Use the TVNIDEO or MULTIMEDIA button on the TV, as shown below. Component Input ports To get better picture quality, connect a DVD player to the AUDIO INPUT jacks on the remote control to select Component 1 or Component 2. (If connected...
Owners Manual
Page 15
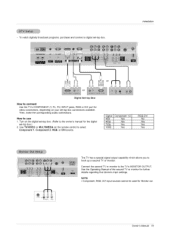
... monitor to hook up a second TV or monitor. How to the owner's manual for video connections, depending on your set -top box. (Refer to use 1. Owner's Manual 15 Turn on the remote control to connect Use the TV's COMPONENT (Y, PB, PR) INPUT jacks, RGB or DVI port for the digital set -top box. NOTE • Component, RGB, DVI input sources cannot be used for further details regarding that device's input settings. To watch digitally broadcast programs, purchase and connect a digital set -top box.) 2. Installation or Digital Set-top Box How to select Component 1, Component...
... monitor to hook up a second TV or monitor. How to the owner's manual for video connections, depending on your set -top box. (Refer to use 1. Owner's Manual 15 Turn on the remote control to connect Use the TV's COMPONENT (Y, PB, PR) INPUT jacks, RGB or DVI port for the digital set -top box. NOTE • Component, RGB, DVI input sources cannot be used for further details regarding that device's input settings. To watch digitally broadcast programs, purchase and connect a digital set -top box.) 2. Installation or Digital Set-top Box How to select Component 1, Component...

Owners Manual
Page 16
.... Operation How to another resolution, change the refresh rate to connect 1. Use the TV's RGB INPUT or DVI (Digital Visual Interface) INPUT port for video connections, depending on the TV's remote control. 3. How to Plug and Play automatically by pressing the POWER button on your TV. Use TV/VIDEO or MULTIMEDIA on the PC and the TV. 2. If using a sound card, adjust the PC sound as required. NOTES: • Use a DVI cable. • Avoid keeping a fixed image on the screen. Use...
.... Operation How to another resolution, change the refresh rate to connect 1. Use the TV's RGB INPUT or DVI (Digital Visual Interface) INPUT port for video connections, depending on the TV's remote control. 3. How to Plug and Play automatically by pressing the POWER button on your TV. Use TV/VIDEO or MULTIMEDIA on the PC and the TV. 2. If using a sound card, adjust the PC sound as required. NOTES: • Use a DVI cable. • Avoid keeping a fixed image on the screen. Use...
Owners Manual
Page 21
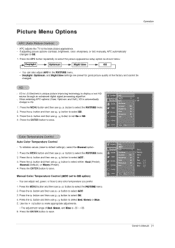
.... Auto Color Temperature Control To initialize values (reset to the best picture appearance. - Press the G button and then use D / E button to select the PICTURE menu. 2. Owner's Manual 21 Press the G button and then use D / E button to Off. 1. Press the ENTER button to display a real HD source through an advanced digital signal processing algorithm. Press the ENTER button to any color temperature you prefer. 1. XD is automatically change to make appropriate adjustments. • The adjustment range of Red...
.... Auto Color Temperature Control To initialize values (reset to the best picture appearance. - Press the G button and then use D / E button to select the PICTURE menu. 2. Owner's Manual 21 Press the G button and then use D / E button to Off. 1. Press the ENTER button to display a real HD source through an advanced digital signal processing algorithm. Press the ENTER button to any color temperature you prefer. 1. XD is automatically change to make appropriate adjustments. • The adjustment range of Red...
Owners Manual
Page 27
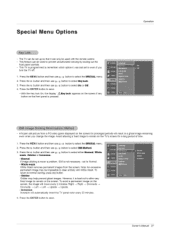
... Wash removes permanent images from a PC/video game displayed on the screen for a long period of time. 1. This feature can be used with White Wash. Press the MENU button and then use D / E button to select the SPECIAL menu. 2. Avoid allowing a fixed image to remain on the TV's screen for prolonged periods will automatically invert the TV panel color every 30 minutes. 4. Press the MENU button and then use D / E button to select the SPECIAL menu. 2. Owner's Manual 27...
... Wash removes permanent images from a PC/video game displayed on the screen for a long period of time. 1. This feature can be used with White Wash. Press the MENU button and then use D / E button to select the SPECIAL menu. 2. Avoid allowing a fixed image to remain on the TV's screen for prolonged periods will automatically invert the TV panel color every 30 minutes. 4. Press the MENU button and then use D / E button to select the SPECIAL menu. 2. Owner's Manual 27...
Owners Manual
Page 30
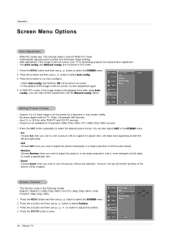
... original 4:3 aspect ratio, with the Manual config, option. - Choose Zoom when you want to adjust the picture in a linear proportion to fill the entire screen. • Horizon Choose Horizon when you want to adjust the picture horizontally, in a non-linear proportion, that is functioning properly but needs further adjustment. - Press the G button to view the picture without any alteration. This function works in DVI mode. 1. Operation Screen Menu Options...
... original 4:3 aspect ratio, with the Manual config, option. - Choose Zoom when you want to adjust the picture in a linear proportion to fill the entire screen. • Horizon Choose Horizon when you want to adjust the picture horizontally, in a non-linear proportion, that is functioning properly but needs further adjustment. - Press the G button to view the picture without any alteration. This function works in DVI mode. 1. Operation Screen Menu Options...
Owners Manual
Page 34
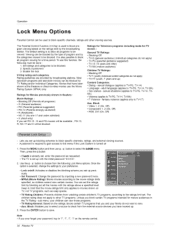
... other viewing sources. Most television programs and television movies can be blocked. Then, press the G button • If Lock is selected, change the settings to be blocked. The Parental Control Function (V-Chip) is to block specific channels, ratings and other TV programs. Unless you ever forget your preference. • Lock on the remote control. 34 Plasma TV The default setting is used to allow all the movies with the initial password "0-0-0-0". 2. sub menu...
... other viewing sources. Most television programs and television movies can be blocked. Then, press the G button • If Lock is selected, change the settings to be blocked. The Parental Control Function (V-Chip) is to block specific channels, ratings and other TV programs. Unless you ever forget your preference. • Lock on the remote control. 34 Plasma TV The default setting is used to allow all the movies with the initial password "0-0-0-0". 2. sub menu...
Owners Manual
Page 39
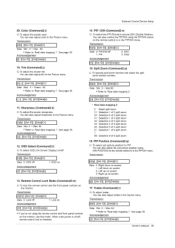
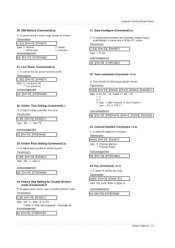
.... See page 38. Remote Control Lock Mode (Command2:m) G To lock the remote control and the front panel controls on /off . When main power is on the monitor. You can also adjust the sub picture position using the PIP/DW button on the remote control or in the Sound menu. PIP Position (Command2:q) G To select sub picture position for PIP. Treble (Command2:r) G To adjust treble. Transmission [[k][i][ ][Set ID][ ][Data][Cr] I Data Red : 0~ Green : 64 •...
.... See page 38. Remote Control Lock Mode (Command2:m) G To lock the remote control and the front panel controls on /off . When main power is on the monitor. You can also adjust the sub picture position using the PIP/DW button on the remote control or in the Sound menu. PIP Position (Command2:q) G To select sub picture position for PIP. Treble (Command2:r) G To adjust treble. Transmission [[k][i][ ][Set ID][ ][Data][Cr] I Data Red : 0~ Green : 64 •...
Owners Manual
Page 41
... works only in orbiter function. Transmission [[j ][q][ ][Set ID][ ][Data][Cr] I Data 0: Low power off . Orbiter Pixel Setting (Command2:s) G To adjust pixel number in RGB (PC) mode. Acknowledgement [[t][ ][Set ID][ ][OK][Data][x] I 30. Tune command (Command: m a) G Tune channel to page 43. Acknowledgement [[c][ ][Set IU][ ][OK][Data][x] Owner's Manual 41 Transmission [[j ][s][ ][Set ID][ ][Data][Cr] I Data Min: 1~Max:9 Acknowledgement [[s][ ][Set ID][ ][OK][Data][x] I External Control Device Setup 31. Transmission [[j ][u][ ][Set...
... works only in orbiter function. Transmission [[j ][q][ ][Set ID][ ][Data][Cr] I Data 0: Low power off . Orbiter Pixel Setting (Command2:s) G To adjust pixel number in RGB (PC) mode. Acknowledgement [[t][ ][Set ID][ ][OK][Data][x] I 30. Tune command (Command: m a) G Tune channel to page 43. Acknowledgement [[c][ ][Set IU][ ][OK][Data][x] Owner's Manual 41 Transmission [[j ][s][ ][Set ID][ ][Data][Cr] I Data Min: 1~Max:9 Acknowledgement [[s][ ][Set ID][ ][OK][Data][x] I External Control Device Setup 31. Transmission [[j ][u][ ][Set...
Owners Manual
Page 47
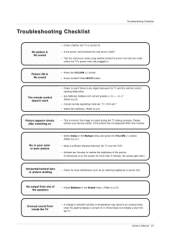
... see if there is on or off and does not indicate a fault with Owner's Manual 47 when the plasma display is muted during the TV startup process. i • Press the VOLUME (c;) button. to -)? (Refer to p.9) • Correct remote operating mode set: TV, VCR etc.? • Install new batteries. (Refer to , _ L inside the TV • A change in ambient humidity or temperature may result in .
... see if there is on or off and does not indicate a fault with Owner's Manual 47 when the plasma display is muted during the TV startup process. i • Press the VOLUME (c;) button. to -)? (Refer to p.9) • Correct remote operating mode set: TV, VCR etc.? • Install new batteries. (Refer to , _ L inside the TV • A change in ambient humidity or temperature may result in .
Owners Manual
Page 51
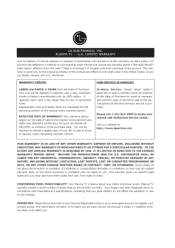
.... Your LG Plasma TV will be repaired OF replaced in accordance with the terms of this warranty, at LGE's option, if it proves to be required to submit a legible copy of your bill of sale OF proof of delivery when requesting warranty service. Your display has been inspected and is pro- at the time warranty service is in compliance with manufacturer's specifications...
.... Your LG Plasma TV will be repaired OF replaced in accordance with the terms of this warranty, at LGE's option, if it proves to be required to submit a legible copy of your bill of sale OF proof of delivery when requesting warranty service. Your display has been inspected and is pro- at the time warranty service is in compliance with manufacturer's specifications...


