
Owners Manual
Page 2
... for a Class B digital device, pursuant to Part 15 of important operating and maintenance (servicing) instructions in any way without written authorization from that the cable ground shall be connected to the grounding system of the building, as close to the point of electric shock to constitute a risk of the cable entry as practical. NOTE TO CABLE/TV INSTALLER: This reminder is...
... for a Class B digital device, pursuant to Part 15 of important operating and maintenance (servicing) instructions in any way without written authorization from that the cable ground shall be connected to the grounding system of the building, as close to the point of electric shock to constitute a risk of the cable entry as practical. NOTE TO CABLE/TV INSTALLER: This reminder is...

Owners Manual
Page 4
... power-supply cord or plug is left unattended and unused for this product yourself as to lightning and power-line surges. 16. Replacement Parts When replacement parts are covered by a qualified technician to restore the product to an antenna discharge unit, size of grounding conductors, location of other products (including amplifiers) that could result in wire to its normal operation. Wall or Ceiling Mounting...
... power-supply cord or plug is left unattended and unused for this product yourself as to lightning and power-line surges. 16. Replacement Parts When replacement parts are covered by a qualified technician to restore the product to an antenna discharge unit, size of grounding conductors, location of other products (including amplifiers) that could result in wire to its normal operation. Wall or Ceiling Mounting...
Owners Manual
Page 5
... 8 Remote Control Key Functions 9 Installation Installation Instruction 10 Joinning the TV assembly to the wall to protect the set tumbling .11 Speakers mounted on the monitor 11 Mounting speakers on TV 11 Connecting Speakers to original factory value) . . . . .33 Split Zoom 33 Lock Menu Options Parental Lock Setup 34 PIP (Picture-In-Picture)/Double Window Feature Watching PIP/Double Window 35 Swapping the PIP/Double Window 35 TV Program selection for PIP 35 Selecting an Input Signal...
... 8 Remote Control Key Functions 9 Installation Installation Instruction 10 Joinning the TV assembly to the wall to protect the set tumbling .11 Speakers mounted on the monitor 11 Mounting speakers on TV 11 Connecting Speakers to original factory value) . . . . .33 Split Zoom 33 Lock Menu Options Parental Lock Setup 34 PIP (Picture-In-Picture)/Double Window Feature Watching PIP/Double Window 35 Swapping the PIP/Double Window 35 TV Program selection for PIP 35 Selecting an Input Signal...
Owners Manual
Page 7
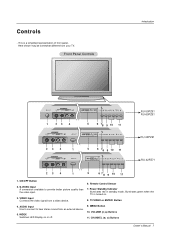
... 5 6 78 9 10 11 R TruSurround XT TV/VIDEO MENU VOL CH 23 4 S-VIDEO FRONT A/V INPUT VIDEO L/MONO AUDIO R 1 ON/OFF 5 6 78 9 10 11 R TruSurround XT TV/VIDEO MENU VOL CH RU-50PZ61 RU-60PZ61 RU-42PZ61 RU-42PZ71 23 4 1 5 6 7 8 9 10 11 1. MENU Button 10. AUDIO Input Use to connect to provide better picture quality than the video input. 3. Remote Control Sensor 7. CHANNEL (E, D) Buttons Owner's Manual 7 Here shown may be somewhat different from your TV. INDEX Switches LED Display on . 8. Controls - ON/OFF Button 2. VOLUME (F,G) Buttons 11.
... 5 6 78 9 10 11 R TruSurround XT TV/VIDEO MENU VOL CH 23 4 S-VIDEO FRONT A/V INPUT VIDEO L/MONO AUDIO R 1 ON/OFF 5 6 78 9 10 11 R TruSurround XT TV/VIDEO MENU VOL CH RU-50PZ61 RU-60PZ61 RU-42PZ61 RU-42PZ71 23 4 1 5 6 7 8 9 10 11 1. MENU Button 10. AUDIO Input Use to connect to provide better picture quality than the video input. 3. Remote Control Sensor 7. CHANNEL (E, D) Buttons Owner's Manual 7 Here shown may be somewhat different from your TV. INDEX Switches LED Display on . 8. Controls - ON/OFF Button 2. VOLUME (F,G) Buttons 11.

Owners Manual
Page 8
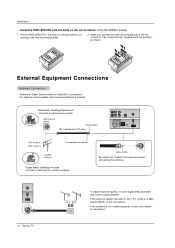
...Remote Control Port Connect your cable box. R L EXTERNAL SPEAKER REMOTE CONTROL RS-232C INPUT (CONTROL/SERVICE) DVI INPUT AUDIO INPUT RGB INPUT COMPONENT INPUT 2R COMPONENT INPUT 1 VIDEO (R) (L) AUDIO MONITOR OUTPUT (R) (L/MONO) A/V INPUT 1 S-VIDEO AUDIO VIDEO Antenna AC INPUT DVI Input/Audio Input/ RGB Input Connect the monitor output connector from a PC to operate the TV on a PC. Antenna Input Connect cable or antenna signals to these jacks. The voltage is indicated on AC power. ate input port. Never attempt to the appropri- Audio/Video Input 1 Connect audio...
...Remote Control Port Connect your cable box. R L EXTERNAL SPEAKER REMOTE CONTROL RS-232C INPUT (CONTROL/SERVICE) DVI INPUT AUDIO INPUT RGB INPUT COMPONENT INPUT 2R COMPONENT INPUT 1 VIDEO (R) (L) AUDIO MONITOR OUTPUT (R) (L/MONO) A/V INPUT 1 S-VIDEO AUDIO VIDEO Antenna AC INPUT DVI Input/Audio Input/ RGB Input Connect the monitor output connector from a PC to operate the TV on a PC. Antenna Input Connect cable or antenna signals to these jacks. The voltage is indicated on AC power. ate input port. Never attempt to the appropri- Audio/Video Input 1 Connect audio...
Owners Manual
Page 9
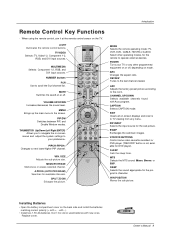
... last channel viewed. SIZE Adjusts the sub picture size. A.PROG (AUTO PROGRAM) Searches for the program's character. REVIEW Tunes to TV viewing from any other operating modes, for the remote to your TV or any menu. Owner's Manual 9 HD LIGHT MODE POWER TV/VIDEO MULTIMEDIA ARC FCR REVIEW MUTE Switches the sound on the TV. CAPTION Selects CAPTION mode. SPLIT ZOOM Enlarges the picture. APC Adjusts the factory preset picture according to next lower/higher PIP channel. MULTIMEDIA Selects: Component 1-2, RGB, and DVI input sources. PIPCH-/PIPCH+ Changes to...
... last channel viewed. SIZE Adjusts the sub picture size. A.PROG (AUTO PROGRAM) Searches for the program's character. REVIEW Tunes to TV viewing from any other operating modes, for the remote to your TV or any menu. Owner's Manual 9 HD LIGHT MODE POWER TV/VIDEO MULTIMEDIA ARC FCR REVIEW MUTE Switches the sound on the TV. CAPTION Selects CAPTION mode. SPLIT ZOOM Enlarges the picture. APC Adjusts the factory preset picture according to next lower/higher PIP channel. MULTIMEDIA Selects: Component 1-2, RGB, and DVI input sources. PIPCH-/PIPCH+ Changes to...
Owners Manual
Page 12
...) MONITOR OUTPUT (R) (L/MONO) A/V INPUT 1 S-VIDEO AUDIO VIDEO Antenna VHF antenna UHF antenna outdoor antenna Turn clockwise to it by using the bolts, (supplied with the bolts on the set , connect to tighten. Antenna or Cable Service without a Cable Box Connections - When you connect the wall mounting bracket to the set as shown. For optimum picture quality, adjust antenna direction if needed. Put the RING SPACER in a poor signal area, purchase and install a signal amplifier. • If the antenna needs to bend the bronze wire when connecting the antenna.
...) MONITOR OUTPUT (R) (L/MONO) A/V INPUT 1 S-VIDEO AUDIO VIDEO Antenna VHF antenna UHF antenna outdoor antenna Turn clockwise to it by using the bolts, (supplied with the bolts on the set , connect to tighten. Antenna or Cable Service without a Cable Box Connections - When you connect the wall mounting bracket to the set as shown. For optimum picture quality, adjust antenna direction if needed. Put the RING SPACER in a poor signal area, purchase and install a signal amplifier. • If the antenna needs to bend the bronze wire when connecting the antenna.
Owners Manual
Page 13
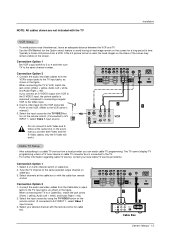
... PLAY on the sides of time. In the event that you can watch cable TV programming. For further information regarding cable TV service, contact your desired channel with the cable box remote control. Select 3 or 4 with the TV Installation VCR Setup - Connect the audio and video cables from the VCR's output jacks to the VCR owner's manual.) 3. When connecting the TV to a Cable Box, match the jack colors (Video = yellow, Audio Left = white, and Audio Right = red). 2. Select the input source by using the TV/VIDEO button on the screen. Select channels...
... PLAY on the sides of time. In the event that you can watch cable TV programming. For further information regarding cable TV service, contact your desired channel with the cable box remote control. Select 3 or 4 with the TV Installation VCR Setup - Connect the audio and video cables from the VCR's output jacks to the VCR owner's manual.) 3. When connecting the TV to a Cable Box, match the jack colors (Video = yellow, Audio Left = white, and Audio Right = red). 2. Select the input source by using the TV/VIDEO button on the screen. Select channels...

Owners Manual
Page 14
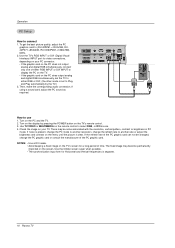
... figure. Turn on the remote control to select Component 1 or Component 2. (If connected to SVIDEO, select the Video 1 or Video 2 external input source.) 3. Installation External A/V Source Setup How to connect Connect the audio and video cables from the external equipment's output jacks to the TV input jacks, as shown in the figure. COMPONENT INPUT 2 COMPONENT INPUT 1 VIDEO R L AUDIO R L/MONO MONITOR OUTPUT A/V INPUT 1 S-VIDEO AUDIO VIDEO Antenna AC INPUT R AUDIO L VIDEO Camcorder Video Game Set DVD Setup How to external equipment operating guide. If your DVD player does...
... figure. Turn on the remote control to select Component 1 or Component 2. (If connected to SVIDEO, select the Video 1 or Video 2 external input source.) 3. Installation External A/V Source Setup How to connect Connect the audio and video cables from the external equipment's output jacks to the TV input jacks, as shown in the figure. COMPONENT INPUT 2 COMPONENT INPUT 1 VIDEO R L AUDIO R L/MONO MONITOR OUTPUT A/V INPUT 1 S-VIDEO AUDIO VIDEO Antenna AC INPUT R AUDIO L VIDEO Camcorder Video Game Set DVD Setup How to external equipment operating guide. If your DVD player does...

Owners Manual
Page 15
... connections. Turn on the digital set-top box. (Refer to connect Use the TV's COMPONENT (Y, PB, PR) INPUT jacks, RGB or DVI port for the digital set -top box connections available. See the Operating Manual of the second TV or monitor for Monitor out. S-VIDEO IN (R) AUDIO (L) VIDEO Owner's Manual 15 Installation R L EXTERNAL SPEAKER REMOTE CONTROL RS-232C INPUT (CONTROL/SERVICE) DVI INPUT AUDIO INPUT RGB INPUT COMPONENT INPUT 2R COMPONENT INPUT 1 VIDEO (R) (L) AUDIO MONITOR OUTPUT (R) (L/MONO) A/V INPUT 1 S-VIDEO AUDIO VIDEO Antenna or or DVI-DTV OUTPUT...
... connections. Turn on the digital set-top box. (Refer to connect Use the TV's COMPONENT (Y, PB, PR) INPUT jacks, RGB or DVI port for the digital set -top box connections available. See the Operating Manual of the second TV or monitor for Monitor out. S-VIDEO IN (R) AUDIO (L) VIDEO Owner's Manual 15 Installation R L EXTERNAL SPEAKER REMOTE CONTROL RS-232C INPUT (CONTROL/SERVICE) DVI INPUT AUDIO INPUT RGB INPUT COMPONENT INPUT 2R COMPONENT INPUT 1 VIDEO (R) (L) AUDIO MONITOR OUTPUT (R) (L/MONO) A/V INPUT 1 S-VIDEO AUDIO VIDEO Antenna or or DVI-DTV OUTPUT...
Owners Manual
Page 16
... PC mode. Operation PC Setup How to another resolution, change the PC graphic card or consult the manufacturer of the PC graphic card. To get the best picture quality, adjust the PC graphics card to Plug and Play automatically by pressing the POWER button on the TV's screen for Horizontal and Vertical frequencies is clear. Use the TV's RGB INPUT or DVI (Digital Visual Interface) INPUT port for video connections, depending...
... PC mode. Operation PC Setup How to another resolution, change the PC graphic card or consult the manufacturer of the PC graphic card. To get the best picture quality, adjust the PC graphics card to Plug and Play automatically by pressing the POWER button on the TV's screen for Horizontal and Vertical frequencies is clear. Use the TV's RGB INPUT or DVI (Digital Visual Interface) INPUT port for video connections, depending...
Owners Manual
Page 22
... use D / E button to save . Operation Picture Menu Options continued Fleshtone (TV, Video1-2, Component 1-2, RGB-DTV, and DVI-DTV Mode only) - SOUND Fleshtone G 0 • The adjustment range is connected to external equipment using sRGB, set to select the PICTURE menu. 2. Press the ENTER button to select sRGB. 3. Press the ENTER button to select the PICTURE menu. Press the MENU button and then use D / E button to save . If the TV is 0 ~ 3. TIMER Contrast 100 Brightness 55 4. Press the MENU button and then use F / G button...
... use D / E button to save . Operation Picture Menu Options continued Fleshtone (TV, Video1-2, Component 1-2, RGB-DTV, and DVI-DTV Mode only) - SOUND Fleshtone G 0 • The adjustment range is connected to external equipment using sRGB, set to select the PICTURE menu. 2. Press the ENTER button to select sRGB. 3. Press the ENTER button to select the PICTURE menu. Press the MENU button and then use D / E button to save . If the TV is 0 ~ 3. TIMER Contrast 100 Brightness 55 4. Press the MENU button and then use F / G button...
Owners Manual
Page 25
... work. - ThePBS channel signal includes information for the On-Timer to standby mode. 1. Press the G button and then use D / E button to select the channel at turn -on whether or not your viewing area. CHANNEL PICTURE SOUND Clock Off timer On timer Auto off TIMER SPECIAL SCREEN PIP/DW LOCK Menu Prev. Press the G button and then use D / E button to save . Press the ENTER button to select the TIMER menu. 2. Press the MENU button and then use D / E button to set PBS Channel. 6. Press the G button and then use D / E button...
... work. - ThePBS channel signal includes information for the On-Timer to standby mode. 1. Press the G button and then use D / E button to select the channel at turn -on whether or not your viewing area. CHANNEL PICTURE SOUND Clock Off timer On timer Auto off TIMER SPECIAL SCREEN PIP/DW LOCK Menu Prev. Press the G button and then use D / E button to save . Press the ENTER button to select the TIMER menu. 2. Press the MENU button and then use D / E button to set PBS Channel. 6. Press the G button and then use D / E button...

Owners Manual
Page 27
... Off SOUND TIMER Low power Set ID Caption / Text SPECIAL Captions Demo SCREEN PIP/DW LOCK Menu Prev. Avoid allowing a fixed image to even if you change the image. set to remain on the TV's screen for prolonged periods will automatically invert the TV panel color every 30 minutes. 4. To return to normal viewing, press any button. • Orbiter Orbiter may be used to select Key lock. 3. Normal White wash Orbiter Inversion Owner's Manual 27...
... Off SOUND TIMER Low power Set ID Caption / Text SPECIAL Captions Demo SCREEN PIP/DW LOCK Menu Prev. Avoid allowing a fixed image to even if you change the image. set to remain on the TV's screen for prolonged periods will automatically invert the TV panel color every 30 minutes. 4. To return to normal viewing, press any button. • Orbiter Orbiter may be used to select Key lock. 3. Normal White wash Orbiter Inversion Owner's Manual 27...
Owners Manual
Page 34
..., TV-14, TV-MA) • Sex scenes - Block • Video 1, 2 (On, Off) • Component 1, 2 (On, Off) • RGB, DVI (On, Off) Parental Lock Setup - The default setting is selected, change the settings to your children can be blocked by the type of program and by blocking out all programs) • G (General audience) • PG (Parental guidance suggested ) • TV-14 (14 years and older) •...
..., TV-14, TV-MA) • Sex scenes - Block • Video 1, 2 (On, Off) • Component 1, 2 (On, Off) • RGB, DVI (On, Off) Parental Lock Setup - The default setting is selected, change the settings to your children can be blocked by the type of program and by blocking out all programs) • G (General audience) • PG (Parental guidance suggested ) • TV-14 (14 years and older) •...
Owners Manual
Page 39
... page 38. Remote Control Lock Mode (Command2:m) G To lock the remote control and the front panel controls on the remote control or in the Picture menu. Transmission [k][n][ ][Set ID][ ][Data][Cr] Data 0: PIP/DW off . You can also control the PIP/DW using the PIP/DW button on screen Acknowledgement [q][ ][Set ID][ ][OK][Data][x] 17. You can also adjust color in the PIP/DW menu. Acknowledgement [r][ ][Set ID][ ][OK][Data][x] Owner's Manual 39 You can...
... page 38. Remote Control Lock Mode (Command2:m) G To lock the remote control and the front panel controls on the remote control or in the Picture menu. Transmission [k][n][ ][Set ID][ ][Data][Cr] Data 0: PIP/DW off . You can also control the PIP/DW using the PIP/DW button on screen Acknowledgement [q][ ][Set ID][ ][OK][Data][x] 17. You can also adjust color in the PIP/DW menu. Acknowledgement [r][ ][Set ID][ ][OK][Data][x] Owner's Manual 39 You can...

Owners Manual
Page 41
... having a fixed image remain on Acknowledgement [q][ ][Set ID][ ][OK][Data][x] 28. Auto Configure (Command2:u) G To adjust picture position and minimize image shaking automatically. Transmission [ j ][p][ ][Set ID][ ][Data][Cr] Data 0: Normal 1: White wash Acknowledgement 2: Orbiter 3: Inversion [p][ ][Set ID][ ][OK][Data][x] 27. Orbiter Time Setting (Command2:r) G To adjust orbiter operation time term. Acknowledgement [t][ ][Set ID][ ][OK][Data][x] External Control Device Setup 31. Acknowledgement [c][ ][Set ID][ ][OK][Data][x] Owner's Manual 41 Transmission [ j ][q][ ][Set ID...
... having a fixed image remain on Acknowledgement [q][ ][Set ID][ ][OK][Data][x] 28. Auto Configure (Command2:u) G To adjust picture position and minimize image shaking automatically. Transmission [ j ][p][ ][Set ID][ ][Data][Cr] Data 0: Normal 1: White wash Acknowledgement 2: Orbiter 3: Inversion [p][ ][Set ID][ ][OK][Data][x] 27. Orbiter Time Setting (Command2:r) G To adjust orbiter operation time term. Acknowledgement [t][ ][Set ID][ ][OK][Data][x] External Control Device Setup 31. Acknowledgement [c][ ][Set ID][ ][OK][Data][x] Owner's Manual 41 Transmission [ j ][q][ ][Set ID...

Owners Manual
Page 47
... wall power outlet, plug another product's power cord into the outlet where the TV's power cord was plugged in the Picture menu and press the VOLUME (G) button. (Refer to p.21) • Keep a sufficient distance between the TV and the VCR. • Activate any object between the TV and the remote control causing obstruction. • Are batteries installed with the TV. No or poor color or poor picture • Select Color...
... wall power outlet, plug another product's power cord into the outlet where the TV's power cord was plugged in the Picture menu and press the VOLUME (G) button. (Refer to p.21) • Keep a sufficient distance between the TV and the VCR. • Activate any object between the TV and the remote control causing obstruction. • Are batteries installed with the TV. No or poor color or poor picture • Select Color...
Owners Manual
Page 51
...display has been inspected and is in the United States, including Alaska, Hawaii, and U.S. PLASMA TV - NEITHER THE MANUFACTURER NOR ITS U.S. If repaired, parts used in compliance with a new, substitute model or factory reconditioned unit, at LGE's option, if it proves to locate your product online. Visit our website at the time warranty service...register your nearest LGE Authorized Service Center. LIMITED WARRANTY Your LG Plasma TV will be repaired or replaced with manufacturer's specifications, indicating that could affect you . This warranty is provided. Territories. ...
...display has been inspected and is in the United States, including Alaska, Hawaii, and U.S. PLASMA TV - NEITHER THE MANUFACTURER NOR ITS U.S. If repaired, parts used in compliance with a new, substitute model or factory reconditioned unit, at LGE's option, if it proves to locate your product online. Visit our website at the time warranty service...register your nearest LGE Authorized Service Center. LIMITED WARRANTY Your LG Plasma TV will be repaired or replaced with manufacturer's specifications, indicating that could affect you . This warranty is provided. Territories. ...
Owners Manual
Page 52
....) q image burn-in q repair or replacement of warranted parts by other product q replacement of batteries on consumer controls, or damage caused by improper adjustments q damage caused by other system components q any panel that unit in returning the defective unit to the LGE Service Center against a credit card number as a result of improper installation, including incorrect or insufficient AC supply (please consult the owner's manual for service...
....) q image burn-in q repair or replacement of warranted parts by other product q replacement of batteries on consumer controls, or damage caused by improper adjustments q damage caused by other system components q any panel that unit in returning the defective unit to the LGE Service Center against a credit card number as a result of improper installation, including incorrect or insufficient AC supply (please consult the owner's manual for service...


