
Owners Manual
Page 1
Retain this manual carefully and completely before operating your dealer if you require service. PLASMA TV OWNER'S MANUAL MODELS: RU-42PZ61/71 RU-50PZ61 RU-60PZ61 Please read this manual for future reference. Model Number : Serial Number : LG Electronics U.S.A., Inc. Record model number and serial number of the TV in the spaces provided below. See the label attached on the back cover and relate this information to your TV.
Retain this manual carefully and completely before operating your dealer if you require service. PLASMA TV OWNER'S MANUAL MODELS: RU-42PZ61/71 RU-50PZ61 RU-60PZ61 Please read this manual for future reference. Model Number : Serial Number : LG Electronics U.S.A., Inc. Record model number and serial number of the TV in the spaces provided below. See the label attached on the back cover and relate this information to your TV.

Owners Manual
Page 2
... cause harmful interference to radio or television reception, which the receiver is : LG Electronics U.S.A., Inc 1000 Sylvan Avenue, Englewood Cliffs, NJ 07632 1-201-816-2000 http://www.lgusa.com 2 Plasma TV However, there is no guarantee that the cable ground shall be determined by .... • Increase the separation between the equipment and receiver. • Connect the equipment into an outlet on a circuit different from LG Electronics. COMPLIANCE: The responsible party for proper grounding and, in particular, specifies that interference will not occur in any way without written ...
... cause harmful interference to radio or television reception, which the receiver is : LG Electronics U.S.A., Inc 1000 Sylvan Avenue, Englewood Cliffs, NJ 07632 1-201-816-2000 http://www.lgusa.com 2 Plasma TV However, there is no guarantee that the cable ground shall be determined by .... • Increase the separation between the equipment and receiver. • Connect the equipment into an outlet on a circuit different from LG Electronics. COMPLIANCE: The responsible party for proper grounding and, in particular, specifies that interference will not occur in any way without written ...

Owners Manual
Page 4
... antenna or cable system is connected to National Electrical Code Instructions Ground Clamp Electric Service Equipment NEC - e. Example of any kind on the product. 4 Plasma TV Outdoor Antenna Grounding If an outside antenna system, extreme care should not be sure the antenna or cable system is damaged.
... antenna or cable system is connected to National Electrical Code Instructions Ground Clamp Electric Service Equipment NEC - e. Example of any kind on the product. 4 Plasma TV Outdoor Antenna Grounding If an outside antenna system, extreme care should not be sure the antenna or cable system is damaged.
Owners Manual
Page 5
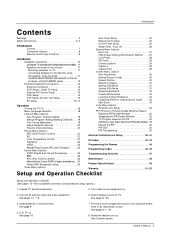
...set tumbling .11 Speakers mounted on the monitor 11 Mounting speakers on TV 11 Connecting Speakers to the Monitor using the speaker wires provided 11 Install the RING SPACER with the bolts on the set as shown. (Only RU-60PZ61 series 12 External Equipment Connections 12 Antenna Connection 12 VCR Setup... / Cable TV Setup 13 External A/V Source Setup 14 DVD Setup 14 DTV Setup / Monitor Out Setup 15 PC Setup...
...set tumbling .11 Speakers mounted on the monitor 11 Mounting speakers on TV 11 Connecting Speakers to the Monitor using the speaker wires provided 11 Install the RING SPACER with the bolts on the set as shown. (Only RU-60PZ61 series 12 External Equipment Connections 12 Antenna Connection 12 VCR Setup... / Cable TV Setup 13 External A/V Source Setup 14 DVD Setup 14 DTV Setup / Monitor Out Setup 15 PC Setup...

Owners Manual
Page 6
...the display is normal during the manufacture and operation of fluorescent lamps. A few minute colored dots may be exchanged or returned. 6 Plasma TV Several tiny, minute colored dots visible on the PDP's efficiency or reliability. The noise from the cooling fans is acceptable and is individually ... In the same way that this product. Wide angle range of noise could occur while the fans are comprised of locations where conventional TVs will normally occur in other PDP manufacturers' products. Gas in each sub-pixel to keep the CPU (Central Processing Unit) cool, the...
...the display is normal during the manufacture and operation of fluorescent lamps. A few minute colored dots may be exchanged or returned. 6 Plasma TV Several tiny, minute colored dots visible on the PDP's efficiency or reliability. The noise from the cooling fans is acceptable and is individually ... In the same way that this product. Wide angle range of noise could occur while the fans are comprised of locations where conventional TVs will normally occur in other PDP manufacturers' products. Gas in each sub-pixel to keep the CPU (Central Processing Unit) cool, the...
Owners Manual
Page 7
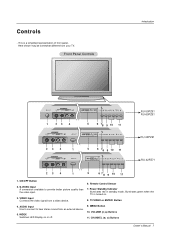
...VIDEO L/MONO AUDIO R ON/OFF 5 6 78 9 10 11 R TruSurround XT TV/VIDEO MENU VOL CH 23 4 S-VIDEO FRONT A/V INPUT VIDEO L/MONO AUDIO R 1 ON/OFF 5 6 78 9 10 11 R TruSurround XT TV/VIDEO MENU VOL CH RU-50PZ61 RU-60PZ61 RU-42PZ61 RU-42PZ71 23 4 1 5 6 7 8 9 10 11 1. VIDEO Input Connects the... video signal from your TV. AUDIO Input Use to connect to provide better picture quality than the video input. ...
...VIDEO L/MONO AUDIO R ON/OFF 5 6 78 9 10 11 R TruSurround XT TV/VIDEO MENU VOL CH 23 4 S-VIDEO FRONT A/V INPUT VIDEO L/MONO AUDIO R 1 ON/OFF 5 6 78 9 10 11 R TruSurround XT TV/VIDEO MENU VOL CH RU-50PZ61 RU-60PZ61 RU-42PZ61 RU-42PZ71 23 4 1 5 6 7 8 9 10 11 1. VIDEO Input Connects the... video signal from your TV. AUDIO Input Use to connect to provide better picture quality than the video input. ...

Owners Manual
Page 8
...For further information, refer to the S-VIDEO input. The voltage is indicated on AC power. Connect S-Video out from a PC to the TV, either directly or through your wired RS-232C INPUT remote control here. (CONTROL/SER- Antenna Input Connect cable or antenna signals to the appropri...- Power Cord Socket This TV operates on the Specifications page. Audio/Video Input 1 Connect audio/video output from an external device to these jacks. Connect a component video...
...For further information, refer to the S-VIDEO input. The voltage is indicated on AC power. Connect S-Video out from a PC to the TV, either directly or through your wired RS-232C INPUT remote control here. (CONTROL/SER- Antenna Input Connect cable or antenna signals to the appropri...- Power Cord Socket This TV operates on the Specifications page. Audio/Video Input 1 Connect audio/video output from an external device to these jacks. Connect a component video...
Owners Manual
Page 9
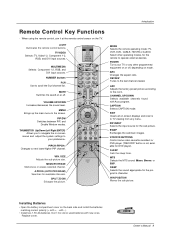
... batteries. SWAP Exchanges the sub/main images. WIN.POSITION Moves the sub picture. Installing Batteries • Open the battery compartment cover on the TV. Don't mix old or used batteries with +, - APC Adjusts the factory preset picture according to next lower/higher PIP channel. PIP INPUT Selects... it at the remote control sensor on the back side and install the batteries matching correct polarity (+ with new ones. HD LIGHT MODE POWER TV/VIDEO MULTIMEDIA ARC FCR REVIEW MUTE Switches the sound on or off , depending on or off . A.PROG (AUTO PROGRAM) Searches for the ...
... batteries. SWAP Exchanges the sub/main images. WIN.POSITION Moves the sub picture. Installing Batteries • Open the battery compartment cover on the TV. Don't mix old or used batteries with +, - APC Adjusts the factory preset picture according to next lower/higher PIP channel. PIP INPUT Selects... it at the remote control sensor on the back side and install the batteries matching correct polarity (+ with new ones. HD LIGHT MODE POWER TV/VIDEO MULTIMEDIA ARC FCR REVIEW MUTE Switches the sound on or off , depending on or off . A.PROG (AUTO PROGRAM) Searches for the ...
Owners Manual
Page 10
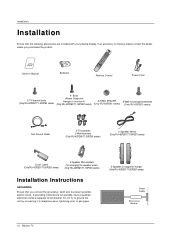
... unit by connecting it to monitor-4) (Only RU-42PZ61/71, 50PZ61 series) 6-RING SPACER (Only RU-60PZ61 series) 6-Wall mounting bracket bolts (Only RU-60PZ61 series) 75Ω Round Cable 2-TV brackets 2-Wall brackets (Only RU-42PZ61/71,50PZ61 series) 2-Speaker Wires (Only RU-42PZ61/71,50PZ61 series) Cover Cable (Only RU-42PZ61/71,50PZ61 series) 2-Speaker Wire Holders (for arranging...
... unit by connecting it to monitor-4) (Only RU-42PZ61/71, 50PZ61 series) 6-RING SPACER (Only RU-60PZ61 series) 6-Wall mounting bracket bolts (Only RU-60PZ61 series) 75Ω Round Cable 2-TV brackets 2-Wall brackets (Only RU-42PZ61/71,50PZ61 series) 2-Speaker Wires (Only RU-42PZ61/71,50PZ61 series) Cover Cable (Only RU-42PZ61/71,50PZ61 series) 2-Speaker Wire Holders (for arranging...
Owners Manual
Page 11
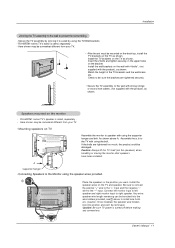
RU-60PZ61 series TV's stand is saled, separately . - Insert the 2 bolts and tighten securely, in the position you want. As shown above to install wire hold- Caution: Always lift the TV itself (not the speakers) when handling or moving the monitor after speakers have been installed...product), as shown. A supporter hanger b • Connecting Speakers to the Monitor using the supporter hanger and bolt. RU-60PZ61 series TV's speaker is saled, separately . - Install the TV brackets on the wall with 4 bolts*, (not supplied with the product), as shown. Check to be damaged. ...
RU-60PZ61 series TV's stand is saled, separately . - Insert the 2 bolts and tighten securely, in the position you want. As shown above to install wire hold- Caution: Always lift the TV itself (not the speakers) when handling or moving the monitor after speakers have been installed...product), as shown. A supporter hanger b • Connecting Speakers to the Monitor using the supporter hanger and bolt. RU-60PZ61 series TV's speaker is saled, separately . - Install the TV brackets on the wall with 4 bolts*, (not supplied with the product), as shown. Check to be damaged. ...
Owners Manual
Page 12
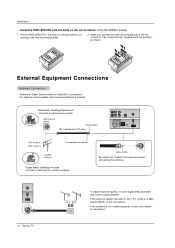
... 1 S-VIDEO AUDIO VIDEO Antenna VHF antenna UHF antenna outdoor antenna Turn clockwise to bend the bronze wire when connecting the antenna. O Antenna 12 Plasma TV Signal Amplifier • To improve picture quality in a poor signal area, purchase and install a signal amplifier. • If the antenna needs to be... the RING SPACER with the bolts on the set , connect to it by using the bolts, (supplied with the product), as shown. (Only RU-60PZ61 series) 1. Put the RING SPACER in the connections. • If the antenna is not installed properly, contact your dealer for outdoor antenna)...
... 1 S-VIDEO AUDIO VIDEO Antenna VHF antenna UHF antenna outdoor antenna Turn clockwise to bend the bronze wire when connecting the antenna. O Antenna 12 Plasma TV Signal Amplifier • To improve picture quality in a poor signal area, purchase and install a signal amplifier. • If the antenna needs to be... the RING SPACER with the bolts on the set , connect to it by using the bolts, (supplied with the product), as shown. (Only RU-60PZ61 series) 1. Put the RING SPACER in the connections. • If the antenna is not installed properly, contact your dealer for outdoor antenna)...
Owners Manual
Page 13
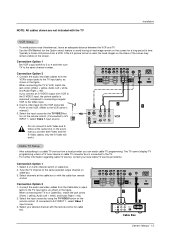
... output from VCR to the same selected output channel on the remote control. (If connected to the Video input. 2. Select the input source by the TV/VIDEO button on the VCR. (Refer to a Cable Box, match the jack colors (Video = yellow, Audio Left = white, and Audio Right = red). 2. Typically a ... a long period of the screen may remain visible on cable box. 2. Connect the audio and video cables from a VCR. Connection Option 1 1. Tune the TV channel to the S-VIDEO input, the picture quality is used; If you connect both Video and SVideo at the cable box or with the...
... output from VCR to the same selected output channel on the remote control. (If connected to the Video input. 2. Select the input source by the TV/VIDEO button on the VCR. (Refer to a Cable Box, match the jack colors (Video = yellow, Audio Left = white, and Audio Right = red). 2. Typically a ... a long period of the screen may remain visible on cable box. 2. Connect the audio and video cables from a VCR. Connection Option 1 1. Tune the TV channel to the S-VIDEO input, the picture quality is used; If you connect both Video and SVideo at the cable box or with the...

Owners Manual
Page 14
...white, and Audio Right = red). Connect the DVD video outputs (Y, PB, PR) to the COMPONENT (Y, PB, PR) INPUT jacks on the TV, as shown in the figure. Refer to the DVD player's manual for operating instructions. • Component Input ports To get better picture quality,...R L/MONO MONITOR OUTPUT A/V INPUT 1 S-VIDEO AUDIO VIDEO Antenna AC INPUT B R (R) AUDIO (L) or S-VIDEO (R) AUDIO (L) DVD 14 Plasma TV Component ports on the TV Y PB PR Video output ports on the DVD player, insert a DVD. 2. Installation External A/V Source Setup How to connect Connect the audio and video...
...white, and Audio Right = red). Connect the DVD video outputs (Y, PB, PR) to the COMPONENT (Y, PB, PR) INPUT jacks on the TV, as shown in the figure. Refer to the DVD player's manual for operating instructions. • Component Input ports To get better picture quality,...R L/MONO MONITOR OUTPUT A/V INPUT 1 S-VIDEO AUDIO VIDEO Antenna AC INPUT B R (R) AUDIO (L) or S-VIDEO (R) AUDIO (L) DVD 14 Plasma TV Component ports on the TV Y PB PR Video output ports on the DVD player, insert a DVD. 2. Installation External A/V Source Setup How to connect Connect the audio and video...

Owners Manual
Page 15
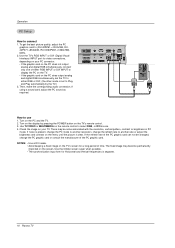
...Antenna or or DVI-DTV OUTPUT (R) AUDIO (L) (R) AUDIO (L) RGB-DTV OUTPUT Digital Set-top Box B R (R) AUDIO (L) How to connect Use the TV's COMPONENT (Y, PB, PR) INPUT jacks, RGB or DVI port for the digital set -top box. (Refer to the owner's manual for video connections, depending... DVI input sources cannot be used for further details regarding that device's input settings. Then, make the corresponding audio connections. Connect the second TV or monitor to select Component 1, Component 2, RGB, or DVI source. To watch digitally broadcast programs, purchase and connect a digital set -...
...Antenna or or DVI-DTV OUTPUT (R) AUDIO (L) (R) AUDIO (L) RGB-DTV OUTPUT Digital Set-top Box B R (R) AUDIO (L) How to connect Use the TV's COMPONENT (Y, PB, PR) INPUT jacks, RGB or DVI port for the digital set -top box. (Refer to the owner's manual for video connections, depending... DVI input sources cannot be used for further details regarding that device's input settings. Then, make the corresponding audio connections. Connect the second TV or monitor to select Component 1, Component 2, RGB, or DVI source. To watch digitally broadcast programs, purchase and connect a digital set -...
Owners Manual
Page 16
...and Play automatically by pressing the POWER button on the PC and the TV. 2. Operation PC Setup How to (RU-42PZ61->1024x768, RU42PZ71->852x480, RU-50/60PZ61->1366x768), 60Hz. 2. There may become permanently imprinted on your TV. R L EXTERNAL SPEAKER REMOTE CONTROL RS-232C INPUT (CONTROL/SERVICE) ...source. 4. Use the Orbiter screen saver when possible. • The synchronization input form for Horizontal and Vertical frequencies is clear. Use the TV's RGB INPUT or DVI (Digital Visual Interface) INPUT port for a long period of the PC graphic card. Then, make the corresponding ...
...and Play automatically by pressing the POWER button on the PC and the TV. 2. Operation PC Setup How to (RU-42PZ61->1024x768, RU42PZ71->852x480, RU-50/60PZ61->1366x768), 60Hz. 2. There may become permanently imprinted on your TV. R L EXTERNAL SPEAKER REMOTE CONTROL RS-232C INPUT (CONTROL/SERVICE) ...source. 4. Use the Orbiter screen saver when possible. • The synchronization input form for Horizontal and Vertical frequencies is clear. Use the TV's RGB INPUT or DVI (Digital Visual Interface) INPUT port for a long period of the PC graphic card. Then, make the corresponding ...

Owners Manual
Page 18
... select Language. 3. Connect power cord correctly. 2. At this moment, the TV is still connected) 1. Press the TV/VIDEO, CH (D / E) button on the TV or press the POWER, TV/VIDEO, MULTIMEDIA, Number (0 ~ 9) button on the remote control and then the TV will be shown on the remote control to standby mode. If the... turned off with the remote control and then the ON/OFF button on the TV • Press the ON/OFF button on the TV and then press the TV/VIDEO, CH (D / E) button on the TV or press the POWER, TV/VIDEO, MULTIMEDIA, Number (0 ~ 9) button on the screen in the language of your ...
... select Language. 3. Connect power cord correctly. 2. At this moment, the TV is still connected) 1. Press the TV/VIDEO, CH (D / E) button on the TV or press the POWER, TV/VIDEO, MULTIMEDIA, Number (0 ~ 9) button on the remote control and then the TV will be shown on the remote control to standby mode. If the... turned off with the remote control and then the ON/OFF button on the TV • Press the ON/OFF button on the TV and then press the TV/VIDEO, CH (D / E) button on the TV or press the POWER, TV/VIDEO, MULTIMEDIA, Number (0 ~ 9) button on the screen in the language of your ...
Owners Manual
Page 19
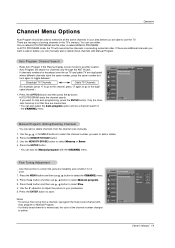
...or Manual Program. • If a finely-tuned channel is called AUTO PROGRAM and the other is memorized, the color of storing channels in the TV's memory. Owner's Manual 19 Press the ENTER button to select Memory or Erase. 4. To start Manual Program: Adding/Deleting Channels - If channels ...IN jack. - If there are duplicated where different channels have the same number, press the same number buttons again to toggle between: Broadcast TV Channels Cable TV Channels (For example, press 17 to go to the channel, press 17 again to go to the duplicated channel.) 1. Operation Channel Menu...
...or Manual Program. • If a finely-tuned channel is called AUTO PROGRAM and the other is memorized, the color of storing channels in the TV's memory. Owner's Manual 19 Press the ENTER button to select Memory or Erase. 4. To start Manual Program: Adding/Deleting Channels - If channels ...IN jack. - If there are duplicated where different channels have the same number, press the same number buttons again to toggle between: Broadcast TV Channels Cable TV Channels (For example, press 17 to go to the channel, press 17 again to go to the duplicated channel.) 1. Operation Channel Menu...
Owners Manual
Page 20
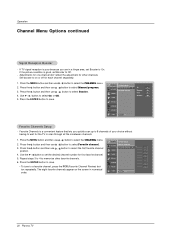
...the CHANNEL menu. 2. Press the G button and then use D / E button to select Booster. 4. CHANNEL Auto program Manual program G TV 2 PICTURE Favorite channel Memory On SOUND Fine 0 Booster Off TIMER SPECIAL SCREEN PIP/DW LOCK Menu Prev. Set booster to wait for other ... 4 to Off. - Operation Channel Menu Options continued Signal Reception Booster - Use F / G button to select the first favorite channel position. 4. If TV signal reception is a convenient feature that lets you are in -between channels. 1. Press the G button and then use D / E button to a ...
...the CHANNEL menu. 2. Press the G button and then use D / E button to select Booster. 4. CHANNEL Auto program Manual program G TV 2 PICTURE Favorite channel Memory On SOUND Fine 0 Booster Off TIMER SPECIAL SCREEN PIP/DW LOCK Menu Prev. Set booster to wait for other ... 4 to Off. - Operation Channel Menu Options continued Signal Reception Booster - Use F / G button to select the first favorite channel position. 4. If TV signal reception is a convenient feature that lets you are in -between channels. 1. Press the G button and then use D / E button to a ...
Owners Manual
Page 21
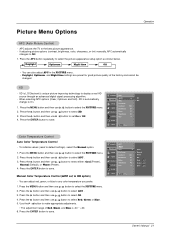
...quality at the factory and cannot be changed. Press the G button and then use D / E button to On. 1. APC adjusts the TV to select the picture appearance setup option as shown below. Press the APC button repeatedly to the best picture appearance. - XD is automatically change...button to select XD. 3. Cool Normal Warm Off Red 0 Green 0 Blue 0 Owner's Manual 21 When selecting APC options (Clear, Optimum and Soft), XD is LG Electronic's unique picture improving technology to select ACC . 3. Press the MENU button and then use D / E button to display a real HD source through an ...
...quality at the factory and cannot be changed. Press the G button and then use D / E button to On. 1. APC adjusts the TV to select the picture appearance setup option as shown below. Press the APC button repeatedly to the best picture appearance. - XD is automatically change...button to select XD. 3. Cool Normal Warm Off Red 0 Green 0 Blue 0 Owner's Manual 21 When selecting APC options (Clear, Optimum and Soft), XD is LG Electronic's unique picture improving technology to select ACC . 3. Press the MENU button and then use D / E button to display a real HD source through an ...
Owners Manual
Page 22
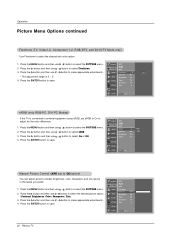
...). 3. CHANNEL APC PICTURE SOUND TIMER SPECIAL SCREEN ACC Fleshtone Contrast Brightness Color Sharpness Tint 100 G 60 50 50 0 PIP/DW LOCK Menu Prev. 22 Plasma TV Press the G button and then use F / G button to select sRGB. 3. Press the ENTER button to save. Press the G button and then use... range is connected to external equipment using sRGB, set to save . SPECIAL Color 55 Sharpness 60 SCREEN Tint 0 PIP/DW LOCK Menu Prev. If the TV is 0 ~ 3. Press the G button and then use D / E button to select On or Off. 4. You can adjust picture contrast, brightness, ...
...). 3. CHANNEL APC PICTURE SOUND TIMER SPECIAL SCREEN ACC Fleshtone Contrast Brightness Color Sharpness Tint 100 G 60 50 50 0 PIP/DW LOCK Menu Prev. 22 Plasma TV Press the G button and then use F / G button to select sRGB. 3. Press the ENTER button to save. Press the G button and then use... range is connected to external equipment using sRGB, set to save . SPECIAL Color 55 Sharpness 60 SCREEN Tint 0 PIP/DW LOCK Menu Prev. If the TV is 0 ~ 3. Press the G button and then use D / E button to select On or Off. 4. You can adjust picture contrast, brightness, ...


