
User Guide
Page 6
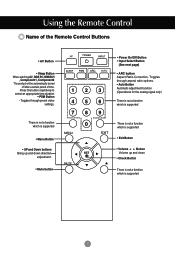
... which is supported 5 Press this button repetitively to select an appropriate time duration • PSM Button - Toggles through preset video settings. Using the Remote Control Name of the Remote Control Buttons • AV Button • Sleep Button When watching AV, RGB PC,HDMI/DVI ,Component1, Component2 The product will be automatically turned...
... which is supported 5 Press this button repetitively to select an appropriate time duration • PSM Button - Toggles through preset video settings. Using the Remote Control Name of the Remote Control Buttons • AV Button • Sleep Button When watching AV, RGB PC,HDMI/DVI ,Component1, Component2 The product will be automatically turned...
User Guide
Page 7
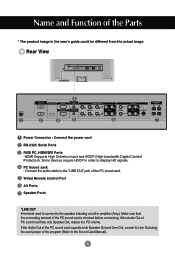
... of the PC sound card supports both Speaker Out and Line Out, convert to Line Out using the card jumper of the program (Refer to display HD signals. Some devices require HDCP in order to the Sound Card Manual). 6 Make sure that the connecting terminal of PC sound card has only... the power cord RS-232C Serial Ports RGB PC, HDMI/DVI Ports -HDMI Supports High Definition input and HDCP (High-bandwidth Digital Content Protection). Wired Remote Control Port AV Ports Speaker Ports *LINE OUT A terminal used to connect to the *LINE OUT jack of the PC sound card.
... of the PC sound card supports both Speaker Out and Line Out, convert to Line Out using the card jumper of the program (Refer to display HD signals. Some devices require HDCP in order to the Sound Card Manual). 6 Make sure that the connecting terminal of PC sound card has only... the power cord RS-232C Serial Ports RGB PC, HDMI/DVI Ports -HDMI Supports High Definition input and HDCP (High-bandwidth Digital Content Protection). Wired Remote Control Port AV Ports Speaker Ports *LINE OUT A terminal used to connect to the *LINE OUT jack of the PC sound card.
User Guide
Page 9
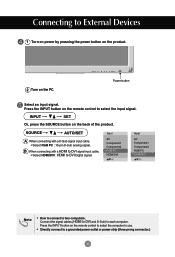
...Component1 Component2 RGB PC HDMI/DVI Note • How to connect to select the input signal. INPUT SET Or, press the SOURCE button on the remote control to select the computer to use. • Directly connect to DVI Digital signal. Connecting to each computer. Connect the signal cables (HDMI ...to DVI and D-Sub) to External Devices 1 Turn on power by pressing the power button on the product. 2 Turn on the remote control to two computers. Press the INPUT button on the back of the product. SOURCE AUTO/SET A When connecting with a HDMI to DVI signal ...
...Component1 Component2 RGB PC HDMI/DVI Note • How to connect to select the input signal. INPUT SET Or, press the SOURCE button on the remote control to select the computer to use. • Directly connect to DVI Digital signal. Connecting to each computer. Connect the signal cables (HDMI ...to DVI and D-Sub) to External Devices 1 Turn on power by pressing the power button on the product. 2 Turn on the remote control to two computers. Press the INPUT button on the back of the product. SOURCE AUTO/SET A When connecting with a HDMI to DVI signal ...
User Guide
Page 12
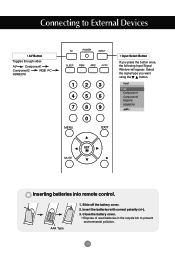
... polarity (+/-). 3. Slide off the battery cover. 2. Connecting to prevent environmental pollution. 11 AAA Type 1. Input AV Component1 Component2 RGB PC HDMI/DVI * Inserting batteries into remote control.
... polarity (+/-). 3. Slide off the battery cover. 2. Connecting to prevent environmental pollution. 11 AAA Type 1. Input AV Component1 Component2 RGB PC HDMI/DVI * Inserting batteries into remote control.
User Guide
Page 13
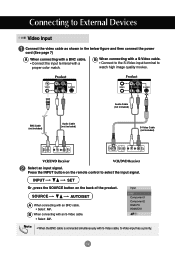
INPUT SET Or, press the SOURCE button on the remote control to select the input signal. Product IN OUT Product IN OUT Audio Cable (not included) BNC Cable (not included) Audio Cable (not included) S-Video ...
INPUT SET Or, press the SOURCE button on the remote control to select the input signal. Product IN OUT Product IN OUT Audio Cable (not included) BNC Cable (not included) Audio Cable (not included) S-Video ...
User Guide
Page 14
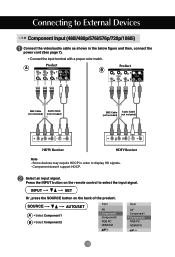
... SOURCE button on the remote control to select the input signal. Component doesn't support HDCP. SOURCE AUTO/SET A • Select Component 1 B • Select Component 2 Input AV Component1 Component2 RGB PC HDMI/DVI Input AV Component1 Component2 RGB PC HDMI/DVI 13 Select an input signal. Connecting to display HD signals. - Some devices...
... SOURCE button on the remote control to select the input signal. Component doesn't support HDCP. SOURCE AUTO/SET A • Select Component 1 B • Select Component 2 Input AV Component1 Component2 RGB PC HDMI/DVI Input AV Component1 Component2 RGB PC HDMI/DVI 13 Select an input signal. Connecting to display HD signals. - Some devices...
User Guide
Page 15
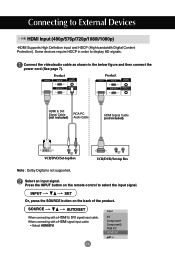
.../720p/1080i/1080p) -HDMI Supports High Definition input and HDCP (High-bandwidth Digital Content Protection). INPUT SET Or, press the SOURCE button on the remote control to display HD signals. Select an input signal. Connecting to DVI Signal Cable (not included) RCA-PC Audio Cable HDMI Signal Cable (not included) VCR/DVD...
.../720p/1080i/1080p) -HDMI Supports High Definition input and HDCP (High-bandwidth Digital Content Protection). INPUT SET Or, press the SOURCE button on the remote control to display HD signals. Select an input signal. Connecting to DVI Signal Cable (not included) RCA-PC Audio Cable HDMI Signal Cable (not included) VCR/DVD...
User Guide
Page 19
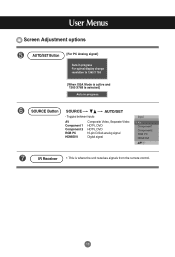
User Menus Screen Adjustment options AUTO/SET Button [For PC Analog signal] [When XGA Mode is active and 1360 X768 is where the unit receives signals from the remote control. 18 Toggles between inputs AV Component 1 Component 2 RGB PC HDMI/DVI Composite Video, Separate Video HDTV, DVD HDTV, DVD 15-pin D-Sub analog signal Digital signal Input AV Component1 Component2 RGB PC HDMI/DVI IR Receiver • This is selected] SOURCE Button SOURCE AUTO/SET -
User Menus Screen Adjustment options AUTO/SET Button [For PC Analog signal] [When XGA Mode is active and 1360 X768 is where the unit receives signals from the remote control. 18 Toggles between inputs AV Component 1 Component 2 RGB PC HDMI/DVI Composite Video, Separate Video HDTV, DVD HDTV, DVD 15-pin D-Sub analog signal Digital signal Input AV Component1 Component2 RGB PC HDMI/DVI IR Receiver • This is selected] SOURCE Button SOURCE AUTO/SET -
User Guide
Page 21
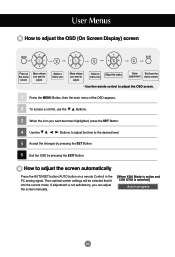
... How to adjust the OSD (On Screen Display) screen Pops up the menu screen Move where you want to adjust Select a menu icon Move where you want to adjust Select a Adjust the status menu icon Save Exit from the adjustment menu screen. • Use the remote control to adjust the OSD screen... highlighted, press the SET Button. 4 Use the Buttons to adjust the item to adjust the screen automatically Press the AUTO/SET button (AUTO button on a remote Control) in the PC analog signal. Then optimal screen settings will be selected that fit into the current mode.
... How to adjust the OSD (On Screen Display) screen Pops up the menu screen Move where you want to adjust Select a menu icon Move where you want to adjust Select a Adjust the status menu icon Save Exit from the adjustment menu screen. • Use the remote control to adjust the OSD screen... highlighted, press the SET Button. 4 Use the Buttons to adjust the item to adjust the screen automatically Press the AUTO/SET button (AUTO button on a remote Control) in the PC analog signal. Then optimal screen settings will be selected that fit into the current mode.
User Guide
Page 29
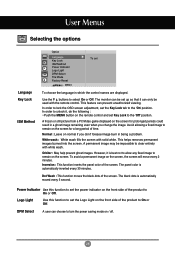
...Select A user can prevent unauthorized viewing. Orbiter : May help prevent ghost images. Power Indicator Use this function to set the power indicator on the remote control and set the Key Lock tab to the 'On' position. Avoid allowing a fixed image to remain on the screen for a long period...screen for prolonged periods could result in a ghost image remaining even when you don't foresee image burn in which the control names are displayed. The panel color is best not to allow any fixed image to remain on the screen, the screen will move every 2 minutes. The monitor can...
...Select A user can prevent unauthorized viewing. Orbiter : May help prevent ghost images. Power Indicator Use this function to set the power indicator on the remote control and set the Key Lock tab to the 'On' position. Avoid allowing a fixed image to remain on the screen for a long period...screen for prolonged periods could result in a ghost image remaining even when you don't foresee image burn in which the control names are displayed. The panel color is best not to allow any fixed image to remain on the screen, the screen will move every 2 minutes. The monitor can...
User Guide
Page 34
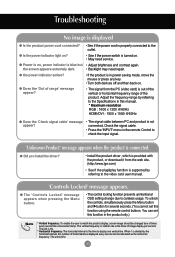
...Hz. * Horizontal frequency: The horizontal interval is turned on ? • See if the power switch is the time to watch the product display, screen image should be tabulated as the horizontal frequency. When 1 is properly connected to the video card user manual. 'Controls Locked' message appears...? • See if the power cord is divided by the horizontal interval, the number of horizontal lines displayed every second can set this function using the remote control buttons. Adjust the frequency range by referring to the outlet. The vertical frequency or refresh rate is not...
...Hz. * Horizontal frequency: The horizontal interval is turned on ? • See if the power switch is the time to watch the product display, screen image should be tabulated as the horizontal frequency. When 1 is properly connected to the video card user manual. 'Controls Locked' message appears...? • See if the power cord is divided by the horizontal interval, the number of horizontal lines displayed every second can set this function using the remote control buttons. Adjust the frequency range by referring to the outlet. The vertical frequency or refresh rate is not...
User Guide
Page 35
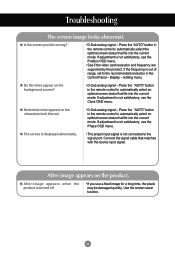
...-saver function. 34 If adjustment is not satisfactory, use the Phase OSD menu. Troubleshooting The screen image looks abnormal. Display - Press the "AUTO" button in the Control Panel - G Horizontal noise appears or the characters look blurred. • D-Sub analog signal - Connect the signal cable that...signal. After-image appears on the background screen? • D-Sub analog signal - Press the "AUTO" button in the remote control to the recommended resolution in the remote control to the signal port. G Do thin lines appear on the product. Setting menu.
...-saver function. 34 If adjustment is not satisfactory, use the Phase OSD menu. Troubleshooting The screen image looks abnormal. Display - Press the "AUTO" button in the Control Panel - G Horizontal noise appears or the characters look blurred. • D-Sub analog signal - Connect the signal cable that...signal. After-image appears on the background screen? • D-Sub analog signal - Press the "AUTO" button in the remote control to the recommended resolution in the remote control to the signal port. G Do thin lines appear on the product. Setting menu.
User Guide
Page 42
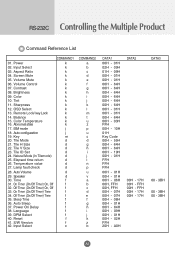
Remote Lock/ key Lock 14. Auto configuration 19. Tile ID Set 24. Speaker 30. Reset 41. Screen Mute 05. Volume Control 07. Brightness 09. Tint 11. Natural Mode (In Tilemode) 25. Lamp fault check 28. Sleep Time 36. S/W Version 42. Balance 15. Color Temperature 16. Elapsed time return 26. Auto Volume 29. Volume...
Remote Lock/ key Lock 14. Auto configuration 19. Tile ID Set 24. Speaker 30. Reset 41. Screen Mute 05. Volume Control 07. Brightness 09. Tint 11. Natural Mode (In Tilemode) 25. Lamp fault check 28. Sleep Time 36. S/W Version 42. Balance 15. Color Temperature 16. Elapsed time return 26. Auto Volume 29. Volume...

User Guide
Page 44
... Select (Command : b) (Main Picture Input) To select input source for the Set. You can also select an input source using the INPUT button on the remote control. Transmission [k][b][ ][Set ID][ ][Data][Cr] Data 2 : AV 4 : Component 1 5 : Component 2 7 : RGB (PC) 8 : HDMI (DTV) 9 : HDMI (PC) Acknowledgement [b][ ][Set ID][ ][OK][Data][x] Data 2 : AV 4 : Component 1 5 : Component...
... Select (Command : b) (Main Picture Input) To select input source for the Set. You can also select an input source using the INPUT button on the remote control. Transmission [k][b][ ][Set ID][ ][Data][Cr] Data 2 : AV 4 : Component 1 5 : Component 2 7 : RGB (PC) 8 : HDMI (DTV) 9 : HDMI (PC) Acknowledgement [b][ ][Set ID][ ][OK][Data][x] Data 2 : AV 4 : Component 1 5 : Component...

User Guide
Page 45
...) 1 : Screen mute on /off ) Acknowledgement [d][ ][Set ID][ ][OK][Data][x] A5 L You can also adjust the screen format using the ARC (Aspect Ratio Control) button on remote control or in the Screen menu.
...) 1 : Screen mute on /off ) Acknowledgement [d][ ][Set ID][ ][OK][Data][x] A5 L You can also adjust the screen format using the ARC (Aspect Ratio Control) button on remote control or in the Screen menu.
User Guide
Page 49
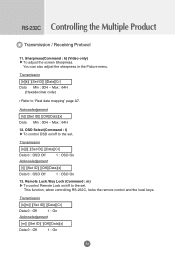
... ID][ ][Data][Cr] Data Min : 00H ~ Max : 64H (Hexadecimal code) • Refer to the set . Remote Lock /Key Lock (Command : m) To control Remote Lock on /off to the set . This function, when controlling RS-232C, locks the remote control and the local keys. OSD Select(Command : l) To control OSD on /off to 'Real...
... ID][ ][Data][Cr] Data Min : 00H ~ Max : 64H (Hexadecimal code) • Refer to the set . Remote Lock /Key Lock (Command : m) To control Remote Lock on /off to the set . This function, when controlling RS-232C, locks the remote control and the local keys. OSD Select(Command : l) To control OSD on /off to 'Real...
User Guide
Page 51
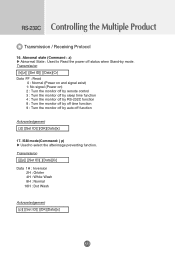
... preventing function. Transmission [k][z][ ][Set ID][ ][Data][Cr] Data FF : Read 0 : Normal (Power on and signal exist) 1: No signal (Power on) 2 : Turn the monitor off by remote control 3 : Turn the monitor off by sleep time function 4 : Turn the monitor off by RS-232C function 8 : Turn the monitor off by off time function...
... preventing function. Transmission [k][z][ ][Set ID][ ][Data][Cr] Data FF : Read 0 : Normal (Power on and signal exist) 1: No signal (Power on) 2 : Turn the monitor off by remote control 3 : Turn the monitor off by sleep time function 4 : Turn the monitor off by RS-232C function 8 : Turn the monitor off by off time function...
User Guide
Page 52
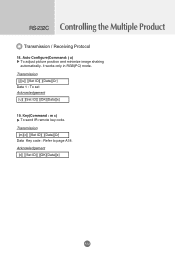
Acknowledgement [c][ ][Set ID][ ][OK][Data][x] A12 L L RS-232C Controlling the Multiple Product Transmission / Receiving Protocol 18. Auto Configure(Command: j u) To adjust picture position and minimize image shaking automatically. it works only in RGB(PC) mode. Transmission [j][u][ ][Set ID][ ][Data][Cr] Data 1 : To set Acknowledgement [u][ ][Set ID][ ][OK][Data][x] 19. Transmission [m][c][ ][Set ID][ ][Data][Cr] Data Key code : Refer to page A18. Key(Command : m c) To send IR remote key code.
Acknowledgement [c][ ][Set ID][ ][OK][Data][x] A12 L L RS-232C Controlling the Multiple Product Transmission / Receiving Protocol 18. Auto Configure(Command: j u) To adjust picture position and minimize image shaking automatically. it works only in RGB(PC) mode. Transmission [j][u][ ][Set ID][ ][Data][Cr] Data 1 : To set Acknowledgement [u][ ][Set ID][ ][OK][Data][x] 19. Transmission [m][c][ ][Set ID][ ][Data][Cr] Data Key code : Refer to page A18. Key(Command : m c) To send IR remote key code.
User Guide
Page 66
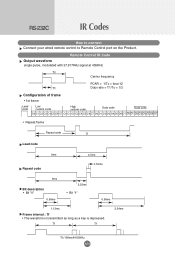
Remote Control IR Code Output waveform single pulse, modulated with 37.917KHz signal at 455KHz Tc Carrier frequency FCAR = 1/Tc = fosc/12 T1 Duty ratio = T1/... 1.12ms Frame interval : Tf • The waveform is transmitted as long as a key is depressed. RS-232C IR Codes L L L How to connect Connect your wired remote control to Remote Control port on the Product. Tf Tf 2.24ms L L L L Tf=108ms@455KHz A26
Remote Control IR Code Output waveform single pulse, modulated with 37.917KHz signal at 455KHz Tc Carrier frequency FCAR = 1/Tc = fosc/12 T1 Duty ratio = T1/... 1.12ms Frame interval : Tf • The waveform is transmitted as long as a key is depressed. RS-232C IR Codes L L L How to connect Connect your wired remote control to Remote Control port on the Product. Tf Tf 2.24ms L L L L Tf=108ms@455KHz A26


