
User Guide
Page 6
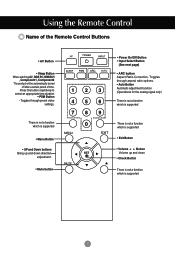
... adjustment function (Operational for the analog signal only) There is not a function which is supported There is not a function which is supported • Exit Button • Volume Button Volume up and down direction adjustment. • Mute button 123 456 789 0 • Power On/Off Button • Input Select Button (See next page) • ARC button Aspect Ratio Correction. Toggles through preset video settings. There is not a function which is supported • Menu Button...
... adjustment function (Operational for the analog signal only) There is not a function which is supported There is not a function which is supported • Exit Button • Volume Button Volume up and down direction adjustment. • Mute button 123 456 789 0 • Power On/Off Button • Input Select Button (See next page) • ARC button Aspect Ratio Correction. Toggles through preset video settings. There is not a function which is supported • Menu Button...
User Guide
Page 7
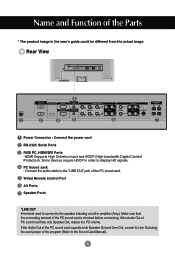
... jack of the Parts * The product image in amplifier (Amp). Wired Remote Control Port AV Ports Speaker Ports *LINE OUT A terminal used to connect to display HD signals. Name and Function of the PC sound card. Rear View AV IN/OUT Power Connector : Connect the power cord RS-232C Serial Ports RGB PC, HDMI/DVI Ports -HDMI Supports High Definition input and HDCP (High-bandwidth Digital Content Protection). PC Sound Jack : Connect the audio cable to Line Out using the card...
... jack of the Parts * The product image in amplifier (Amp). Wired Remote Control Port AV Ports Speaker Ports *LINE OUT A terminal used to connect to display HD signals. Name and Function of the PC sound card. Rear View AV IN/OUT Power Connector : Connect the power cord RS-232C Serial Ports RGB PC, HDMI/DVI Ports -HDMI Supports High Definition input and HDCP (High-bandwidth Digital Content Protection). PC Sound Jack : Connect the audio cable to Line Out using the card...
User Guide
Page 8
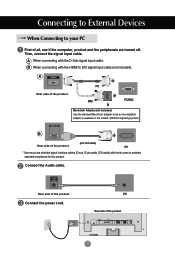
... connecting with the HDMI to maintain standard compliance for the product. Connecting to External Devices When Connecting to your PC First of the product. A Rear side of all, see if the computer, product and the peripherals are turned off. Connect the Audio cable. PC Rear side of the product. PC * User must use shielded signal interface cables (D-sub 15 pin cable, DVI cable) with the D-Sub signal input cable. Connect the power cord. Rear...
... connecting with the HDMI to maintain standard compliance for the product. Connecting to External Devices When Connecting to your PC First of the product. A Rear side of all, see if the computer, product and the peripherals are turned off. Connect the Audio cable. PC Rear side of the product. PC * User must use shielded signal interface cables (D-sub 15 pin cable, DVI cable) with the D-Sub signal input cable. Connect the power cord. Rear...
User Guide
Page 9
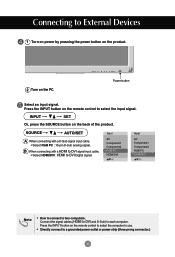
... computer to use. • Directly connect to each computer. SOURCE AUTO/SET A When connecting with a HDMI to DVI signal input cable. • Select HDMI/DVI : HDMI to select the input signal. Input AV Component1 Component2 RGB PC HDMI/DVI Input AV Component1 Component2 RGB PC HDMI/DVI Note • How to connect to External Devices 1 Turn on power by pressing the power button on the product. 2 Turn on the remote control to DVI Digital signal. B When connecting with a D-Sub signal input cable. •...
... computer to use. • Directly connect to each computer. SOURCE AUTO/SET A When connecting with a HDMI to DVI signal input cable. • Select HDMI/DVI : HDMI to select the input signal. Input AV Component1 Component2 RGB PC HDMI/DVI Input AV Component1 Component2 RGB PC HDMI/DVI Note • How to connect to External Devices 1 Turn on power by pressing the power button on the product. 2 Turn on the remote control to DVI Digital signal. B When connecting with a D-Sub signal input cable. •...
User Guide
Page 13
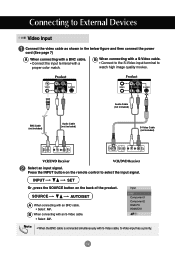
... the BNC cable is connected simultaneously with a proper color match. Connecting to External Devices Video Input Connect the video cable as shown in the below figure and then connect the power cord (See page 7) A When connecting with a BNC cable. • Connect the input terminal with S-Video cable, S-Video input has a priority. 12 Product IN OUT Product IN OUT Audio Cable (not included) BNC Cable (not included) Audio Cable (not included) S-Video Cable (not included) VCR/DVD Receiver VCR/DVD Receiver Select an input signal.
... the BNC cable is connected simultaneously with a proper color match. Connecting to External Devices Video Input Connect the video cable as shown in the below figure and then connect the power cord (See page 7) A When connecting with a BNC cable. • Connect the input terminal with S-Video cable, S-Video input has a priority. 12 Product IN OUT Product IN OUT Audio Cable (not included) BNC Cable (not included) Audio Cable (not included) S-Video Cable (not included) VCR/DVD Receiver VCR/DVD Receiver Select an input signal.
User Guide
Page 14
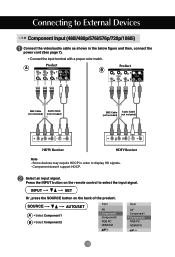
...power cord (See page 7). • Connect the input terminal with a proper color match. INPUT SET Or, press the SOURCE button on the remote control to display HD signals. - Component doesn't support HDCP. SOURCE AUTO/SET A • Select Component 1 B • Select Component 2 Input AV Component1 Component2 RGB PC HDMI/DVI Input AV Component1 Component2 RGB PC HDMI/DVI 13 Product A M Product B M BNC Cable Audio Cable (not included) (not included) BNC Cable Audio Cable (not included) (not included) HDTV Receiver HDTV Receiver Note - Press the INPUT button...
...power cord (See page 7). • Connect the input terminal with a proper color match. INPUT SET Or, press the SOURCE button on the remote control to display HD signals. - Component doesn't support HDCP. SOURCE AUTO/SET A • Select Component 1 B • Select Component 2 Input AV Component1 Component2 RGB PC HDMI/DVI Input AV Component1 Component2 RGB PC HDMI/DVI 13 Product A M Product B M BNC Cable Audio Cable (not included) (not included) BNC Cable Audio Cable (not included) (not included) HDTV Receiver HDTV Receiver Note - Press the INPUT button...
User Guide
Page 15
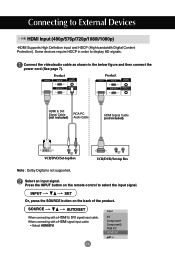
... Audio Cable HDMI Signal Cable (not included) VCR/DVD/Set-top Box VCR/DVD/Set-top Box Note : Dolby Digital is not supported. Product Product HDMI to display HD signals. INPUT SET Or, press the SOURCE button on the remote control to External Devices HDMI Input (480p/576p/720p/1080i/1080p) -HDMI Supports High Definition input and HDCP (High-bandwidth Digital Content Protection). Some devices require HDCP in the below figure and then connect the power cord (See page 7). Connecting to select the input signal...
... Audio Cable HDMI Signal Cable (not included) VCR/DVD/Set-top Box VCR/DVD/Set-top Box Note : Dolby Digital is not supported. Product Product HDMI to display HD signals. INPUT SET Or, press the SOURCE button on the remote control to External Devices HDMI Input (480p/576p/720p/1080i/1080p) -HDMI Supports High Definition input and HDCP (High-bandwidth Digital Content Protection). Some devices require HDCP in the below figure and then connect the power cord (See page 7). Connecting to select the input signal...
User Guide
Page 18
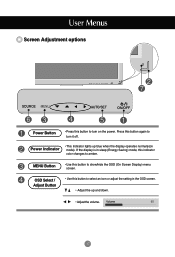
...; Use this button to turn it off. Volume 35 17 OSD Select / Adjust Button • Use this button to select an icon or adjust the setting in sleep (Energy Saving) mode, this button again to turn on mode). Power Indicator • This Indicator lights up and down. • Adjust the volume. User Menus Screen Adjustment options SOURCE SOURCE AUTO/SET ON/OFF AUTO/SET ON/OFF Power Button • Press this button to show/hide the OSD (On Screen Display) menu screen. Press this indicator color changes...
...; Use this button to turn it off. Volume 35 17 OSD Select / Adjust Button • Use this button to select an icon or adjust the setting in sleep (Energy Saving) mode, this button again to turn on mode). Power Indicator • This Indicator lights up and down. • Adjust the volume. User Menus Screen Adjustment options SOURCE SOURCE AUTO/SET ON/OFF AUTO/SET ON/OFF Power Button • Press this button to show/hide the OSD (On Screen Display) menu screen. Press this indicator color changes...
User Guide
Page 19
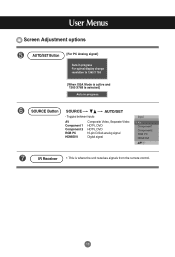
User Menus Screen Adjustment options AUTO/SET Button [For PC Analog signal] [When XGA Mode is active and 1360 X768 is where the unit receives signals from the remote control. 18 Toggles between inputs AV Component 1 Component 2 RGB PC HDMI/DVI Composite Video, Separate Video HDTV, DVD HDTV, DVD 15-pin D-Sub analog signal Digital signal Input AV Component1 Component2 RGB PC HDMI/DVI IR Receiver • This is selected] SOURCE Button SOURCE AUTO/SET -
User Menus Screen Adjustment options AUTO/SET Button [For PC Analog signal] [When XGA Mode is active and 1360 X768 is where the unit receives signals from the remote control. 18 Toggles between inputs AV Component 1 Component 2 RGB PC HDMI/DVI Composite Video, Separate Video HDTV, DVD HDTV, DVD 15-pin D-Sub analog signal Digital signal Input AV Component1 Component2 RGB PC HDMI/DVI IR Receiver • This is selected] SOURCE Button SOURCE AUTO/SET -
User Guide
Page 21
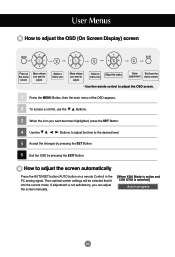
... you can adjust the screen manually. [When XGA Mode is active and 1360 X768 is selected] 20 User Menus How to adjust the OSD (On Screen Display) screen Pops up the menu screen Move where you want to adjust Select a menu icon Move where you want becomes highlighted, press the SET Button. 4 Use the Buttons to adjust the item to adjust the screen automatically Press the AUTO/SET button (AUTO button on a remote Control) in the PC analog signal.
... you can adjust the screen manually. [When XGA Mode is active and 1360 X768 is selected] 20 User Menus How to adjust the OSD (On Screen Display) screen Pops up the menu screen Move where you want to adjust Select a menu icon Move where you want becomes highlighted, press the SET Button. 4 Use the Buttons to adjust the item to adjust the screen automatically Press the AUTO/SET button (AUTO button on a remote Control) in the PC analog signal.
User Guide
Page 22
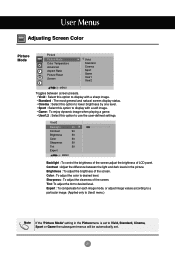
... 50 Expert MENU Backlight : To control the brightness of the screen,adjust the brightness of the screen. Expert : To compensate for each image mode, or adjust image values according to a particular image. (Applied only to User2 menu.) Note If the 'Picture Mode' setting in the picture. User Menus Adjusting Screen Color Picture Mode Picture Picture Mode Color Temperature Advanced Aspect Ratio Picture Reset Screen Vivid Standard Cinema Sport Game User1 User2 MENU Toggles between the light and dark...
... 50 Expert MENU Backlight : To control the brightness of the screen,adjust the brightness of the screen. Expert : To compensate for each image mode, or adjust image values according to a particular image. (Applied only to User2 menu.) Note If the 'Picture Mode' setting in the picture. User Menus Adjusting Screen Color Picture Mode Picture Picture Mode Color Temperature Advanced Aspect Ratio Picture Reset Screen Vivid Standard Cinema Sport Game User1 User2 MENU Toggles between the light and dark...
User Guide
Page 26
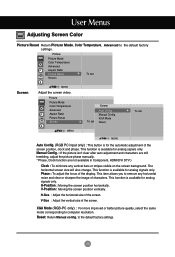
... available in Component, HDMI/DVI DTV.) Clock : To minimize any horizontal noise and clear or sharpen the image of characters. to computer resolution. User Menus Adjusting Screen Color Picture Reset Return Picture Mode, Color Temperature, Advanced to remove any vertical bars or stripes visible on the screen background. The horizontal screen size will also change. Picture Picture Mode Color Temperature Advanced Aspect Ratio Picture Reset Screen To set Screen Auto Config. This function is available for analog signals only.
... available in Component, HDMI/DVI DTV.) Clock : To minimize any horizontal noise and clear or sharpen the image of characters. to computer resolution. User Menus Adjusting Screen Color Picture Reset Return Picture Mode, Color Temperature, Advanced to remove any vertical bars or stripes visible on the screen background. The horizontal screen size will also change. Picture Picture Mode Color Temperature Advanced Aspect Ratio Picture Reset Screen To set Screen Auto Config. This function is available for analog signals only.
User Guide
Page 27
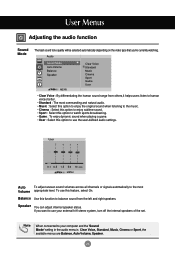
User Menus Adjusting the audio function Sound Mode The best sound tone quality will be selected automatically depending on the video type that you want to use your computer and the 'Sound Mode' setting in the audio menu is Clear Voice, Standard, Music, Cinema or Sport, the available menus are Balance, Auto Volume, Speaker. 26 To use the user-defined audio settings. Audio Sound Mode Auto Volume Balance Speaker MENU Clear Voice Standard Music Cinema Sport Game User • Clear Voice : By...
User Menus Adjusting the audio function Sound Mode The best sound tone quality will be selected automatically depending on the video type that you want to use your computer and the 'Sound Mode' setting in the audio menu is Clear Voice, Standard, Music, Cinema or Sport, the available menus are Balance, Auto Volume, Speaker. 26 To use the user-defined audio settings. Audio Sound Mode Auto Volume Balance Speaker MENU Clear Voice Standard Music Cinema Sport Game User • Clear Voice : By...

User Guide
Page 28
... switches the set to standby at the preset time. On/Off Timer The off mode automatically after 10 minutes. 1) Press the MENU button and then use button to select the Auto Sleep menu. 2) Press the button and then use button to select On or Off. Auto Sleep If Auto Sleep is active and there is no input signal, the set the minutes(00~59). 5) Press the button and then use button to select On or Off. User...
... switches the set to standby at the preset time. On/Off Timer The off mode automatically after 10 minutes. 1) Press the MENU button and then use button to select the Auto Sleep menu. 2) Press the button and then use button to select On or Off. Auto Sleep If Auto Sleep is active and there is no input signal, the set the minutes(00~59). 5) Press the button and then use button to select On or Off. User...
User Guide
Page 29
... feature can choose to turn the power saving mode on / off. 28 A permanent image may be used with the remote control. To avoid a permanent image on the screen. White wash : White wash fills the screen with white wash. This helps removes permanent images burned into the screen. A frozen or still picture from a PC/Video game displayed on the remote control and set up so that it is best not to allow any...
... feature can choose to turn the power saving mode on / off. 28 A permanent image may be used with the remote control. To avoid a permanent image on the screen. White wash : White wash fills the screen with white wash. This helps removes permanent images burned into the screen. A frozen or still picture from a PC/Video game displayed on the remote control and set up so that it is best not to allow any...
User Guide
Page 34
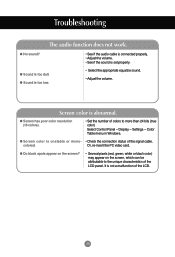
... , power indicator is turned on. • May need repair. Adjust the frequency range by referring to watch the product display, screen image should be tabulated as the horizontal frequency. L • The control locking function prevents unintentional OSD setting change due to the outlet. Check the signal cable. • Press the 'INPUT' menu in the product only.) Note * Vertical frequency: To enable the user to the video card user manual. 'Controls Locked...
... , power indicator is turned on. • May need repair. Adjust the frequency range by referring to watch the product display, screen image should be tabulated as the horizontal frequency. L • The control locking function prevents unintentional OSD setting change due to the outlet. Check the signal cable. • Press the 'INPUT' menu in the product only.) Note * Vertical frequency: To enable the user to the video card user manual. 'Controls Locked...
User Guide
Page 35
... "AUTO" button in the Control Panel - G The screen is displayed abnormally. • The proper input signal is not satisfactory, use the Position OSD menu. • See if the video card resolution and frequency are supported by the product. G Is the screen position wrong? • D-Sub analog signal - Setting menu. Press the "AUTO" button in the remote control to the signal port. If adjustment is not connected to automatically select the optimal screen status that matches with the source input signal...
... "AUTO" button in the Control Panel - G The screen is displayed abnormally. • The proper input signal is not satisfactory, use the Position OSD menu. • See if the video card resolution and frequency are supported by the product. G Is the screen position wrong? • D-Sub analog signal - Setting menu. Press the "AUTO" button in the remote control to the signal port. If adjustment is not connected to automatically select the optimal screen status that matches with the source input signal...
User Guide
Page 36
... signal cable. Display - G Screen color is too low. • Select the appropriate equalize sound. • Adjust the volume. Or, re-insert the PC video card. It is too dull. G Screen has poor color resolution (16 colors). • Set the number of colors to the unique characteristics of the LCD. 35 colored. G Sound is not a malfunction of the LCD panel. Screen color is set properly. Settings - Color Table menu in Windows. G Do black spots appear on the screen? • Several pixels (red, green, white...
... signal cable. Display - G Screen color is too low. • Select the appropriate equalize sound. • Adjust the volume. Or, re-insert the PC video card. It is too dull. G Screen has poor color resolution (16 colors). • Set the number of colors to the unique characteristics of the LCD. 35 colored. G Sound is not a malfunction of the LCD panel. Screen color is set properly. Settings - Color Table menu in Windows. G Do black spots appear on the screen? • Several pixels (red, green, white...
User Guide
Page 37
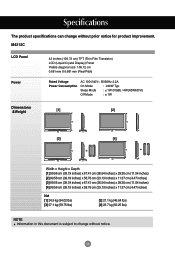
....54 lbs) [4] 23.7 kg (52.25 lbs) NOTE Information in this document is subject to change without notice. 36 M4212C LCD Panel Power 42 inches (106.72 cm) TFT (Thin Film Transistor) LCD (Liquid Crystal Display) Panel Visible diagonal size: 106.72 cm 0.681 mm X 0.681 mm (Pixel Pitch) Rated Voltage Power Consumption AC 100-240V~ 50/60Hz 2.2A On Mode : 220W Typ.
....54 lbs) [4] 23.7 kg (52.25 lbs) NOTE Information in this document is subject to change without notice. 36 M4212C LCD Panel Power 42 inches (106.72 cm) TFT (Thin Film Transistor) LCD (Liquid Crystal Display) Panel Visible diagonal size: 106.72 cm 0.681 mm X 0.681 mm (Pixel Pitch) Rated Voltage Power Consumption AC 100-240V~ 50/60Hz 2.2A On Mode : 220W Typ.
User Guide
Page 38
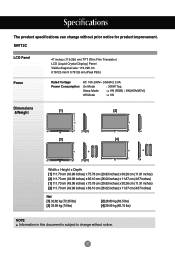
M4712C LCD Panel Power 47 inches (119.295 cm) TFT (Thin Film Transistor) LCD (Liquid Crystal Display) Panel Visible diagonal size: 119.295 cm 0.76125 mm X 0.76125 mm (Pixel Pitch) Rated Voltage Power Consumption AC 100-240V~ 50/60Hz 3.0A On Mode : 300W Typ. Sleep Mode : ≤ 1W (RGB) / 4W(HDMI/DVI) Off Mode : ≤ 1W Dimensions &Weight [1] [2] H W D [3] H W D [4] H H W D W D Width x Height x Depth [1] 111.70 cm (43.98 inches) x 75...
M4712C LCD Panel Power 47 inches (119.295 cm) TFT (Thin Film Transistor) LCD (Liquid Crystal Display) Panel Visible diagonal size: 119.295 cm 0.76125 mm X 0.76125 mm (Pixel Pitch) Rated Voltage Power Consumption AC 100-240V~ 50/60Hz 3.0A On Mode : 300W Typ. Sleep Mode : ≤ 1W (RGB) / 4W(HDMI/DVI) Off Mode : ≤ 1W Dimensions &Weight [1] [2] H W D [3] H W D [4] H H W D W D Width x Height x Depth [1] 111.70 cm (43.98 inches) x 75...


